Welcome to Moda Fabrics!
Chevron With a Twist Quilt
Chevron With a Twist Quilt
Published:
Feb 22 2015 - 23:00


Greetings Moda Bake Shop readers - it's Karen Miller from Redbird Quilt Co and Karen's Quilt's, Crows and Cardinals blog here to share "Chevron with a Twist".
This unique little quilt can be made from a single layer cake and a bit of yardage. Keep it scrappy, skip the applique, and you can put it together in a weekend.
Alternatively, add the applique accents (the Twist!) and you'll create a unique and decorative wall quilt for all to admire.
We'll use half square triangles to make the chevrons and learn how to make the neatest faux ruched flowers!! Once you see how simple, fun and beautiful they are, you'll want to include them in all of your applique!!

For the sample I used the beautiful Heart's Content fabric by Laundry Basket Quilts - but you can use any number of the latest Moda fabric layer cakes to prepare Chevron with a Twist.
Let's get started.
![]()

Quilt as Shown: (single background fabric)
- 1 Layer Cake Heart's Content (42181LC)
- 2-1/8 yards Heart's Content Tan Dot (42185-11) (Half Square Triangles (HST) and applique background)
- 1/2 yard Heart's Content Heart Warm Red Wheat (42182-14) (binding)
- 4 yards Heart's Content First Kiss Wheat (42182-12) (backing)
- 1/3 yard Heart's Content Heart Warm Red Paisley (Optional -- extra HST fabric)
- 65" square piece of batting (I used 100% wool)
With a Twist (Applique):
- (14) 5" - 10" Scraps of Hearts Content Fabrics in Red/Blue (faux ruched flowers and applique bird/wing)
- 1/4 yard of Hearts Content Candlelight or Chocolate (bias stems)
- Clover #6 Bias Tape Maker (1/4" bias stems)
- Size 11 Straw Needle
- Marking tool(s) (Sewline lead pencil, soapstone, colored pencils)

Other:
- Aurifil 50 Wt Mako Cotton Color #2314 (quilting the background)
- Aurifil 50Wt Mako Cotton Color # 2370 (piecing and quilting the chevrons)
- 6.5" square ruler (makes trimming easy - completely optional)
- Rotating rotary cutting mat (completely optional but an awesome tool)
- Sandpaper board (comes in handy when marking applique pieces)
![]()
Unless otherwise noted, use a scant 1/4" seam allowance
First up: Half Square Triangles (HST)
With A Twist (Applique) : If you're making the quilt as shown, prepare 84 HST from 21 layer cake "slices" and (21) 10" background squares (layer cake or yardage).
Without A Twist (No Applique) : Skipping the applique? Prepare 96 HST using (24) 10" layer cake "slices" and background fabric. Note: there are a total of (42) slices in a layer cake - keep this in mind if you're skipping the Twist.
The following recipe details how to make Chevron with a Twist (as shown above).
****
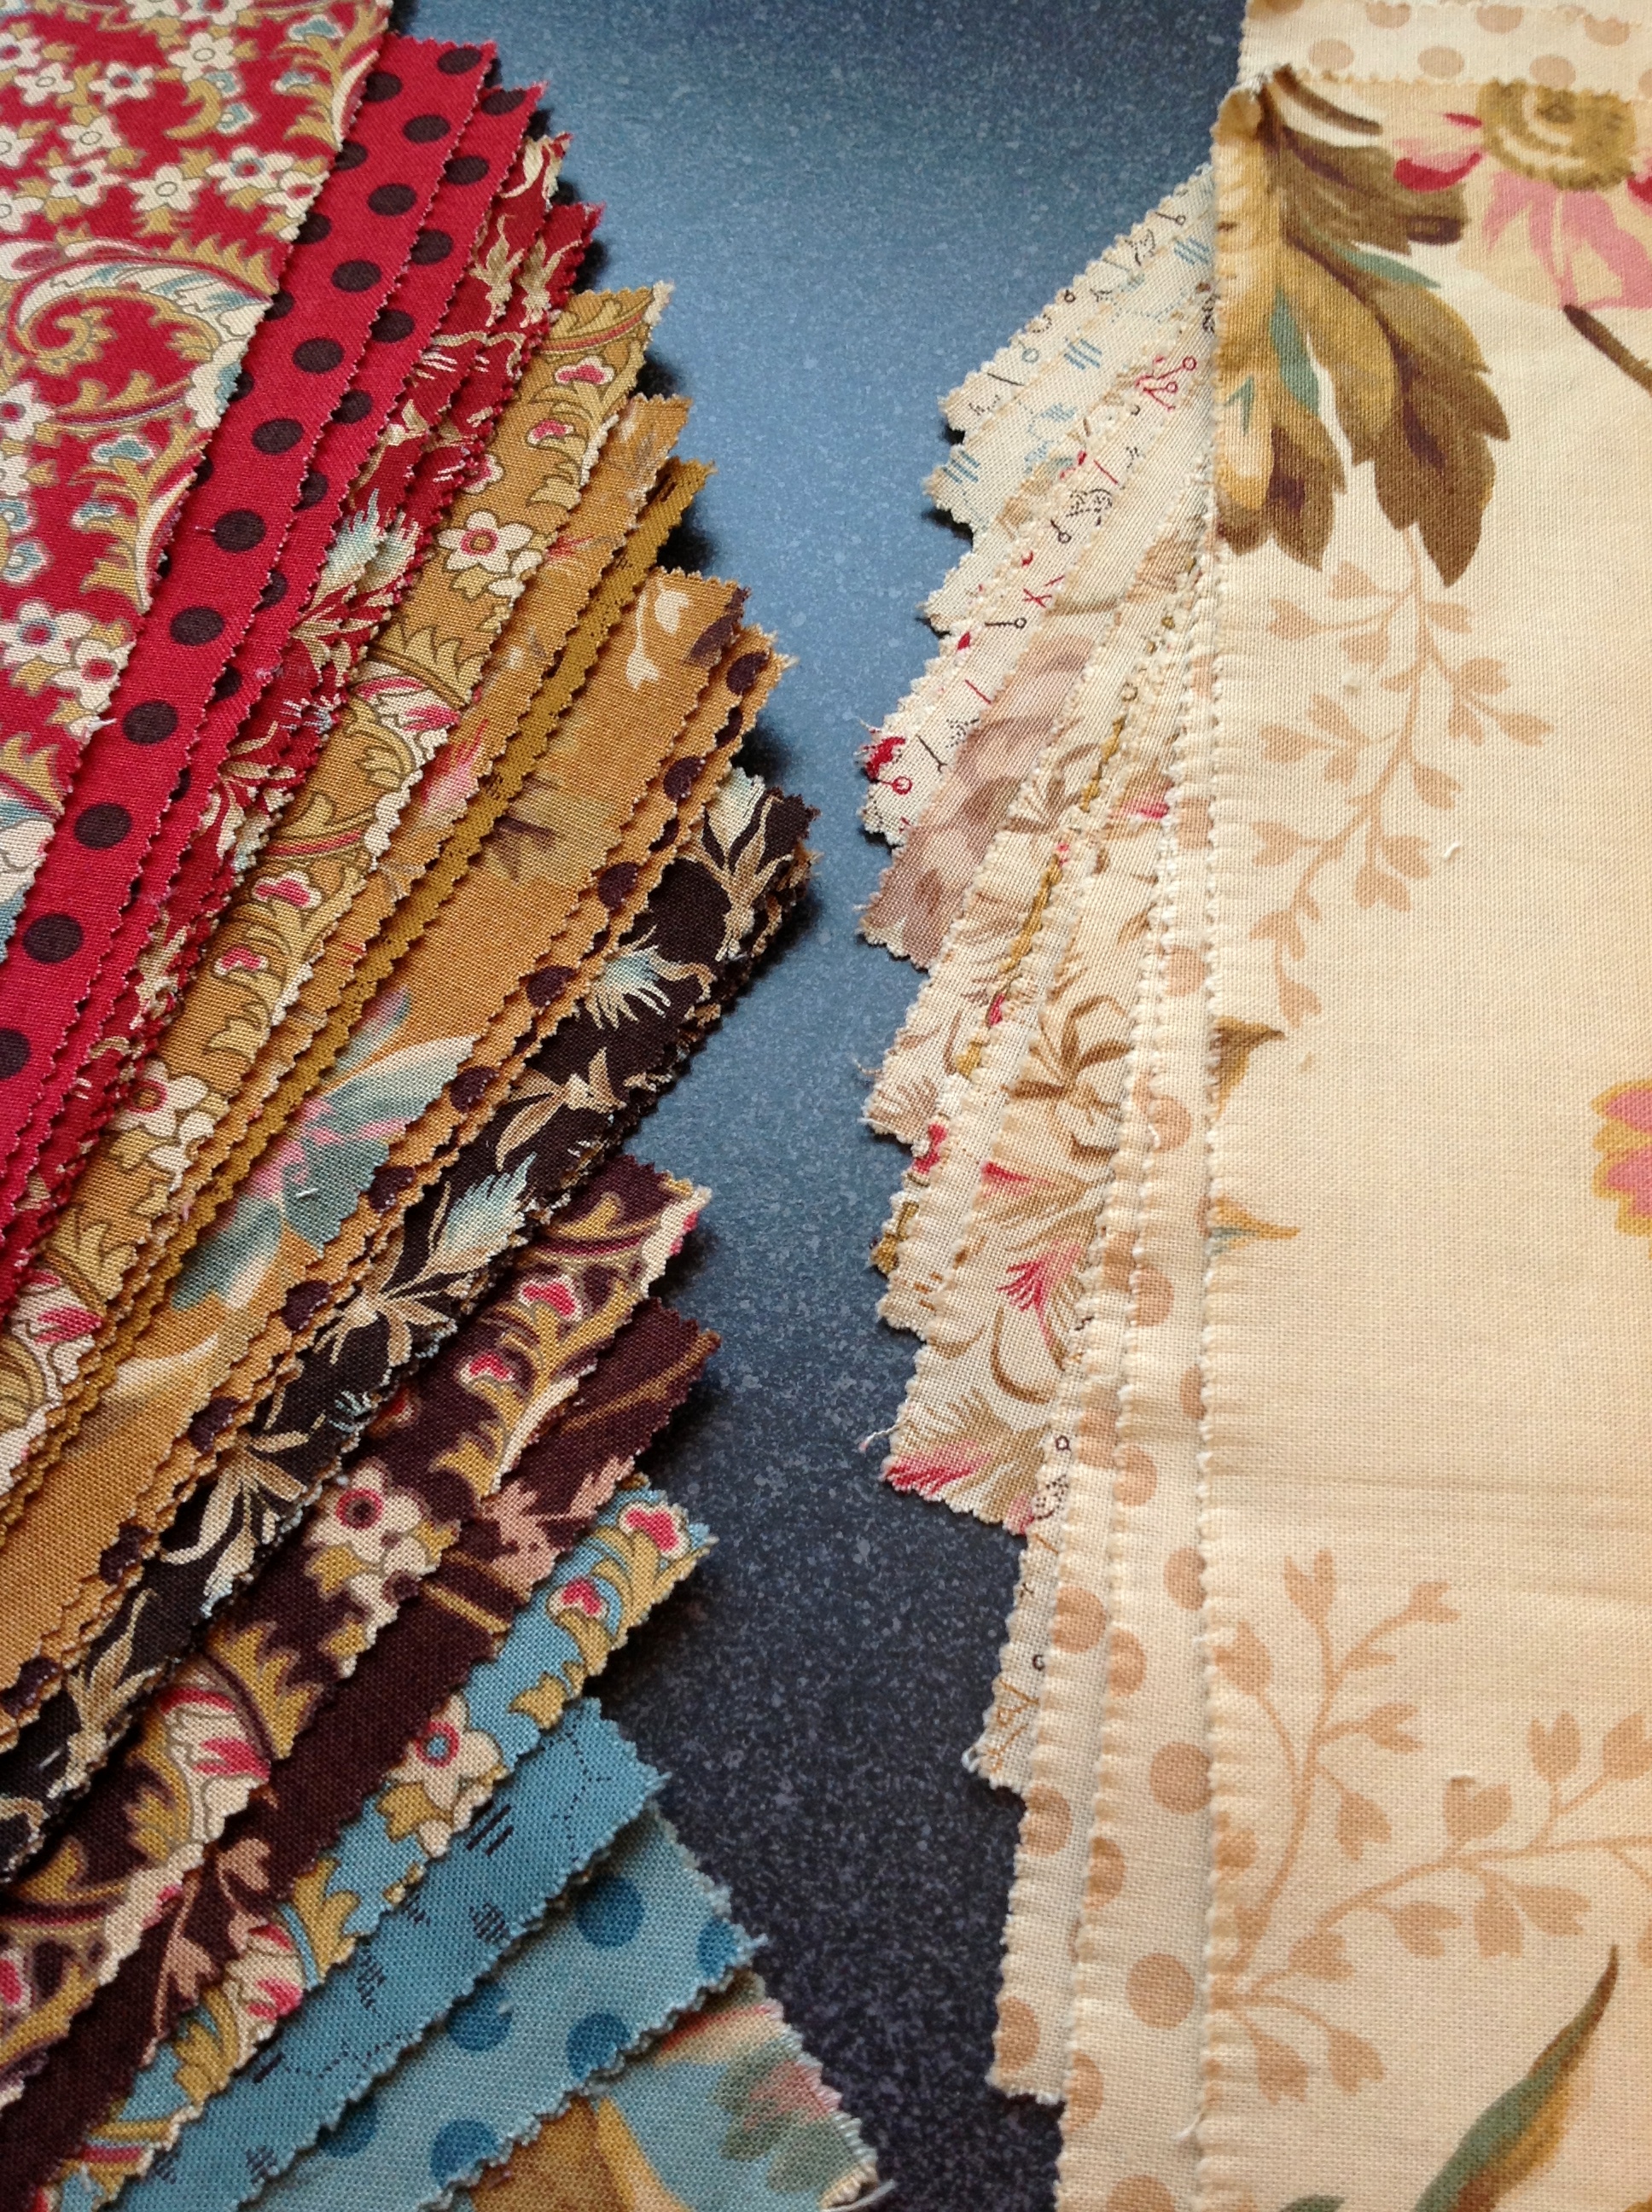
Of the 42 layer cake slices, choose 21 dark slices to make your HST's.
For a scrappy look you can use the light colored slices for the HST backgrounds. I chose to use the Heart's Content Tan Dot yardage for the sample background.
To use yardage for your background, cut (21) 10" squares from the yardage (24 if you are making Chevron without a Twist).
Additionally & Optionally: I purchased a little "extra" yardage of Heart's Content Warm Red Paisley so I could fold a little more red into the quilt. I replaced 4 layer cake slices with (4) 10" squares of Warm Red Paisley. So pretty.
The Half Square Triangle Perimeter Method:
Prepare 84 Half Square Triangles using the "perimeter" method described below:
Layer a dark colored layer cake slice with a tan dot background slice (or light-colored layer cake slice).

Don't worry if they don't align exactly - I cut my 10" dot backgrounds by hand, so they were slightly smaller than the layer cake slices. Just center the smaller piece on the larger piece.

Sew a 1/4" seam around the entire layered square (around the perimeter).

Pivot in the corners and continue to stitch the entire perimeter of the fabric layers.
When you return to where you started stitching, take a couple of extra (overlap) stitches and trim threads.

It's not necessary to leave an opening while stitching the perimeter of the fabric.

Prepare to make two diagonal cuts through the sewn square (resulting in 4 pieces)
If you have one of those nifty rotating rotary cutting mats, NOW is the time to dig it out and use it!!
Place the sewn block on a rotary mat and align a ruler on point from sewn corner to sewn corner

With a rotary cutter, make a straight-line cut from point to point.
Without moving the fabric, align the ruler on the other points and make a second rotary cut from point to point.
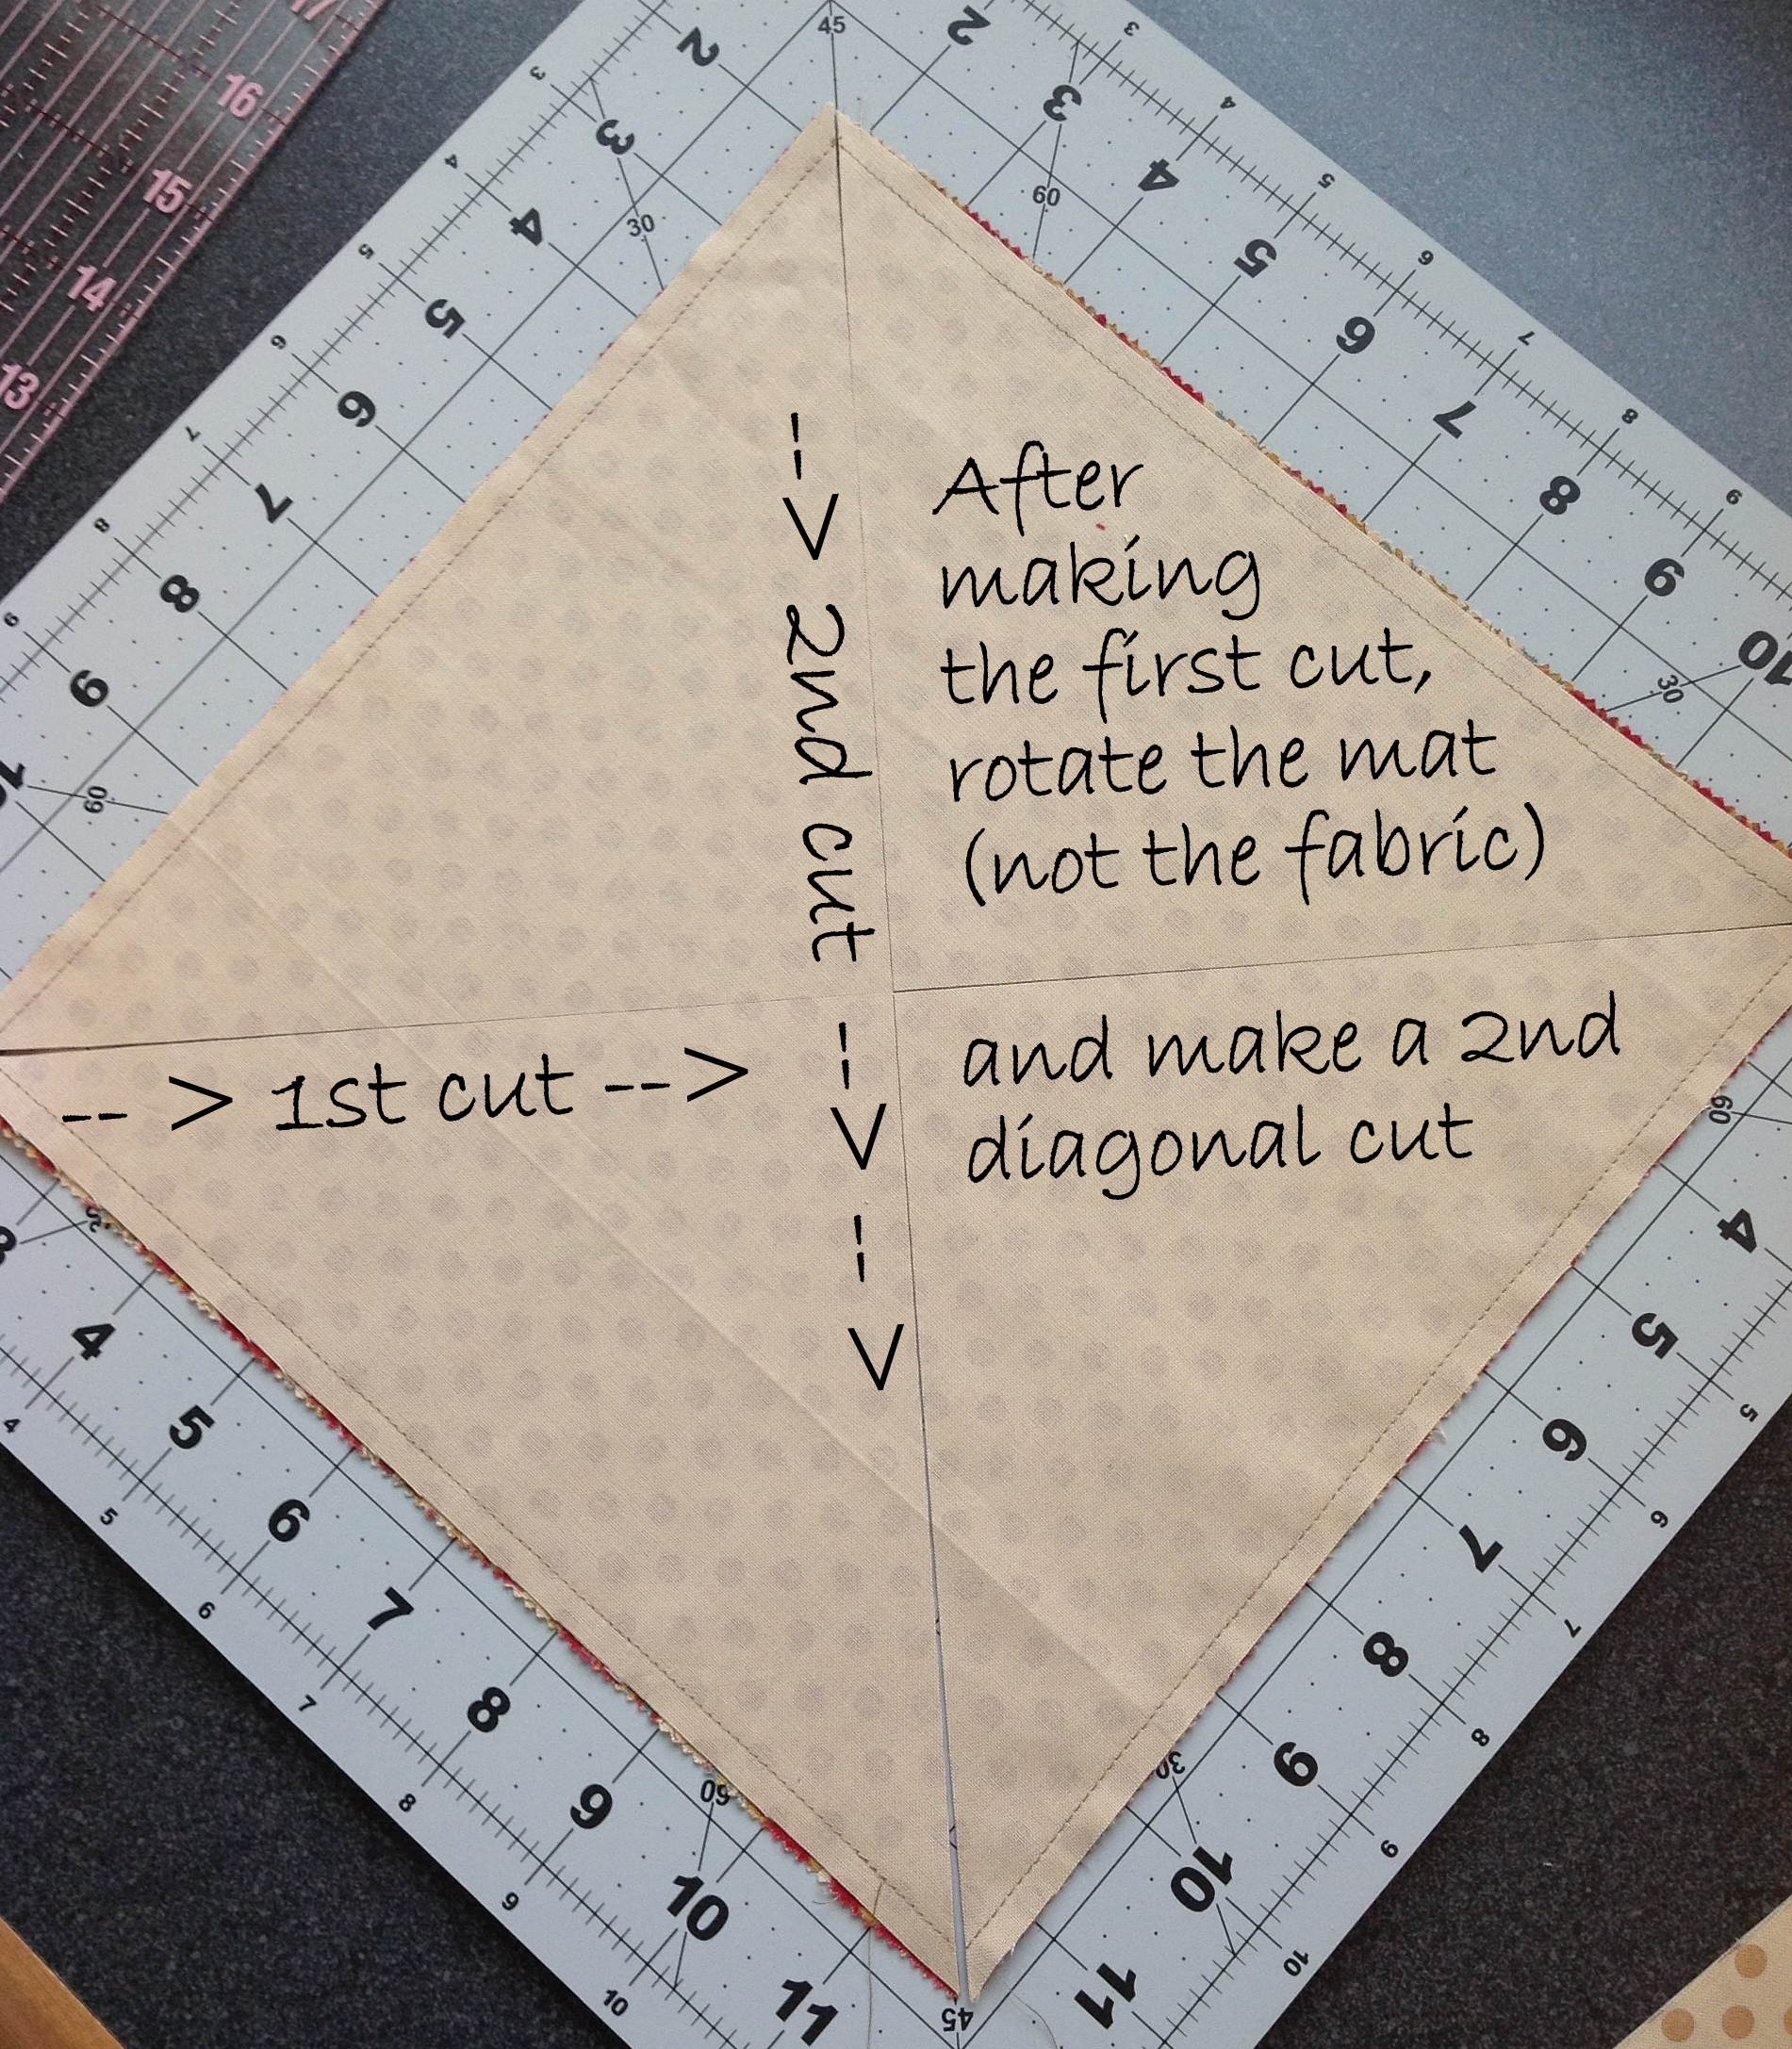
Woohoo! You now have 4 Half Square Triangles
Note: when working with the HST's be aware that they are cut on the bias -- so handle them with care to avoid distorting the shape of the fabric.

Press each HST to the dark-side.
Begin by positioning the HST dark-side fabric up on an ironing surface.
Before opening, press to set the seam.

Open the seam by flipping the dark colored fabric open - finger press and then press open with an iron.

Repeat those steps for the other 3 HST's from this layer cake slice - press all seams toward the dark fabric.

From each layer cake pair you will yield (4) 6.75" Half Square Triangles (HST)
Next - use a 6.5" square ruler and "square-up" each HST to 6.5". If you don't have a 6.5" square ruler, use any rotary cutting ruler that is at least 6.5" wide.
Remember that rotating cutting mat that I mentioned in the step above? It works great for this step too!

Be sure to align the 45 degree mark of the ruler on the HST diagonal seam before trimming.

Once the 6.5" ruler is aligned properly, trim as needed to achieve 6.5" square.
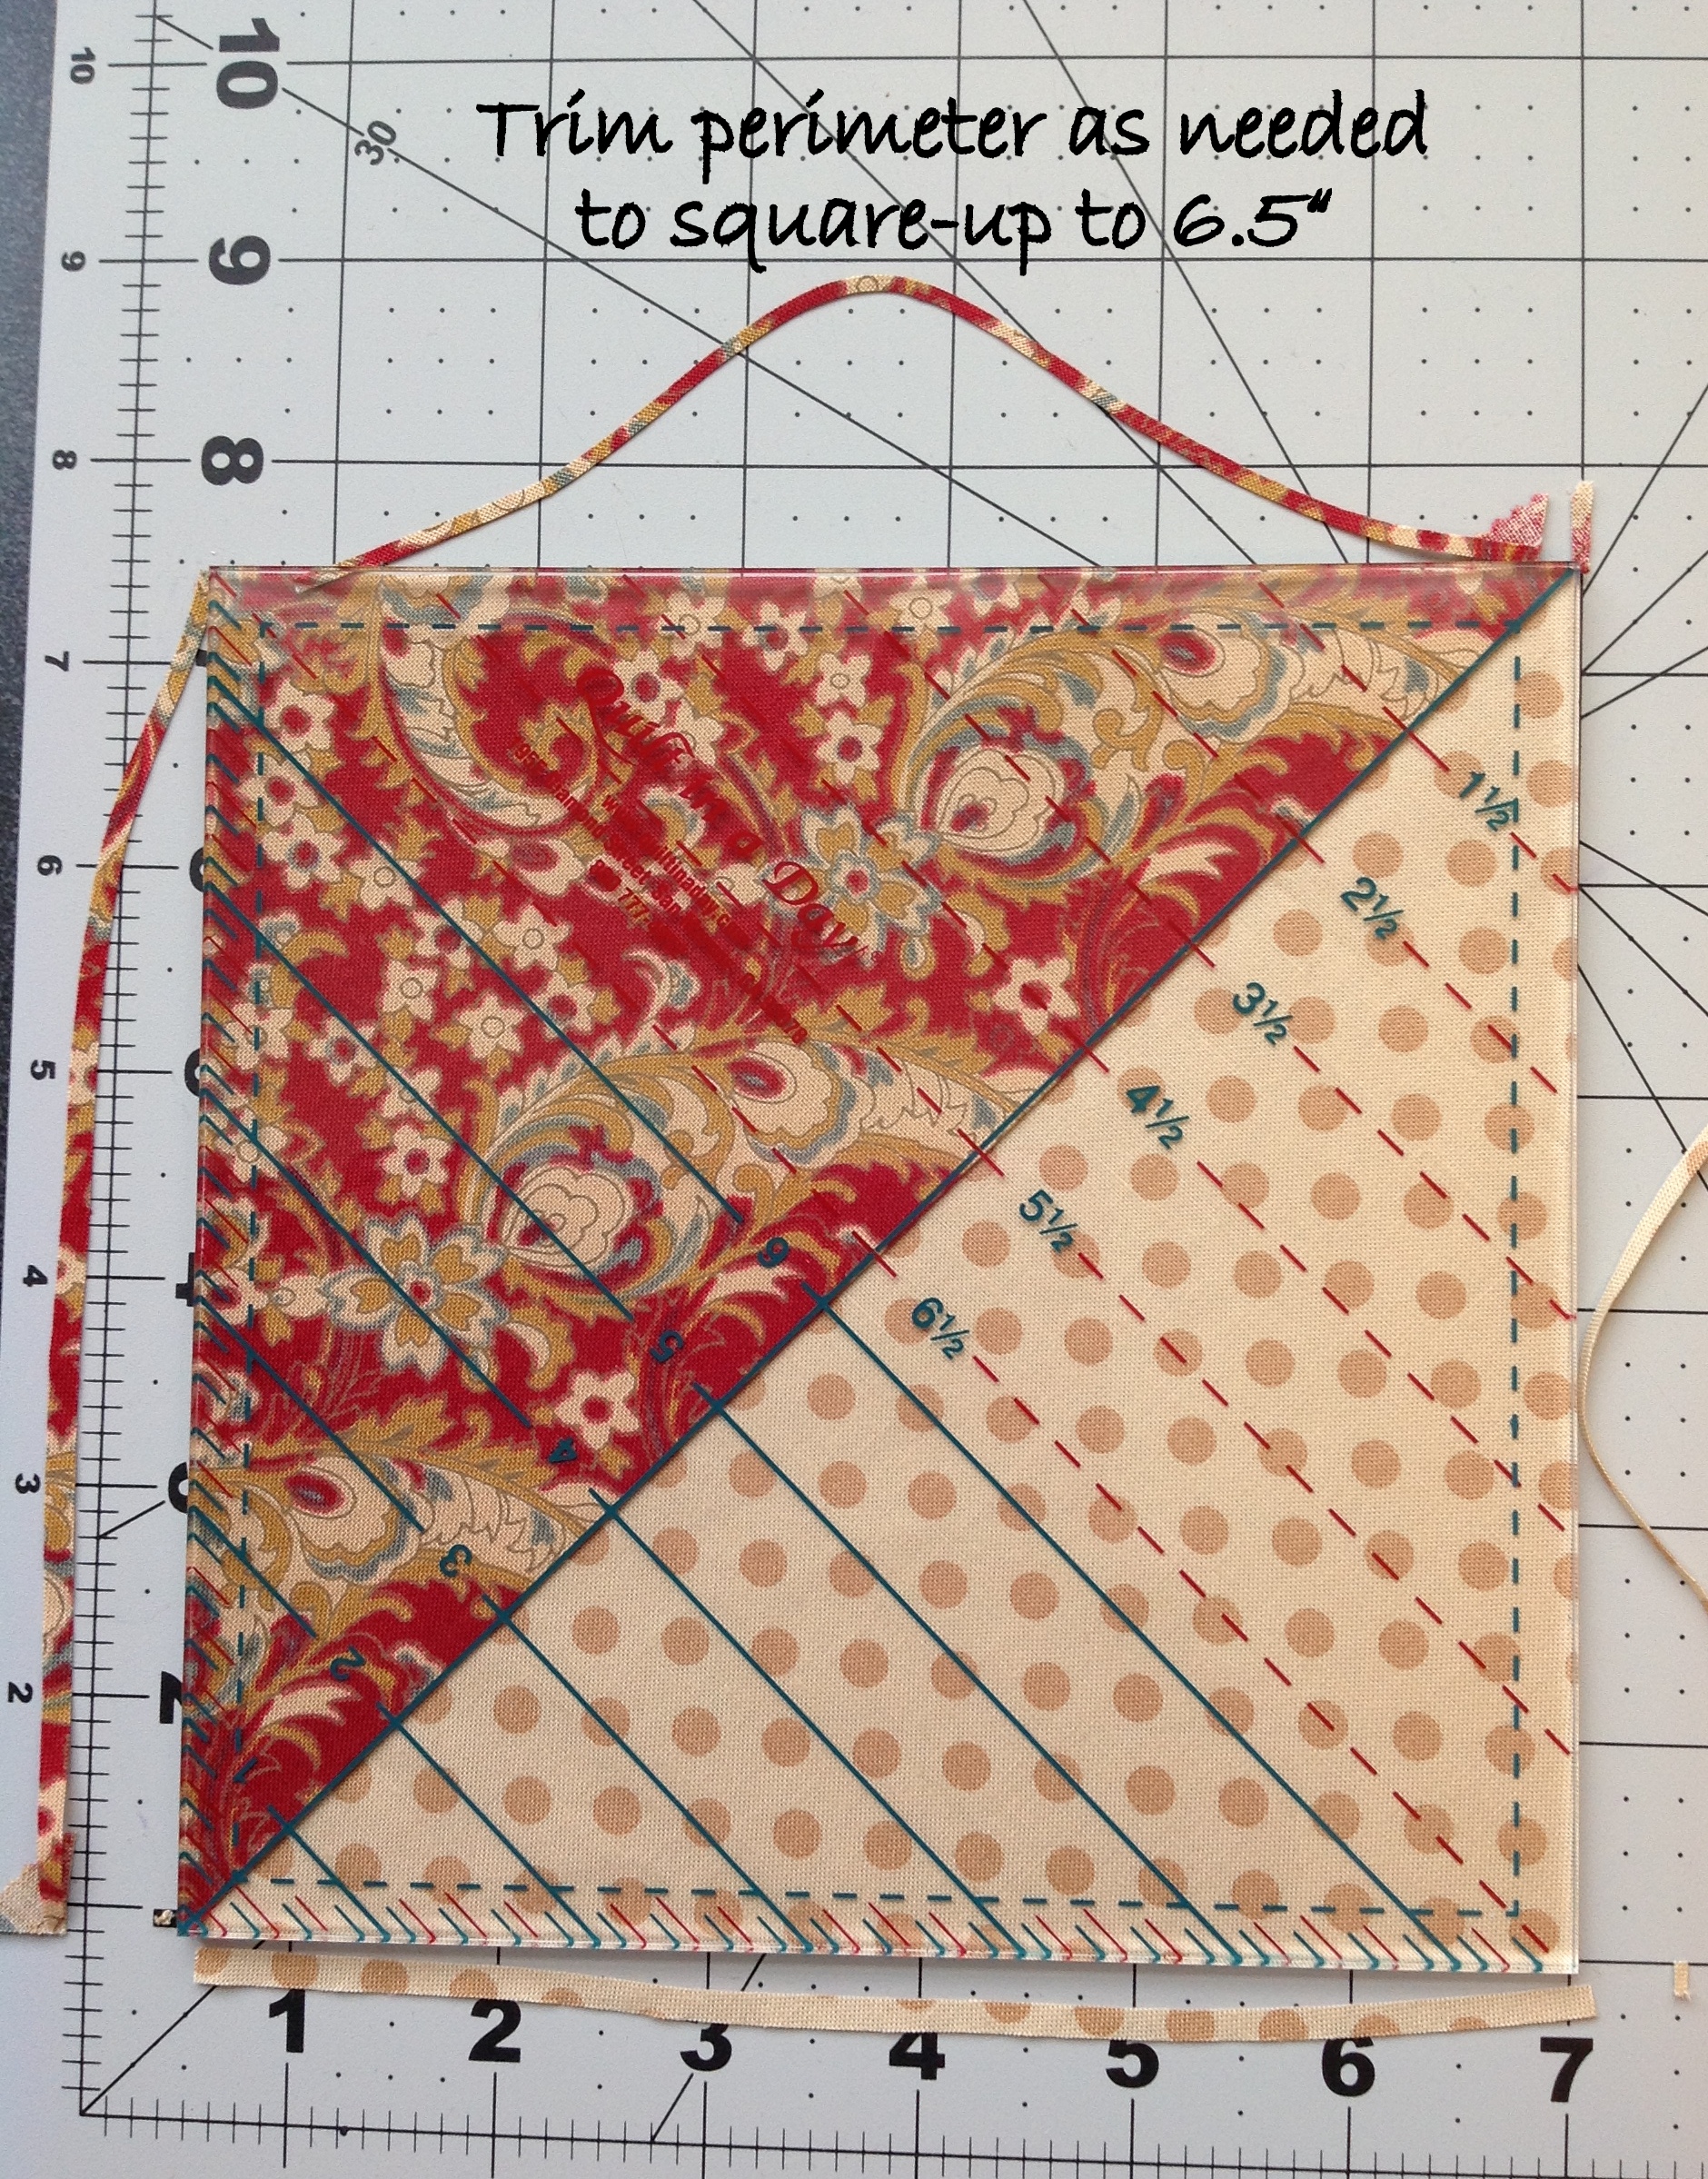
Repeat the trimming step for the other 3 HST's.

Repeat the sewing, pressing and trimming process for the remaining 20 layer cake pairs.
No Twist? If you're skipping the applique use a total of 24 layer cake pairs and prepare 96 HST's.

I grouped each activity to "get in the groove" with each of the steps above. First sewing the perimeter of the layer cake pairs, then cutting all of them twice on the diagonal, then pressing each HST open. The steps move along pretty quickly.
Now comes the fun part !!
Once all the HST's are prepared, position them in your favorite layout. After you've fussed and found a final design you like, take a picture of it before you collect-up HST's to be sewn.

When preparing the sample, I stitched the HST's into rows, and then sewed the rows together.
Sewing rows allows you to chain stitch AND press directionally so your seams row-to-row will nest.
In this quilt design you will have a total of 10 rows of 10 Half Square Triangles (except where the applique block interferes).
From floor to sewing machine (my approach)...
My approach for collecting blocks to sew begins with the top row where I take the 2nd HST from the left and flip it to its left, right-sides together, on top of the left-most HST.
Put a pin in the stitching edge of the pair (to avoid confusion about which edge to stitch).
Repeat for HST 4, flipping it to the left onto HST 3, and 6 onto 5, etc. working across the top of the quilt so you end up with 5 pair of HST's with a pin in the stitching edge.
Make a stack of the 5 pair of HST's with the top pair in the stack being the top left corner of the quilt.

Take this stack of 5 pair to your machine and stitch each pair, chain feeding the next pair without cutting the thread.

Once you have these 5 pair sewn, cut the threads and sew the first pair to the 2nd pair (check your picture to make sure you're sewing the correct edges together).
The seams won't always nest. Take a minute to pin so your points align once sewn.
![]()
Not all of my points come out this nice - I thought I'd show you a good one ;) (After pressing)
No need to press seams while you are sewing a row - save some time and get the row sewn first... then move it to the ironing area.
![]()
Once you have a row sewn together, move to pressing area, set each seam and then press all seams of the same row in one direction (alternate the direction of the seams for each row -- so when you sew your rows together the seams will nest).
![]()
![]()
![]()
When you're ready to sew rows together, most of the seams will nest, making life a bit easier.
It's very important to sew with a scant 1/4 seam allowance to preserve your chevron points. If your seam allowance is too large the points of the blocks will get sewn off.
With a Twist Sewing Order:
Piece 4 individual Sections of Half Square Triangles and set aside while you prepare the applique block (the applique block is easier to handle before it's sewn to the surrounding sections).
We'll be attaching the applique block to the Sections later in the recipe.
Sections to Sew and Set Aside:
Section 1: The top 4 rows of 10 HST's
Section 2: The middle left 4 rows of 2 HST's
Section 3: The middle right 4 rows by 4 HST's
Section 4: The bottom 2 rows of 10 HST's
This diagram gives you a visual of the sections to be prepared and the pressing direction for each row.

Moving on to the Twist!!
Prepare Applique Background:
Cut a piece of background fabric 25.5" square (we'll square it to 24.5" once the applique is complete)
Prepare Applique Vase and Bird:
Use the applique template in the printer friendly PDF (at end of recipe) or by downloading from here ==> Chevron with A Twist Applique Template
Cut out and stage the vase, bird body, and bird wing using your favorite fabrics and applique method (bird and wing are not reversed - if you're using fusible you'll need to reverse them).
![]()
Note: The sample was completed using Needle Turn applique. For an in-depth needle turn applique tutorial, visit my blog by here ==> Needle Turn Applique Tutorial.
Prepare Bias Stems:
Use a Clover #6 Bias Tape Maker to prepare and stage (11) 1/4" bias stems ranging from 5" to 12" in length.

Note: For a refresher on how to prepare bias stems, refer to the Moda Bake Shop Redbird and Berries Recipe or review the Bias Stem tutorial on my blog here ==> Preparing Bias Stem Tutorial.
Prepare Faux Ruched Flowers:
The faux ruched flowers shown in the sample are not difficult to create, but they do require a few important steps. I've outlined the steps below:
Start with a square of fabric between 5" and 6" square.

Find something round to use as a guide to mark a circle 1" smaller than the fabric square. I used a small kitchen bowl.

Using a marking tool (I used a Sewline Pencil Lead in PINK) - trace the circle on the fabric square. (If your fabric is 6" square, use a 5" circle... trace a 4" circle if you're starting with a 5" square.)

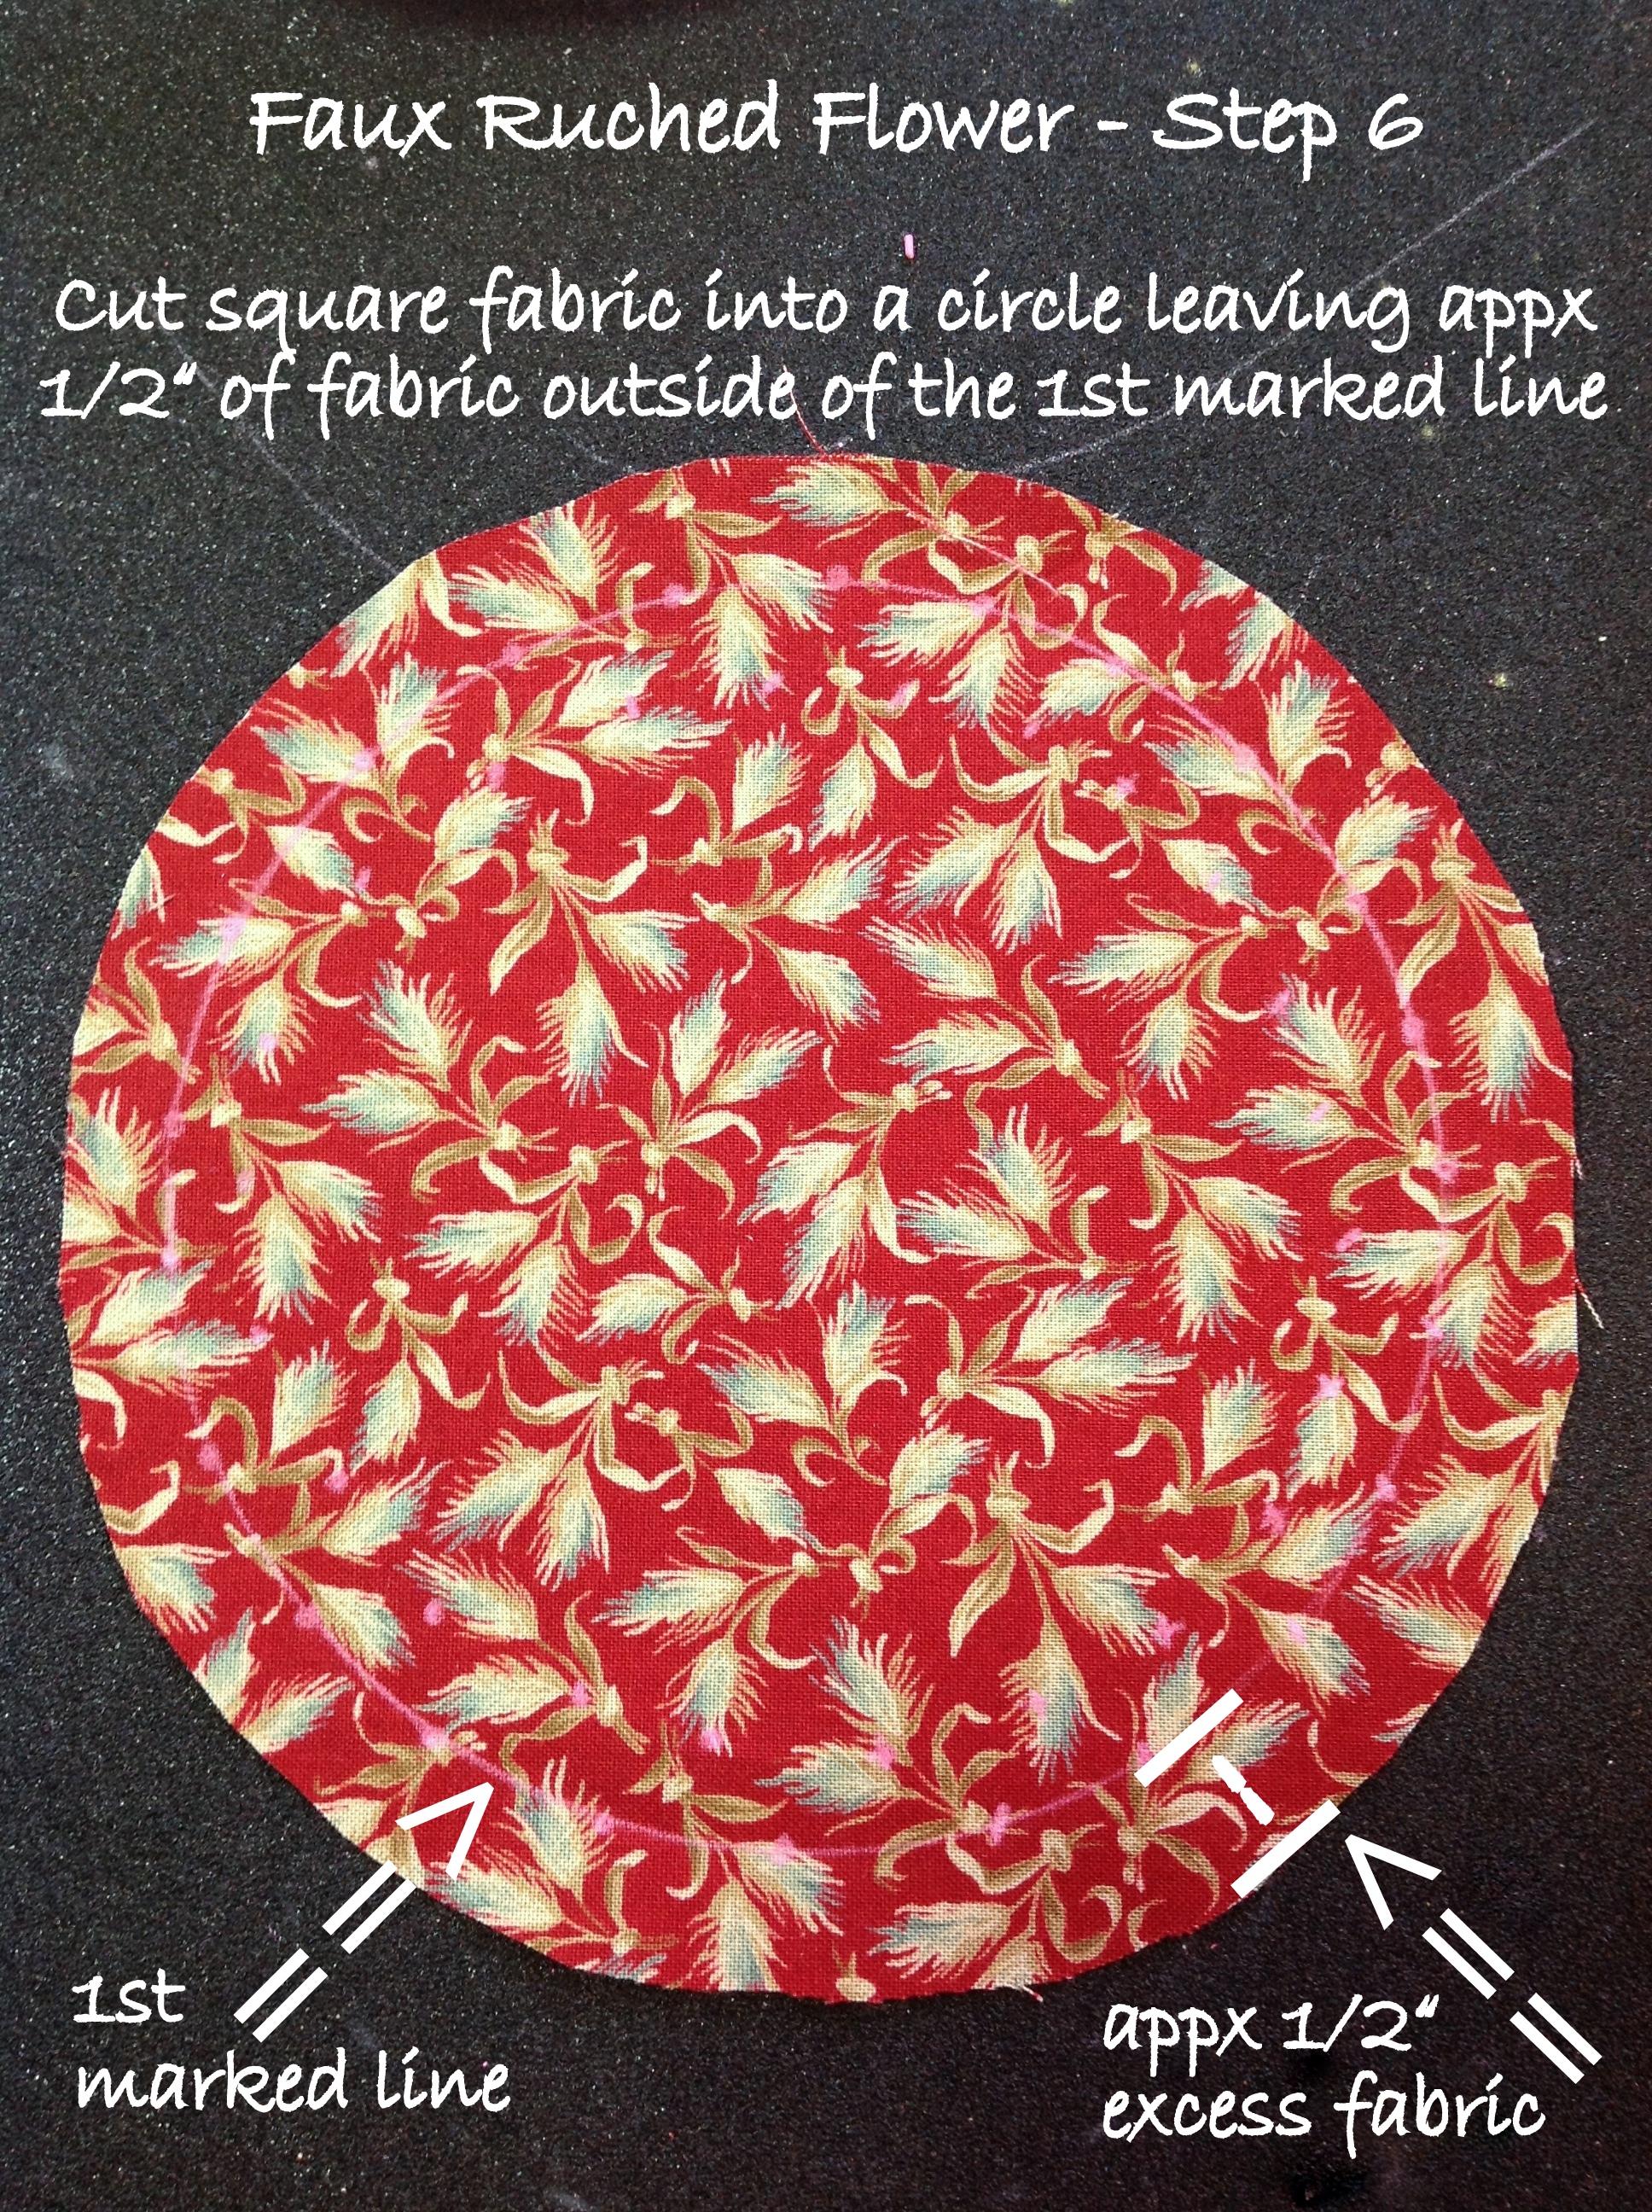
Next you'll mark two concentric circles of dots on the fabric. The first set of dots will be made on the marked line. A 2nd set of dots will be made appx 1/2" inside of the marked line.
The circles in neon green below highlight the first set of evenly spaced dots on the marked line. Don't fuss too much about how far apart they are or that there is the same number left and right, just rough them in. The camera didn't pickup the pink marks very well -- so use the neon green color to follow the marks.

Next, mark the 2nd set of dots appx 1/2" inside the marked line and first set of dots. Center each of the 2nd set of dots between the 1st set (see below).

Next step - Cut the square piece of fabric into a circle leaving appx 1/2" of excess fabric outside of the line you marked in Step 3.
Thread and knot a needle with a generous length (12-18") of strong thread - use a complimentary color as some of the threads will show. I used Aurifil 50Wt Mako Cotton Color #2370 and a #11 Straw Needle.

Bring the needle and thread up from the wrong side of the fabric on one of the 1st set of dots (on the marked line).

Fold under the excess 1/2" of fabric on the marked line (wrong sides together) - you'll fold as you go, just take one fold to start. Your starter knot will be buried in the fold.
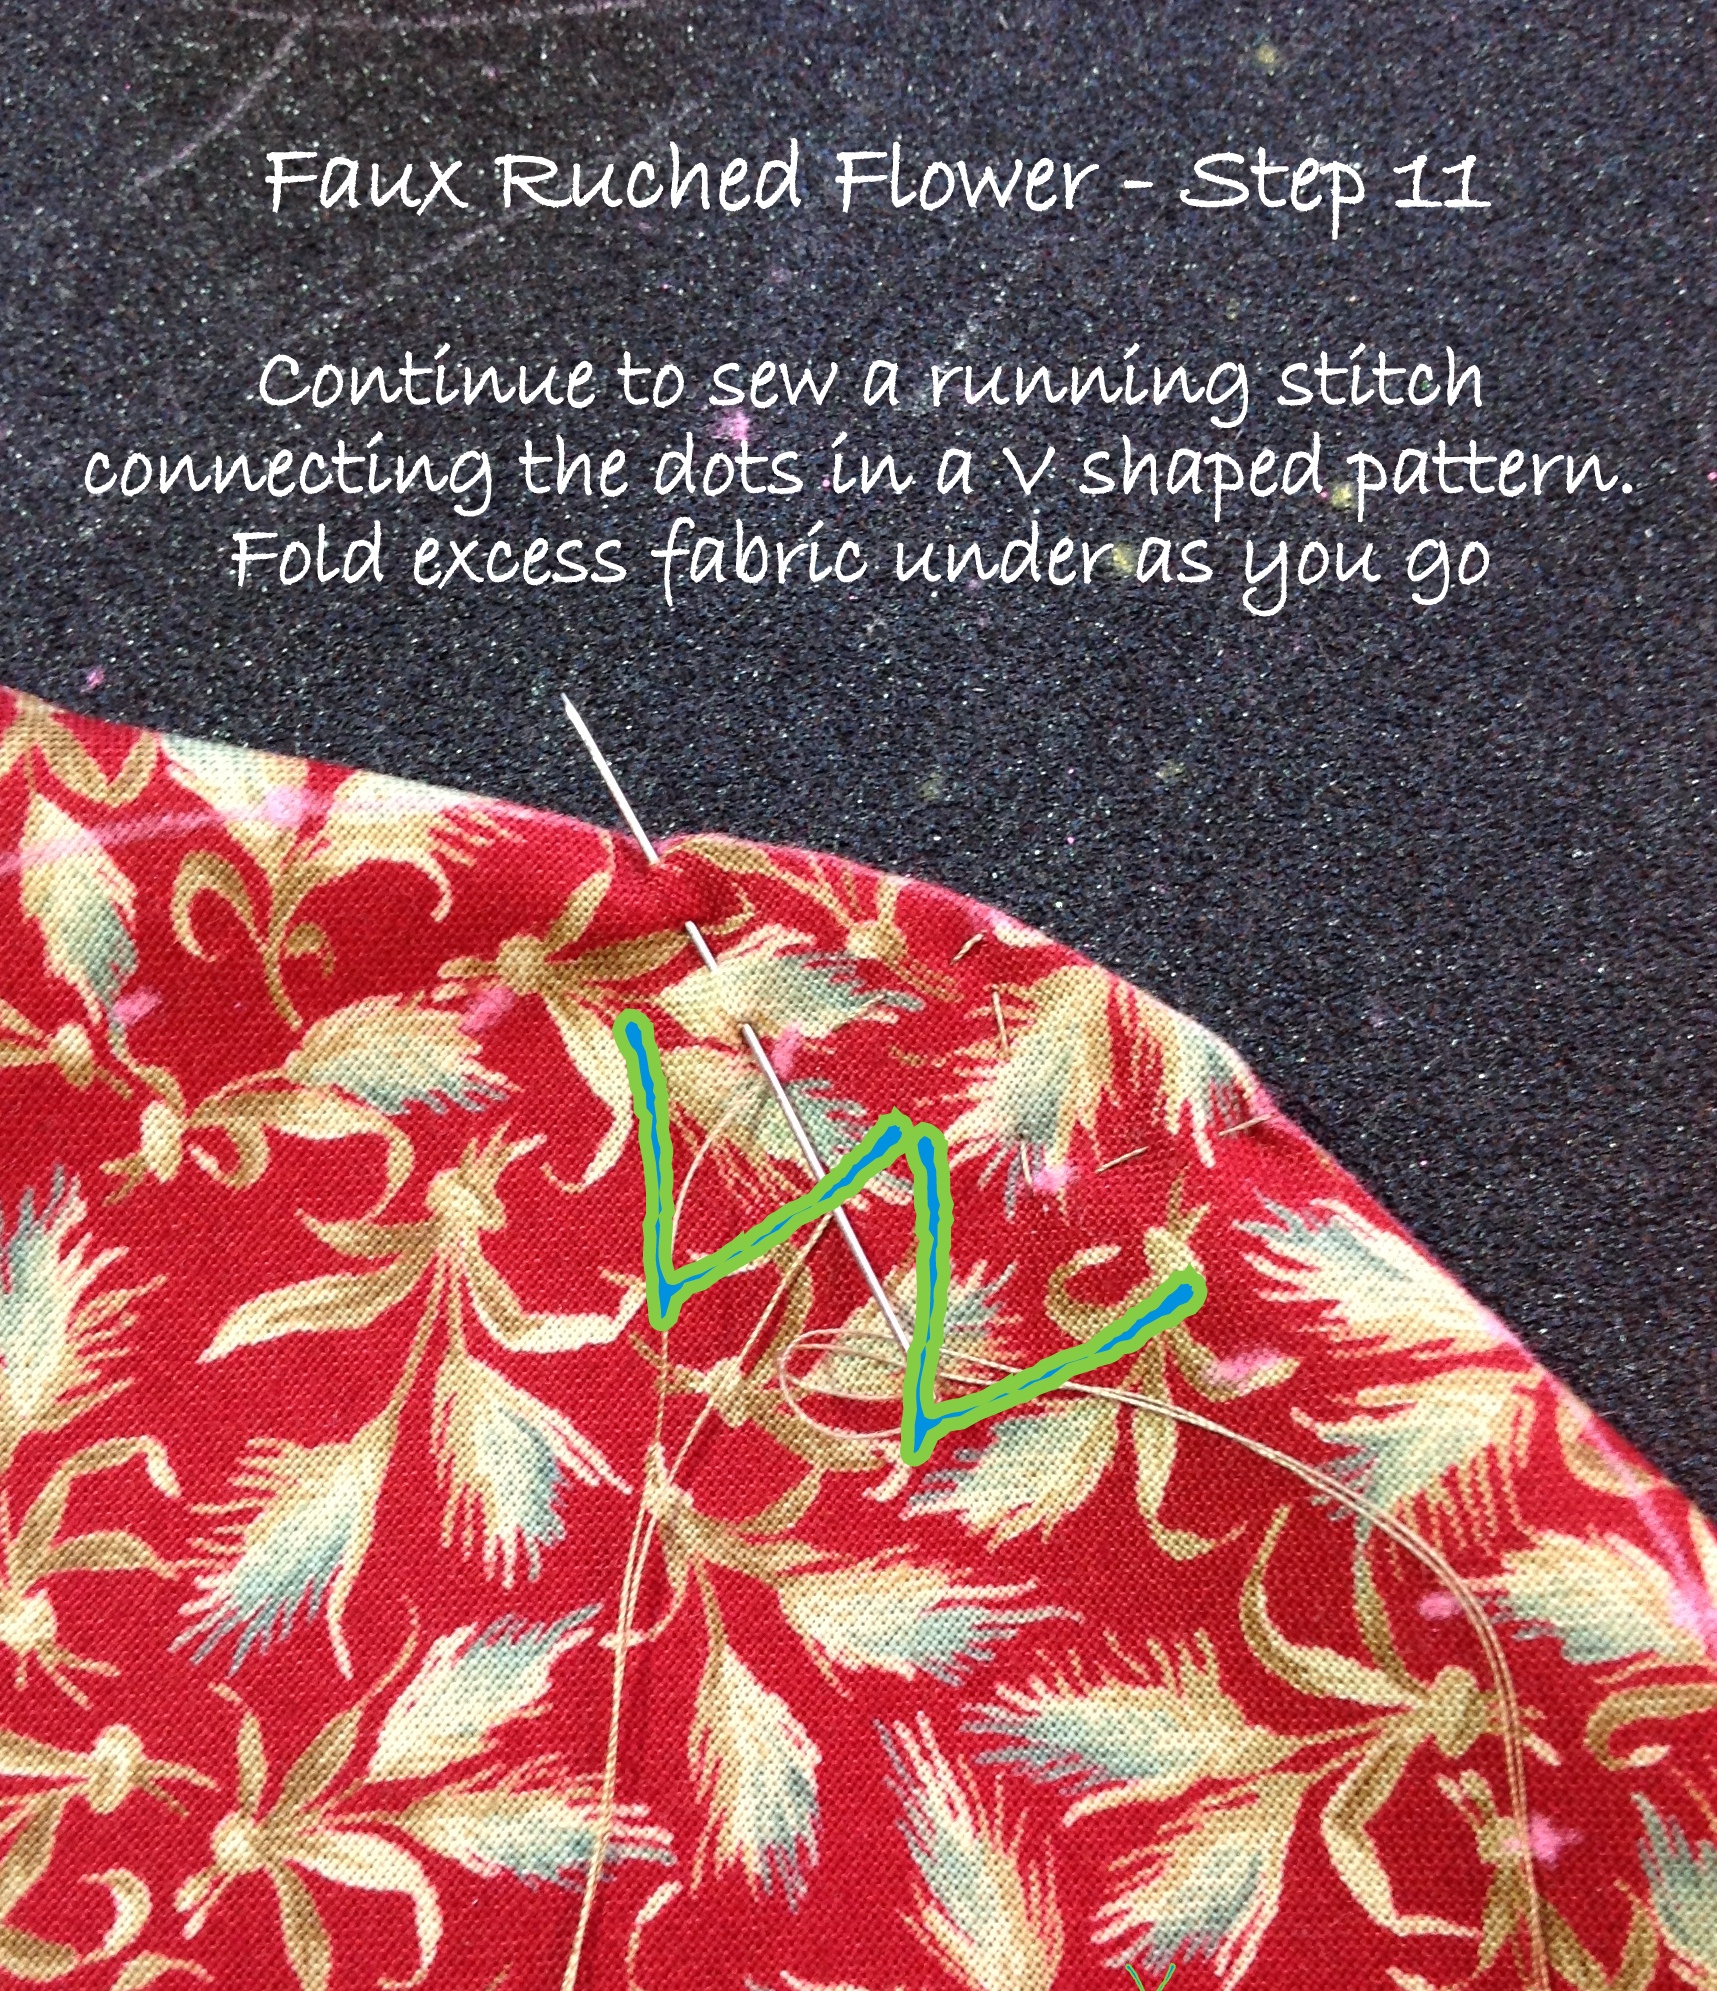
Now sew a running stitch from an outside dot to an inside dot (1/2 of a "V" shape). You'll take about 2 stitches between the two dots -- don't stitch too small, you'll need to gather this running stitch to make the outside of the flower (the faux ruched edge).

Follow the "V" pattern in your dots with a running stitch, folding the excess 1/2" under as you go and catching it with the running stitch.

Continue to sew a running stitch, connecting the dots in a "V" shaped pattern.
Now and then, gather the fabric within the running stitch. You'll see the ruched (scalloped) edge take shape as you go.
Don't pull too tight, you don't want to break the thread else you'll need to start over.

This is what it looks like from the back -- be sure to "catch" the excess fabric with the running stitch as you go.

Continue to stitch and draw the thread taut to form the ruched edge (or scallop).

After you've stitched the "V" pattern around the perimeter, drawn the threads taut, AND you're happy with the size and shape of the perimeter of the flower, put a knot in the area of the last stitch - this will secure your scalloped (ruched) edge so it won't come loose.
Note: You can vary the size of your flower considerably by how tight you draw the thread before you knot it.
Note: Don't worry that the center of your flower is "puffy" - we'll tack that down later.
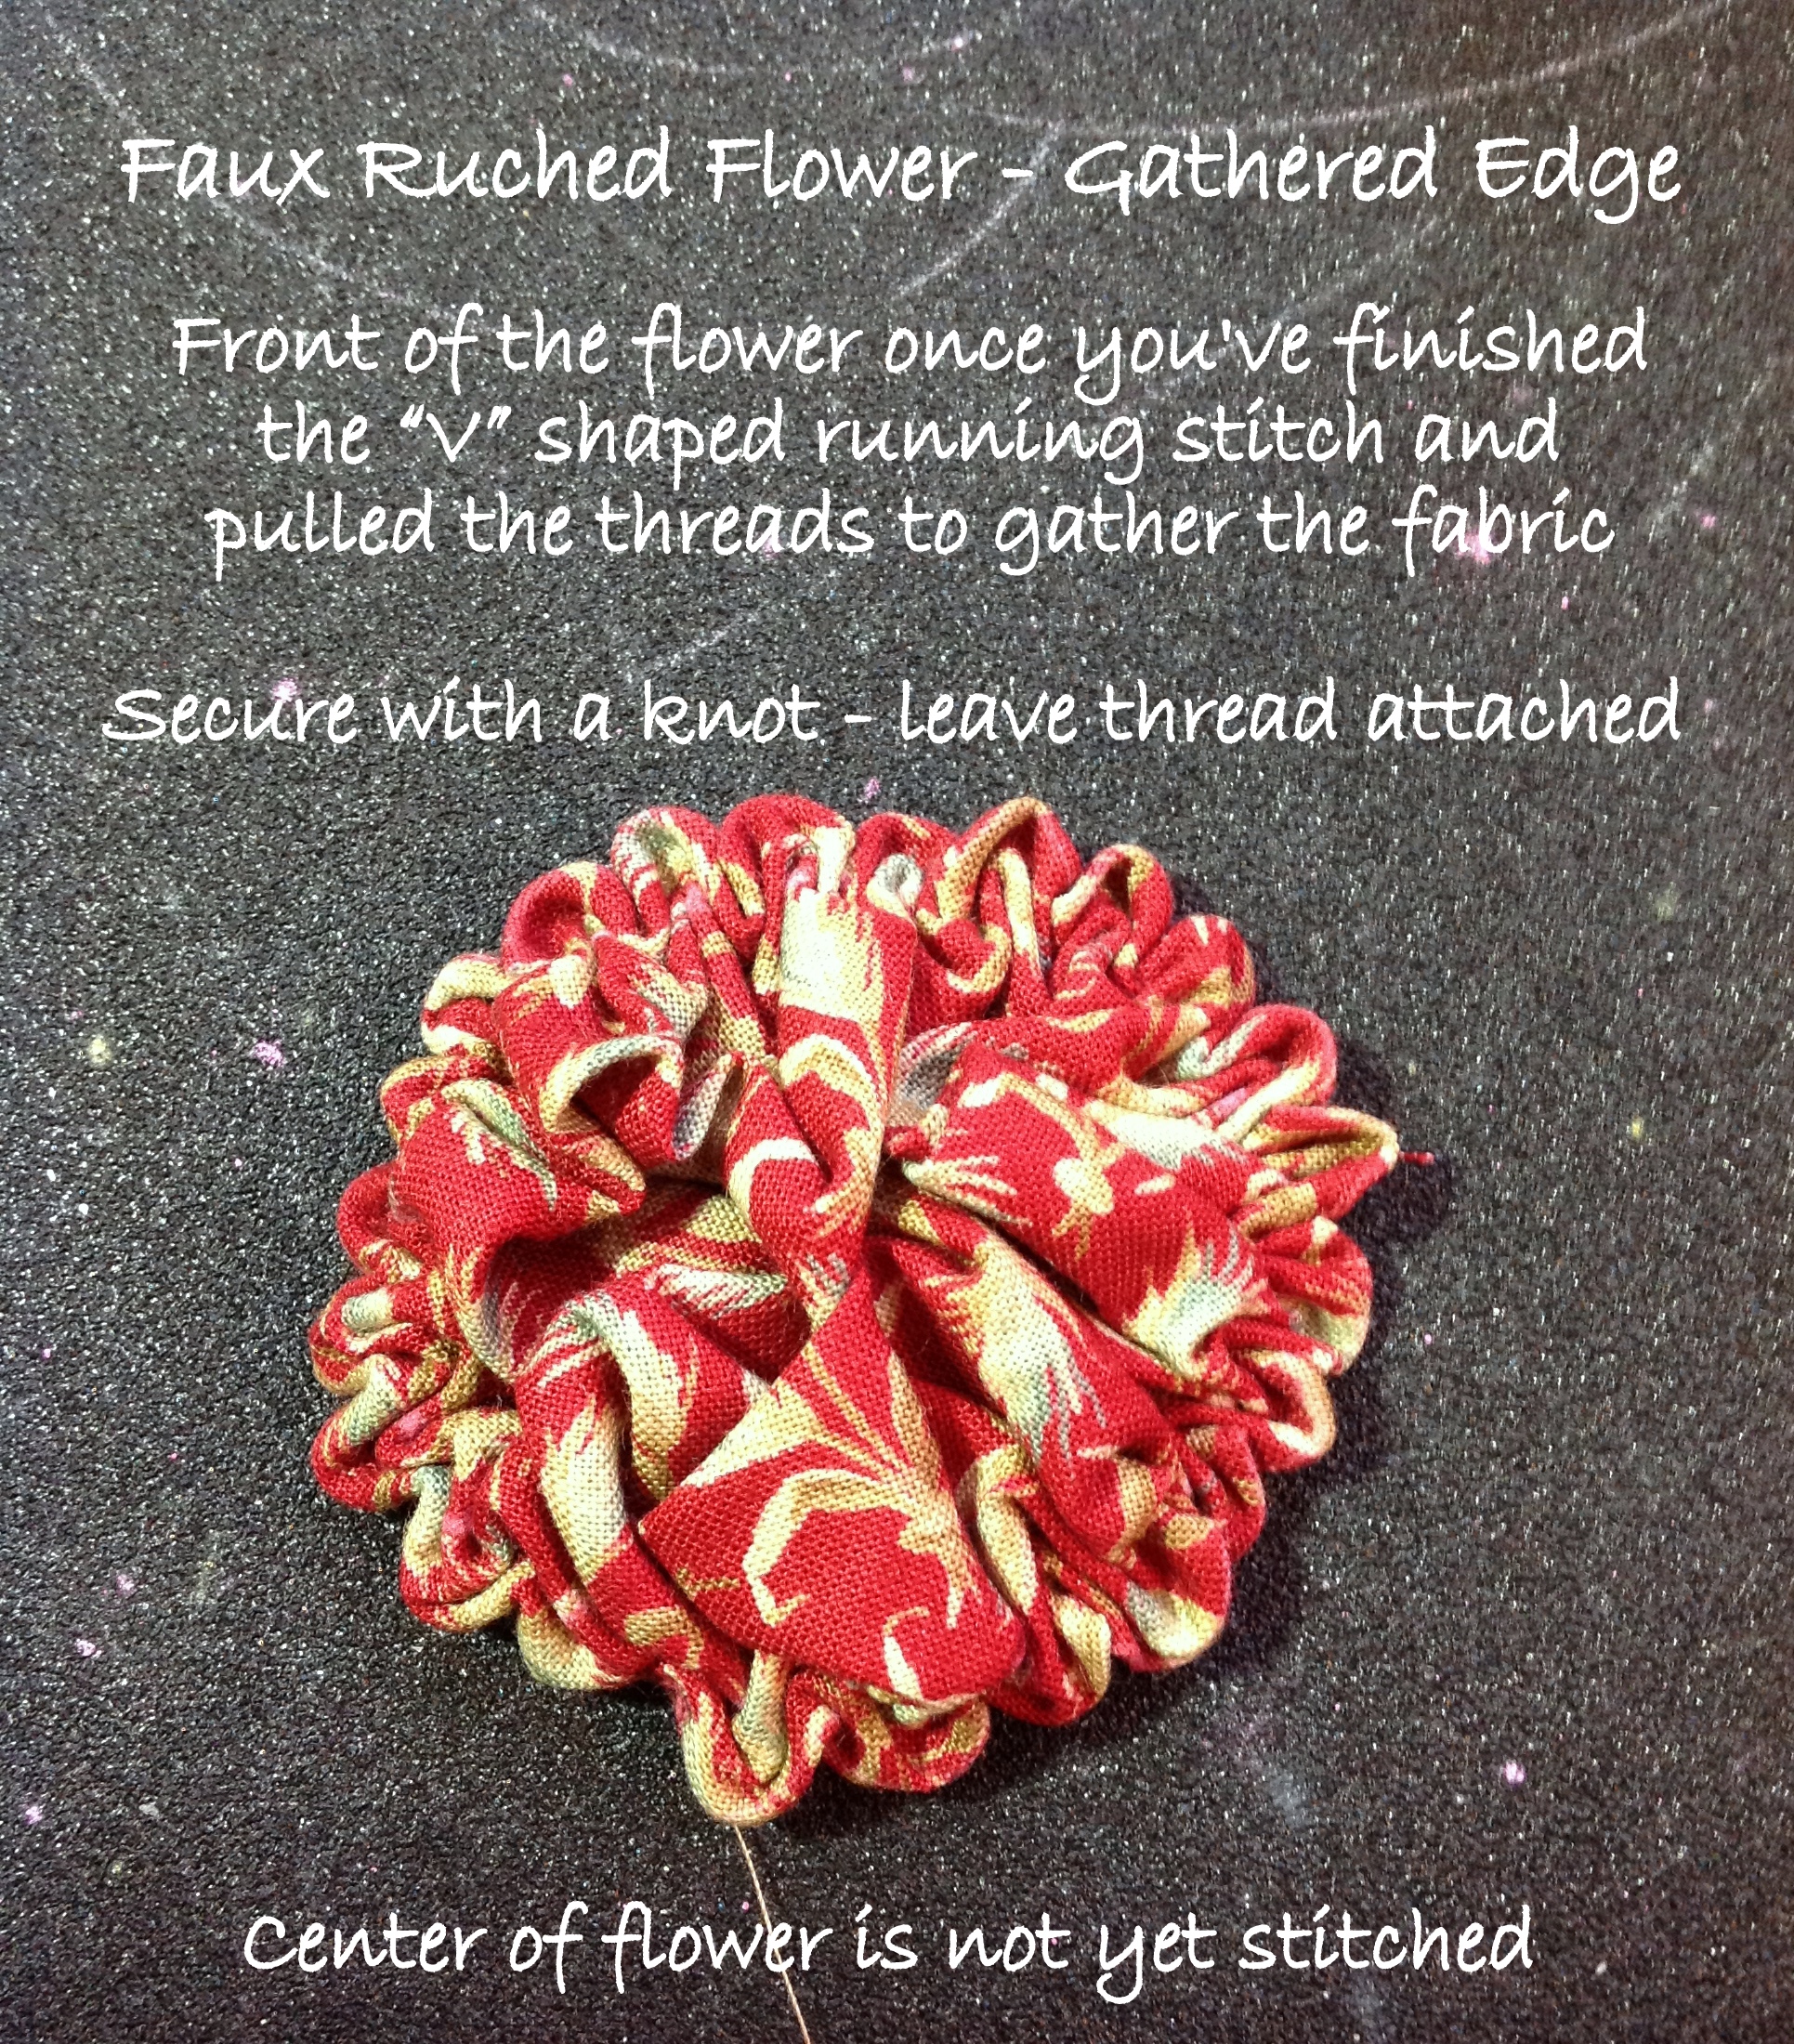
If you have thread remaining after knotting, leave it attached, you can use it when you attach the flower to the background fabric.
Image of the back of the ruched flower:

Once you're happy with the size....
Prepare a total of 13 ruched flowers in varying colors and sizes. The faux ruched flowers on the sample quilt ranged from 2" to 2-3/4" in diameter. They don't need to be exact ;)

OK - we've prepared the vase, the bird and the flowers...
Now - lets get to the applique!!
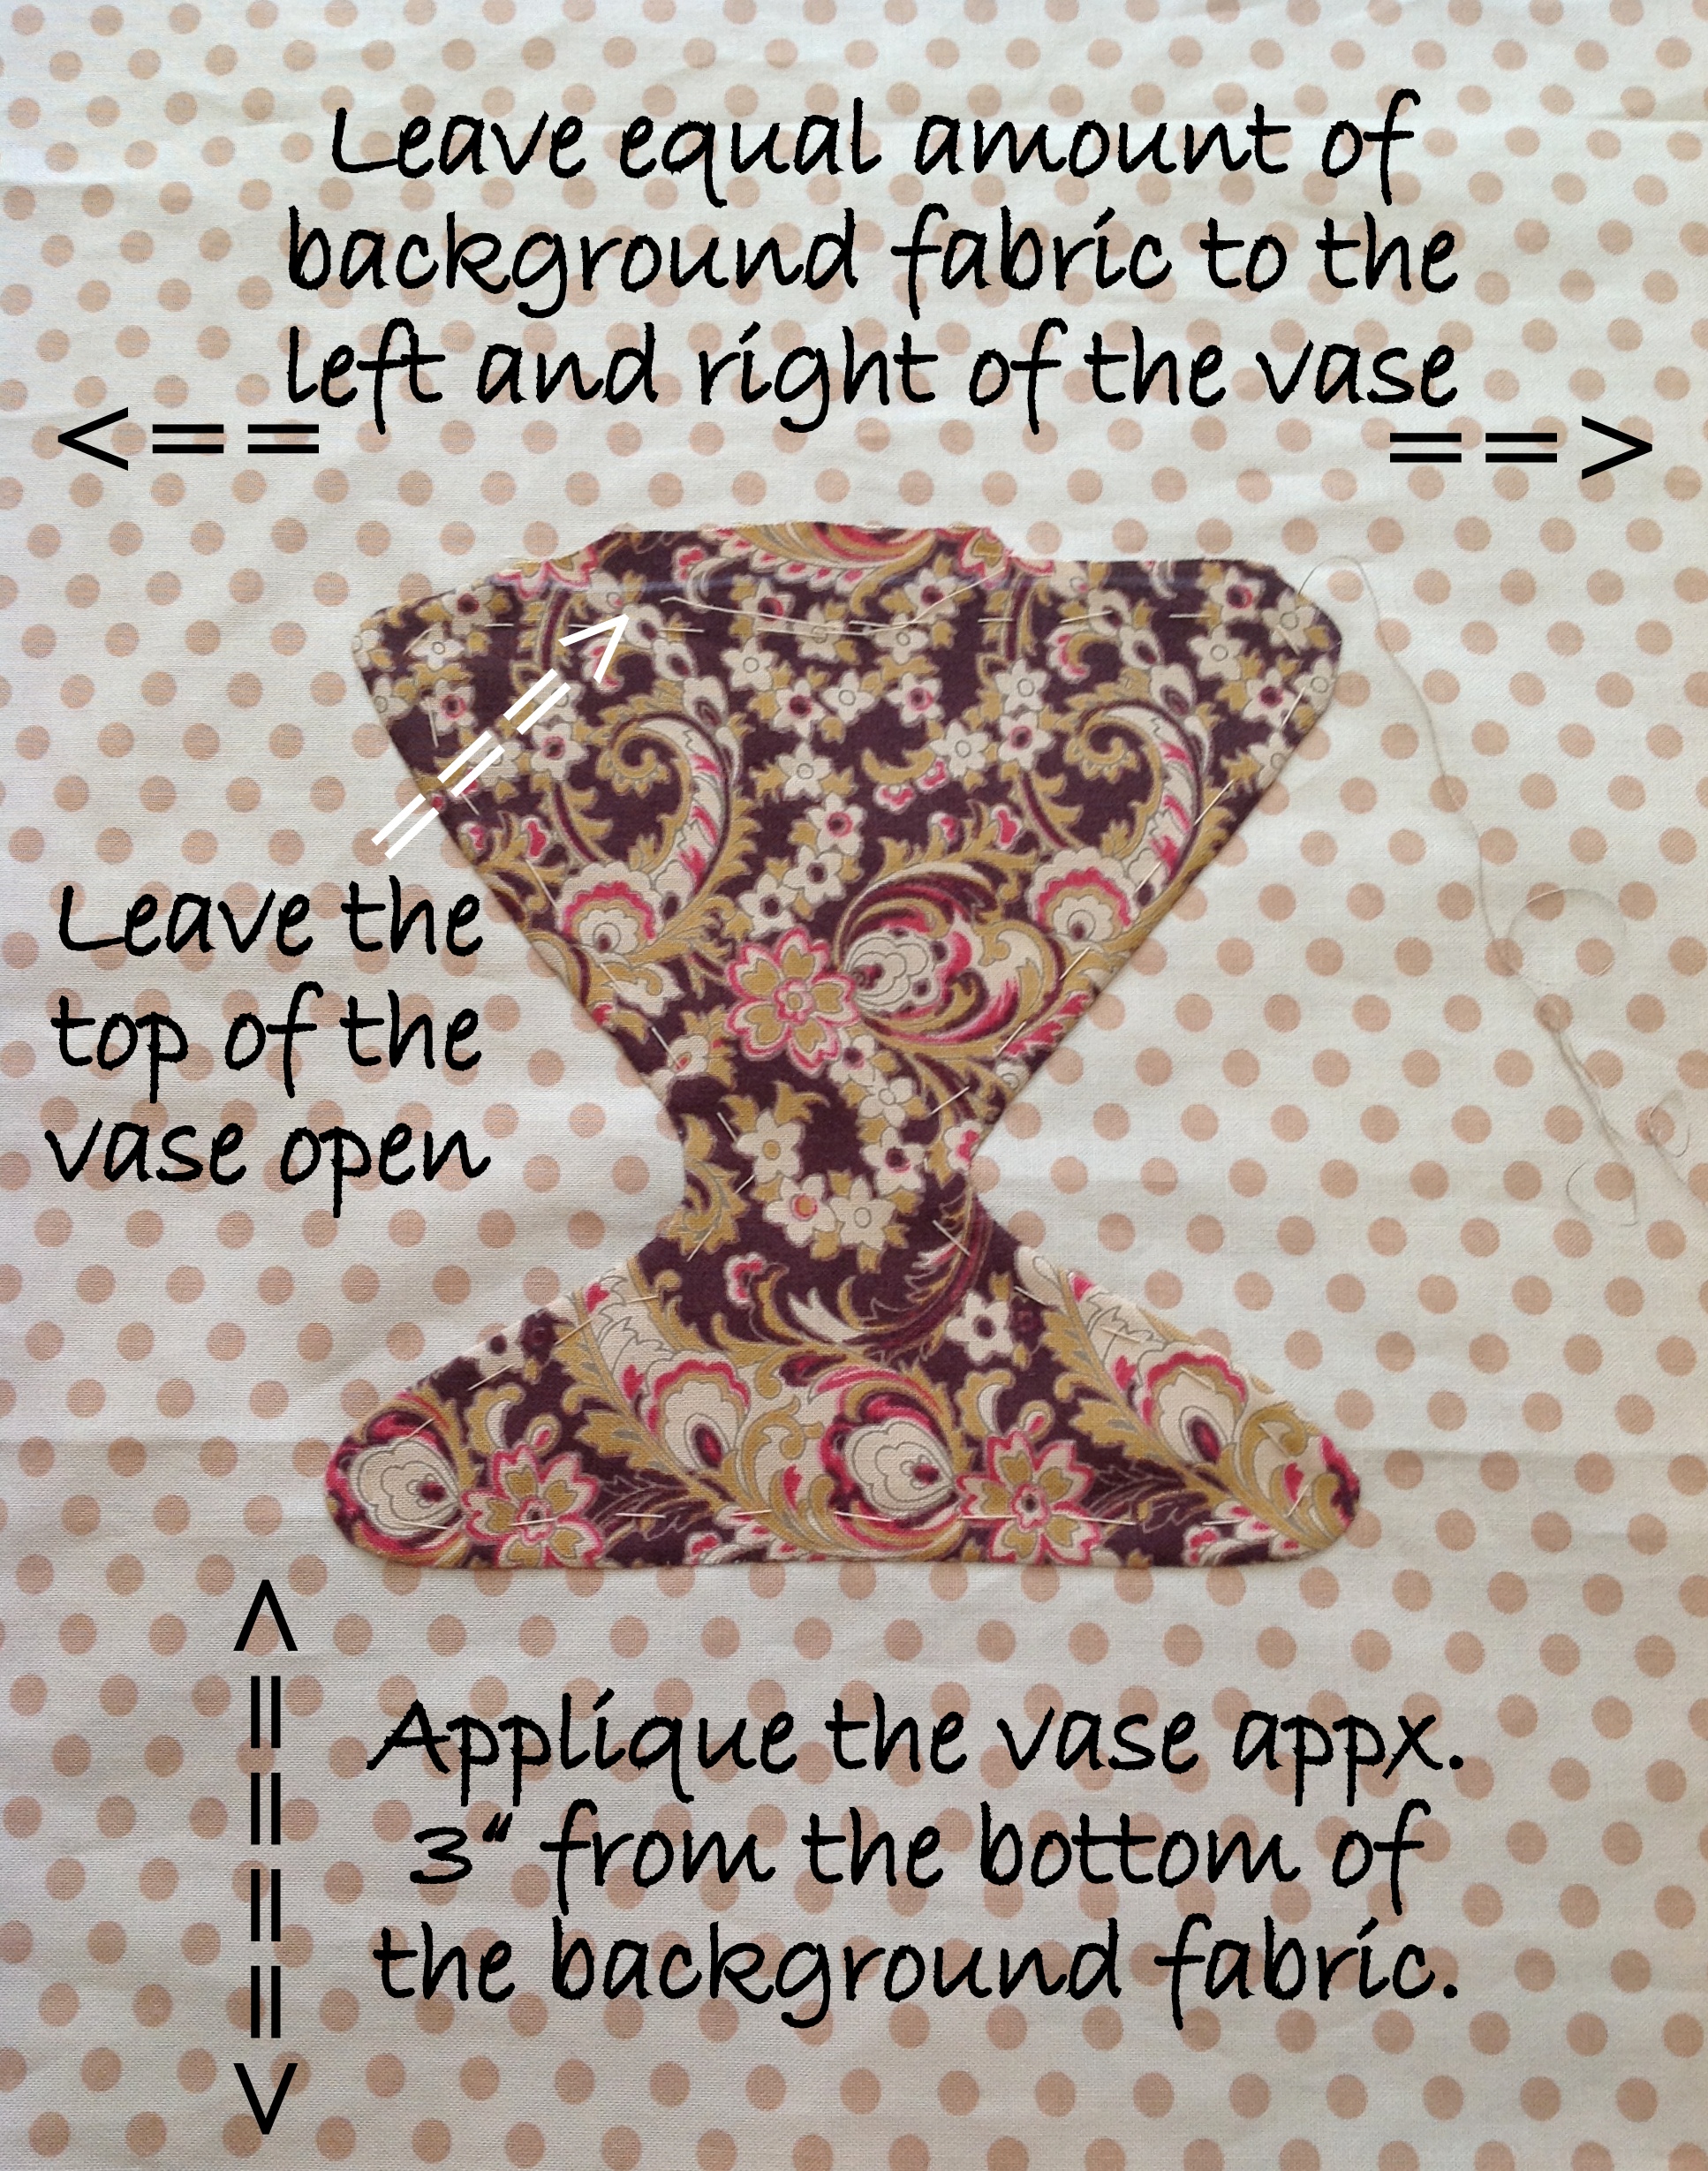
You begin the applique by attaching the vase to the background fabric appx 3" from the bottom edge of the background fabric and centered left to right. Leave the top edge of the vase open to tuck the stems under it as you go. Stitch it closed later.
I used needle turn applique to attach the vase using Aurifil 50wt Mako Cotton thread. I love doing hand work with this fine, yet strong thread.

Once the vase is attached, use the diagram below to position and mark where the stems and flowers will be sewn.
I don't recommend pinning or basting all of the stems and flowers at this point, just position them in a manner that is pleasing to your eye and use a marking tool to mark their positions for future placement. I used a water soluble blue pen to mark - it worked perfectly.
Leave roughly 2" to 3" of blank space around the outside edges of the applique block.

Now lets get some of these things appliqued. I started with the stem and flower nearest the vase. Use pins to secure the applique stem to the background prior to stitching. This method (pinning across the stem but not through it (below)) allows the stem to float as necessary while you stitch. You may also choose to thread baste or glue baste the stems in place for stitching.

Once arranged, use an invisible stitch (similar to the stitch used for needle turn applique) to attach the stem to the background. You can see more about applique invisible stitch here.
Stitching the flower:
Appliqueing the faux ruched flowers require two steps:
- Securing the flower edges (scallops) to the background
- Tacking the center fabric to the background
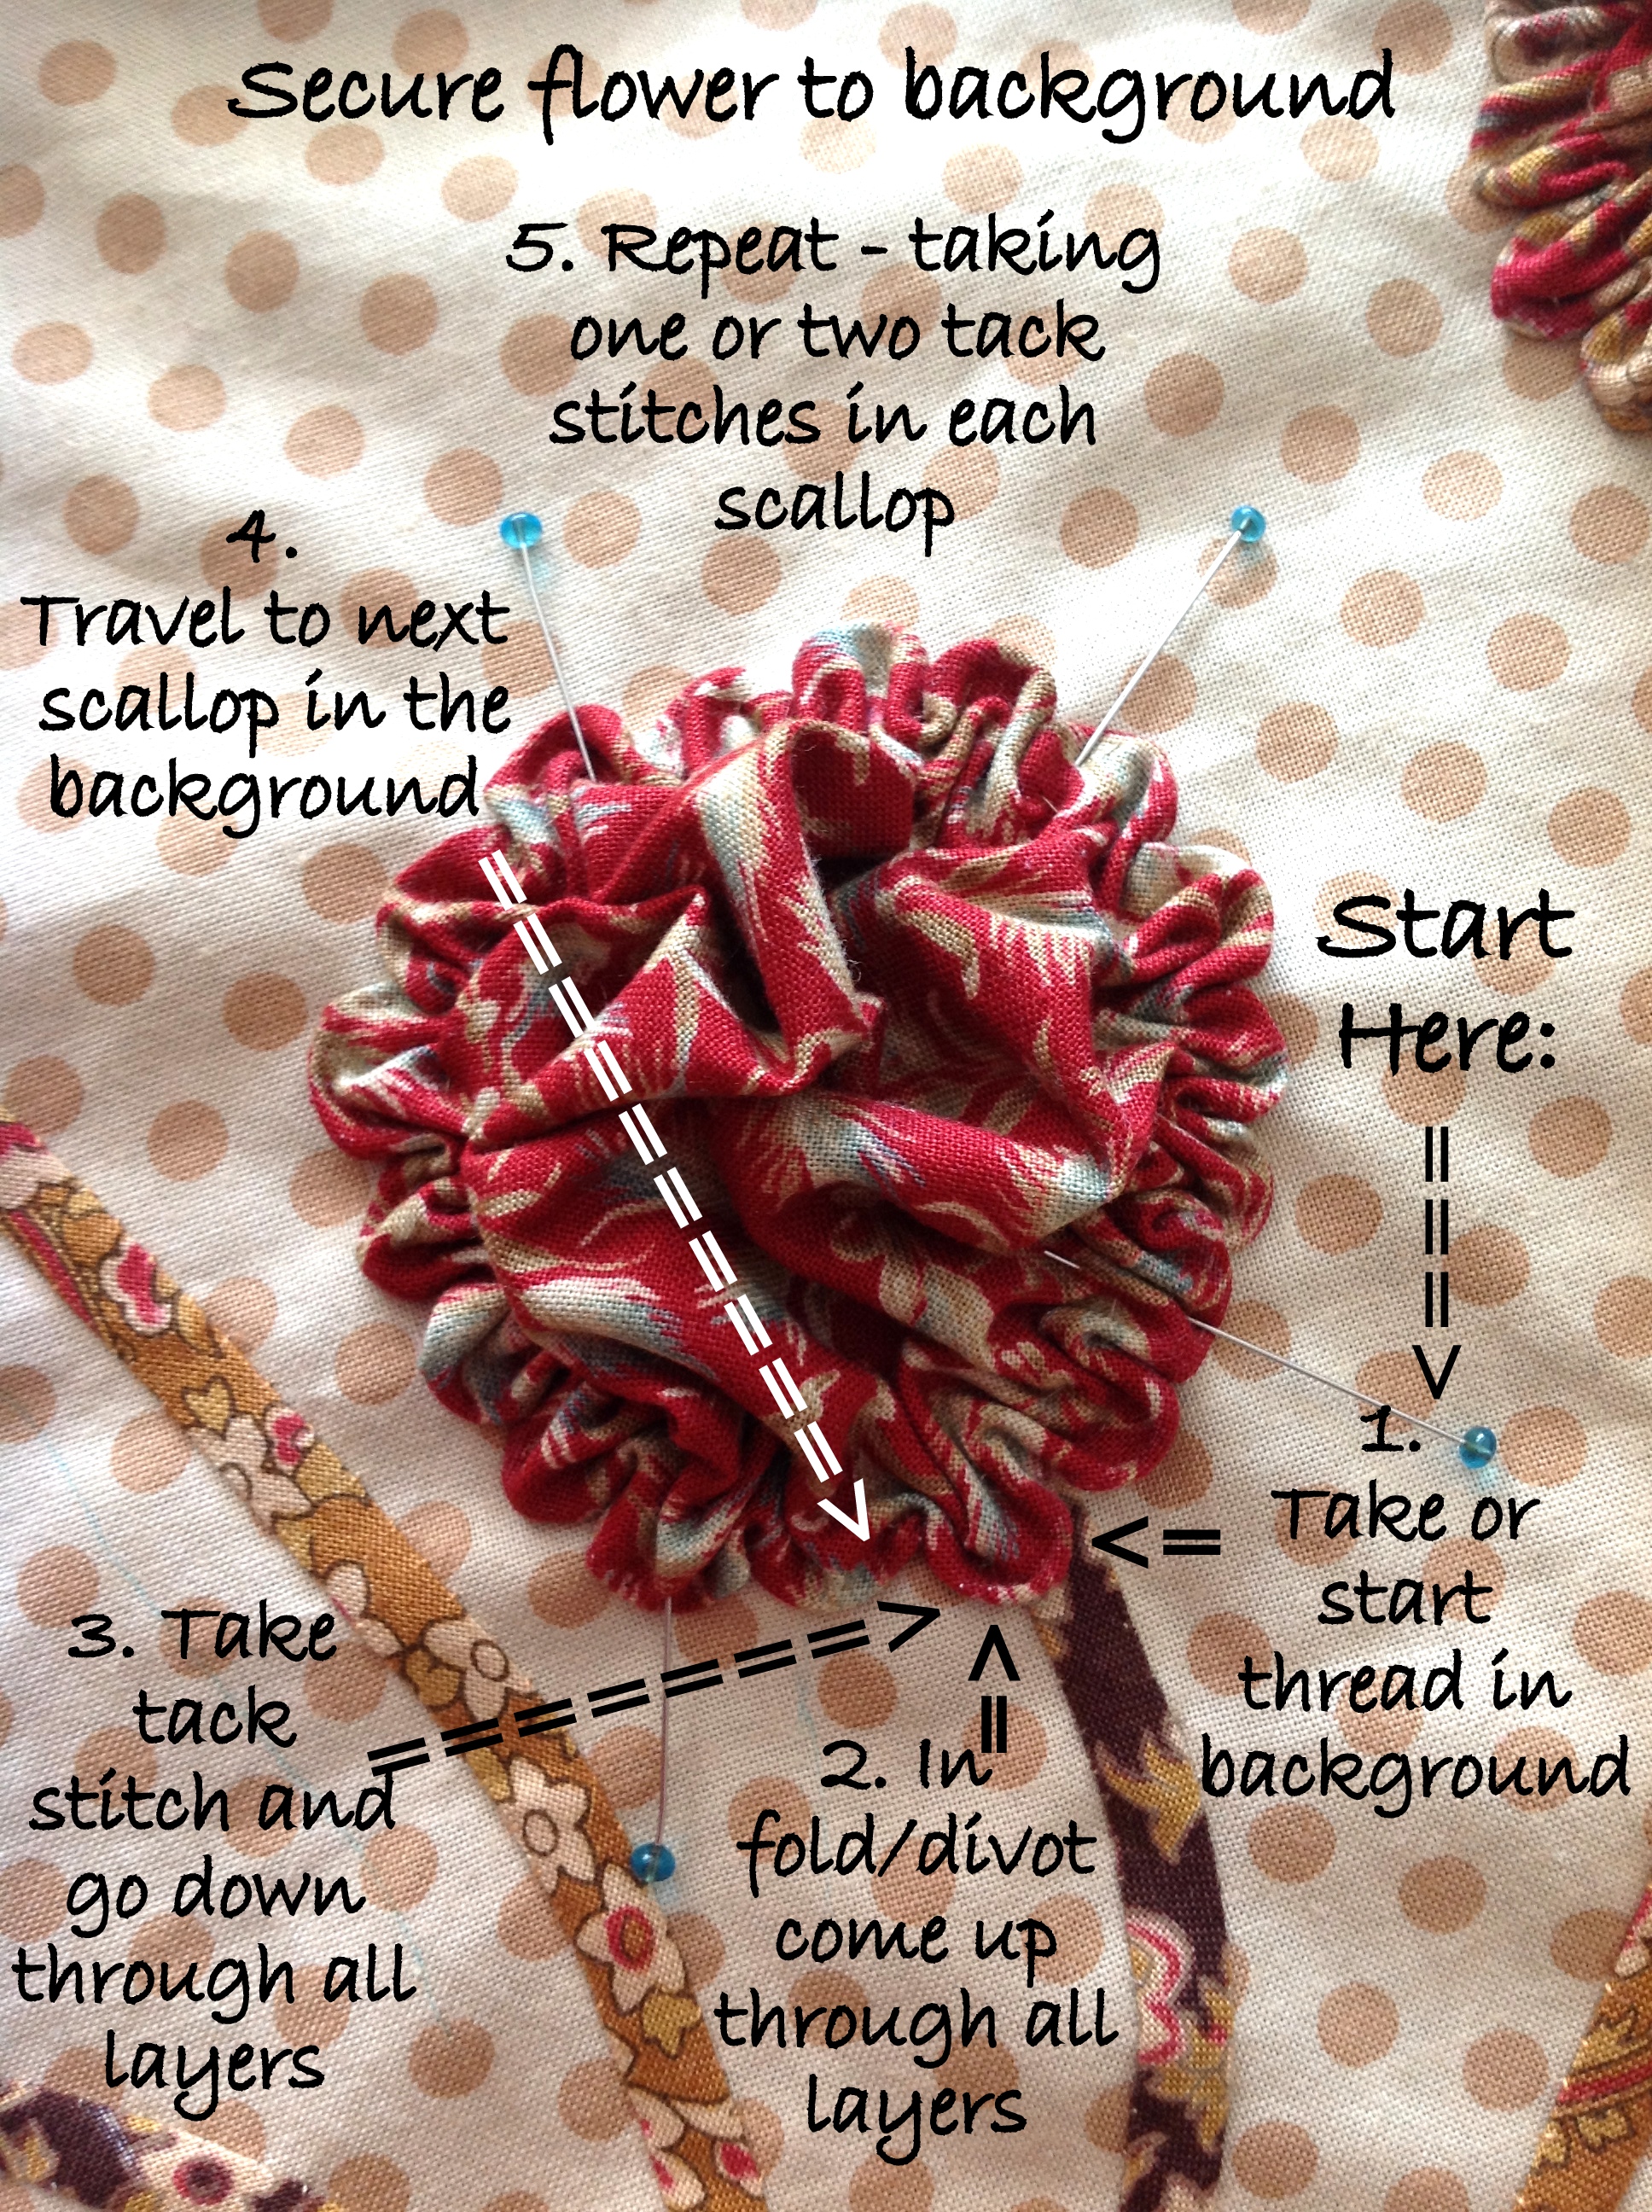
Step 1:
If you have the running stitch thread still attached to the flower, you can use it for this step. Else, prepare a new length of thread with a knotted end. You're going to take small tack stitches through the folds and divots of the scallops to secure the outer edge of the flower to the background fabric (take care to NOT pucker, gather or wrinkle the background fabric).
Start with your needle and thread on the wrong side of the background fabric, come up in a scallop fold/divot, travel less than 1/8" and go back down. On the back side, travel to the next scallop (or next stitch same scallop) and repeat the tack stitch process.
Work your way around the flower scallops taking one or two stitches per scallop. It takes a little time - but it's important to secure the outside edge of the flower to the background.
Showing the wrong side of the background fabric after the flower scallops are secured (a stem is shown too)

Step 2.
Once the scallops are secure you'll again use tack stitches to knock down the center section of fabric and complete your faux ruched flower. You'll take anywhere from 15-30 tack stitches inside the flower center for this step.
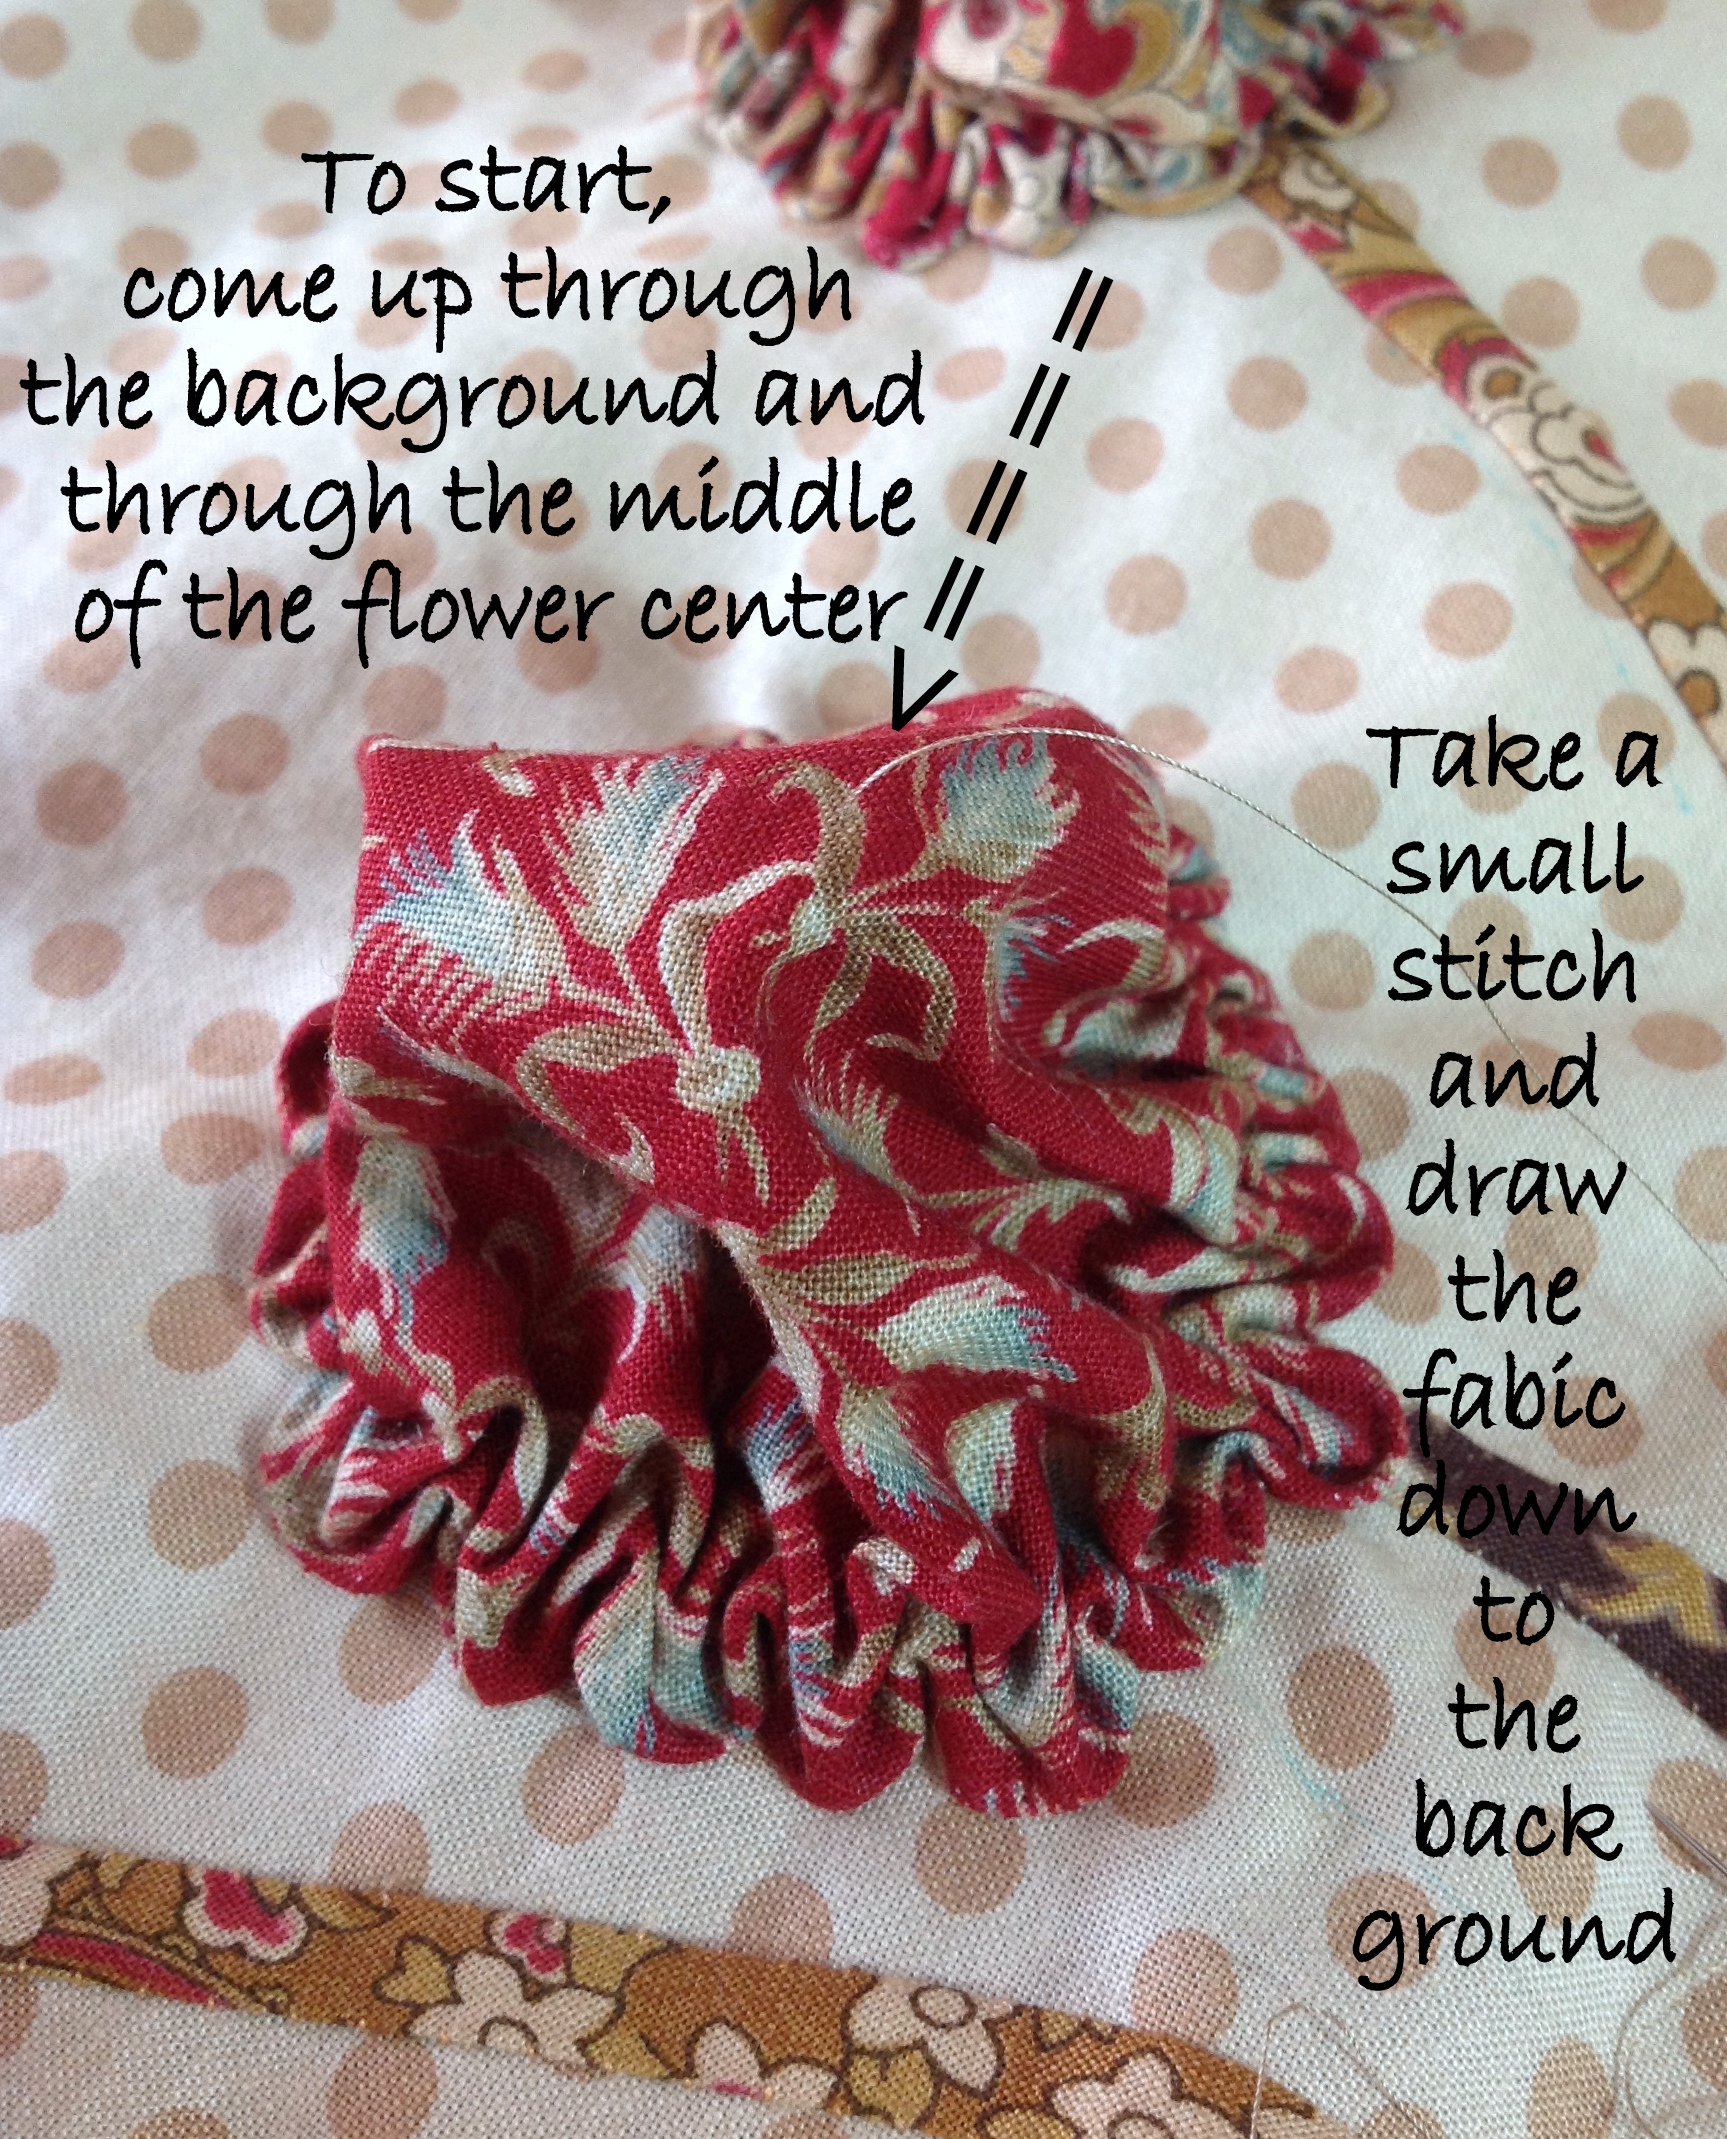
Start with a new length of thread (knotted). Pull the center fabric up/away from the background fabric (so you can find the middle).
With your needle, come up through the background fabric and directly through the middle of the flower. Take a small stitch and go back down through the middle and all the way through the background (drawing the center fabric down to the background).
Showing after the 1st tack stitch is taken:

Now pull another section of the fabric away from the background, travel and repeat this step, taking tack stitches here and there in the center fabric.

Each time you go through the background, fluff up the flower center and take another tack stitch to draw that area down.

Doing this tacking repeatedly will shape the center of the flower.

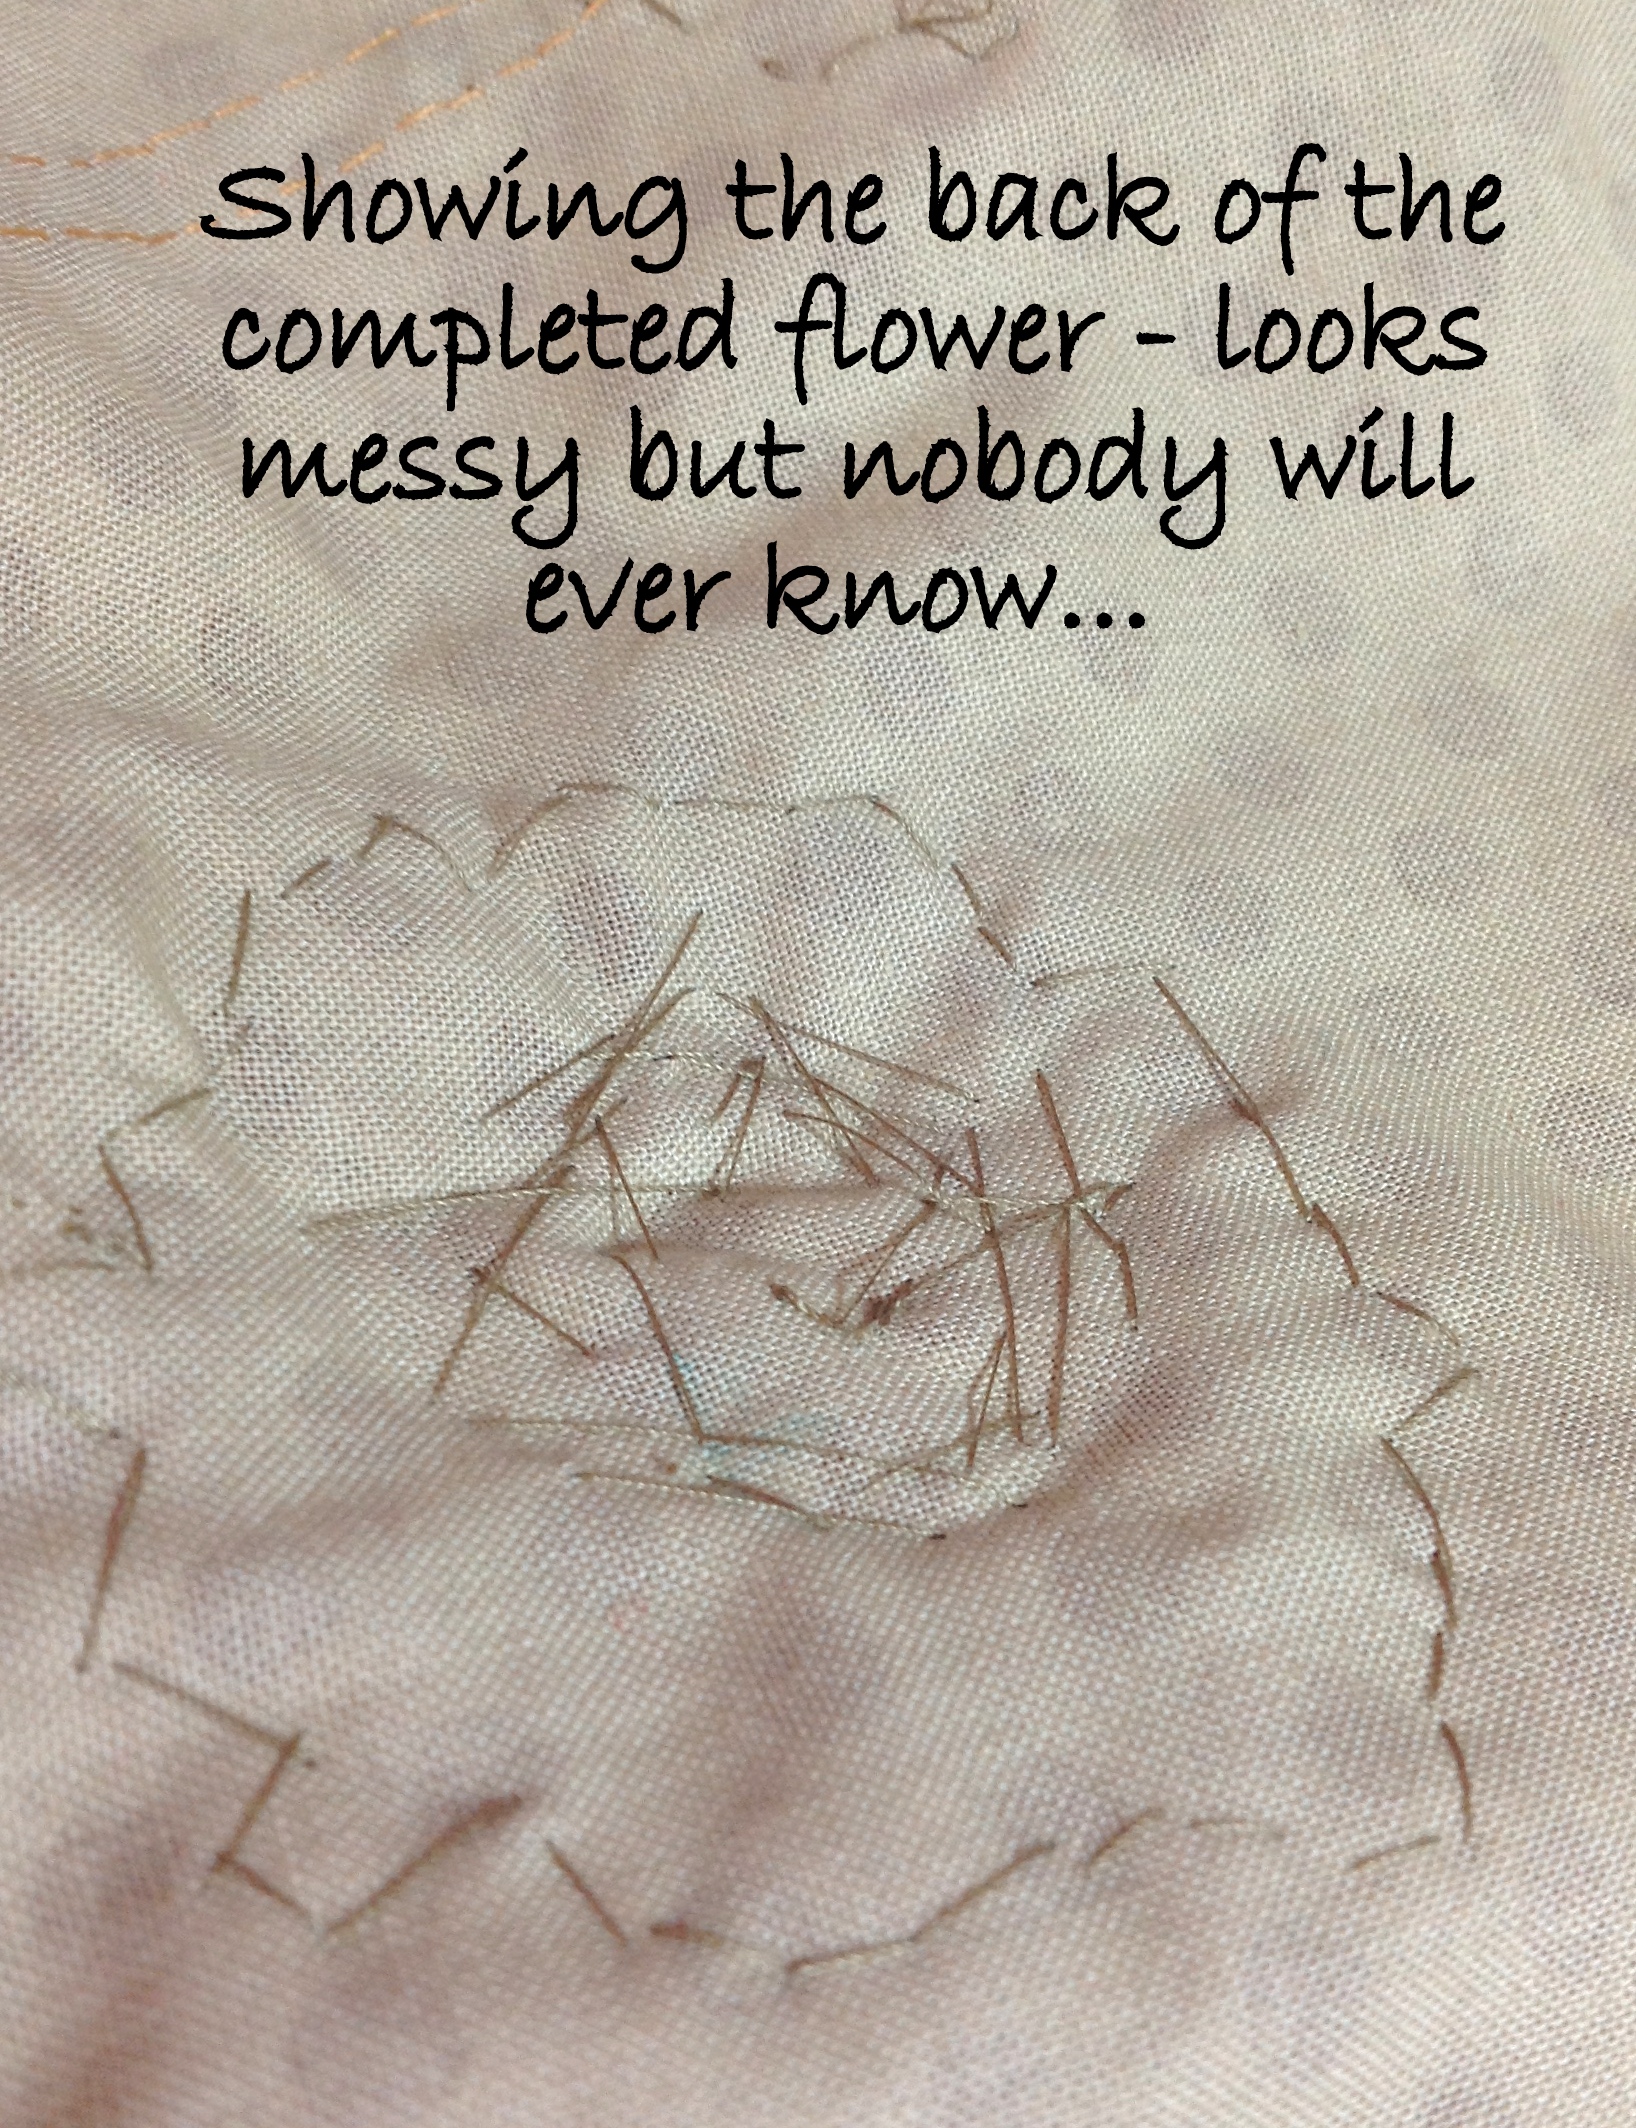
Here's a look at the back at this stage:

The more tacking you do, the more folds or dimension will be created. It's quite a fun process but requires patience #slowstitching.

The back of the completed flower:
So now you know how to get through a faux ruched flower!! WOW -- that was a big step but the payoff is great!
Now cycle through the remaining stems and flowers. Use the placement diagram above and attach one or two stems and flowers at a time -- until you've completed all 13!

Take your time and enjoy the process -- it's got to be something you find relaxing, else it's no fun!!

Once all your stems are placed, be sure and stitch the top of the vase closed.
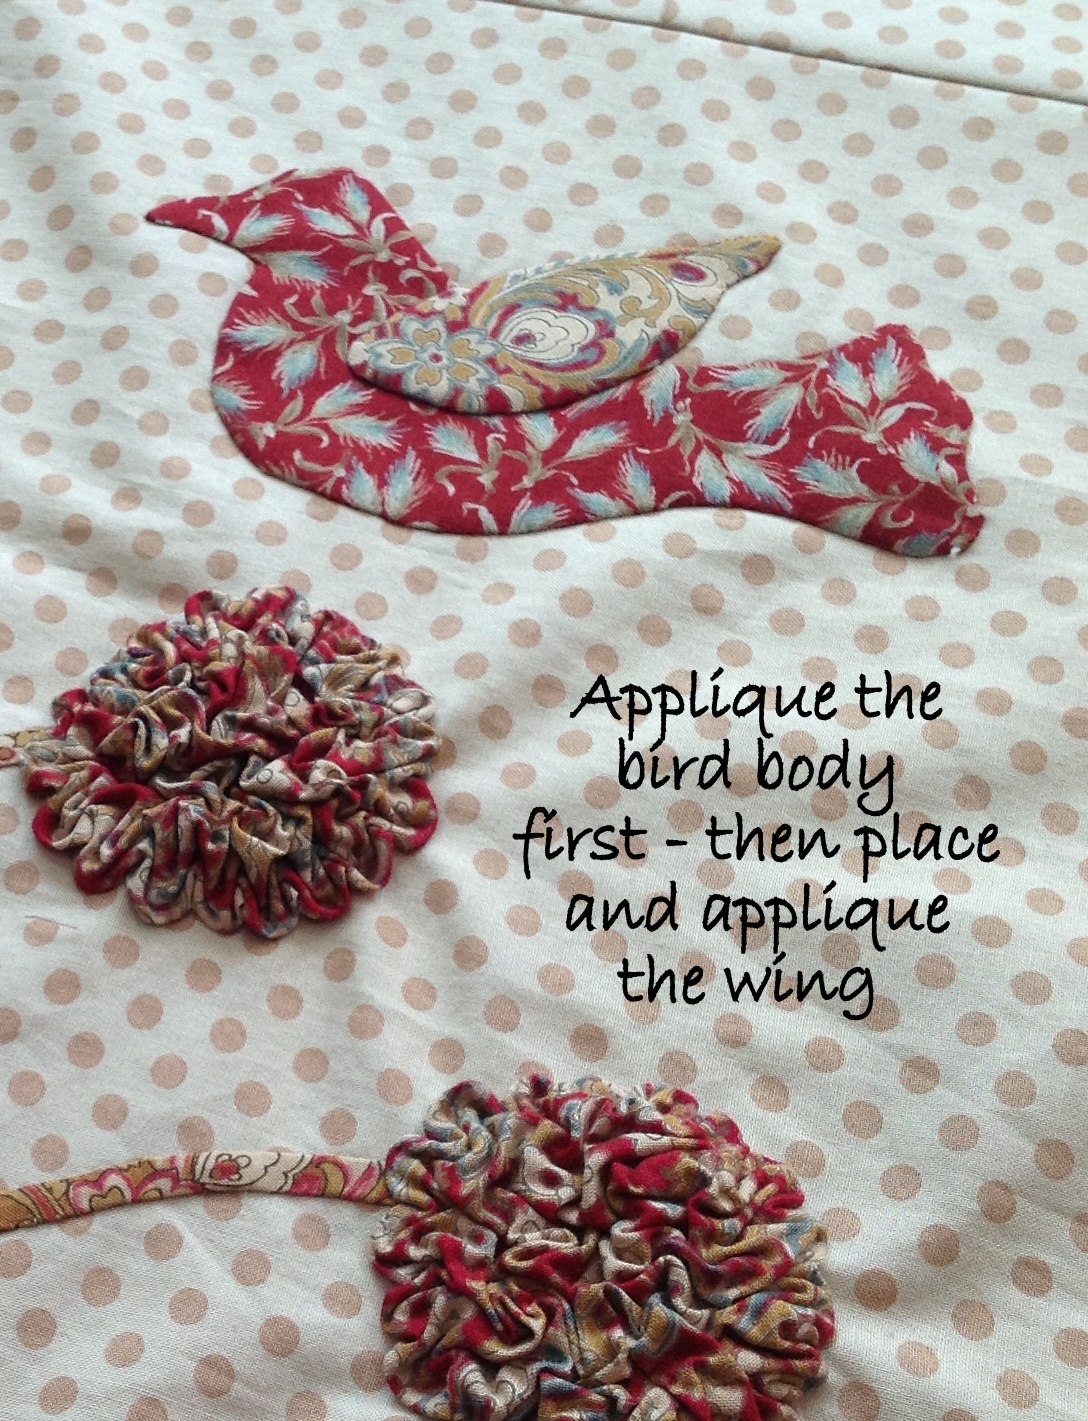
Next up - use the placement diagram (above) to position and applique the bird body and wing (using the applique method of your choice). The image below shows the pieces prepared for Needle Turn Applique.

Applique the bird body first, then layer and applique the bird wing.
Woohoo!
Now lets square-up the applique background to 24.5" square. This may be a little tricky because the applique stitching tends to gather the fabric. First, press the block from the backside while it is resting on a fluffy bath towel. The towel will keep the applique from being pressed flat while allowing you to get the background fabric prepared to be squared. Do the best you can.
Now you're ready to sew your sections together. First sew the A seam (Section 2 to the Applique Block), then the B seam (Section 3 to the Applique Block). Seam C is next, attaching the bottom rows to the piece you just created. Lastly, attach the top (Section 1) to the rest of the quilt (Seam D).
This diagram shows the sewing order next to the seams to be sewn:

Yippee -- the quilt top is prepared!! This calls for a happy dance!!
Prepare for Quilting:
You'll need to piece a 65" square backing and gather your batting to prepare for quilting. The sample was layered with 100% Wool batting and pin-basted.

The quilting was done free motion on my home sewing machine using Aurifil 50Wt Mako Cotton (my favorite thread for machine quilting) and experimenting with some awesome new curved acrylic rulers.

If you're interested in learning more about the quilting process or design, be sure to hop over to my blog and follow along. I plan to share more images and a few insights into the quilting details over the next few weeks.

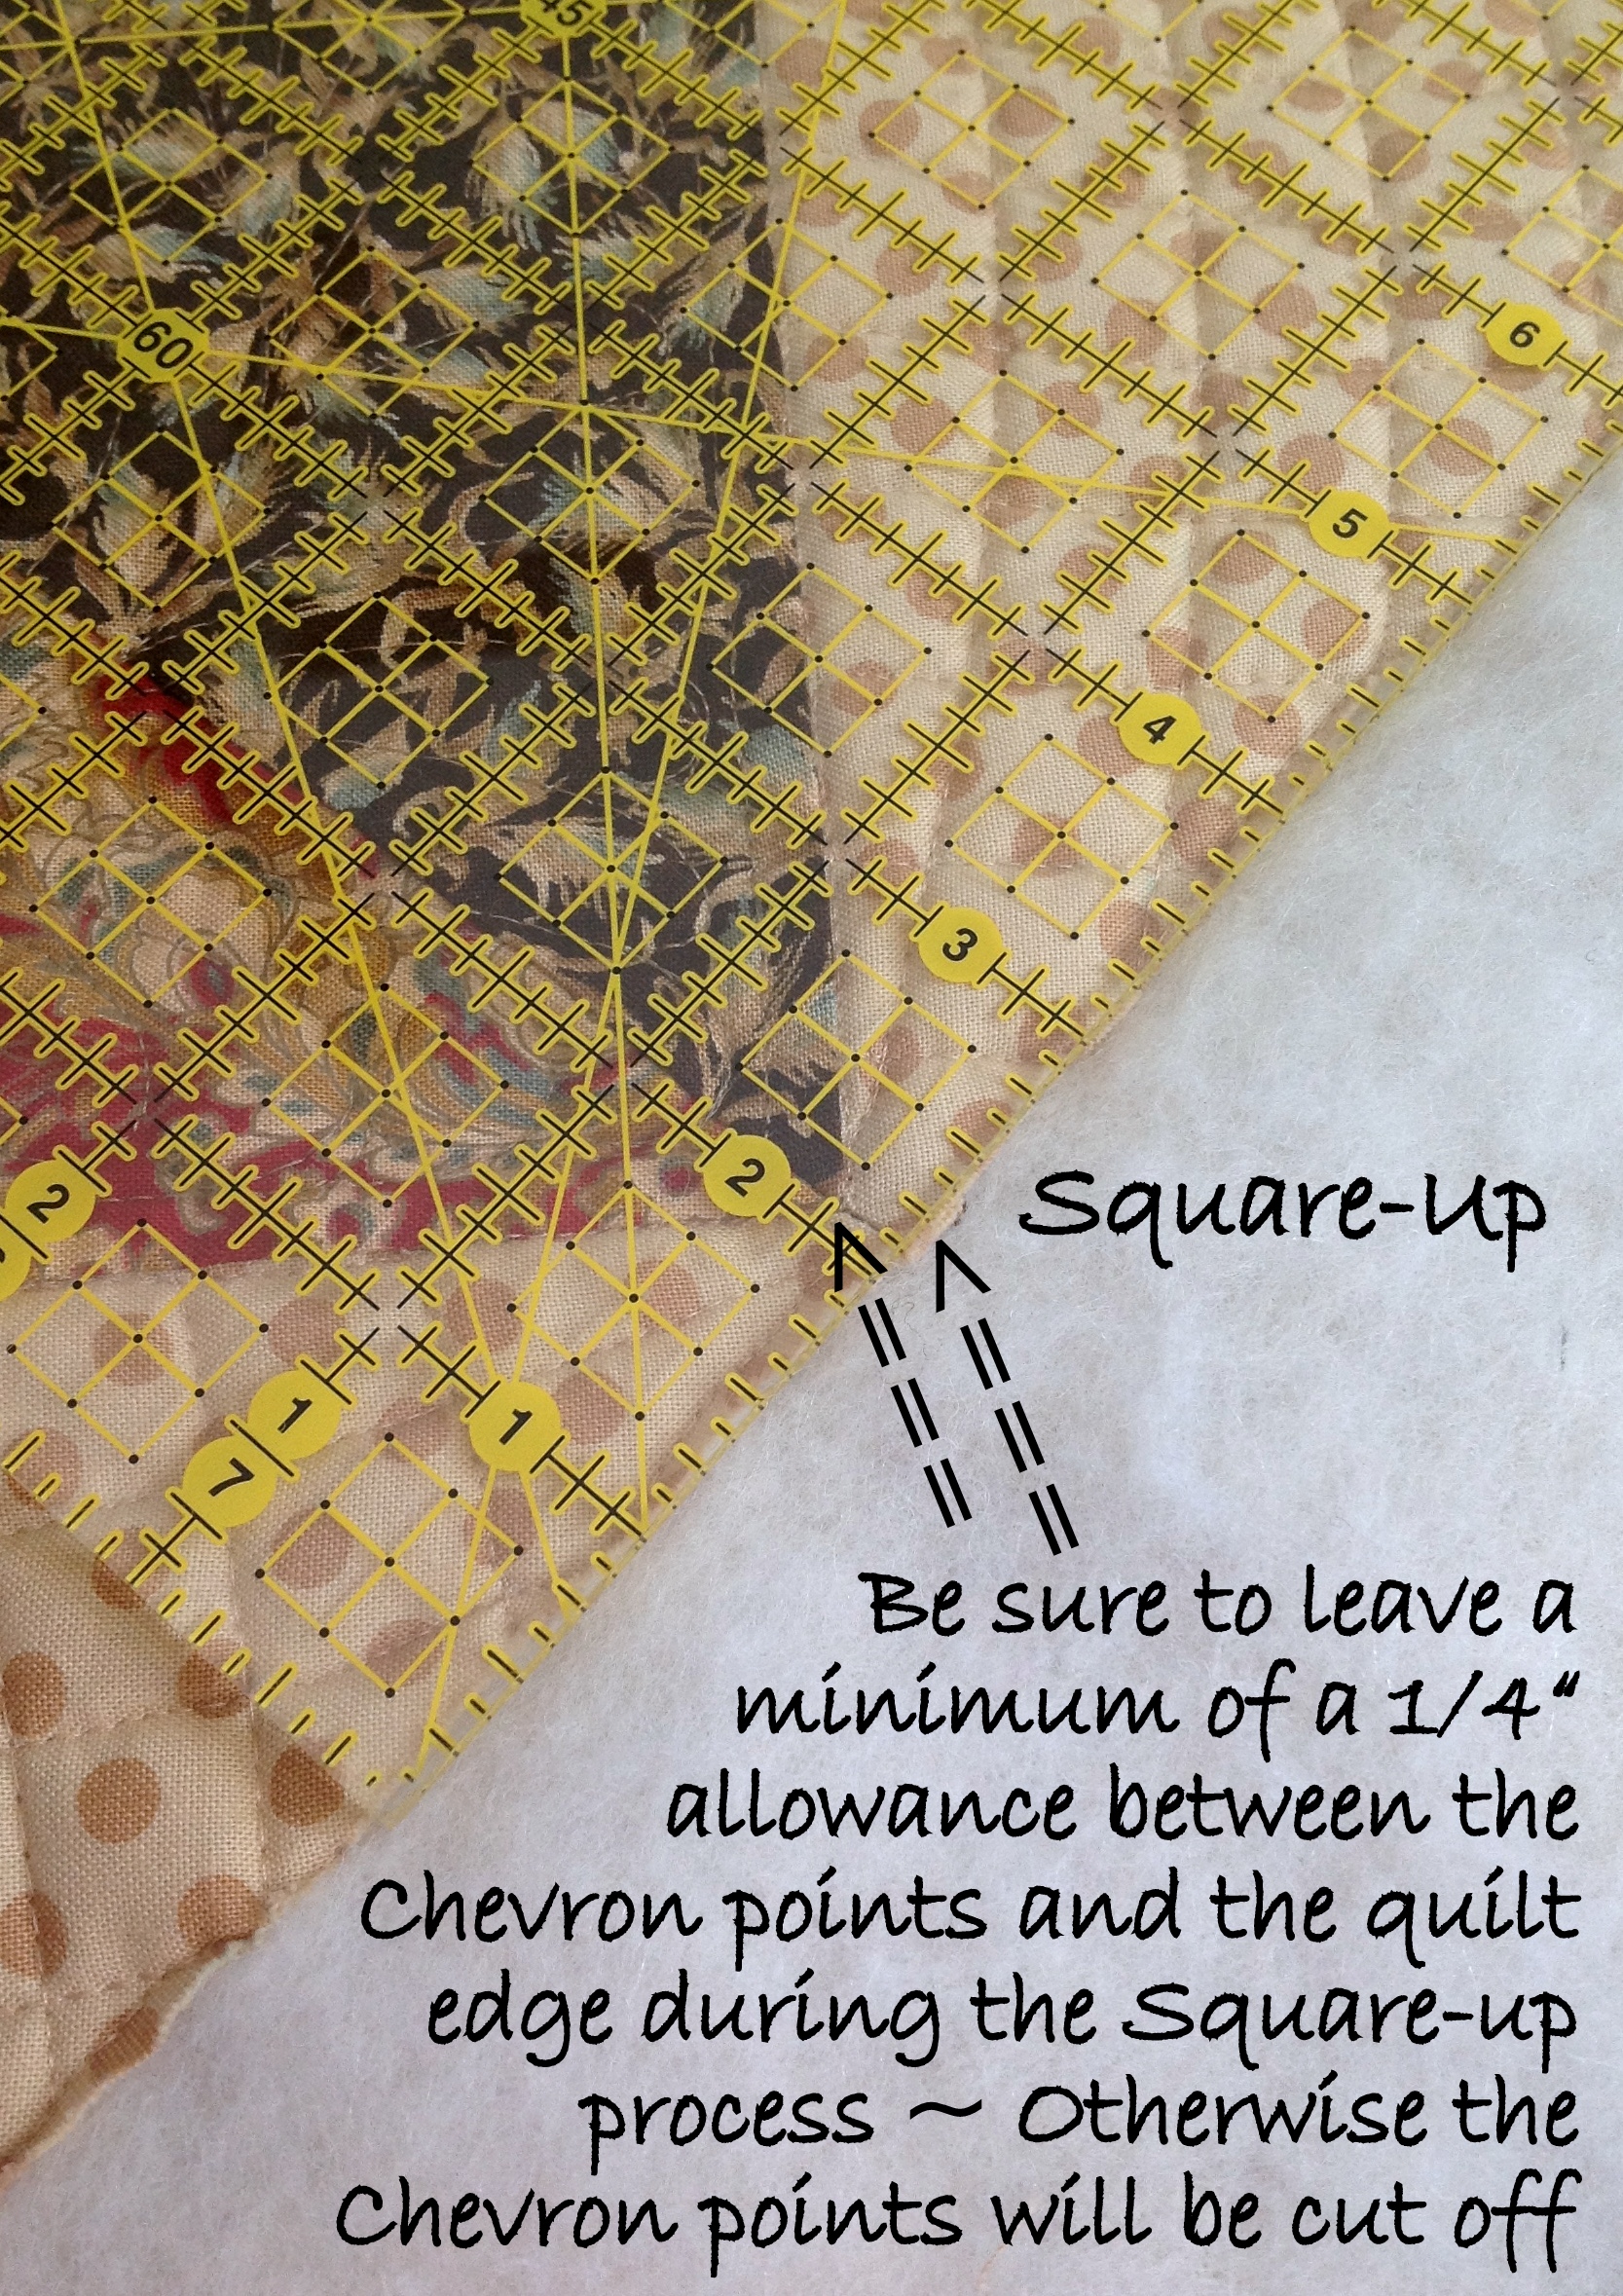
Squaring-Up:
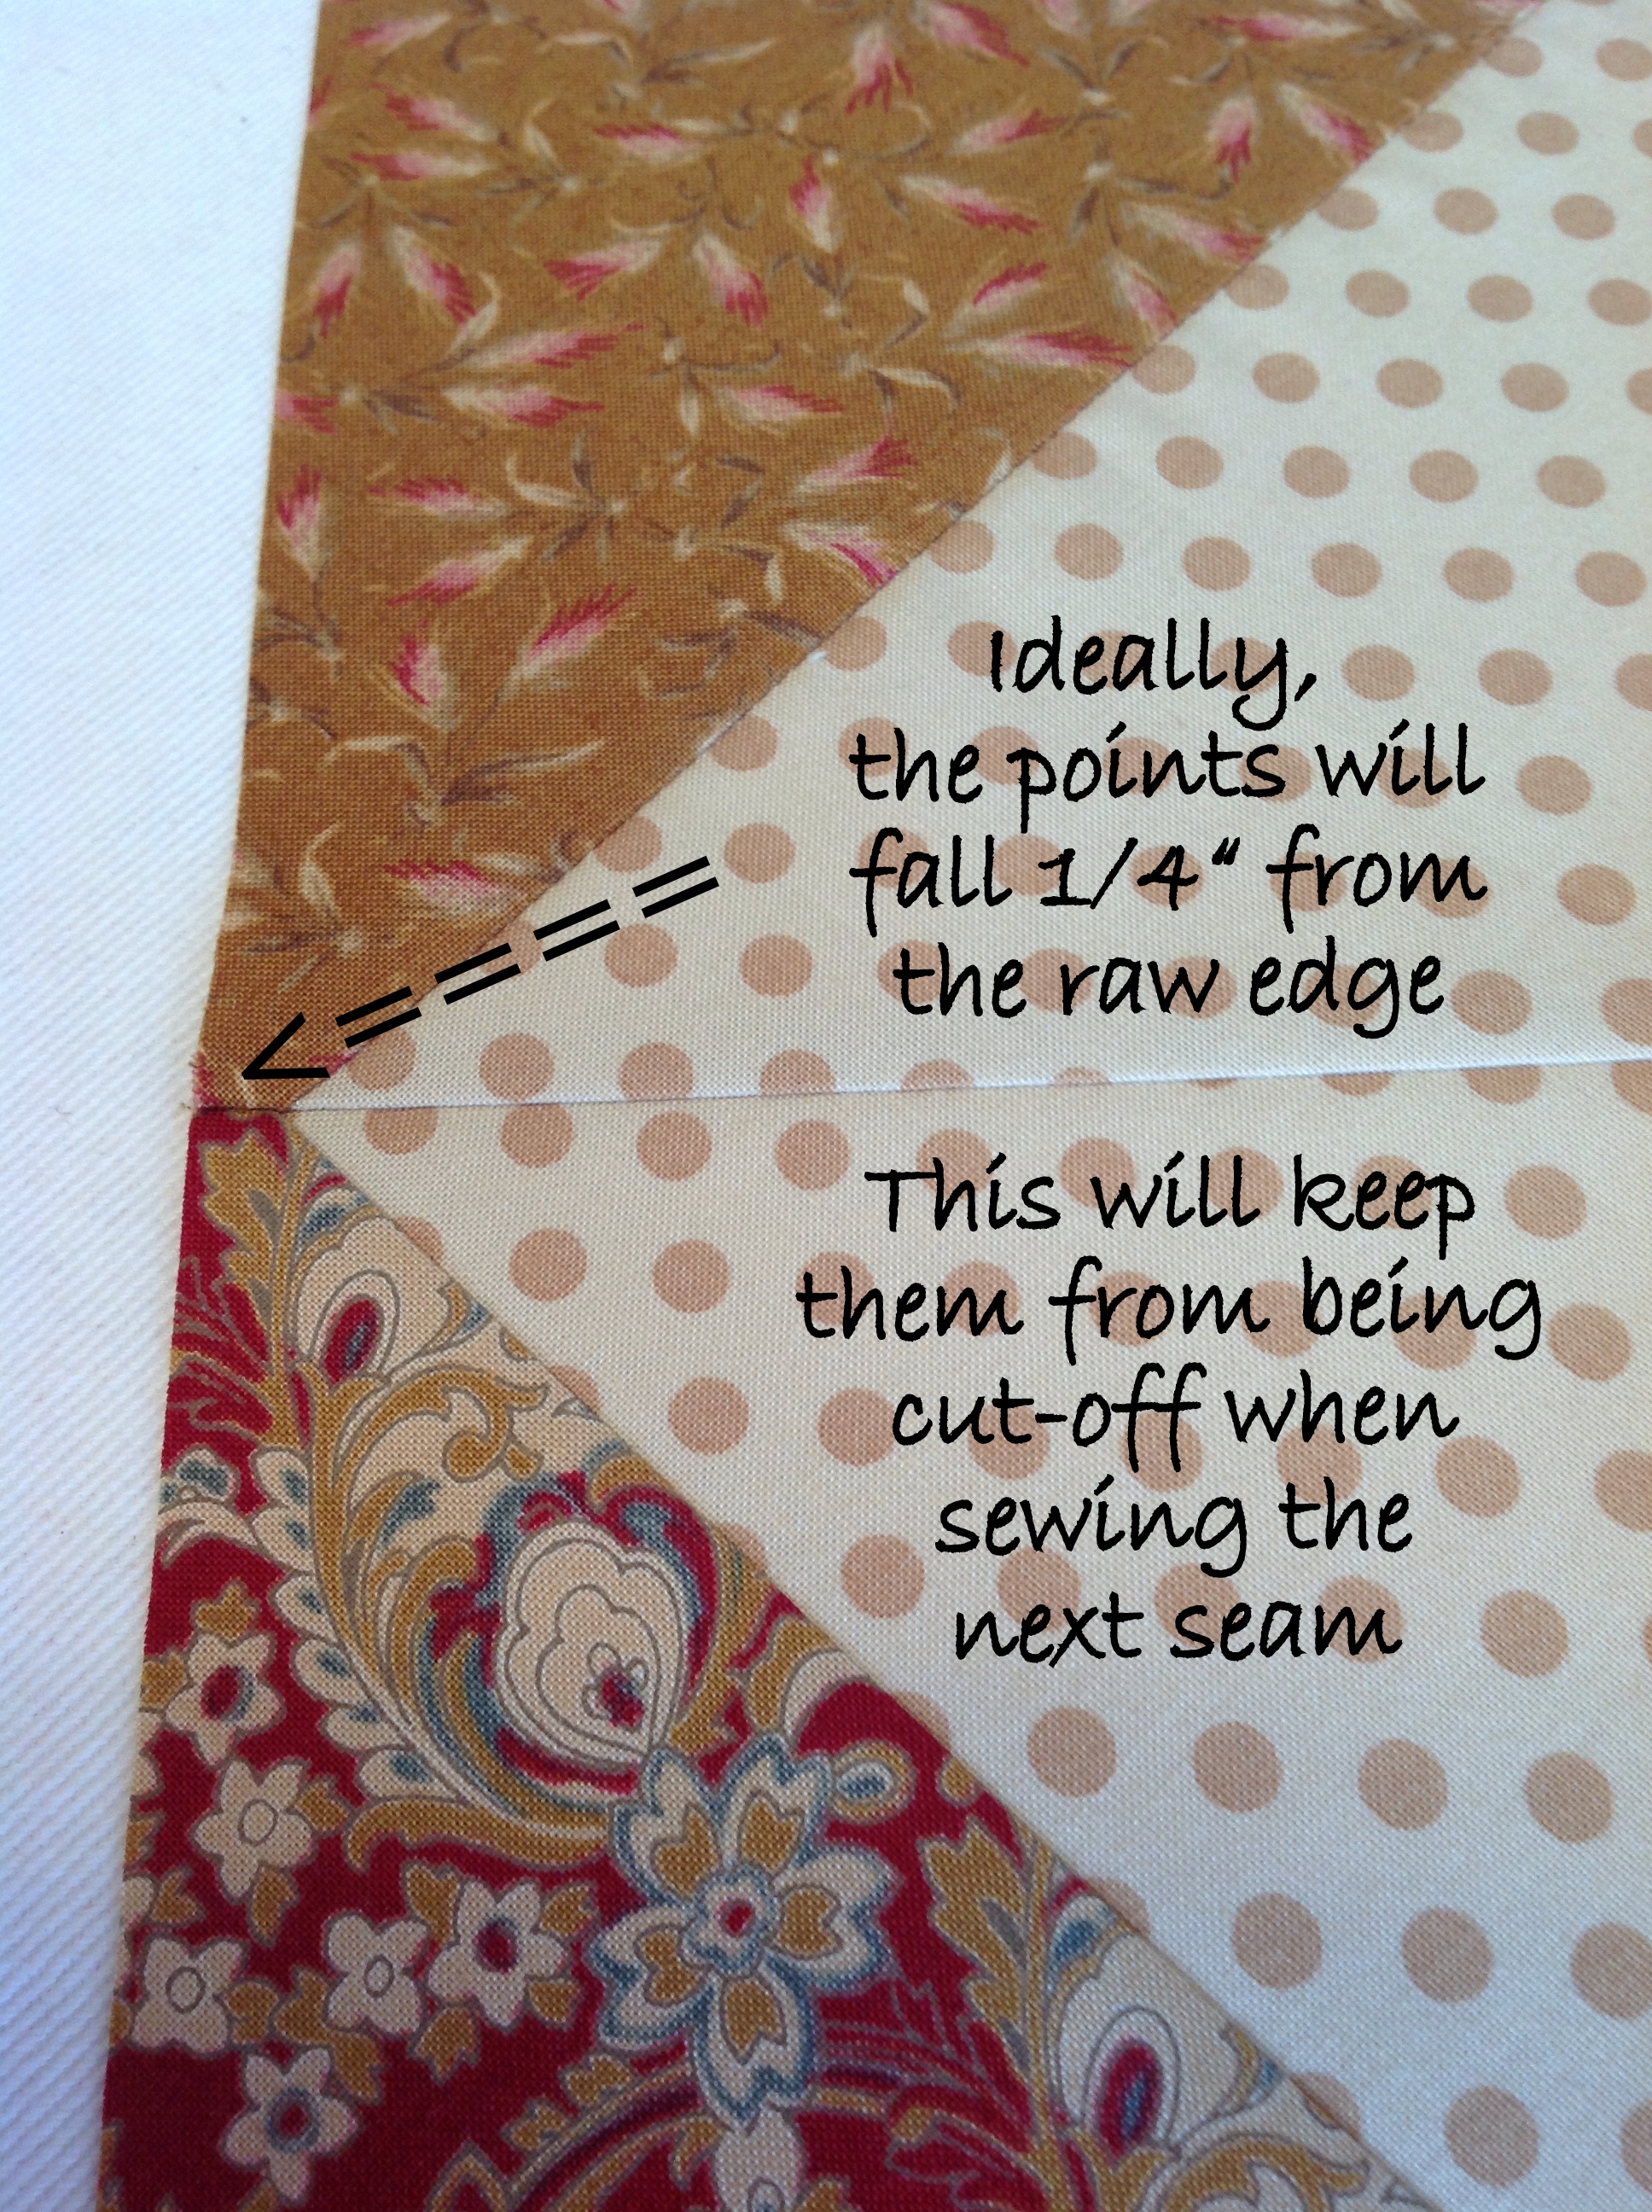
After the quilting is completed you'll need to square-up the quilt. The quilting shrunk the quilt a little - -it squared up at 58-1/2" wide and tall. When you are squaring up - take into consideration your points, and be sure to leave at least a 1/4" of fabric outside of the points - it will be covered with the binding.
Once you've finished squaring up, prepare 6 width of fabric lengths of 2-1/4" wide binding strips. If you need a binding refresher, refer to this Moda Bake Shop Basics Binding tutorial ==> MBS Binding Basics (however, don't use a 3/8" seam as the Binding Basics tutorial suggests, it will be too wide for this quilt).
When attaching the binding, use a 1/4 seam allowance so your points are not cut off.

Once the binding is attached, sit back and admire your new quilt.

Congratulations! It was fun creating and sharing this recipe with you.
![]()
One 60" x 60" decorative quilt

Thank you so much for joining in the fun. I'd love to know if YOU plan to Twist or if you have other ideas for the techniques shared in this recipe. Any questions? Please leave a comment - I'd be happy to try to answer them.
Be sure to hop over to my blog, say hello, and stay tuned for upcoming details about free motion quilting Chevron with a Twist. See links below to follow me on Instagram and Facebook too!!
As always, thanks for your support!
Karen Miller
{karensquiltscrowscardinals.blogspot.com}
![]()
Posted in: