Welcome to Moda Fabrics!
Just Keep Swimming Quilt
Just Keep Swimming Quilt
Published:
Apr 9 2015 - 23:18
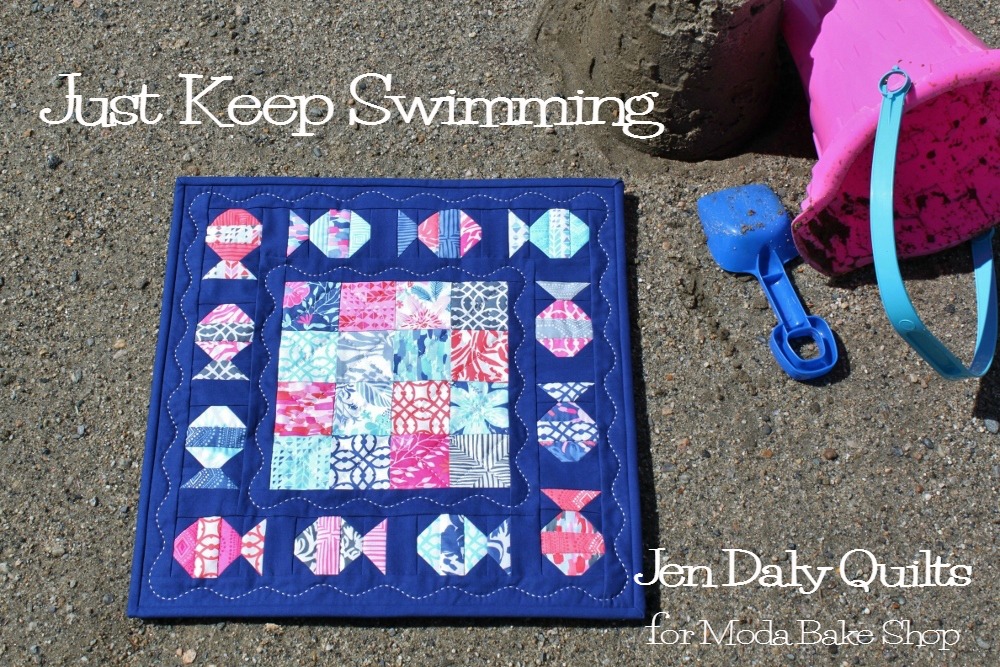

Hi there! My name is Jen Daly and I'm thrilled to be sharing my first Moda Bake Shop recipe with you today! Just Keep Swimming is a fast and fun little quilt featuring tropical fish swimming around colorful patchwork. To make Just Keep Swimming, you'll only need 1 mini charm pack (love mini charm packs!!) and a 1/2 yard of a complementary background fabric. I chose Kate Spain's gorgeous "Paradiso" for my version of Just Keep Swimming -- perfect for summer! Hang Just Keep Swimming on a wall, display it on a table, or even turn it into a pillow. Just have fun!!
![]()

- 1 Mini Charm Pack (shown in Paradiso by Kate Spain)
- 1/2 yard background/binding fabric (shown in Royal Blue Bella Solid)
- 2/3 yard backing fabric (shown in Paradiso Lagoon Blue Bonaire)
- batting measuring 20" x 20"
- white size 8 perle cotton
- light-colored marking pencil
Also Helpful:
- spray basting adhesive
- sandpaper board
![]()
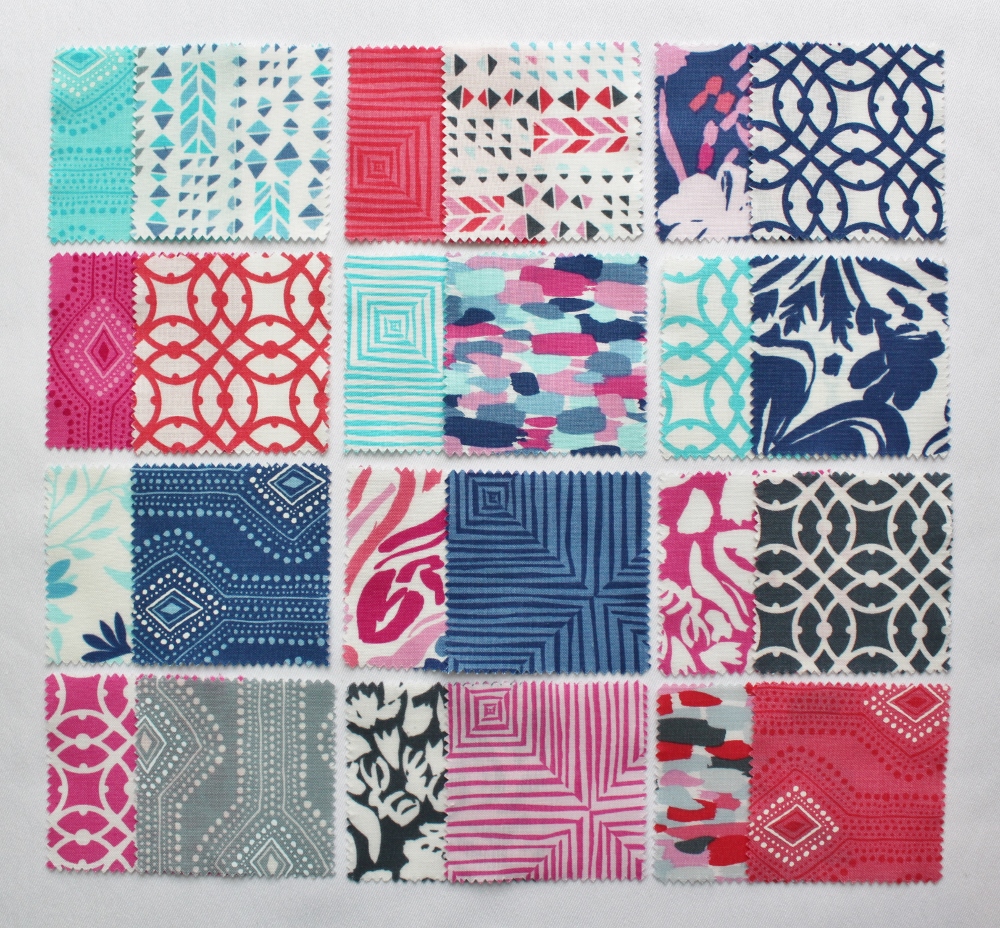
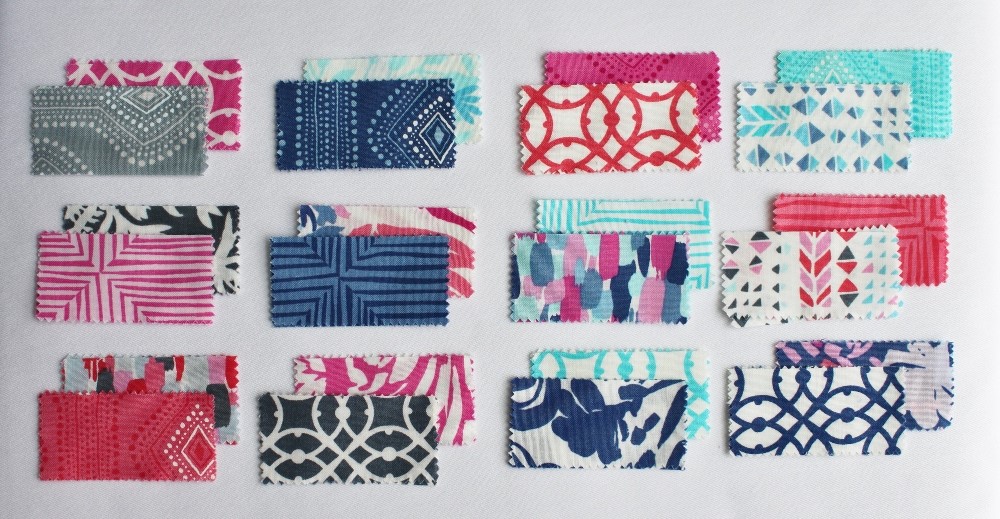
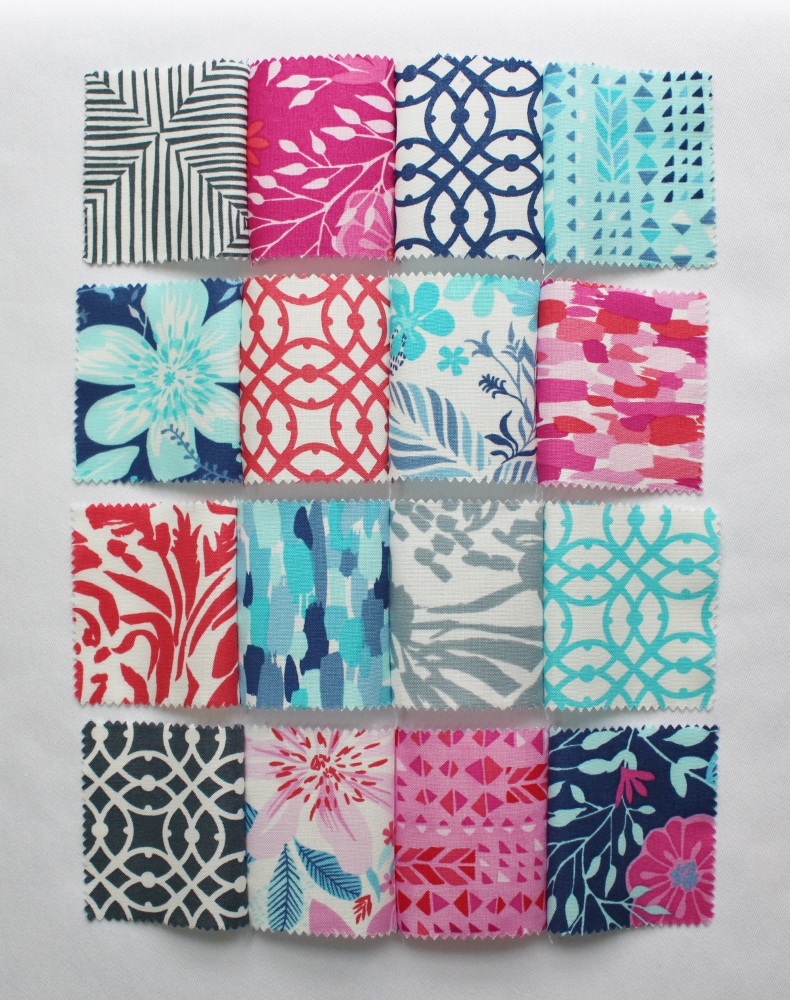
Before cutting, spend a few moments sorting your mini charm squares. You'll need to reserve 16 mini charm squares for the center of the quilt and you'll be using 24 (2 each) for the 12 fish blocks -- you'll have 2 squares left over.
Here's how I sorted mine. For the patchwork center of the quilt:

For the fish blocks:
Cutting Background Fabric:
First cut your background fabric into the following:
- 3 strips 1 1/4" x WOF (width of fabric - or one selvage edge to the other)
- 4 strips 1 1/2" x WOF
- 3 strips 2 1/4" x WOF (for binding - feel free to adjust the width to suit your preference)

Further cut your strips into the following:
- from the 3 - 1 1/4" x WOF strips:
- 72 - 1 1/4" x 1 1/4"
- from the 4 - 1 1/2" x WOF strips:
- from the first strip, 12 - 1 1/2" x 2 1/2"
- from the second strip, 4 - 1 1/2" x 9 1/2"
- from the remaining two strips, 4 - 1 1/2" x 15 1/2"
- reserve the 3 - 2 1/4" x WOF strips for binding

Cutting Mini Charm Squares:
Each fish block is made of 2 mini charm squares -- one for the front and the back of the fish, and one for the middle stripe and the tail. Gather 12 sets of 2 squares for each fish. Cut each mini charm square in half -- each half should measure 1 1/4" x 2 1/2".
Assemble Fish Blocks:
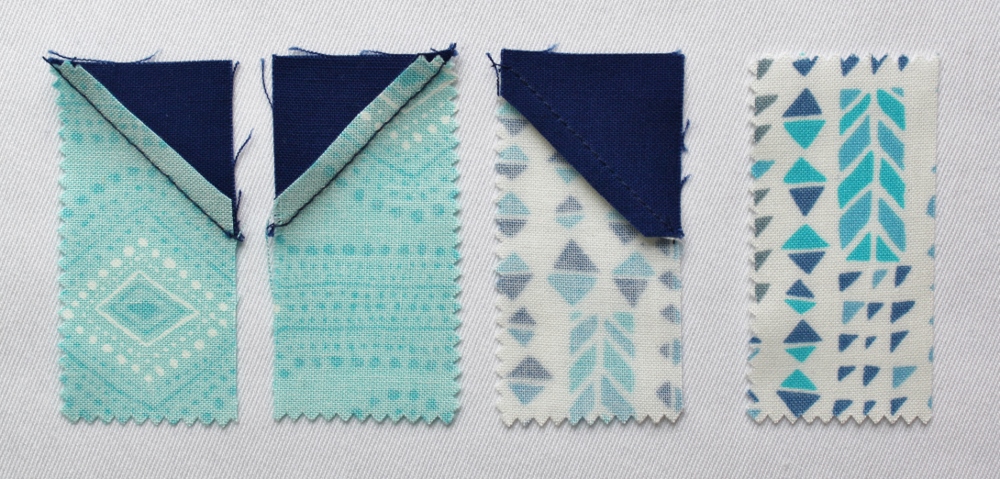
On the back of each of 72 background fabric 1 1/4" x 1 1/4" squares and using a light marking pencil, draw a diagonal line from corner to corner. Note: placing the squares on a sandpaper board before drawing the lines helps to keep the fabric from shifting or distorting as you draw the lines.

For each fish:
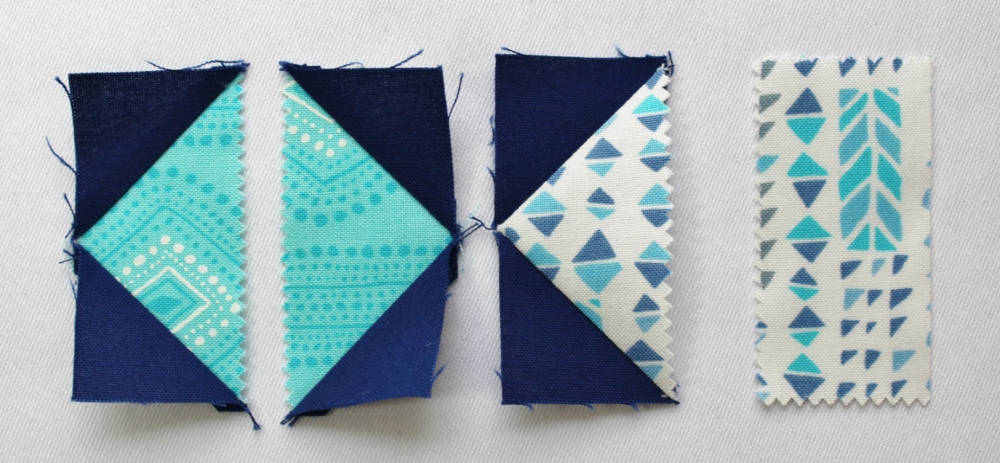
Place fish front, back, and tail mini charm 1 1/4" x 2 1/2" rectangles on flat surface with right sides up (reserve the fish stripe 1 1/4" x 2 1/2" rectangle for later use). Place 1 background fabric 1 1/4" x 1 1/4" on each rectangle with drawn line visible as follows:

Stitch along drawn lines. Press towards the background fabric for the front and back of fish and towards the print for the fish tail:

Trim excess fabric a scant 1/4" from seams:
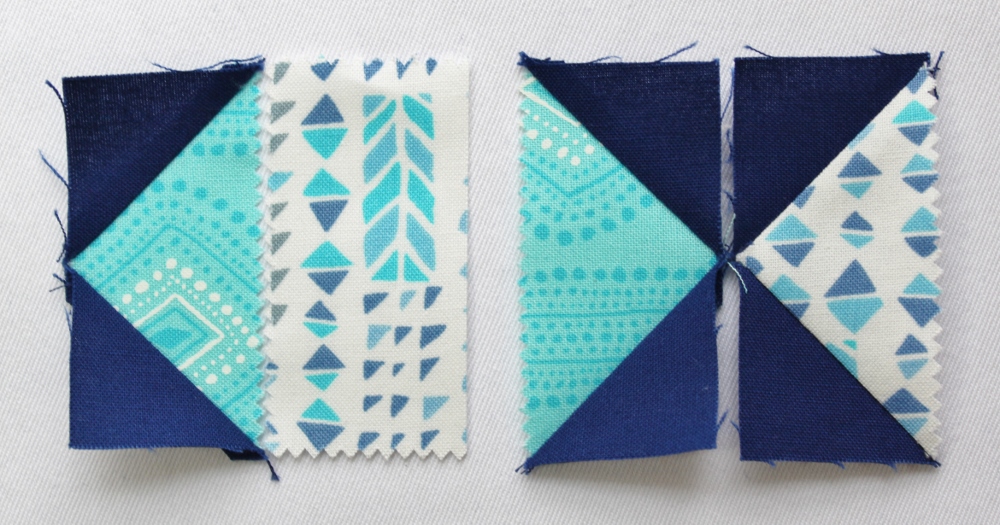
Place 1 background fabric 1 1/4" x 1 1/4" on fish front, back, and tail units with drawn lines visible as follows:

Stitch along drawn lines. Press towards the background fabric for the front and back of fish and towards the print for the fish tail:
Trim excess fabric a scant 1/4" from seams:

Lay out fish front, stripe, back, and tail units as follows:
Stitch together fish front and stripe and fish back and tail:

Stitch together fish stripe and fish back to make a finished fish. Fish block should measure 2 1/2" x 3 1/2".

Repeat to make 12 fish blocks:

Assemble Quilt Center:
Lay out 16 reserved mini charm squares as desired in 4 rows of 4 each:

Stitch mini charm squares together in rows:
Stitch together rows. Finished center should measure 8 1/2" x 8 1/2":

Press seams in each row in one direction, alternating direction row by row:

Add Inner Borders:
Note: I added all borders using a partial seam method.
Place a background fabric 1 1/2" x 9 1/2" atop right edge of quilt center with right side of quilt center facing up and aligning rough edges. The top edge of both the quilt center and the inner border strip should line up, but the border strip should extend 1" beyond the quilt center:

Stitch along edge, stopping at least 2" before end of border strip. Press towards inner border:

Place a background fabric 1 1/2" x 9 1/2" atop top edge of quilt center with right side of quilt center facing up as follows:

Stitch top inner border to quilt center. Press towards inner border:

Repeat steps to add left side inner border:

Repeat steps to add bottom inner border. Note: make sure to tuck the bottom of the right side inner border out of the way before stitching -- see bottom right corner of photo:

Finish stitching the right border seam:

Here's a close-up of the bottom right corner prior to stitching:

And here's what the stitched together quilt center and inner borders should look like. At this point, the quilt should measure 10 1/2" x 10 1/2":

Assemble Fish Borders:
Referring to quilt, lay out quilt center unit, 12 fish blocks, and 12 - 1 1/2" x 2 1/2" rectangles as desired:

Each fish border will include 3 - 1 1/2" x 2 1/2" rectangles and 3 fish blocks as follows:
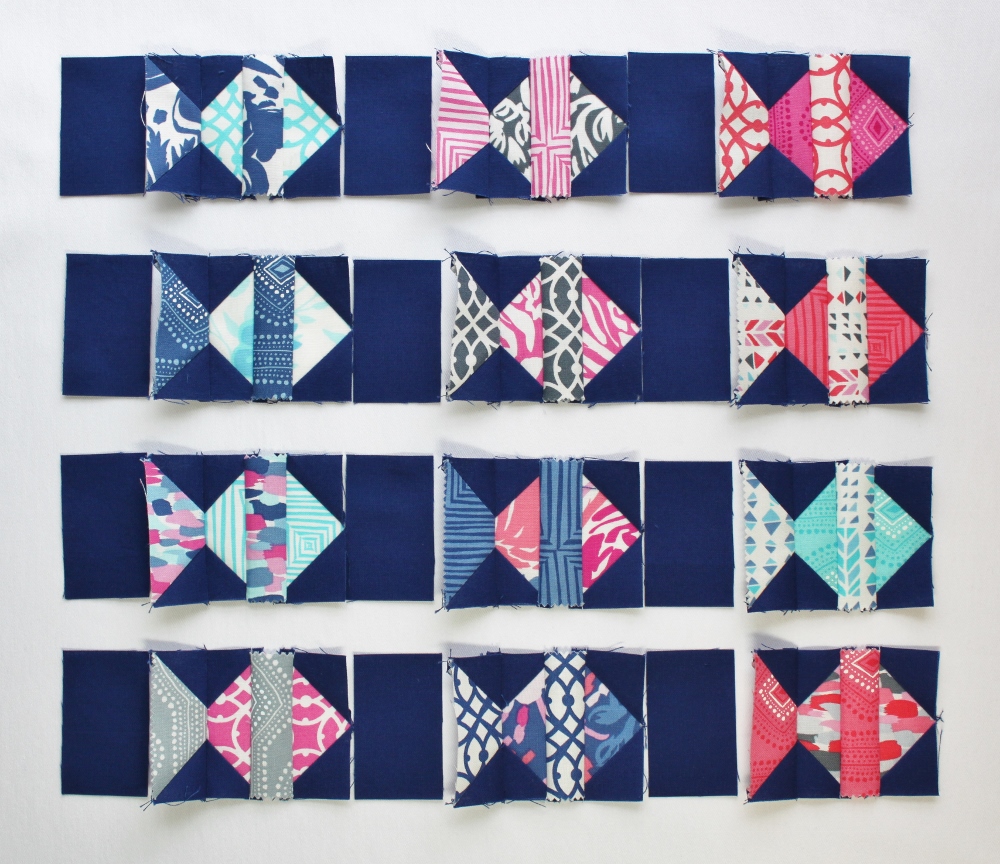
For each border, stitch together 1 1/2" x 2 1/2" rectangles and fish blocks. Press seams towards the 1 1/2" x 2 1/2" rectangles:

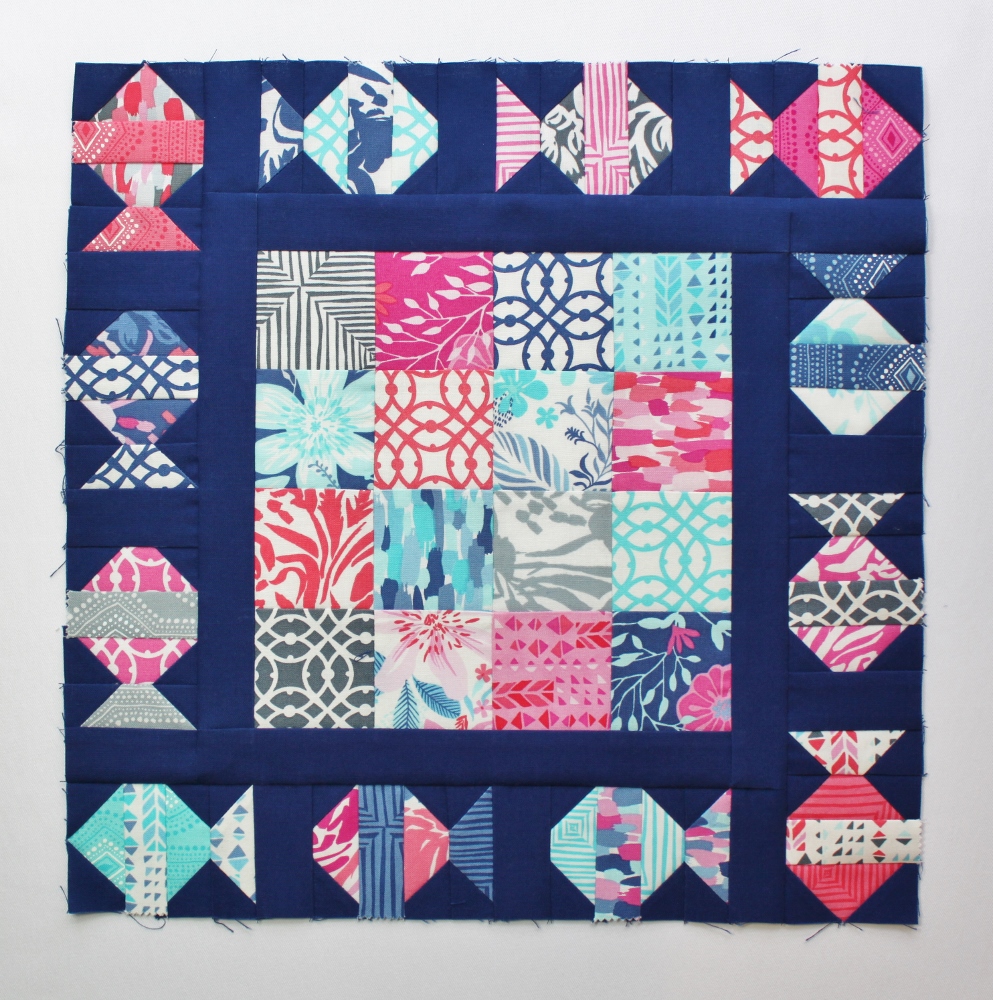
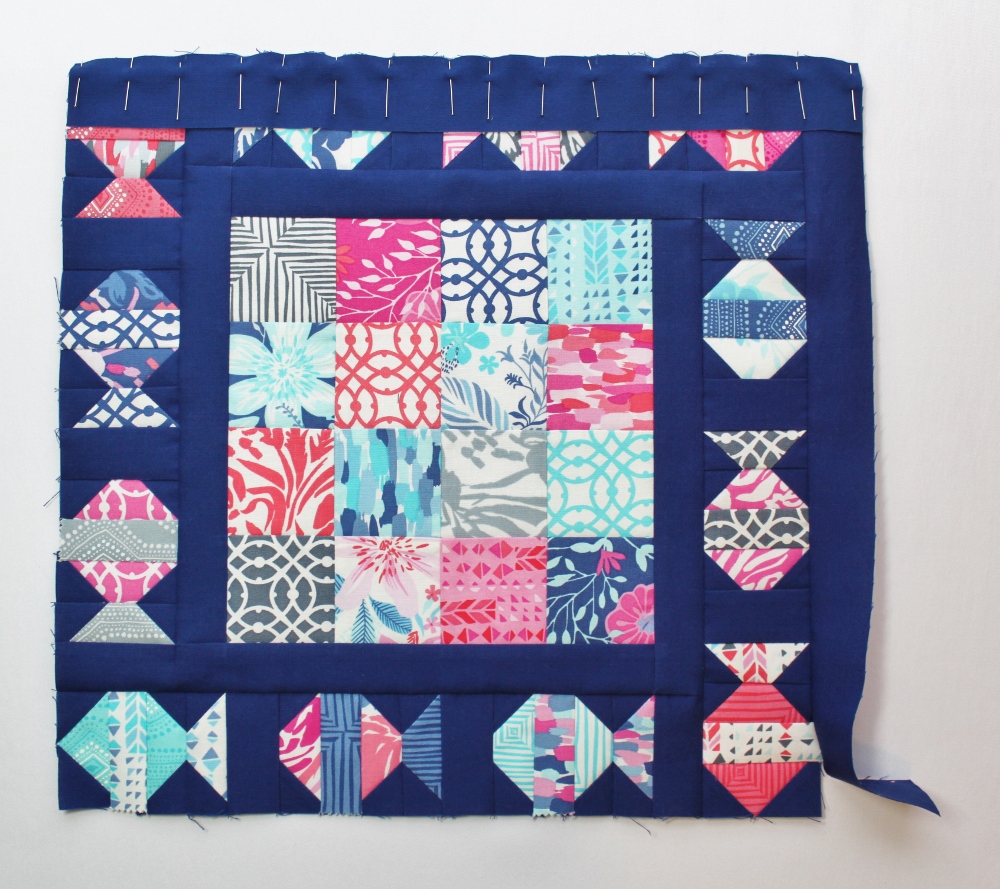
Add Fish Borders:
The fish borders are stitched to the quilt center unit using the same partial seam method demonstrated above.
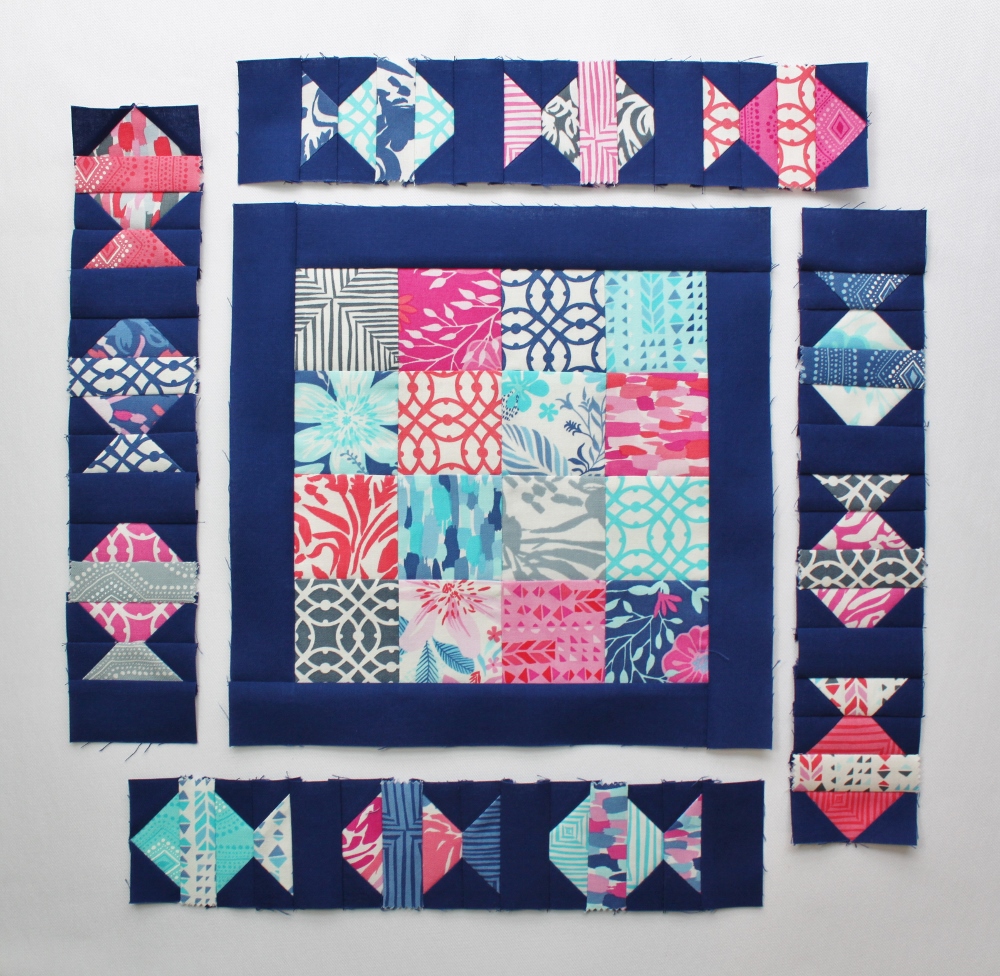
Place 1 fish border atop right edge of quilt center unit with right side of quilt center unit facing up and aligning rough edges. The fish border should extend 2" beyond the quilt center unit. Stitch, making sure to stop sewing at least 3" from the end of the fish border. Press towards inner border:

Repeat steps to add top fish border:

Repeat steps to add left fish border:
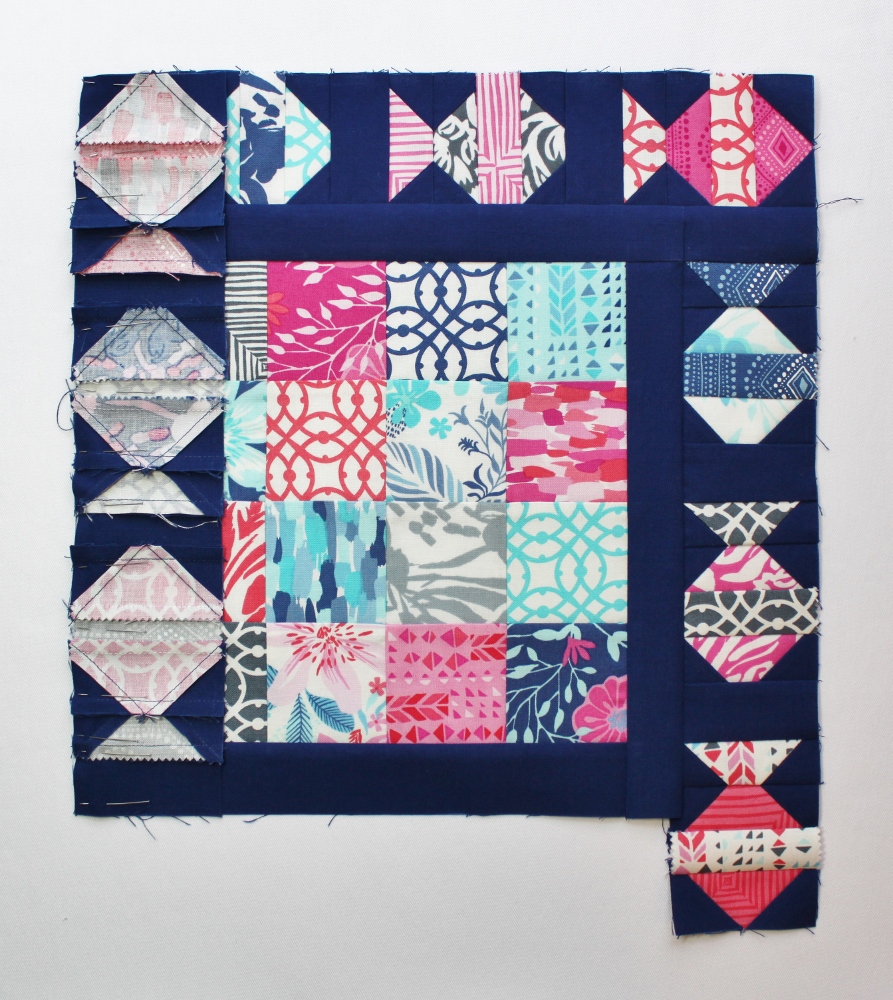
Repeat steps to add bottom fish border, again making sure to tuck the bottom of the right side fish border out of the way before stitching :

Finish right edge seam and press well. Quilt should now measure 14 1/2" x 14 1/2":
Add Outer Borders:
Using the same partial seam method, add the 4 - 1 1/2" x 15 1/2" outer borders pressing seams towards the outer borders.
Add the right side (stop stitching at least 2" from edge of border strip):
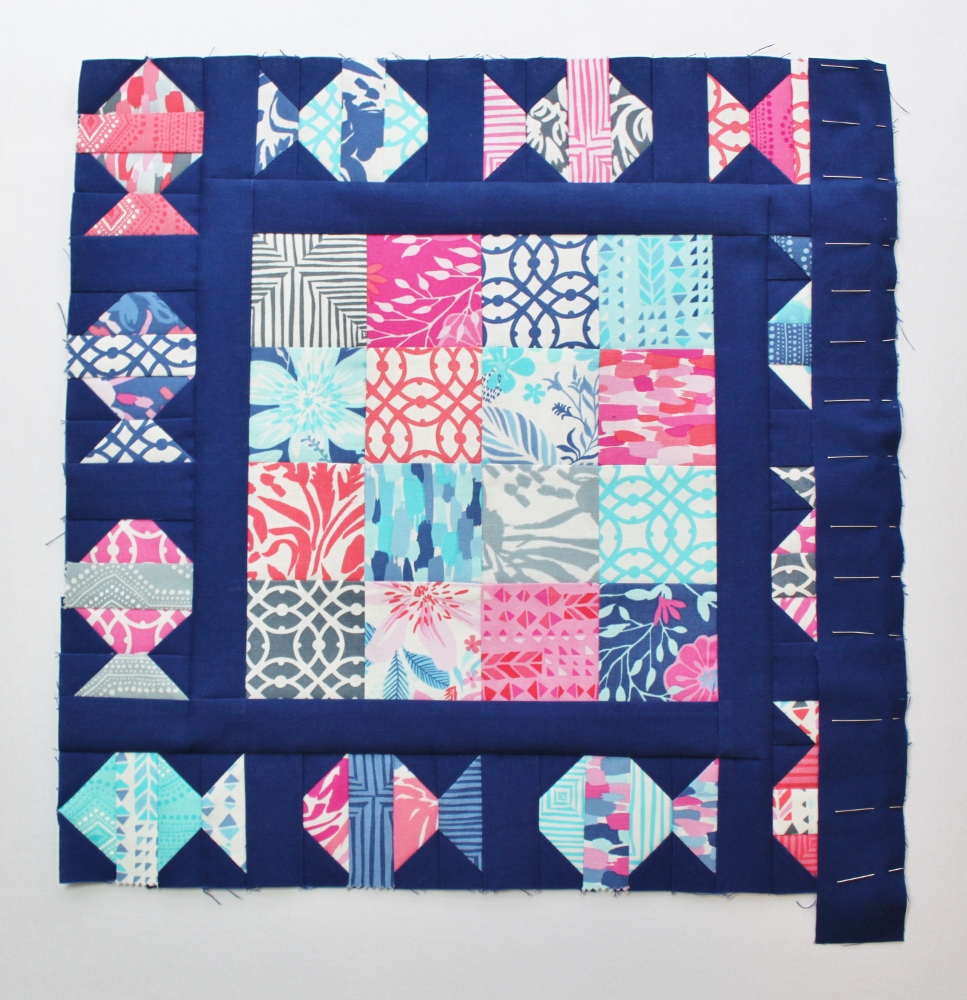
Add the top border:
Add the left border:
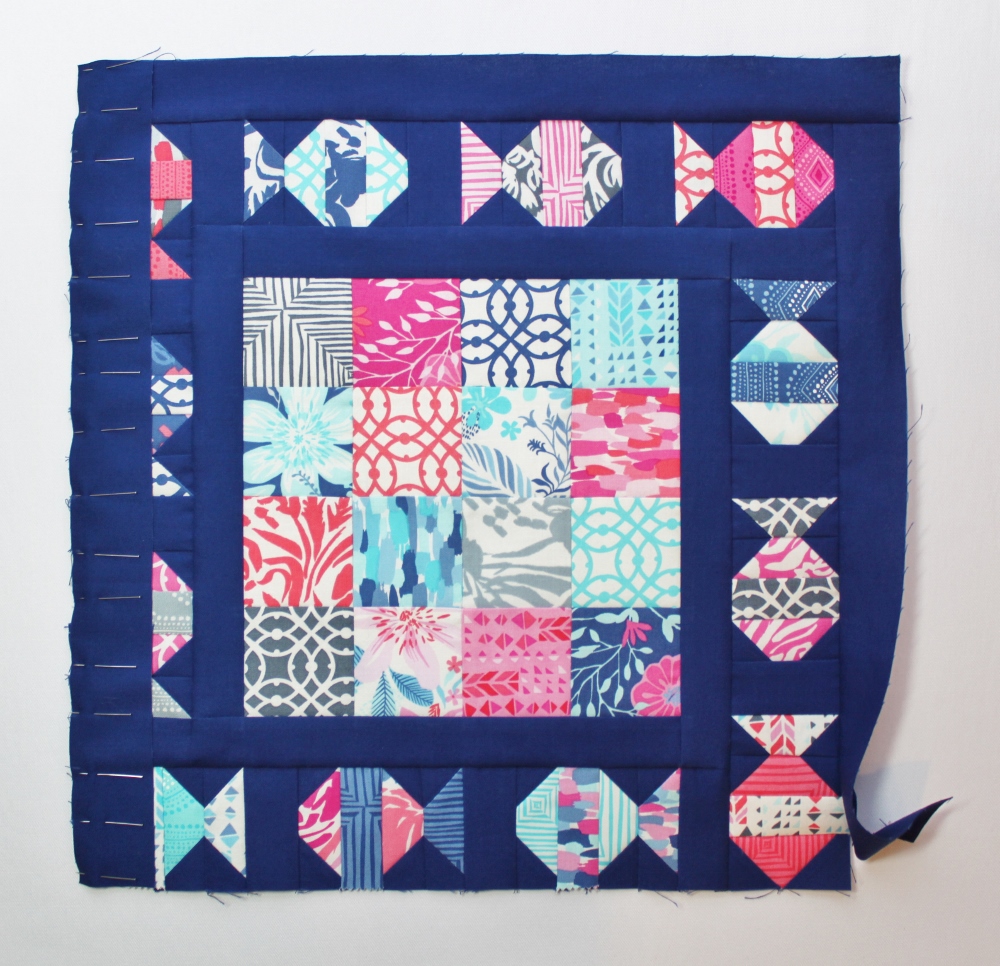
Add the bottom border:
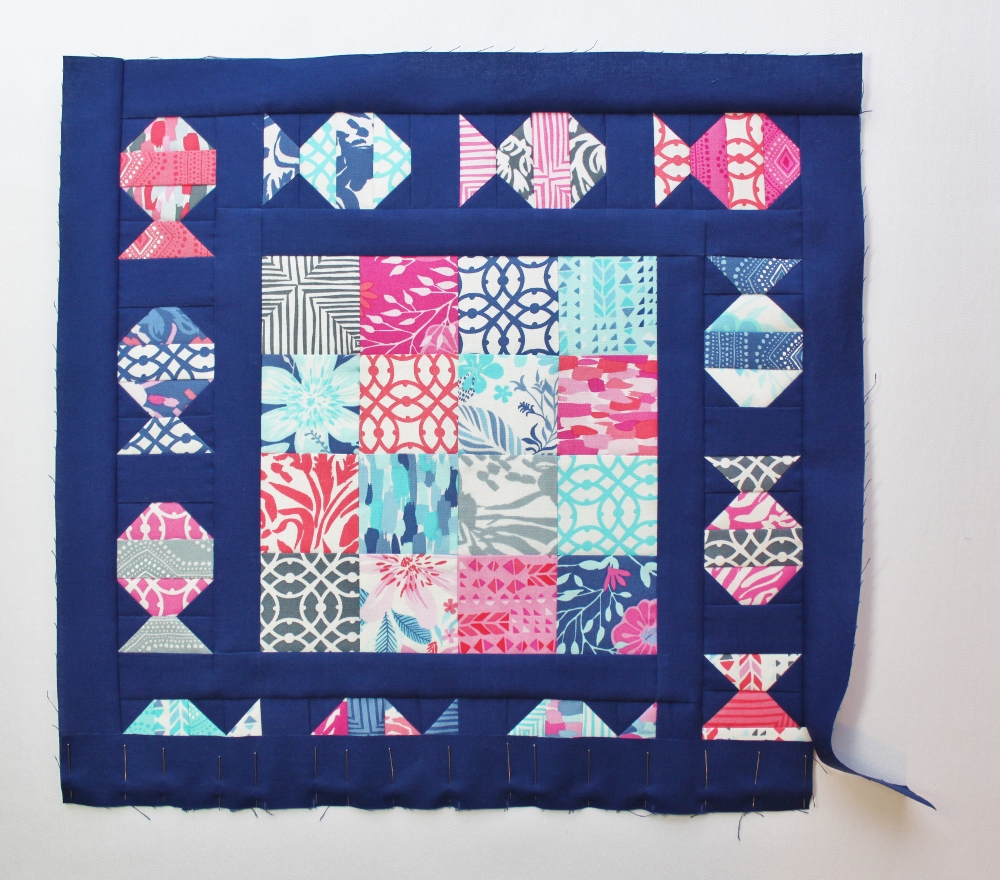
Finish stitching the right side seam. Press well. And voilà, you've finished your quilt top!

Finish Quilt:
Layer the quilt top with batting and backing. Baste and quilt as desired. Because of the small size of this quilt, I chose to baste it using spray basting adhesive between the three layers. To quilt, I used size 8 white perle cotton and a big stitch in a cross hatch pattern for the patchwork center. I also quilted on either side of each fish's stripe and finally, I quilted a wavy line in both the inner and outer borders.
![]()

This recipe yields 1 charming 16" x 16" quilt. If you'd like to make Just Keep Swimming into a pillow, consider increasing the dimensions of your outer border strips to 1 3/4" x 15 3/4." This would allow for a 1/2" outer seam allowance and would still result in a 16" x 16" finished pillow top. Good luck!
Jen Daly
{jendalyquilts.blogspot.com}
![]()
Posted in: