Welcome to Moda Fabrics!
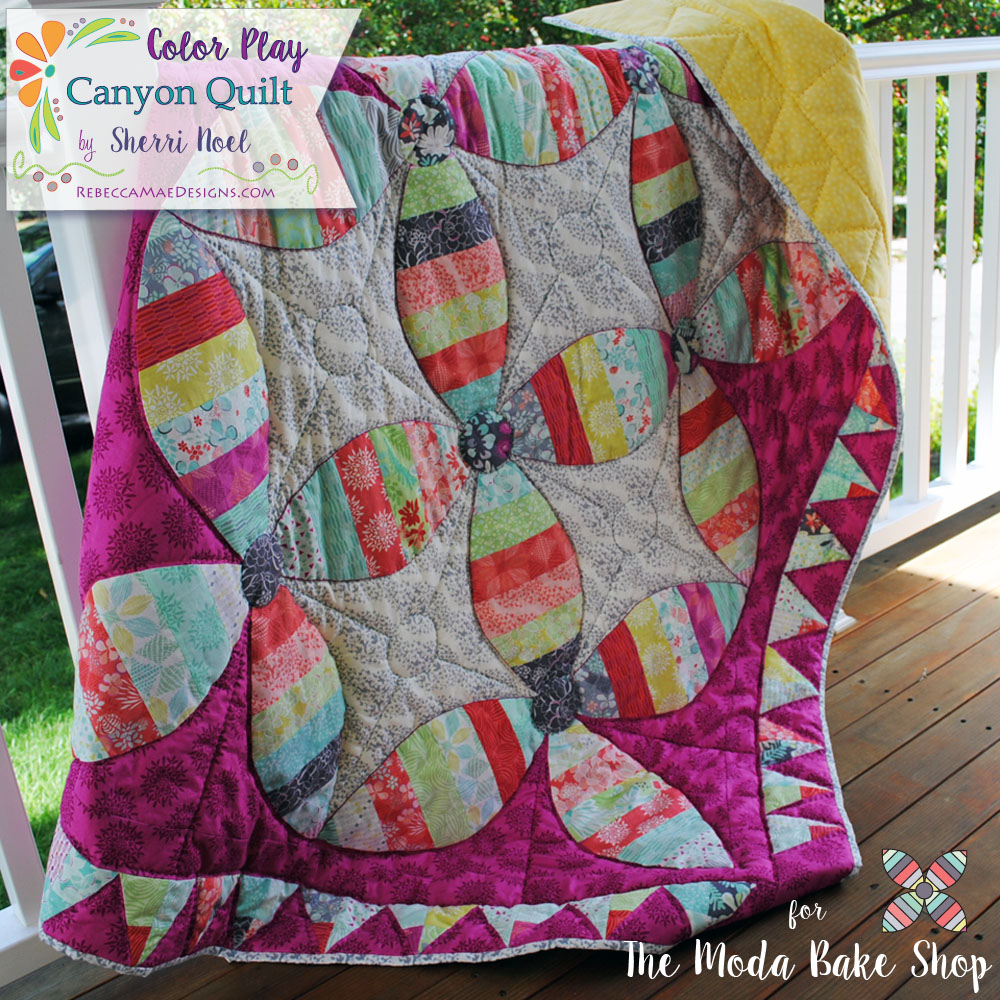
Canyon Color Play Quilt
Canyon Color Play Quilt
Published:
Sep 29 2015 - 23:00
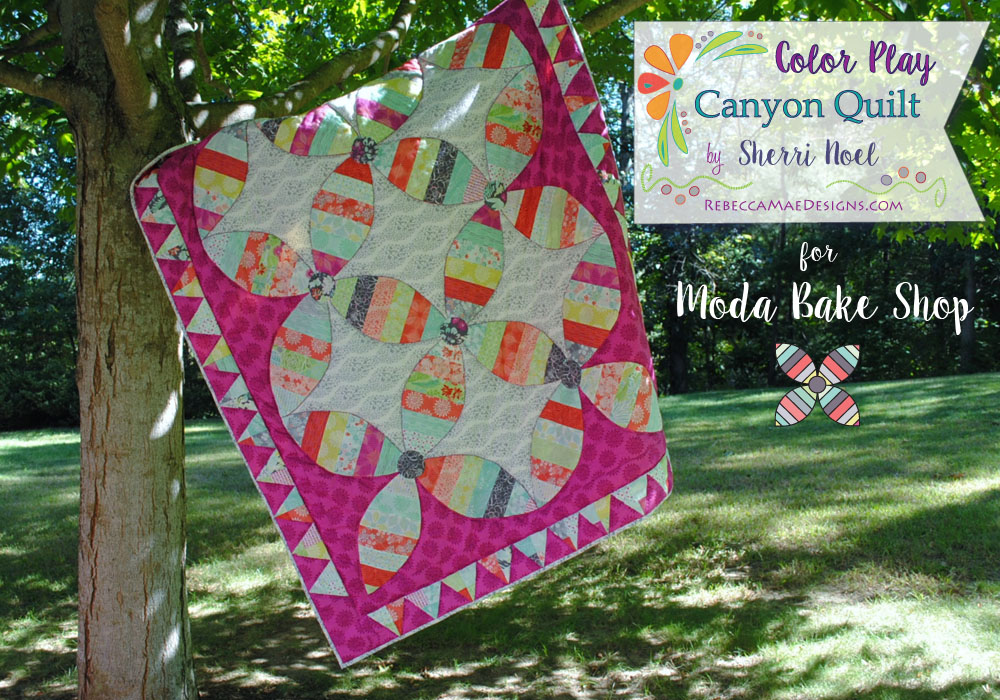

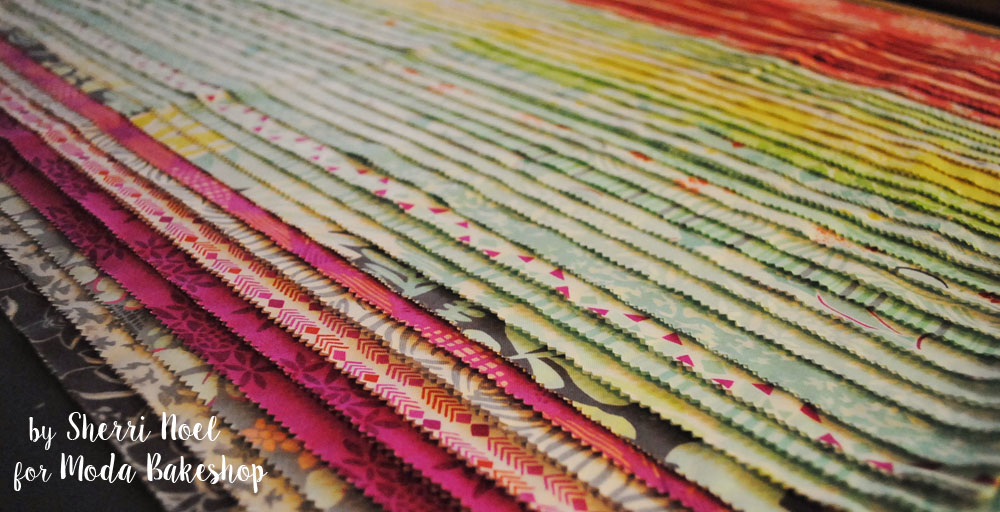
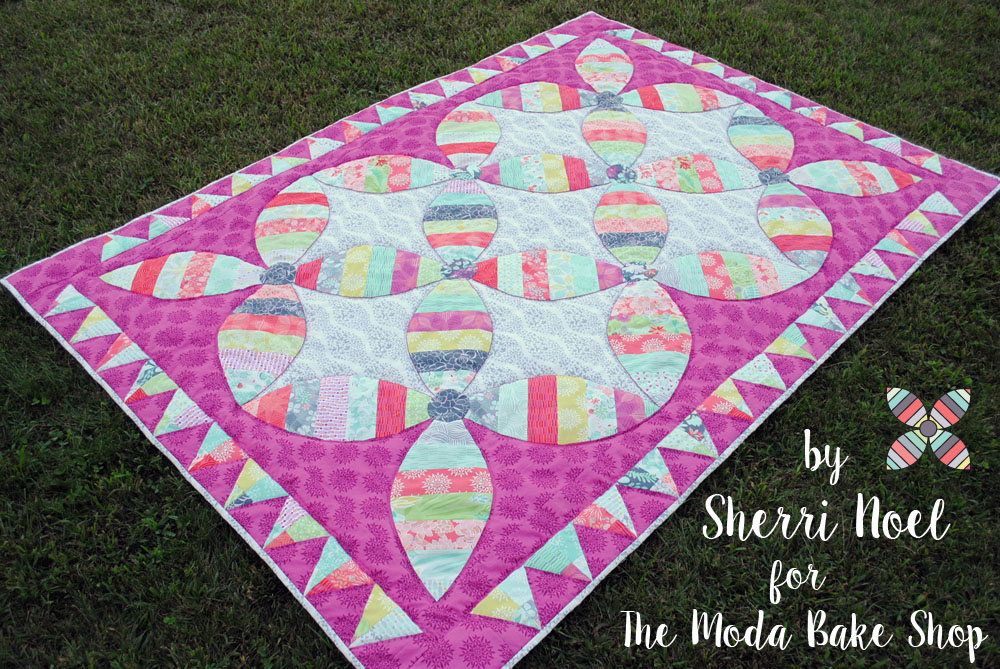
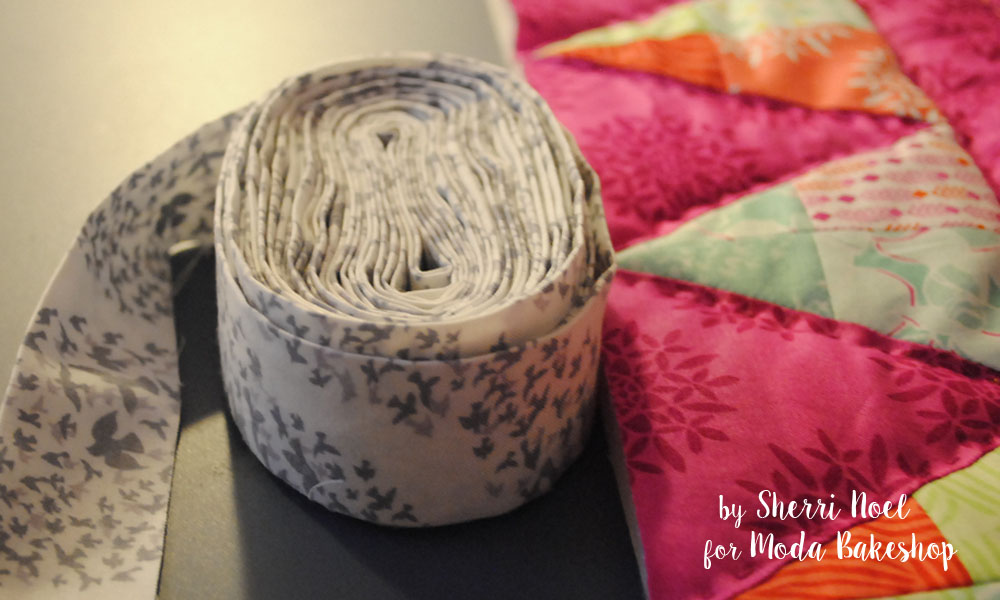
Hello, I'm Sherri Noel from RebeccaMaeDesigns and I'm so happy to be here at the Moda Bake Shop to share my Color Play ~ Canyon Quilt design. This design is a large scrappy orange peel quilt made from Kate Spain's Canyon Collection. This fabric is really delicious! I'm a huge Kate Spain fan, so I was very excited to work with her new collection, and it doesn't disappoint! The fabric is beautifully soft and the colors are so pretty. The quilt design goes together easier than you might think and involves piecing and applique. We will use one entire jelly roll... every last bit! I hope you have fun and enjoy!
This quilt finishes at 56" x 78".
![]()
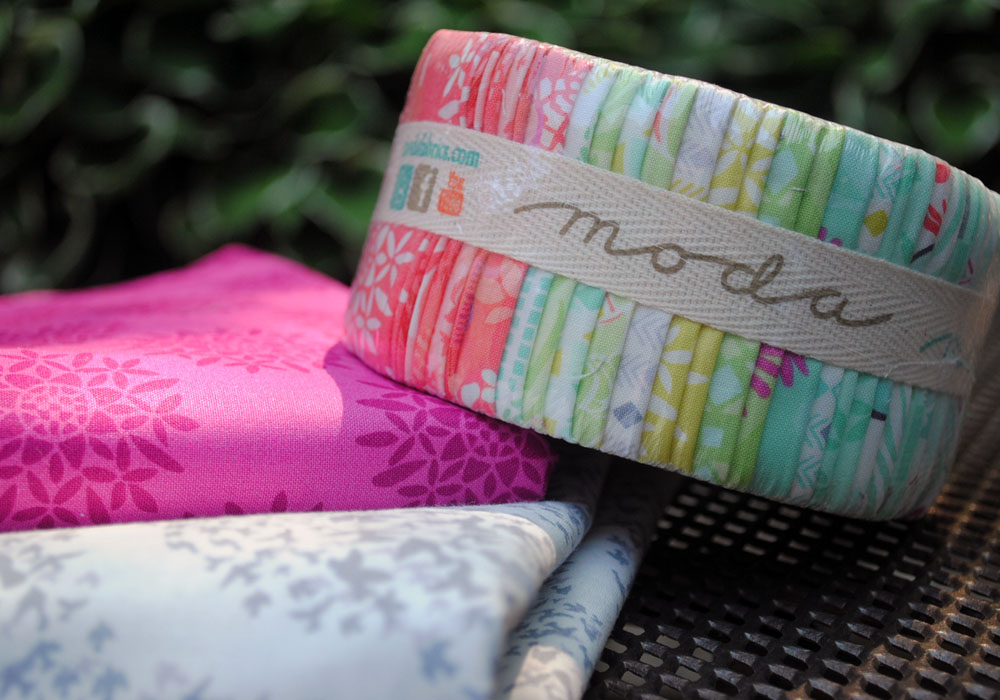
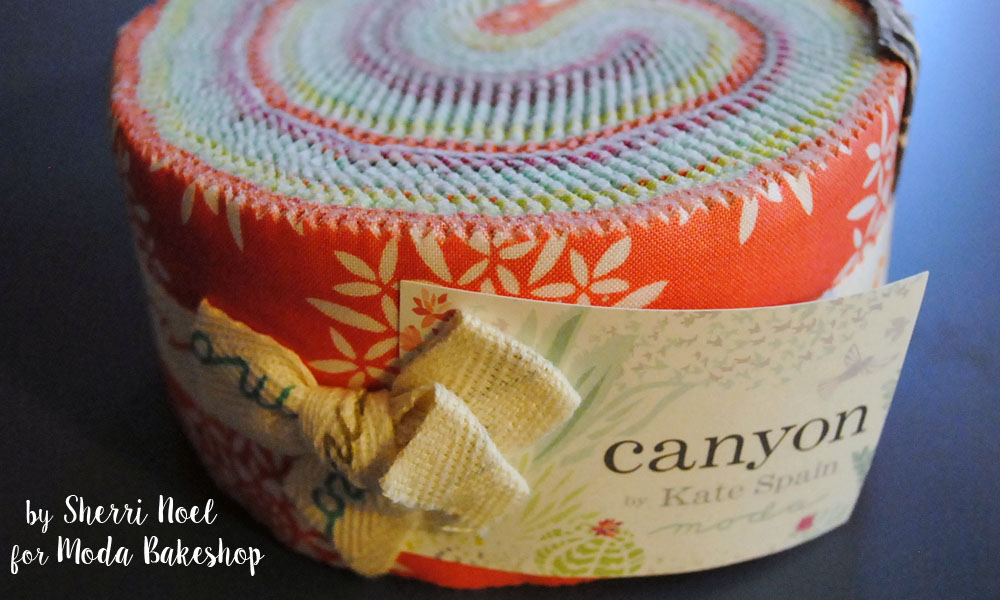
1 CANYON Jelly Roll
2 1/4 Yards CANYON Sedum Amethyst
2 Yards CANYON Murmuration Sand
1 Fat Eighth of CANYON Desert Moonlight (or any of the Canyon Moonlight print for applique circles)
4 1/2 Yards Backing Fabric (MODA Marble Mate Dots in lemon is used on the sample)
60 Degree Triangle ruler (mine is from creative grids)
Optional ~ No-Melt Mylar Template plastic for applique
![]()

Read through all instructions before beginning.
Instructions are broken down into 4 parts:
Part 1 ~ Piecing the Background
Part 2 ~ Piecing the Peels and Applique Instructions
Part 3 ~ Making the Pieced Border
Part 4 ~ Quilting and Binding
Here we go!...
PART 1 ~ PIECING THE BACKGROUND
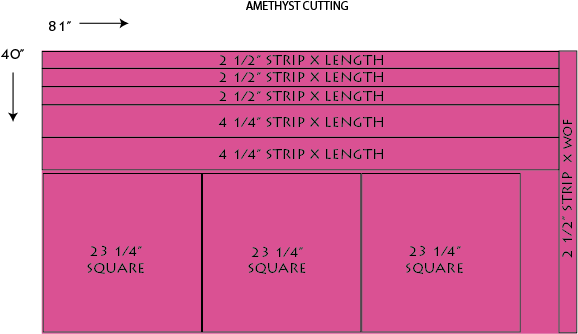
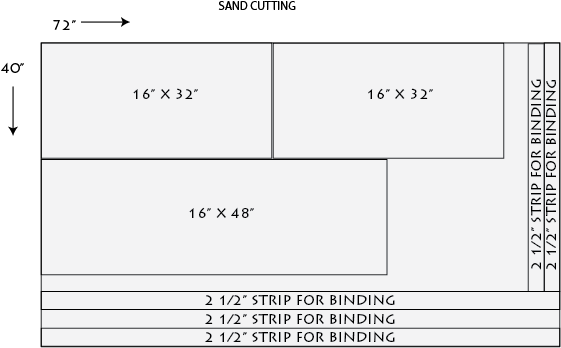
We will start by cutting and piecing the background with the Amethyst and Sand Fabrics. Note the cutting diagrams for the Amethyst and Sand fabric below, they show all the cuts you will make for this quilt. Be sure to cut your fabric according to the diagram so that you have enough fabric for the large cuts.
From Amethyst cut:
(3) 23 1/4" squares:
From Sand fabric cut:
(2) 16" x 32"
(1) 16" x 48"
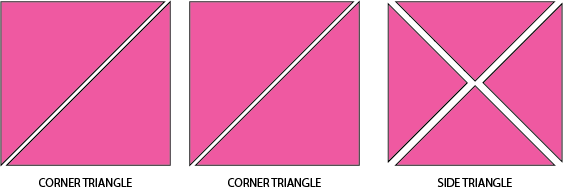
Take your three 23 1/4" squares of Amethyst fabric.
Cut two squares on the diagonal = 4 corner triangles
Cut one on both diagonals = 2 side triangles (set remaining 2 aside for scrap bin)
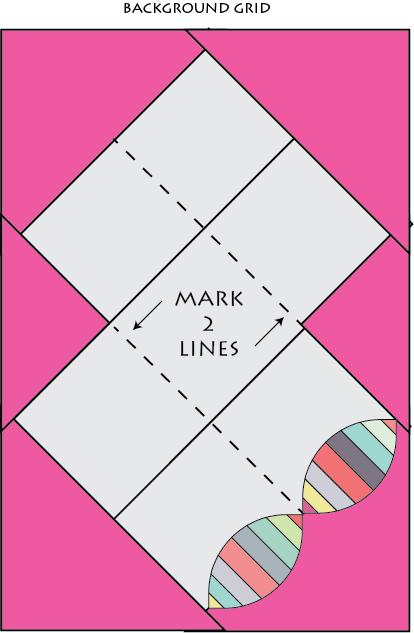
So let's prepare the parts for our background. Piece the background together in the order marked (1-5) following the diagram below. This is what the layout and assembly will look like:

After you assemble the background, mark two lines with an erasable marker to form a grid. We will use this grid for placing our peels. NOTE: These marks will be covered by the peels but it's best to use a marking tool that wont accidentally stain your fabric.
Square your pieced background to 44" x 65 3/4". Set it aside and we will work on the peels.
PART 2 ~ PIECING THE PEELS and Applique Instructions
Now is the fun part... We get to play with the Jelly Roll!
Spread out your jelly roll strips and admire them!
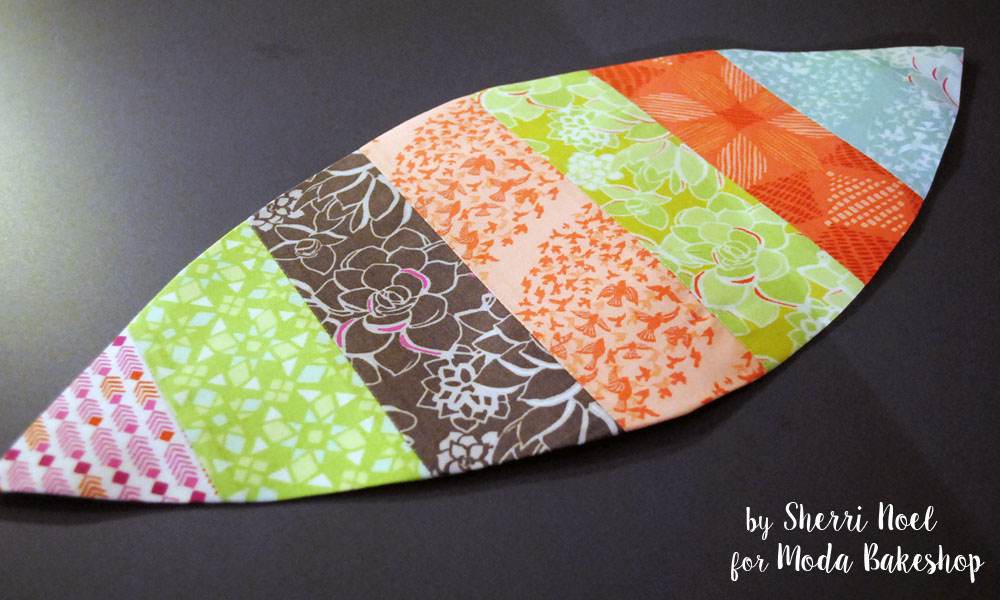
Mix them up into 5 scrappy groups of 8 strips each. Sew groups of 8 strips together and subcut each group into (5) 7 1/2" sections.
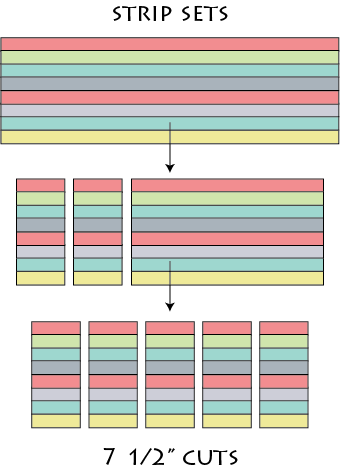
NOTE: Sewing in opposing directions can help keep long strips from getting wavy. I pressed my seams open so my peels would lie a bit flatter. If you choose to do this use a smaller stitch length. You can press open or to the side for these strip sets ~ personal preference.
Print the applique Color Play - Templates.
NOTE: The templates DO NOT include a seam allowance. There are many ways to applique. You could choose to cut out your peels without the seam allowance and machine applique with a blanket stitch (or other decorative stitch)... Or you might like to needle turn applique or use a freezer paper method.
I decided to use a heat resistant plastic template, I love to hand applique and the neat look of my edges turned under. I'll show you this method but feel free to do what works best for you!
Cut and trace the printed template to make a Mylar heat resistant template. (DO NOT add a seam allowance to the mylar template ~ cut it out the same size as the printed template.)
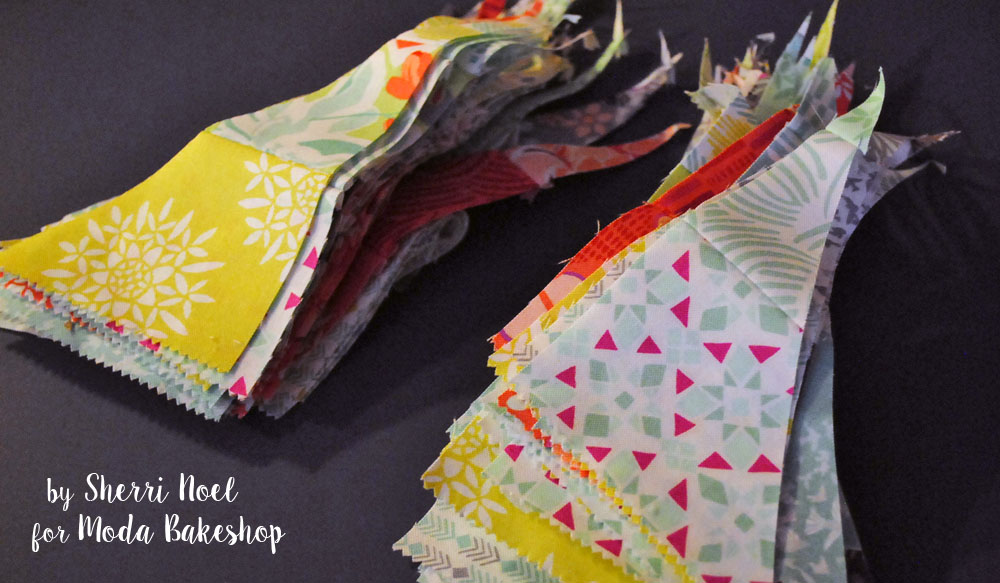
Carefully (read next step first!) cut out 24 peels adding 1/4" allowance outside template.
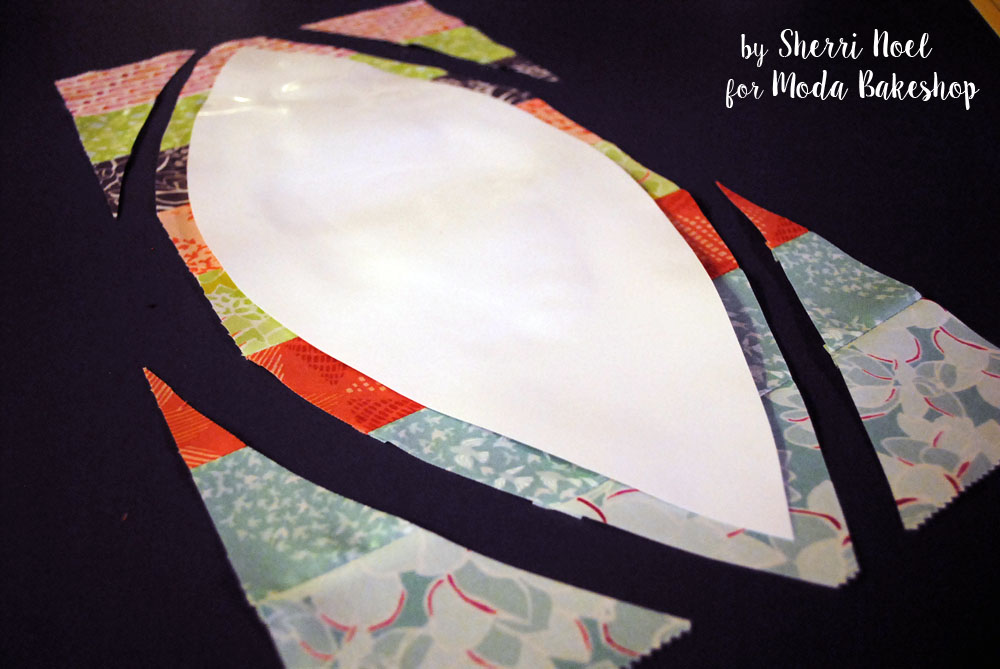
Set all the bits that you trimmed off aside, we will use them for the border!
Place the mylar template on the wrong side of your peel. Using a hot iron, press the seam allowance over the edge of the template. Your peels are pressed and ready to applique!
Hand applique 20 peels in place using the seams and markings as a grid. NOTE: I glue basted my peels a couple at a time with a few dots of Roxanne glue around the edges. The glue basted them in place for hand appliqueing and I didn't have to work with pins in my way.
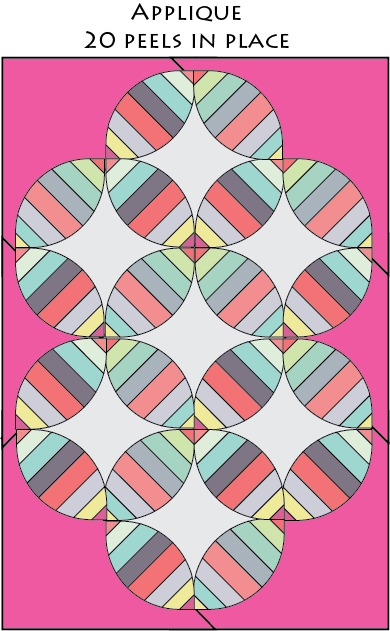
Use your 2 1/2" cuts of Amethyst fabric to make your border pieces. Join short ends to background unit first then long sides. After border is attached, applique remaining four corner peels and eight circles. NOTE: If you like to cut away fabric from the back side of the quilt (under applique) to reduce bulk and keep the quit from getting too heavy ~ now is a good time to do it. If you prefer to leave it then that's fine too.

PART 3 ~ MAKING THE PIECED BORDER
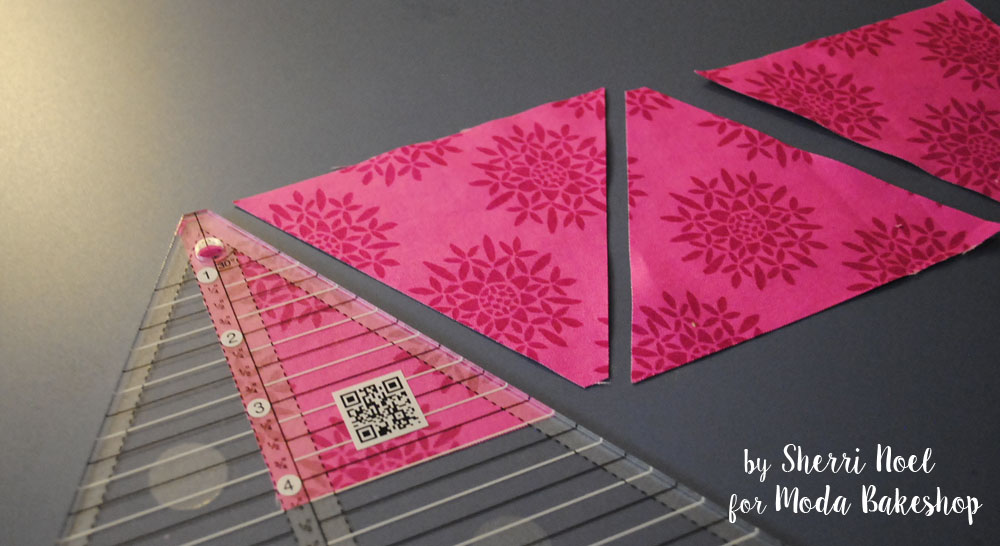
Take your 92 corner bits from cutting the peels and sew them into 48 pairs matching at the seam. Using a ruler, align at the center seam and trim a straight edge along bottom.
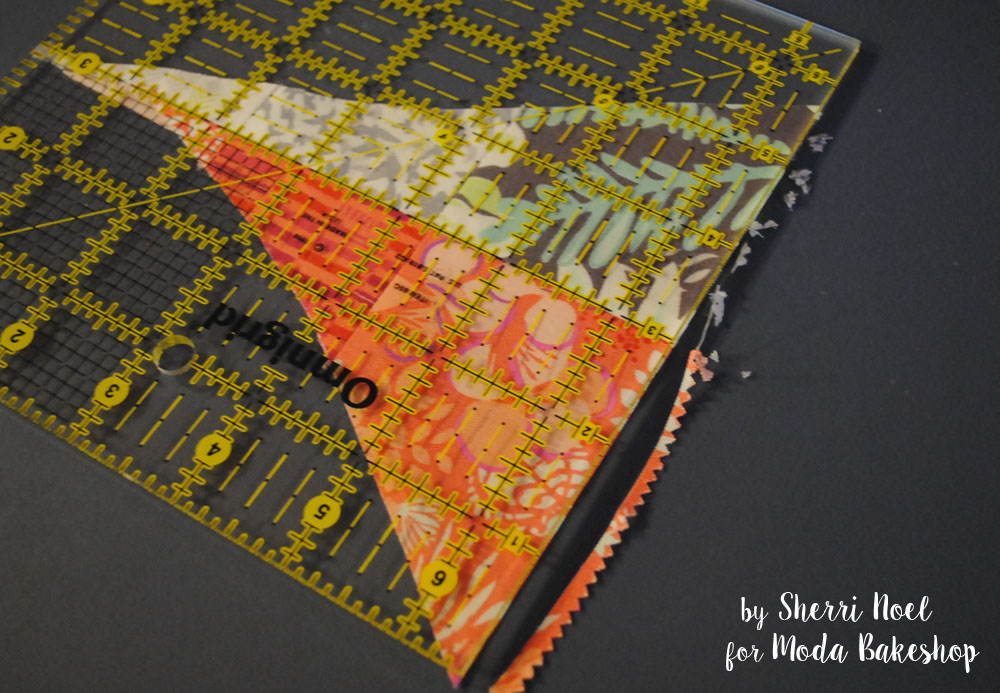
Using your 60 degree ruler, align the center seam line and the 4 1/4" line and trim.
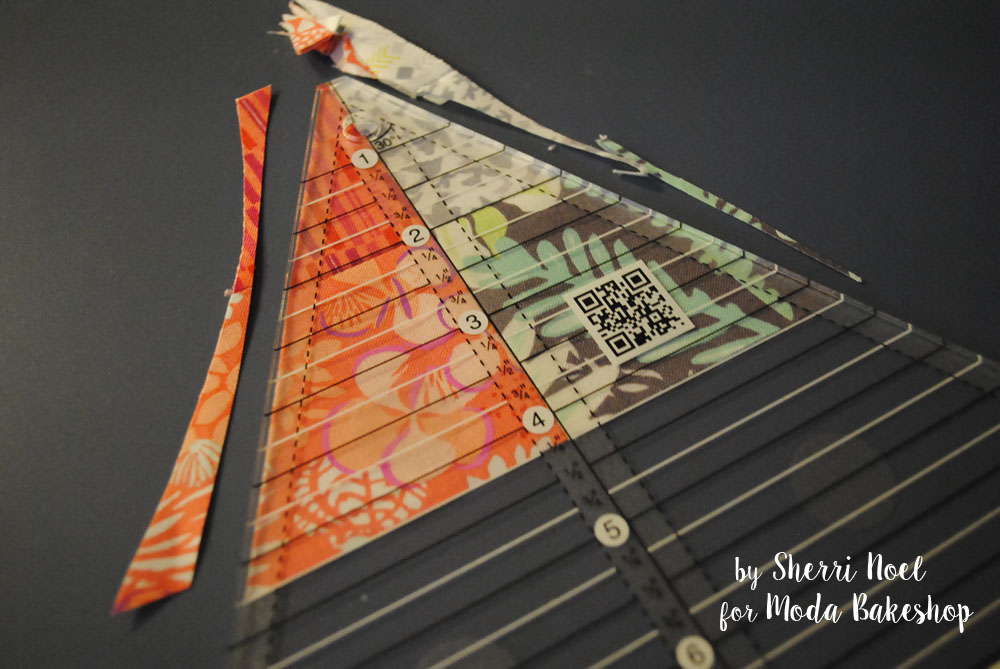

From your 4 1/4" Amethyst strips cut 44 triangles, and 8 end pieces. To cut end pieces, line up straight edge of fabric at the 1/4" mark (to the left of the center line in photo below) and trim along angle. You will need 4 as shown below and 4 cut in reverse.
Line up pieces for sewing, begin and end with an end piece in amethyst. For the short ends of the quilt (top and bottom) will need to join 10 pieced triangles and 9 amethyst triangles. For the long sides of the quilt you will need to join 14 pieced triangles and 13 amethyst triangles.
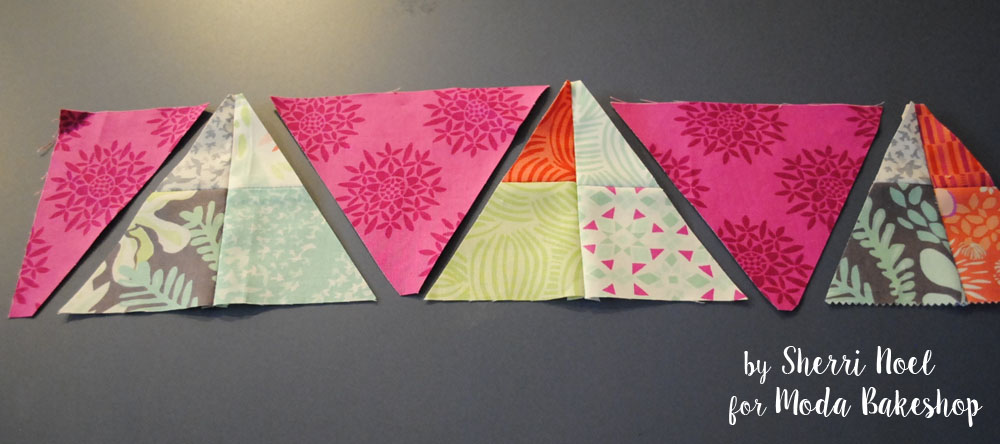
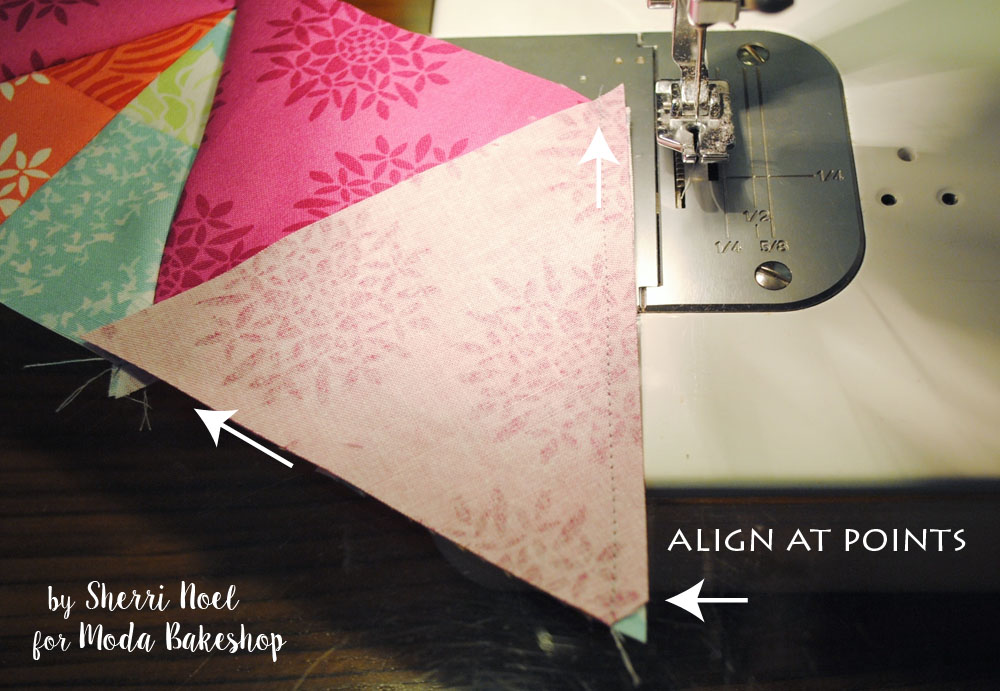
Make sure to keep the blunt point of the triangles at the top and bottom of the strip set to be sure your bias edges stay within the strip and not along the outside edge. Match up points, join and trim away dog ears to reduce bulk. Wait until border strip is completely joined before pressing with an iron to avoid stretching your bias seams.
From remaining 4 1/4" amethyst strip, cut and join (4) 1 1/4" x 4 1/4" pieces to the ends of the top and bottom border.
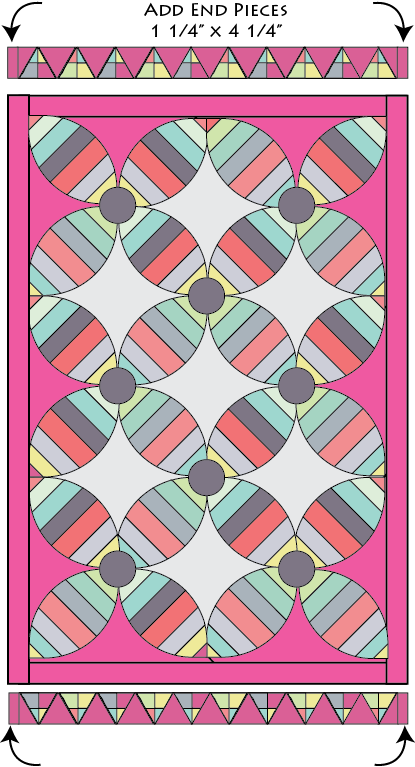 Join two borders to the quilt. Start by matching and pinning at both ends and in center, then pin in between well before sewing. Due to all the bias (and stretch) in the border strip you may need to pin more than usual to keep everything in place for sewing.
From remaining 4 1/4" amethyst strip cut and join (4) 7 3/4" x 4 1/4" pieces to the ends of the side borders.
Your top is done! Now, if you wanted to make this into a larger quilt it would easily work up with a border into a twin or queen size. If you turn the quilt on it's side and add a border, the center of the quilt fits nicely on the top of a king mattress while the added border hangs over the side of the bed...
All that's left is quilting and binding!
Part 4 ~ QUILTING AND BINDING
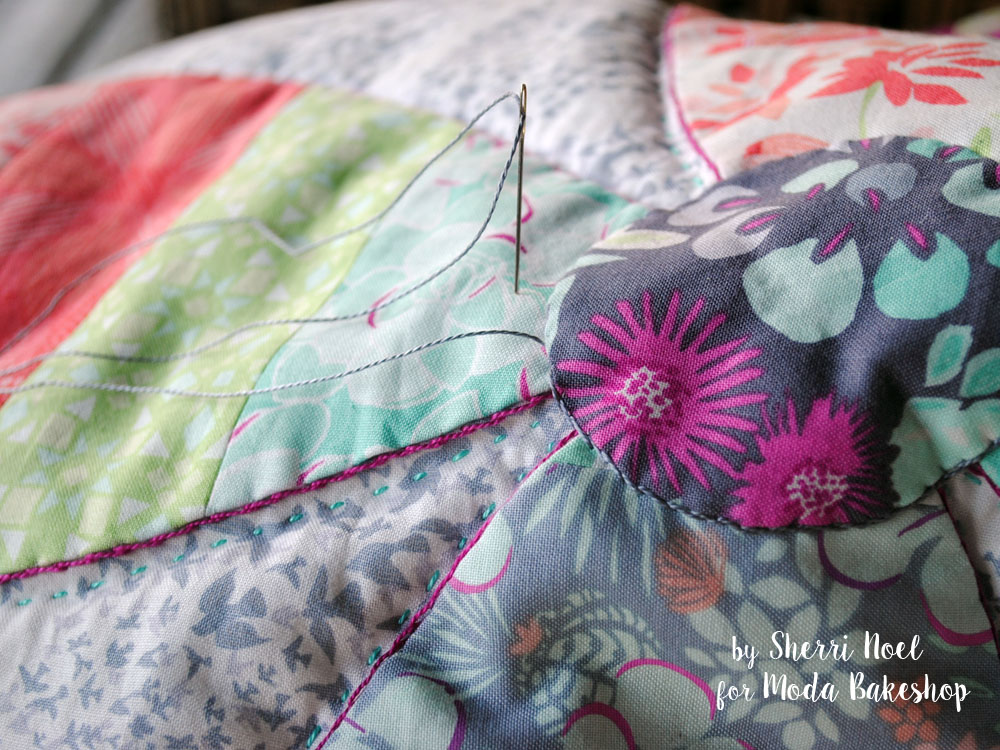
I thought this quilt would be perfect for big-stitch hand quilting with Perle Cotton. If you've visited or follow my blog, you might already know that I love hand quilting with big stitches. I just love it!
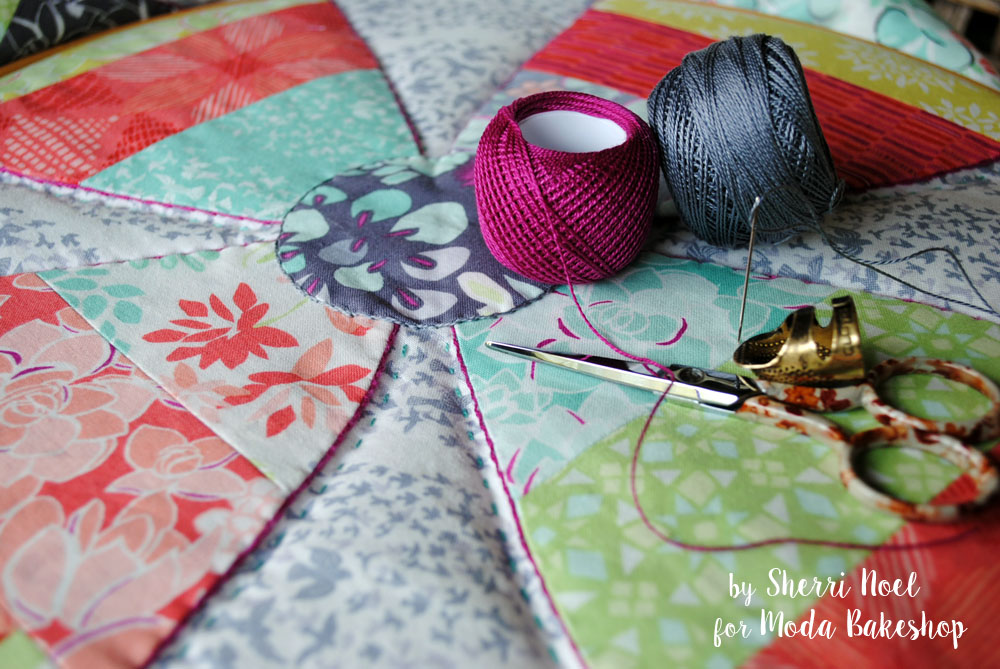
I also did some stitching around my applique to help it stand out a little and can I just say... it's so dreamy next to this Canyon fabric! YUM!
Want to learn more about how I quilted this Canyon quilt? Check out my Hand Quilting Color Play ~ Canyon Quilt post. And if you haven't been to my site before... you might also like my Hand Quilting Big-Stitches with Perle Cotton Tutorial.
All that is left now is adding this gorgeous binding!
I hope you've enjoyed this tutorial, I've had great fun working on this quilt for you and it goes without saying that this fabric is to die for... seriously, it doesn't get any better. Thank you Kate Spain! Now, go make your new quilt!!! And please stop by my blog for a visit and share pics!
![]()
One generous 56" x 78" delicious lap quilt to savor and enjoy!
Happy Sewing!
Sherri Noel
![]()
Posted in: