Welcome to Moda Fabrics!
Star Bright Quilt
Star Bright Quilt
Published:
Feb 4 2016 - 23:00
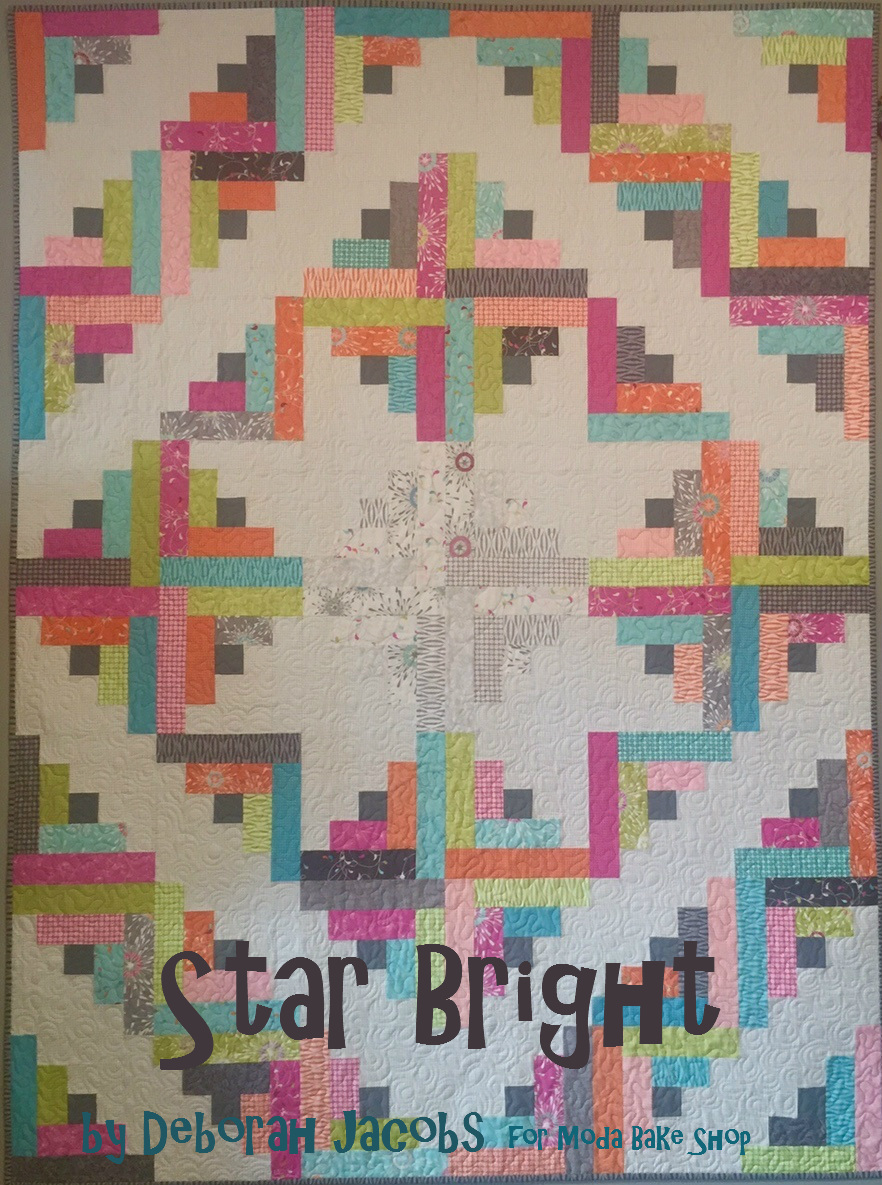

Hello there! It's Deb from Gathering Friends. "Star Bright" is a very easy and simple quilt that plays with the color to make a stunning pattern. This 60" x 80" quilt uses the same block design throughout the quilt. It's great for chain piecing and comes together really quickly. I’ve used a light background in my quilt, but would be fun in a complimentary solid for a different look. I love this fabric line! Today in Minnesota, the weather is cold and snowy and this quilt just reminds me that spring is coming. I sure hope you enjoy making it!

![]()
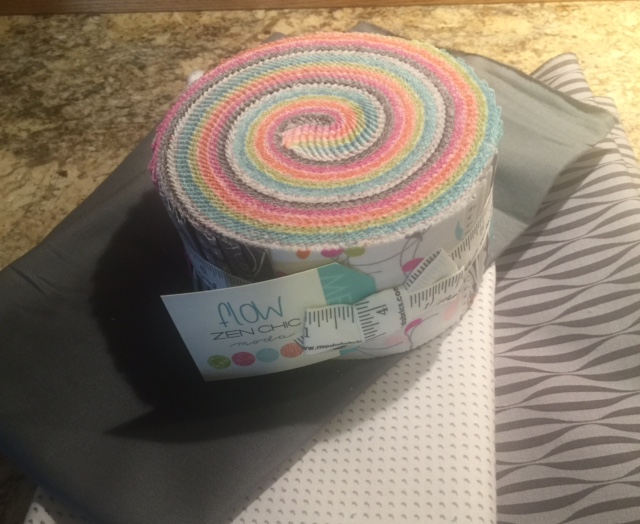
1 Jelly Roll® {Flow by Zen Chic}
1/4 yard dark fabric {Bella Solid Graphite 9900-202}
2-1/8 yards light fabric {1596-15}
5 yards backing fabric
3/4 yard binding fabric {1594-14}
CUTTING:
Separate the jelly roll into light prints and med/dark prints.
From the 5 lightest jelly roll strips cut a TOTAL of:
(4) 2½" x 10½" print rectangles
(4) 2½" x 8½" print rectangles
(4) 2½" x 6½" print rectangles
(4) 2½" x 4½" print rectangles
(4) 2½" print squares
These are the five prints I used. I set aside the 2-1/2" jelly roll strip that was the same print as my light(background) and used that when I cut strips of the light background fabric.
From 2½" medium to dark jelly roll strips cut a TOTAL of:
(44) 2½" x 10½" print rectangles
(44) 2½" x 8½" print rectangles
(44) 2½" x 6½" print rectangles
(44) 2½" x 4½" print rectangles
From light (background):
(48) 2½" x 8½" rectangles
(48) 2½" x 6½" rectangles
(48) 2½" x 4½" rectangles
(48) 2½" squares
From dark (center squares):
(44) 2½" squares

![]()
Make 44 pieced squares using the following instructions. Use the medium and dark jelly roll strip rectangles for these 44 pieced squares.
Sew a 2½" dark square and a 2½" light square together. Press seam towards the dark. Make 44.

To get the most of your sewing time, you can chain sew the squares together if you wish. Press and then cut apart.
Sew a 2½" x 4½" light rectangle to the left side. Press seam towards the light rectangle. Proof square to 4½".

Sew a 2½" x 4½" print rectangle (cut from your jelly roll) to the bottom. Press seam towards the print rectangle.

Sew a 2½" x 6½" print rectangle (cut from your jelly roll) to the right side. Press seam towards the print rectangle. Proof square to 6½".
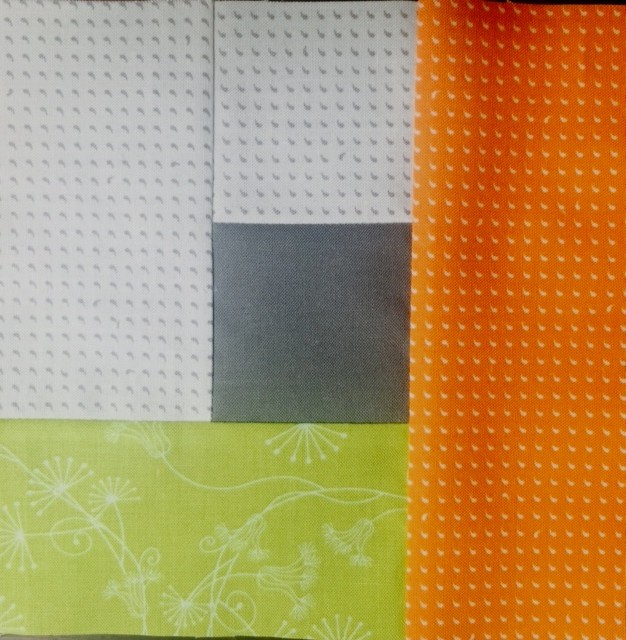
Sew a 2½" x 6½" light rectangle to the top. Press seam towards the light rectangle.
Sew a 2½" x 8½" light rectangle to the left side. Press seam towards the light rectangle. Proof square to 8½".
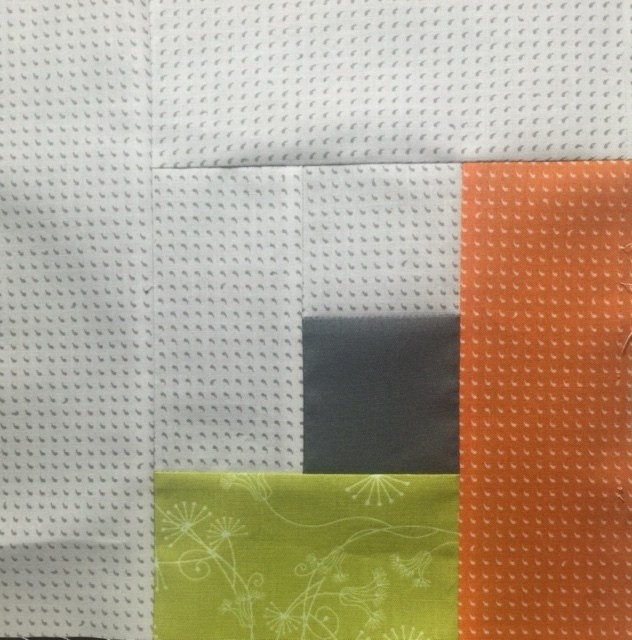
Sew a 2½" x 8½" print rectangle to the bottom. Press seam towards the print rectangle.
Sew a 2½" x 10½" print rectangle to the right side. Press seam towards the print rectangle. Proof square to 10½".
Make a total of 44 print squares.
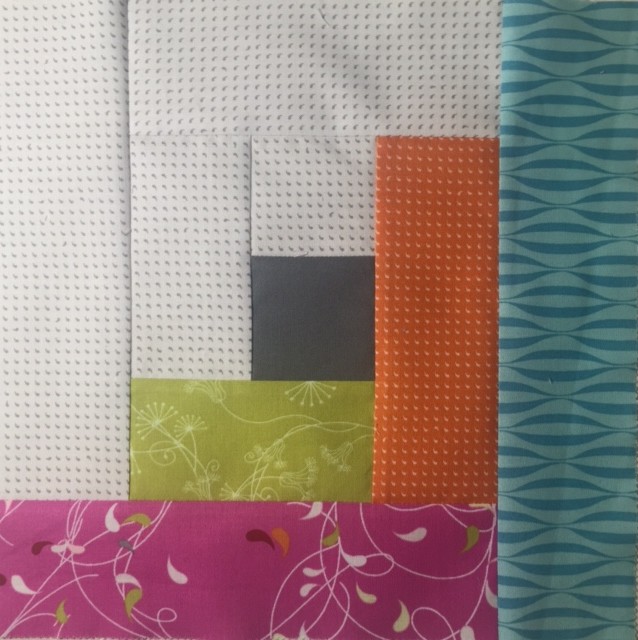
Make 4 pieced squares using the following instructions. Use the lightest jelly roll strip rectangles for these 4 pieced squares.
Sew a 2½" print square and a 2½" light square together. Press seam towards the print. Make 4.

Sew a 2½" x 4½" light rectangle to the left side. Press seam towards the light rectangle. Proof square to 4½".

Sew a 2½" x 4½" light print rectangle to the bottom. Press seam toward the print rectangle.
Sew a 2½" x 6½" light print rectangle the right side. Press seam toward the print rectangle. Proof square to 6½".

Sew a 2½" x 6½" light rectangle to the top. Press seam towards the light rectangle.

Sew a 2½" x 8½" light rectangle to the left side. Press seam towards the light rectangle. Proof square to 8½".

Sew a 2½" x 8½" light print rectangle to the bottom. Press seam toward the print rectangle.
Sew a 2½" x 10½" light print rectangle to the right side. Press seam toward the print rectangle. Proof square to 10½".

Make 4 light print squares. These will be the very center of your star in your quilt.
Layout the center of your quilt using the 4 light print squares you just made. Using 8 of the 44 print squares, layout as diagrammed below. Make sure the direction of each block is exactly as shown or you will not have a star in the center of the quilt. Sew each row together. Press seams to the left on the top row and to the right on the bottom row. Sew the rows together to make the quilt center.

Layout the remaining 40 squares as you desire. Stand back to check out the layout to make sure all the squares are going the right direction and you can see the center star. Looking through a camera helps also. Look at color next and make sure you don't have all the pinks in one corner, or all the orange on the bottom.
Sew each row together. Alternate seam pressing direction in each row so the seams lay together nicely. Sew the rows to the quilt center.
The quilt below is the one I made, but the possibilities are unlimited.

Here is another option. I put the light squares in the four corners and flip flopped the blocks til they formed the design I wanted. Have fun with this!

One more option would be to add a border or two to make the quilt a different size.
![]()
This quilt finishes at 60" x 80".
Deborah Jacobs
{www.GatheringFriendsQuiltShop.com}
![]()
Posted in: