Welcome to Moda Fabrics!
Peppermint Garland Quilt
Peppermint Garland Quilt
Published:
Jun 29 2016 - 23:00


Cindy Sharp of Tops to Treasures here. It has been a while since I wrote for The Bake Shop. It is always a pleasure, and I am glad to be back. With temperatures in my neck of the woods reaching the high 90s it is very nice to participate in Christmas in July...err, very late June. I hope you enjoy JOL as much as I have.

Is there a time of year that fills us with more joy than Christmas? I know summer holidays are fun and spring break is often very refreshing, but neither fills the world with the sort of peace and anticipation that Christmas does. I know not everyone celebrates the holiday, and of those that do there are many different traditions, however, I think it is pretty safe to say that all of the traditions include food, family, and lots of love. Any where there is food and family there is bound to be laughter too. That is exactly how JOL by Wenche Wolff Hailing of Northern Quilts makes me feel. I chose to use this line to make my Peppermint Garlands quilt as an out pouring of that happy feeling. I love the way the pinwheels add a different punch to a traditional Irish chain look, like the quilt is an extension of yule time decorations. The punch of red like laughter on a cold winter night; the shades of grey like the view outside my windows; doodled hearts and snowflakes and reindeer; the fact that my sweet mother pieced the quilt for me; all of it fills me with a peace and joy that I dearly hope you find if you too choose to make this quilt.
I can not wait for Christmas to roll around again. I will be snuggling under this quilt, by my hearth listening to stories brought home by my college boys. The air will be dancing with the sounds of laughter and the smells of good food, and I will think back, for just a moment about this very moment and wish you the merriest of Christmases.
This quilt/project finishes at 74"x 98".
![]()
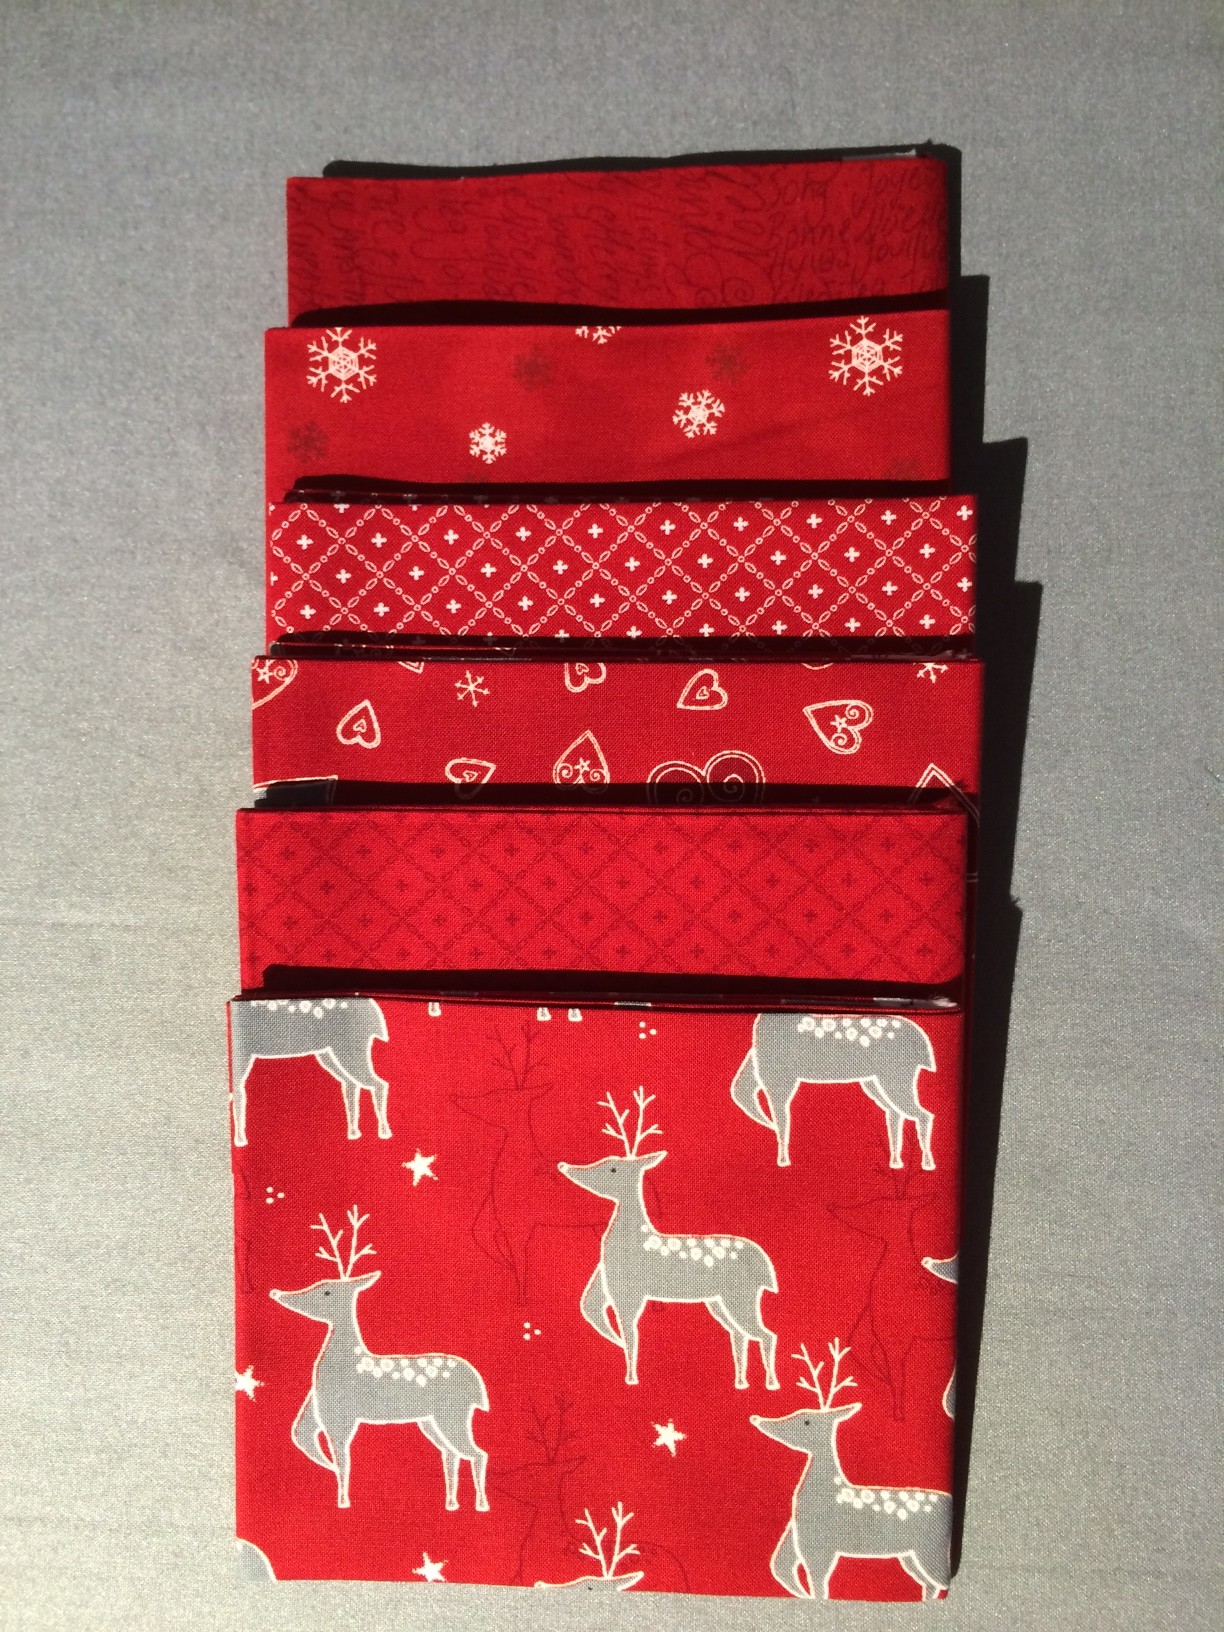
1 Fat Quarter Bundle* JOL by Wenche Wolff Hailing of Northern Quilts
3/4 yards additional medium fabric. I split mine into 1/4 yd cuts of three different fabrics. {SKU 39705-15, SKU 39704-15, SKU 39704-14}
1/4 yard additional dark fabric. {SKU 39702-17}
1/2 yards for the inner border {SKU 39702-16}
1 3/4 yards for the outer border {SKU 39704-12}
6 yards backing fabric {SKU 39700-17 }
2/3 yards binding fabric {SKU 39702-17l}
![]()
Peppermint Garlands quilt is fairly simple as quilts go. When finished it would measure about 74" x 98", perfect for a twin sized bed. It is composed of 35, 12" finished blocks, set 5 x 7 with two borders. There are two types of blocks: 18 Irish Pinwheel blocks, and 17 Shoo Fly blocks. The magic happens when you take special care as to where you place your fabrics.
I love JOL, it is fun and festive and perfect for a garland of peppermints; however, if you want to make this quilt your own try using a different fabric line. Imagine the possibilities. I have attached a coloring page to help get you started.
If you stick with my basic design, a string of pinwheels, you need to make sure that your fabrics can be divided into:

2 yards (8 fat quarters) light fabric - the background for the chains of pinwheels;

2 1/2 yards (10 fat quarters, extra yardage not pictured) medium fabric - the background for the rest of the quilt;

1 1/4 yards (5 fat quarters, extra yardage not pictured) dark fabric - for the Shoo Fly centers and large half square triangles; and
1 1/4 yards (5 fat quarters) accent fabric - for the pinwheels.
Cutting directions:
From Accent fabric (reds), cut 180, 3" x 3" squares (for pinwheels)

From Light fabric (white & light grey), cut:
- 180, 3" x 3" squares (for pinwheel backgrounds)
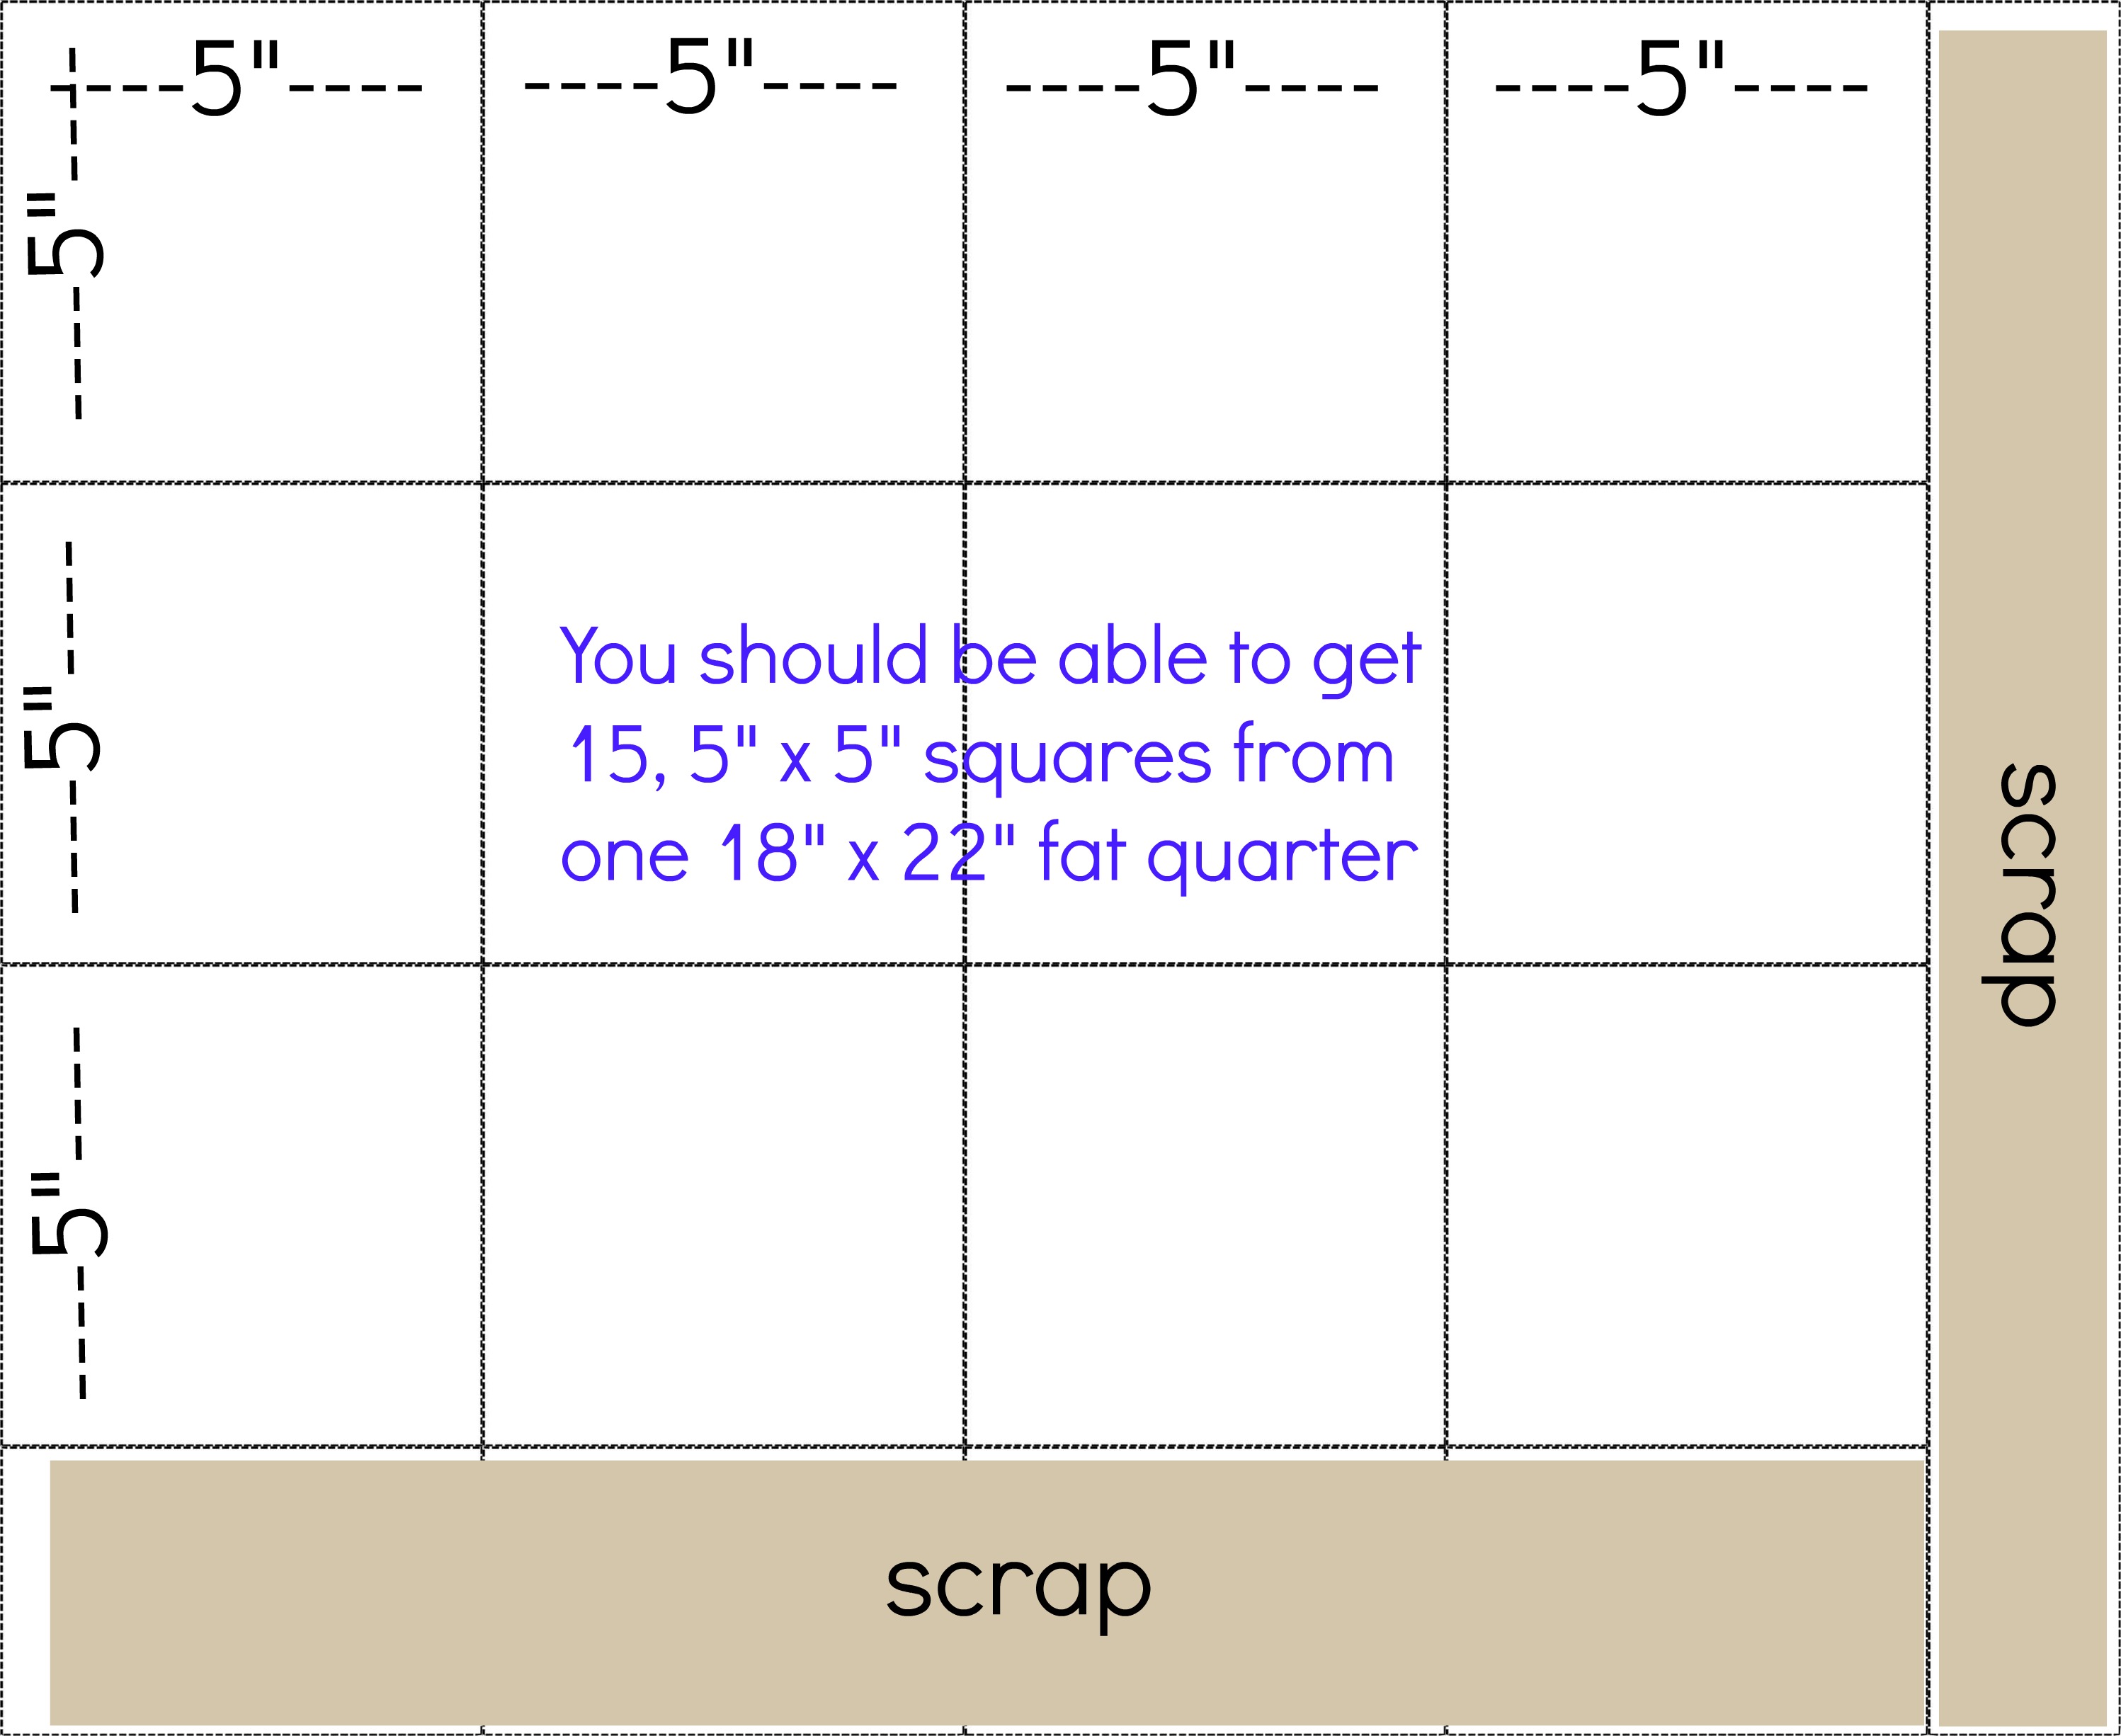
- 34, 5"x 5" squares (for Shoo Fly half square triangles)
From Medium fabric (medium grey), cut 140, 4 1/2" x 4 1/2" squares (background)
From Dark fabric (dark grey): If you want your Shoo Fly blocks to have all the same fabric in each block, cut 17, 5" x 18" strips from your fat quarters, then sub cut each strip (1 per block) into 2, 5" x 5" squares, and 1, 4 1/2 x 4 1/2" square) 
- cut 17, 4 1/2" x 4 1/2" squares (Shoo fly centers)
- cut 34, 5" x 5" squares (Shoo fly half square triangles)
Inner Border - cut 8, 1 1/2" x width of fabric strips
Outer Border - cut 8, 5 1/2" x width of fabric strips
Binding - cut 9, 2 1/2" x width of fabric strips.
SEWING DIRECTIONS

Make 17 Shoo Fly blocks:
- Gather:
- 34, 5" x 5" squares light fabric
- 34, 5" x 5" squares dark fabric
- 68, 4 1/2" x 4 1/2" squares medium fabric
- 17, 4 1/2" x 4 1/2" squares dark fabric
- Make 68 half square triangles - use your favorite method to make 68, 4 1/2" half square triangles. OR
- Draw a diagonal line on the back of each 5" square of light fabric.

-
- Pair each square of light fabric with a 5" square of dark fabric.
- With right sides together, sew a 1/4" from each side of the drawn line.
- Cut on drawn line.
- Iron seam open.
- Trim units to 4 1/2" x 4 1/2" square.
- The construction method starts with squares that are about 1/8" bigger than needed for this process. You really do need to trim them.
- You will get 2, 4 1/2" x 4 1/2", half square triangles from each pair of 5" x 5" squares.
- Make 17 Shoo Fly blocks: Make them one at a time.
- Gather:
- 4, 4 1/2 " x 4 1/2" half square triangles,
- 4, 4 1/2" x 4 1/2" squares medium fabric
- 1, 4 1/2" x 4 1/2" square dark fabric
- Arrange pieces in front of you so that they look like the Shoo Fly block pictured above. Make sure that the dark corners of the half square triangles are touching the dark center square.
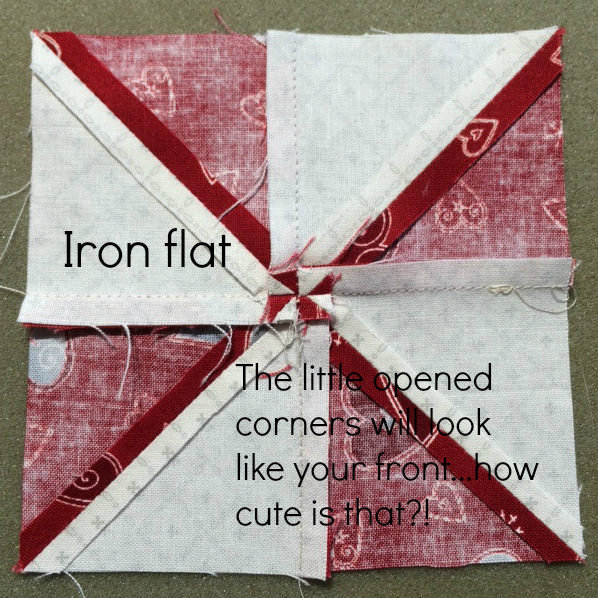
- Sew in rows of 3 patches, ironing seam allowances towards the dark fabric.
- Sew rows together, popping or fanning the seam allowances so that they are as flat as you can get them. (If you need a tutorial on "Popping or fanning seams" there is a short one further on in these instructions. It works the same no matter what patches you are sewing together.)
- Press flat.
- Trim to 12 1/2" x 12 1/2" square
- Repeat for 17 blocks.
- Gather:

Make 18 Irish Pinwheel blocks:
- Gather:
- 180, 3" x 3" squares light fabric
- 180, 3" x 3" squares accent fabric
- 72, 4 1/2" x 4 1/2" squares medium fabric
- Make 360 half square triangles - use your favorite method to make 360, 2 1/2" half square triangles. OR
- Draw a diagonal line on the back of each 3" square of light fabric. (Just like you did for the Shoo Fly blocks, only the pieces are smaller.)
- Pair each square of light fabric with a 3" square of accent fabric.
- With right sides together, sew a 1/4" from each side of the drawn line.
- Cut on line.
- Iron seam open.
- Trim units to 2 1/2" x 2 1/2" square. You will get 2, 2 1/2" x 2 1/2", half square triangles from each pair of 3" squares.
- Make 90 pinwheel blocks
- Gather 360, 2 1/2" half square triangles
- Sew in sets of 2

- Set them in front of you so they look like how they are going to end up.
- With right sides together, make sure that the patch on the bottom has the red edges down and to the left and the patch on top has red edges up and to the left. If you do this, the red triangles will be on top of, or beneath the white ones.
- It is very important to make sure that you sew all of the sets the same way. If you do not, you may get pinwheels going in different directions.

- "Turn the page" .

- Align, sew, and repeat. Make 180 units made of 2 half square triangles. They should measure 2 1/2" x 4 1/2"

- Iron the seam allowances towards the red. Set two patches in front of you so that the points will be coming together....just like it will look when you are done.

- Sew.
- Pop/fan seams


-
- Trim to 4 1/2" x 4 1/2"
- Make 18 Irish Pinwheel blocks: Make them one at a time.
- Gather:
- 5, 4 1/2" square pinwheel blocks
- 4, 4 1/2" squares medium fabric
- Arrange pieces in front of you so that they look like the Irish Pinwheel block pictured above.
- Sew in rows of 3 patches, ironing seam allowances towards the medium fabric.
- Sew rows together, popping or fanning the seam allowances so that they are as flat as you can get them.
- Press flat.
- Trim to 12 1/2" x 12 1/2" square
- Repeat for 18 blocks.
- Gather:

Assemble Center of quilt: It is helpful to use a design wall for this portion of the quilt. A design wall is any surface big enough to hold your blocks all at one time...it will need to be bigger than 63" x 88". You can use a clean floor (Watch out for your helpful four legged friend. They like to rearrange things.) or a shower curtain (it is okay if it is hanging over a bath tub....as long as there is no one else using it at the moment) or a large bed (it works better if the bed is made). If you are lucky enough to have one a free standing or wall mounted design wall is perfect for this job.
- Gather:
- 17, 12 1/2" Shoo Fly blocks
- 18, 12 1/2" Irish Pinwheel blocks
- Arrange the blocks in 7 rows of 5, alternating Irish Pinwheels and Shoo Flies. Irish Pinwheels go in the corners. It should look like the picture above.
- Sew blocks to make rows
- Iron seam allowances towards the Shoo Fly blocks
- Pop/fan seams
- Iron flat.
- Sew rows to make center. The center should measure 60 1/2" x 84 1/2" at this point.
Add borders:
- Gather:
- 8, 1 1/2" x width of fabric strips of inner border fabric
- 8, 5 1/2" x width of fabric strips of outer border fabric
- Sew inner border strips in sets of two along the short edges
- Iron seams open.
- Attache one long skinny unit to each side of the quilt. It works best if you do this in pairs....left side, then right side; top then bottom.
- Iron seam allowances towards the border fabric.
- Trim excess, making sure that the corners are square....as in a 90 degree angle.
- Repeat process with outer border strips.
Quilt as desired: I used Gizmo b2b by Anne Bright and white thread. I love the way that it looks like snow flakes, and doodles at the same time.

Don't forget to add a label! It helps you remember when you made the quilt, maybe who helped you make it or why you made it...and some day it will remind the recipient how much you love them. My label was machine embroidered using a pattern from Urban Threads. Notice, who made the quilt?! Thanks MOM!! You are the best.

![]()
This quilt finishes at 73" x 96".
I would love to hear from you, to see a picture of your finished quilt, help you with any questions you may have. Feel free to contact me.
Cindy Sharp
{Tops to Treasures}
![]()
Posted in: