Welcome to Moda Fabrics!
Happy Table Runner
Happy Table Runner
Published:
Jul 3 2016 - 23:00
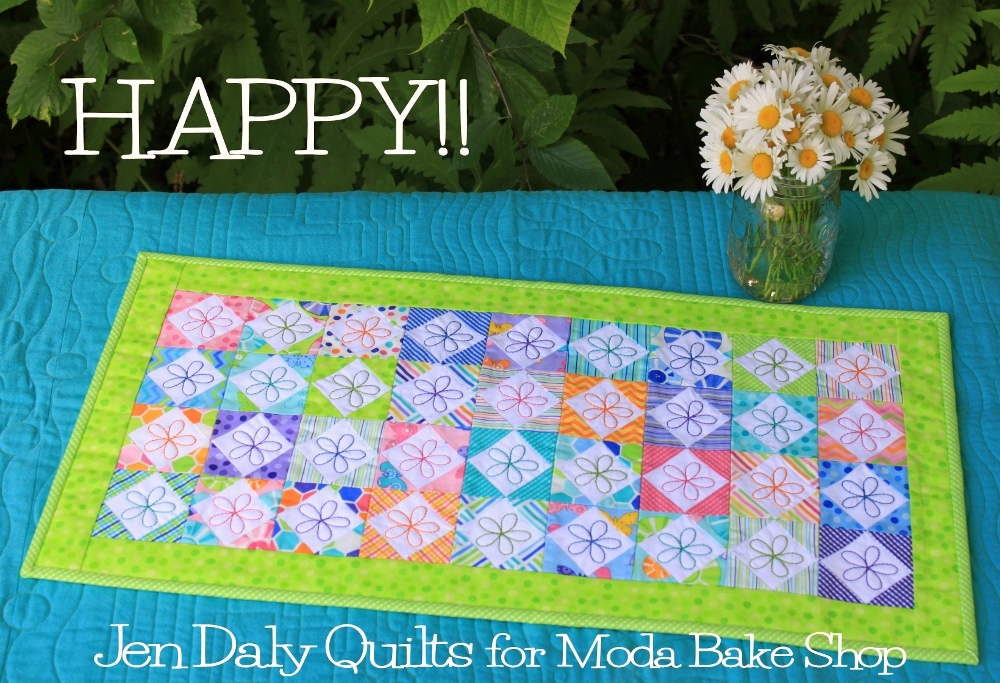

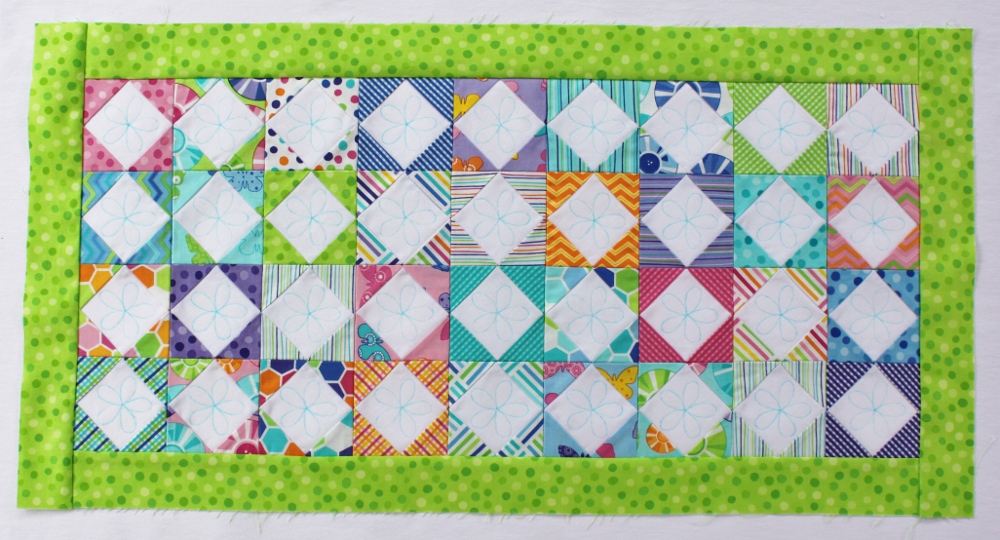
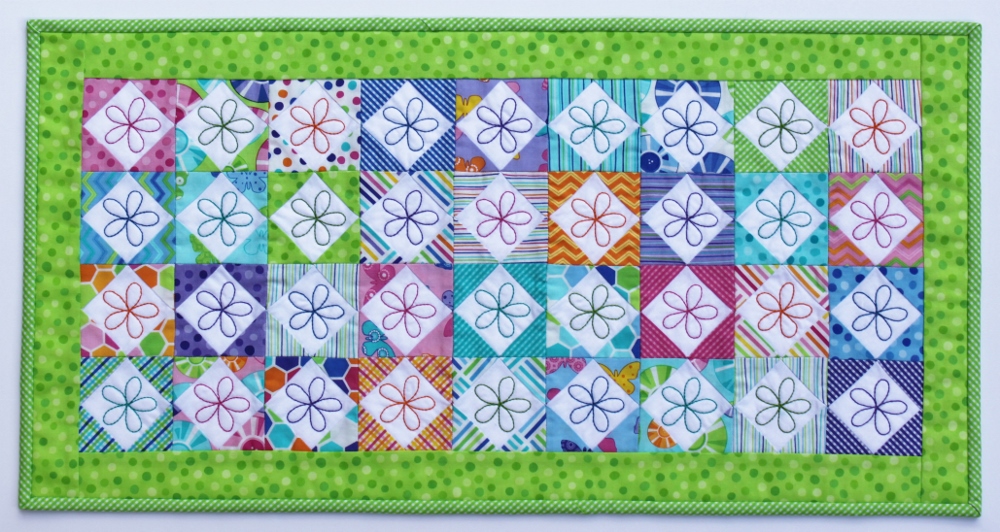
Hi again! I'm Jen Daly and I'm back at the Moda Bake Shop today with a great mini charm pack project that's perfect for summer. Happy!! is a 13" x 25 1/2" table runner that features a garden of cheerful embroidered flowers blooming atop simple Square in a Square blocks. My little quilt is made with the "Brighten Up!" collection by Me and My Sister Designs, and I think their colorful fabrics are perfect for this charming project. The best part about Happy!! is that once you've got your quilt top assembled, you can take it along with you this summer and embroider the flowers at your leisure.
Here we go...
![]()
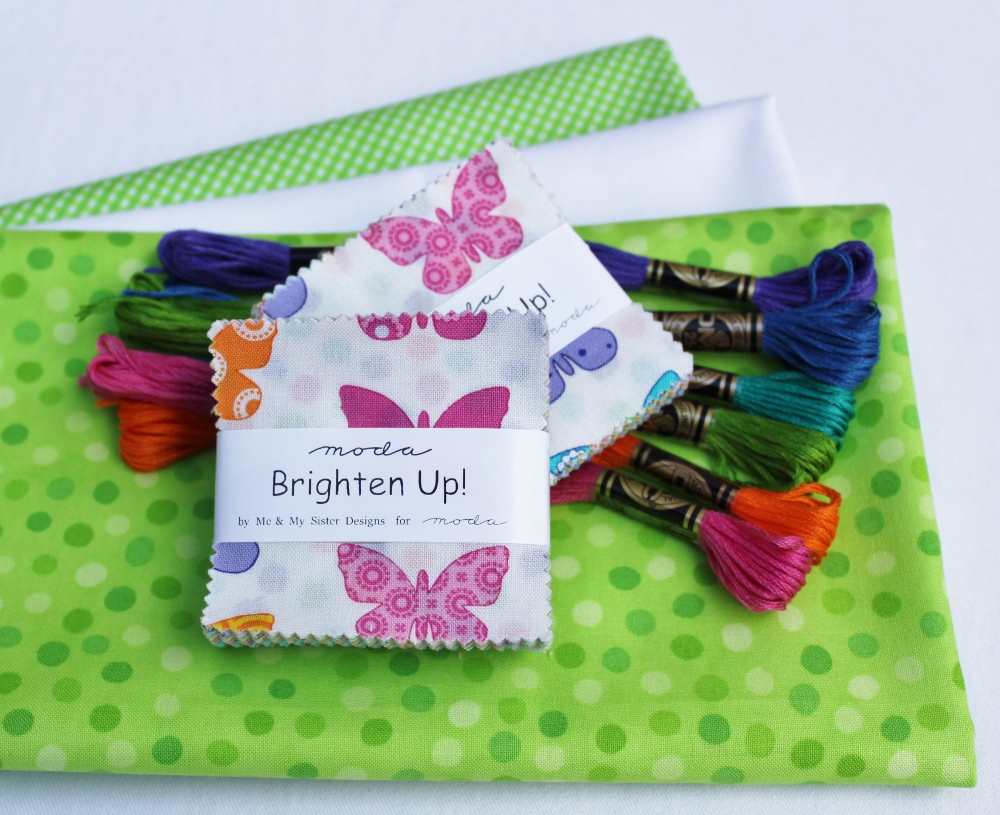
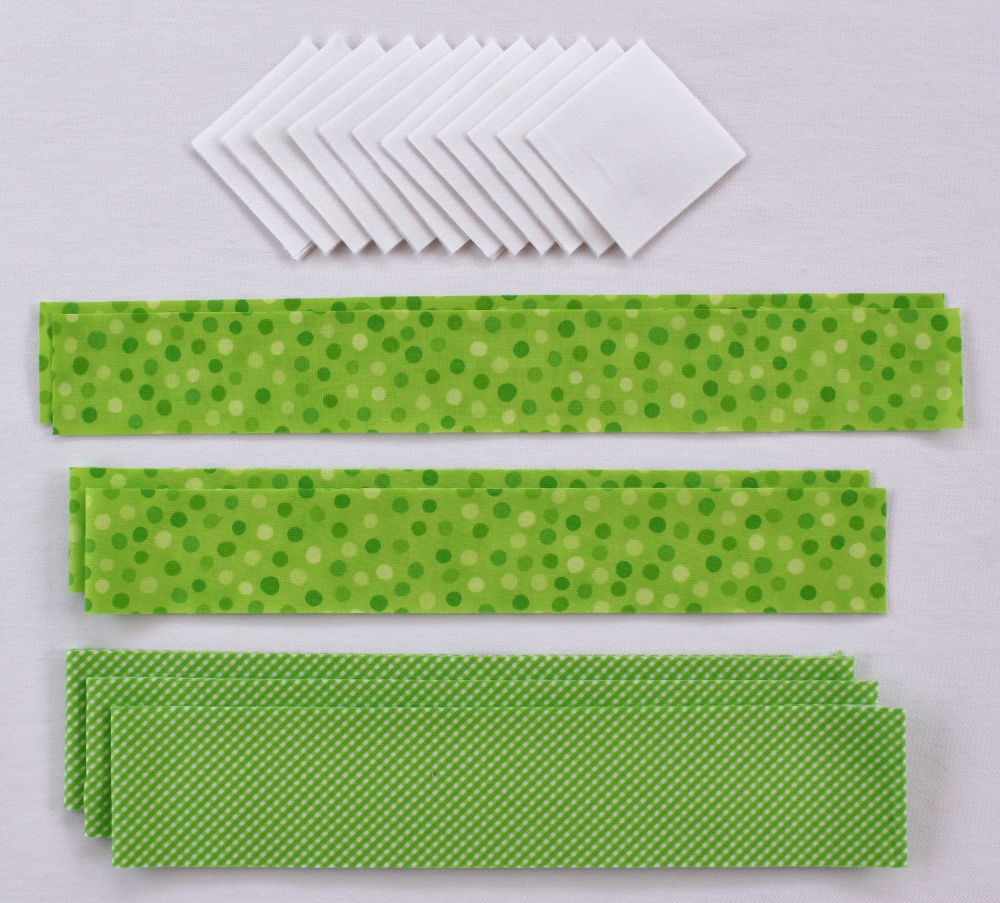
- 2 Mini Charm Packs/Moda Candy (shown in Brighten Up! by Me & My Sister Designs)
- 1/4 yard white background fabric (shown in White Bleached Bella Solid)
- 1/8 yard border fabric (shown in Brighten Up! Green - 22282 15)
- 1/4 yard binding fabric (shown in Brighten Up! Green - 22286 15)
- 1/2 yard backing fabric
- batting measuring 18" x 30"
- washout marking pen
- spray basting adhesive (optional)
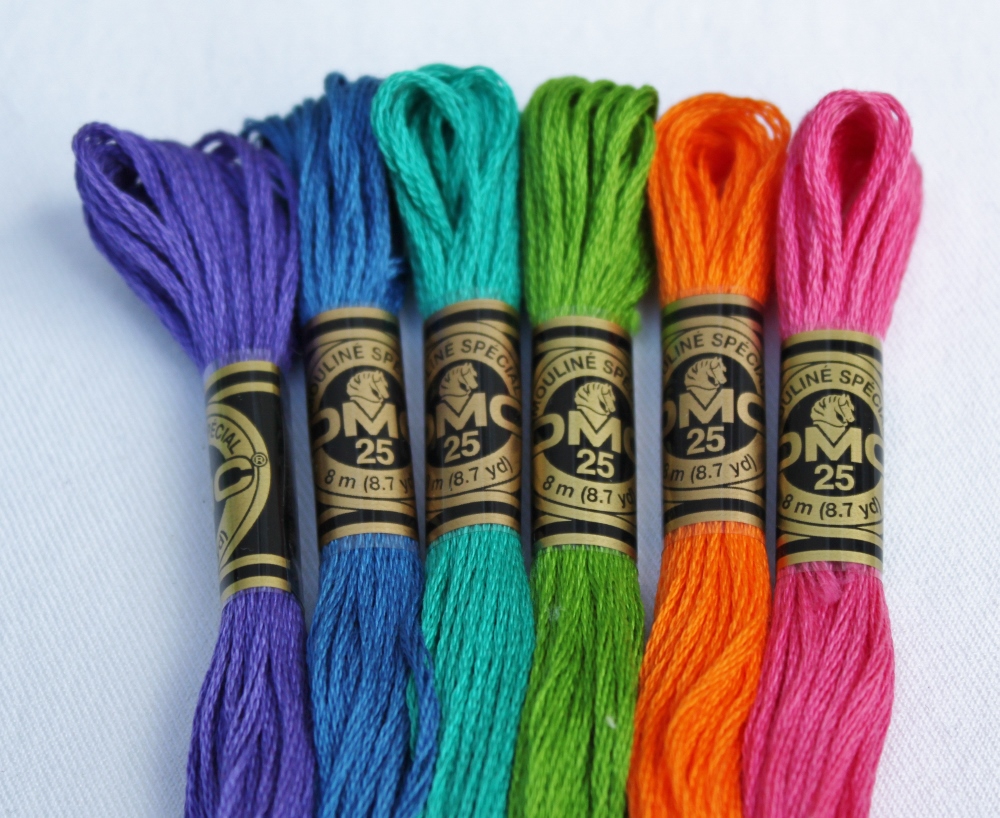
- embroidery floss (shown in DMC 333 (purple), 825 (blue), 3812 (aqua), 906 (green), 971 (orange), and 602 (pink)
![]()
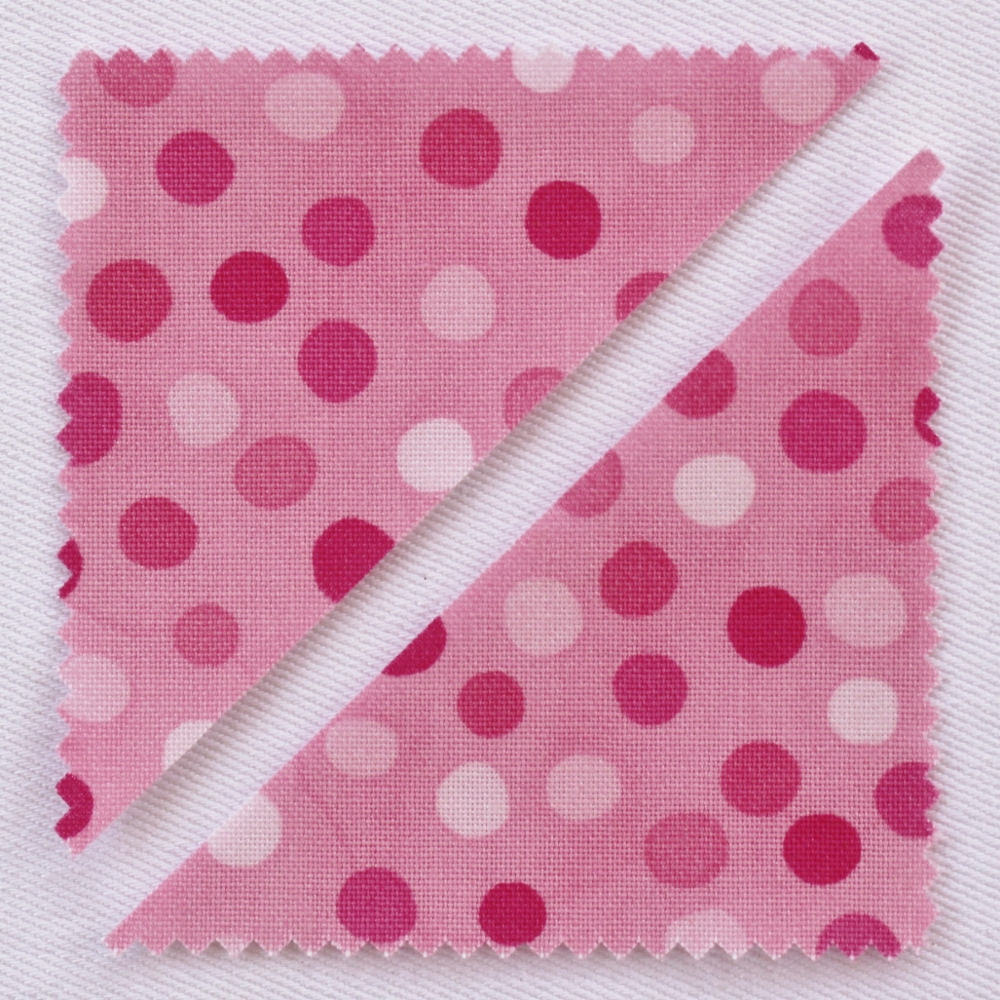
Before cutting, take a moment to look through your fabrics and plan. You'll be making 36 Square in a Square blocks using 2 duplicate mini charm squares for each. I found it helpful to identify which colors from the fabric line I wanted to showcase with my embroidery—in this case, green, orange, pink, aqua, blue, and purple. I then decided that I wanted to make 6 blocks (with matching embroidered flowers) for each of the 6 colors and sorted my mini charm squares accordingly.

CUTTING:
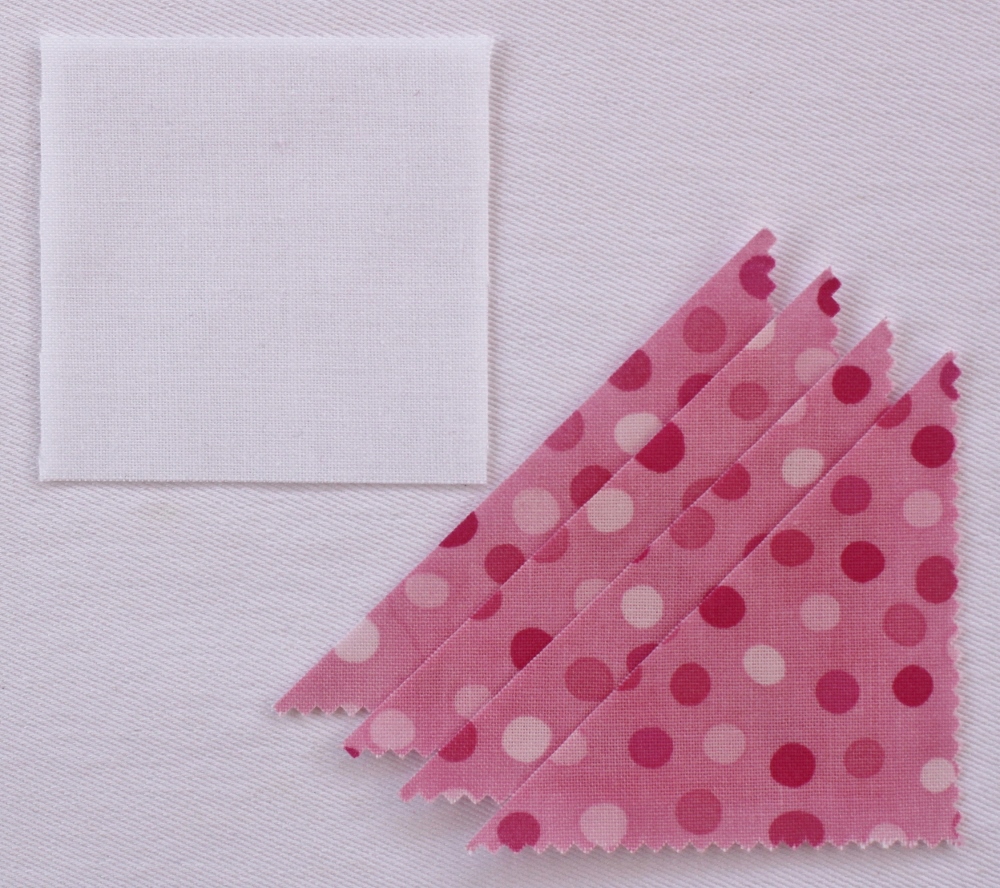
- Cut each of the 72 mini charm squares (36 sets of 2) in half diagonally to create two triangles.
2. From the white background fabric, cut 36—2 1/4" x 2 1/4" squares.
3. From the border fabric, cut 2—1 3/4" x 13" strips and 2—1 3/4" x 23" strips.
4. From the binding fabric, cut 3—2 1/4" x WOF (width of fabric) strips.
5. From your backing fabric, cut a panel 18" x 30".
SQUARE IN A SQUARE BLOCKS:
You can make the Square in a Square blocks for this quilt using either traditional piecing or paper piecing—the cutting is the same for both methods. I chose to paper piece the blocks, but I'll include instructions for traditional piecing as well.
Paper Pieced Square in a Square Blocks:
The following are some paper piecing tips that I included in my last tutorial. If you’re new to paper piecing, you might find it helpful to check out some online video tutorials first—YouTube has several.
- When positioning fabric shapes for sewing, it helps to hold the foundation pattern and fabric shapes up to a light source (window, light box, lamp) to check your positioning.
- Shorten your stitch when paper piecing to 18-20 stitches per inch. This helps you to more readily remove the paper from the back of your work when you’re finished.
- Foundation papers specifically designed for paper piecing are great to work with and much easier to remove from your finished work. If you don’t have access to foundation paper and decide to use regular copy paper, just be very careful when removing it from the back of your work to make sure you don’t pull out your stitches.
- Start sewing a couple of stitches before each sewing line and stop a couple of stitches beyond each sewing line.
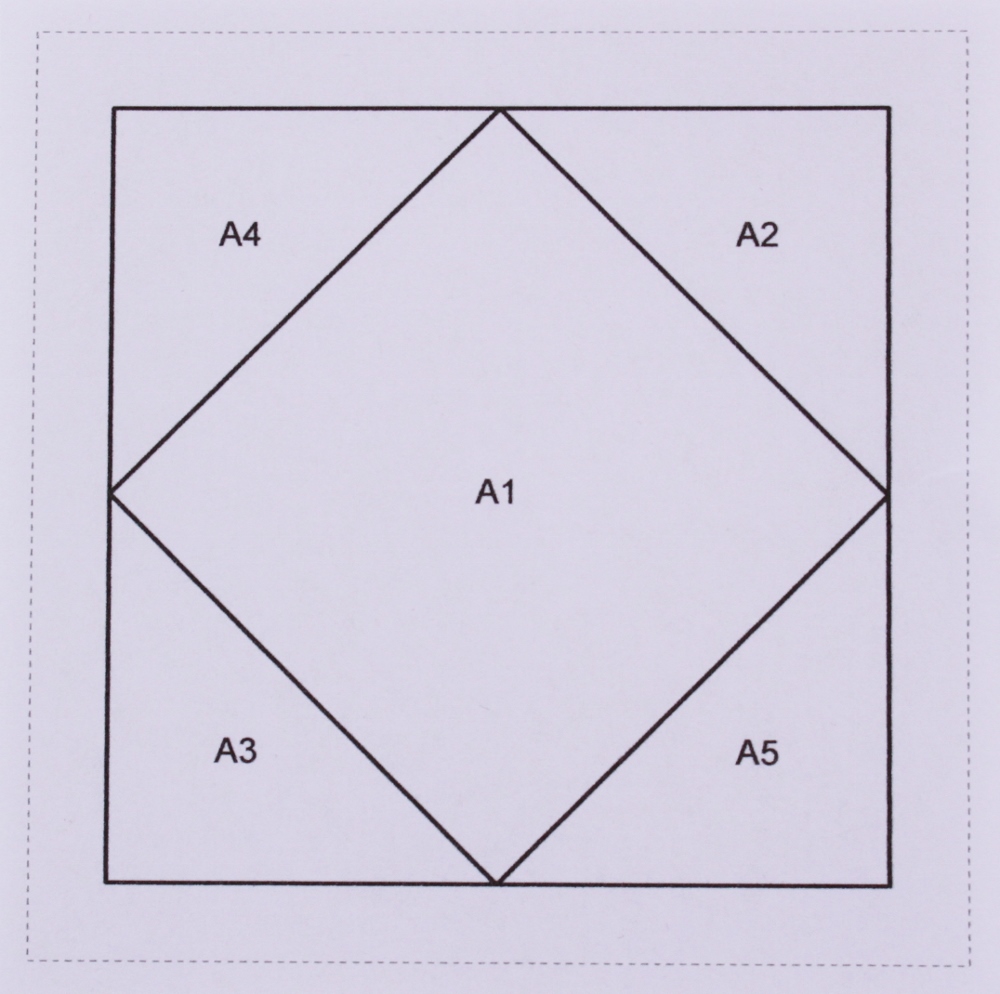
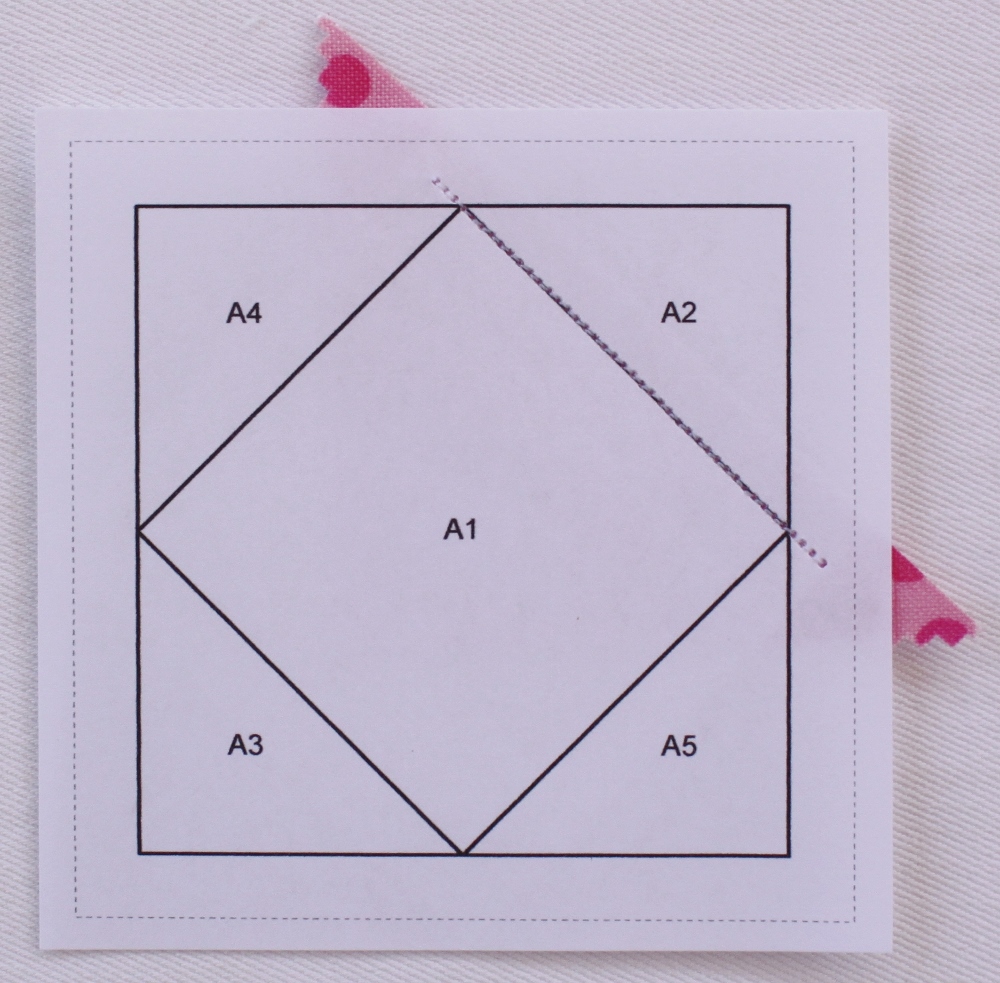
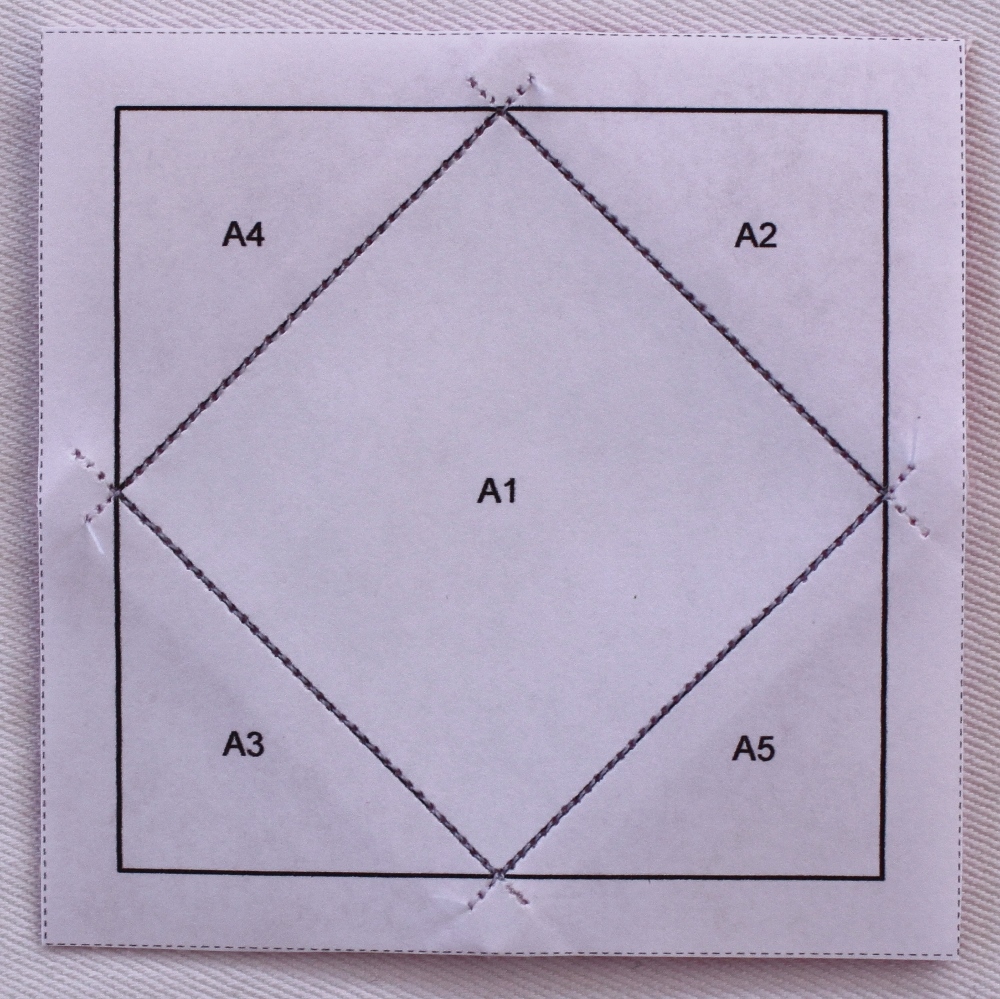
You’ll need 36 foundation pattern for the Square in a Square blocks. Here's a link to a pattern sheet containing 6 Square in a Square foundation patterns. Before you get started, make sure that the foundation patterns measure 3″ x 3″ from outermost line to outermost line.
For each Square in a Square block, you'll need 1 foundation pattern:
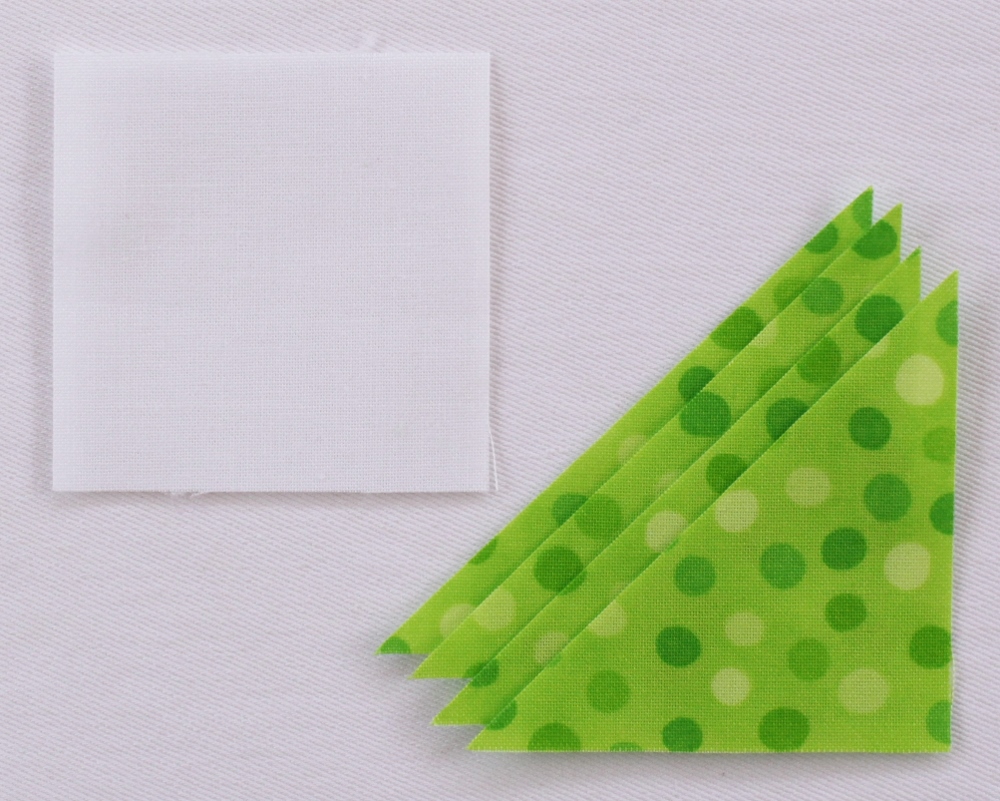
You'll also need 1 background fabric 2 1/4" x 2 1/4" square and 4 triangles cut diagonally from 2 duplicate mini charm squares:
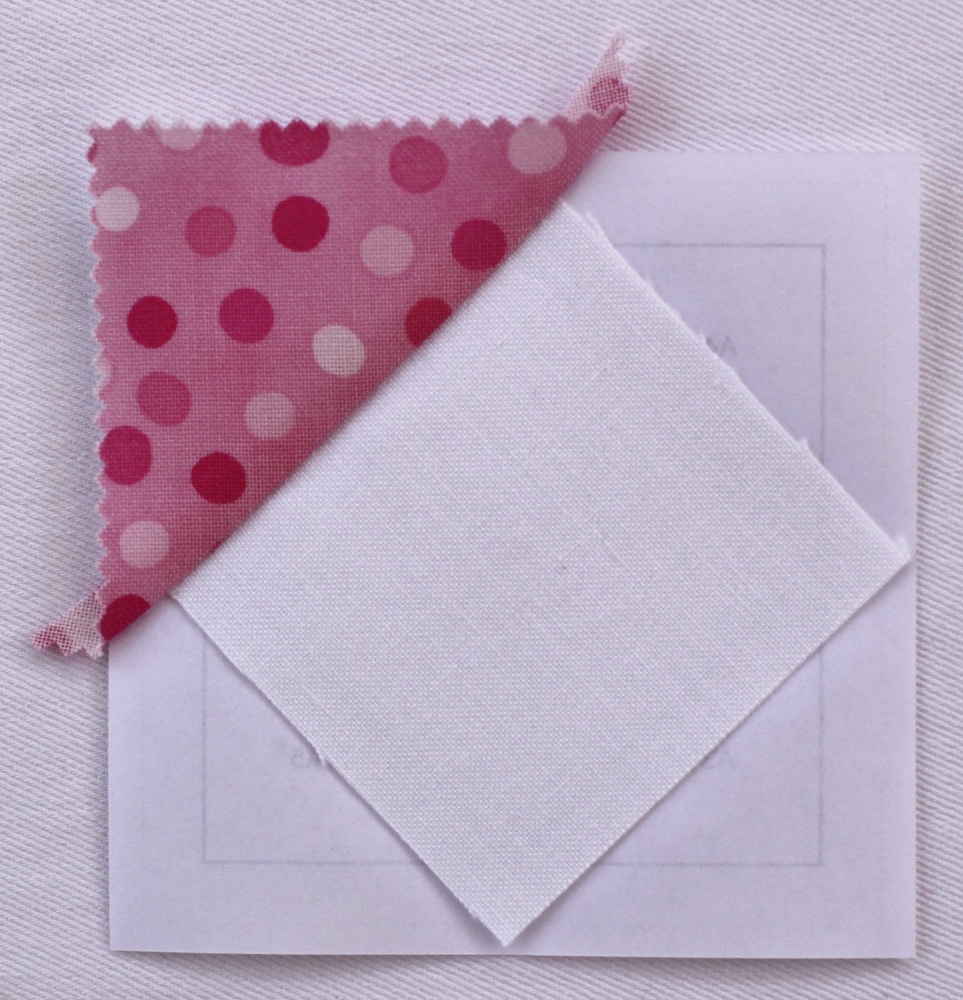
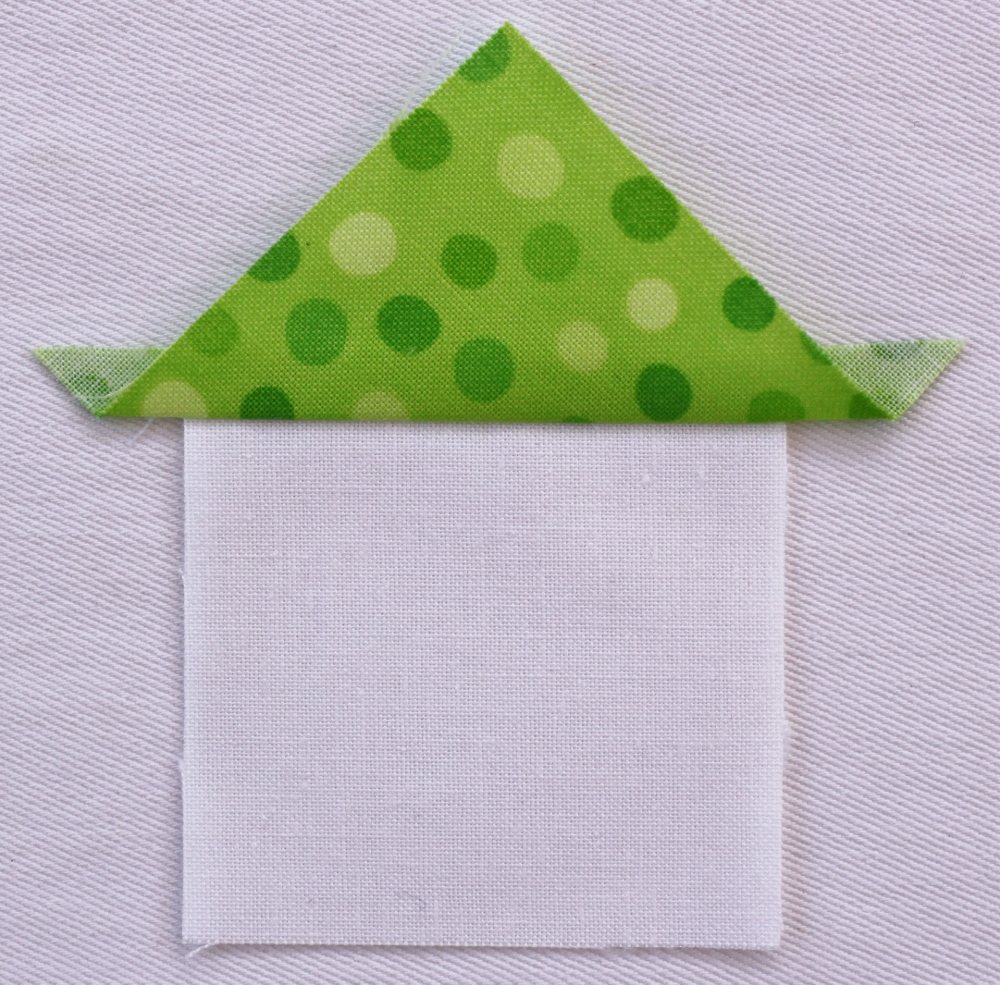
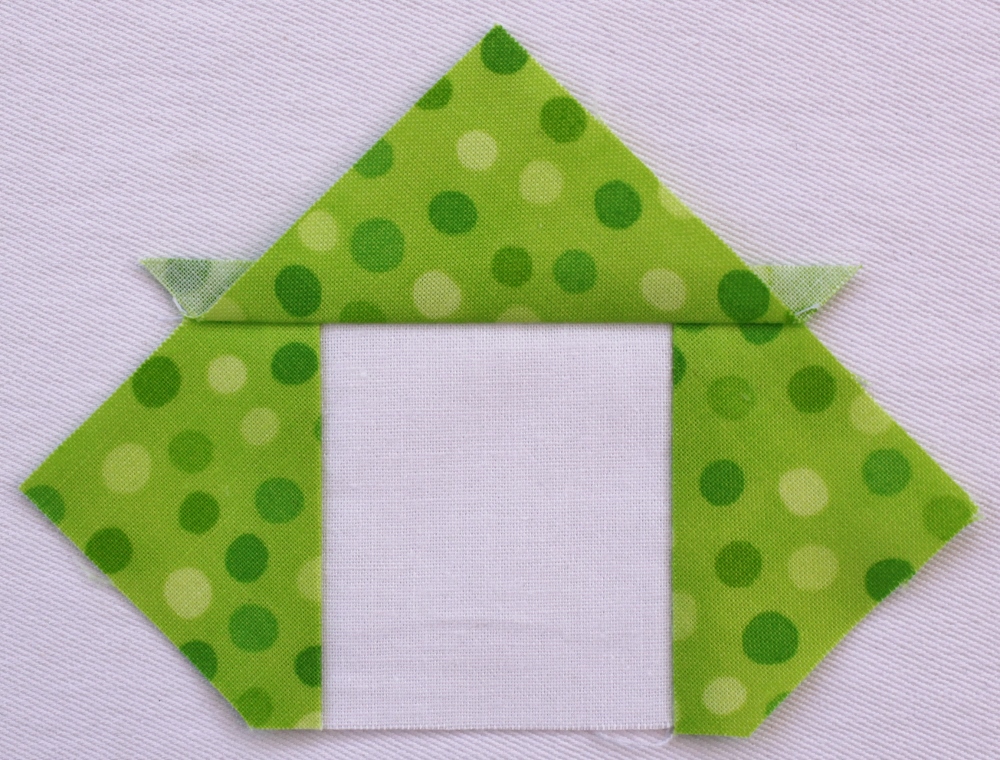
- Lay your foundation pattern right side down on a flat surface. Position the white background 2 1/4″ square right side up on the blank side of the paper, making sure that it completely covers section A1 and extends at least 1/4″ beyond all sides of section A1. You can pin the 2 1/4″ square in place if you like.
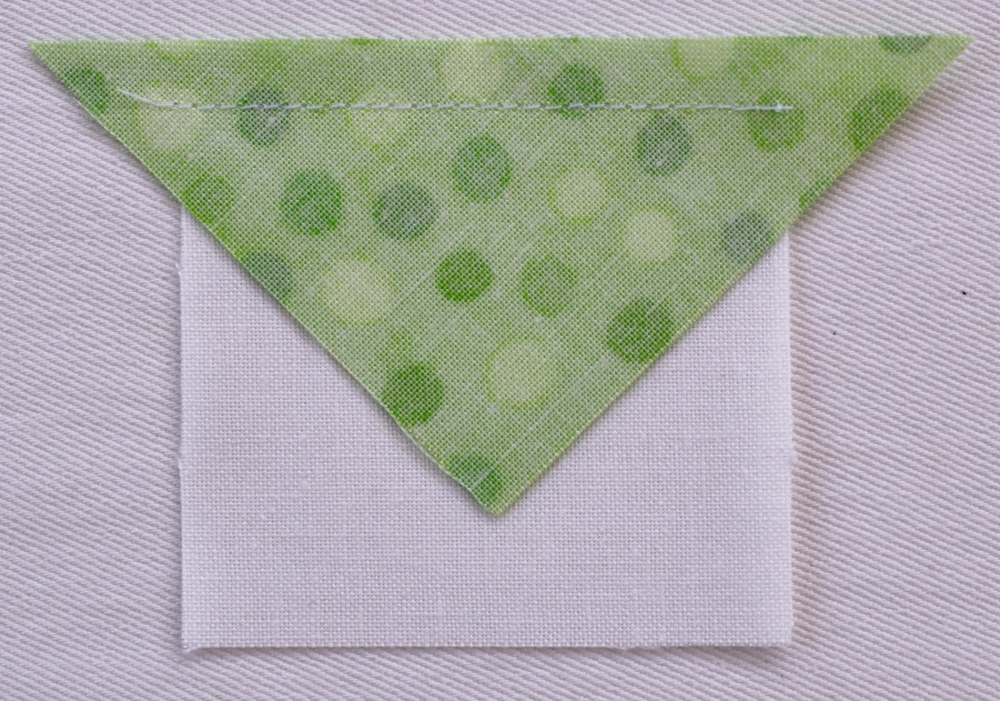
- Position 1 mini charm triangle atop the white 2 1/4″ with right sides together. The long edge of the triangle should run parallel to the line between sections A1 and A2 and should extend into section A2 by at least 1/4″. Position the triangle in such a way that when folded over after sewing, it will completely cover section A2 and extend at least 1/4″ beyond all edges of the section.
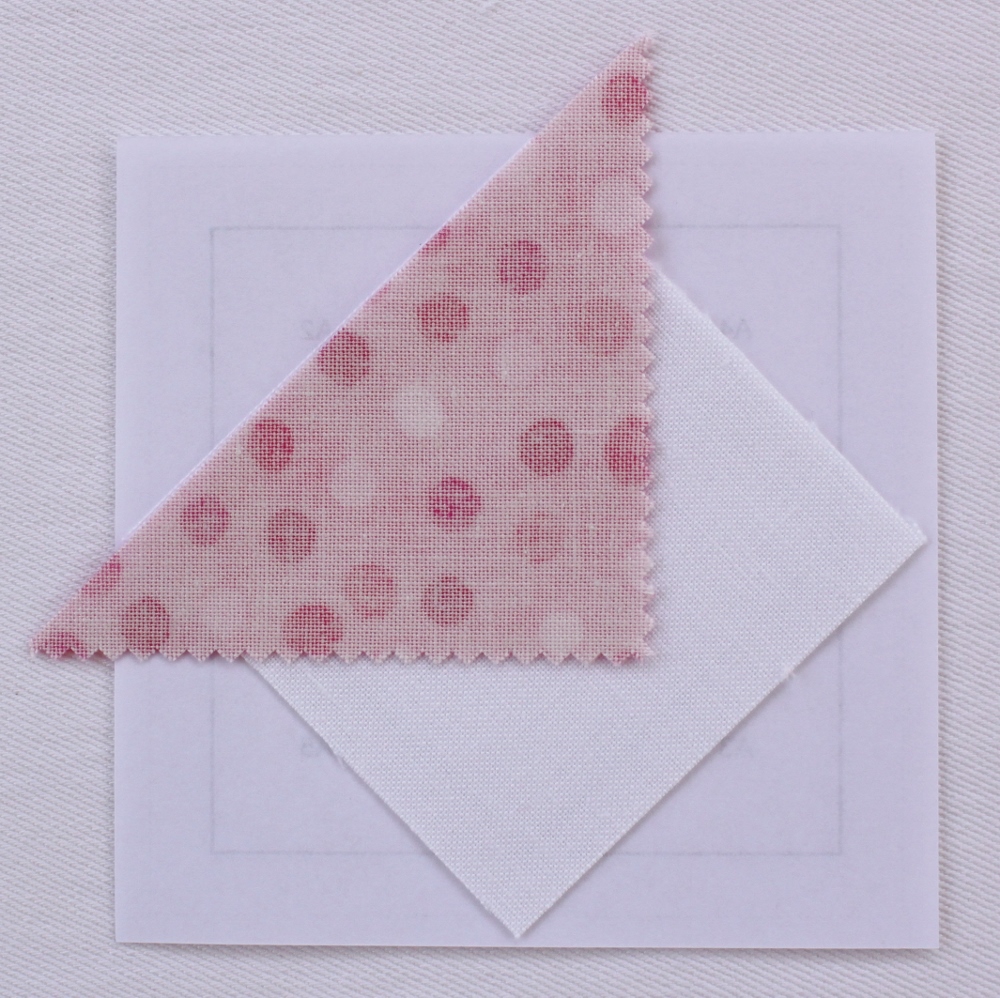
3. Flip your work over and stitch directly on the line between sections A1 and A2.
4. Flip your work over again, and fold back the paper along the seam line. Trim seam allowance to a scant 1/4".

5. Unfold paper and press.

6. Open fabric and press. Before moving on to the next area, make sure that the mini charm triangle covers area A2 completely, including an extra 1/4″ on each side.
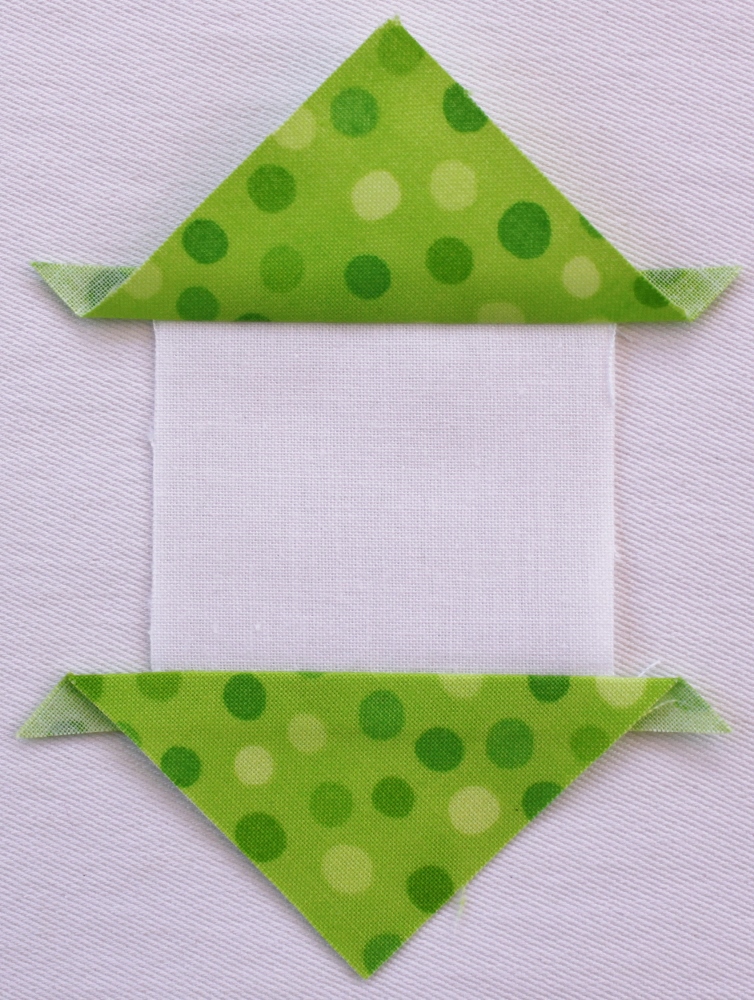
7. Continue in same manner, covering area A3 with a second mini charm triangle:
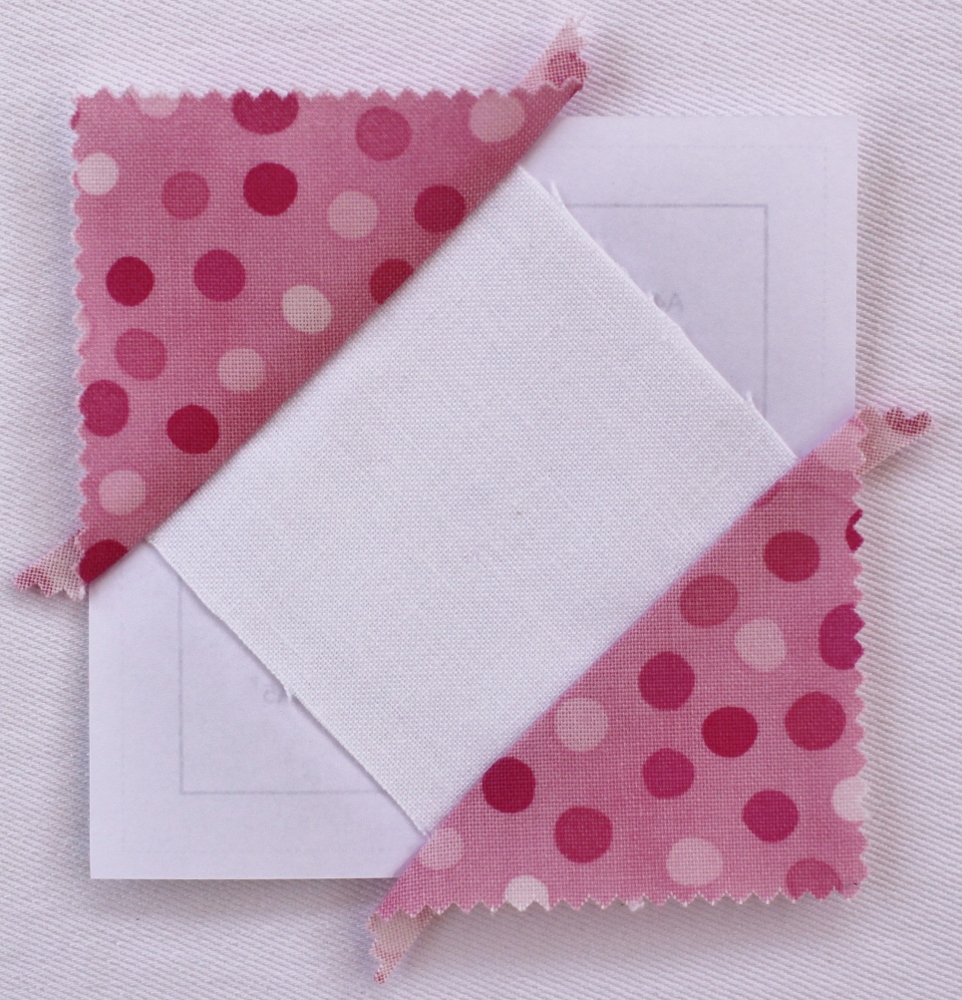
8. In same manner, cover area A4 with a third mini charm triangle:
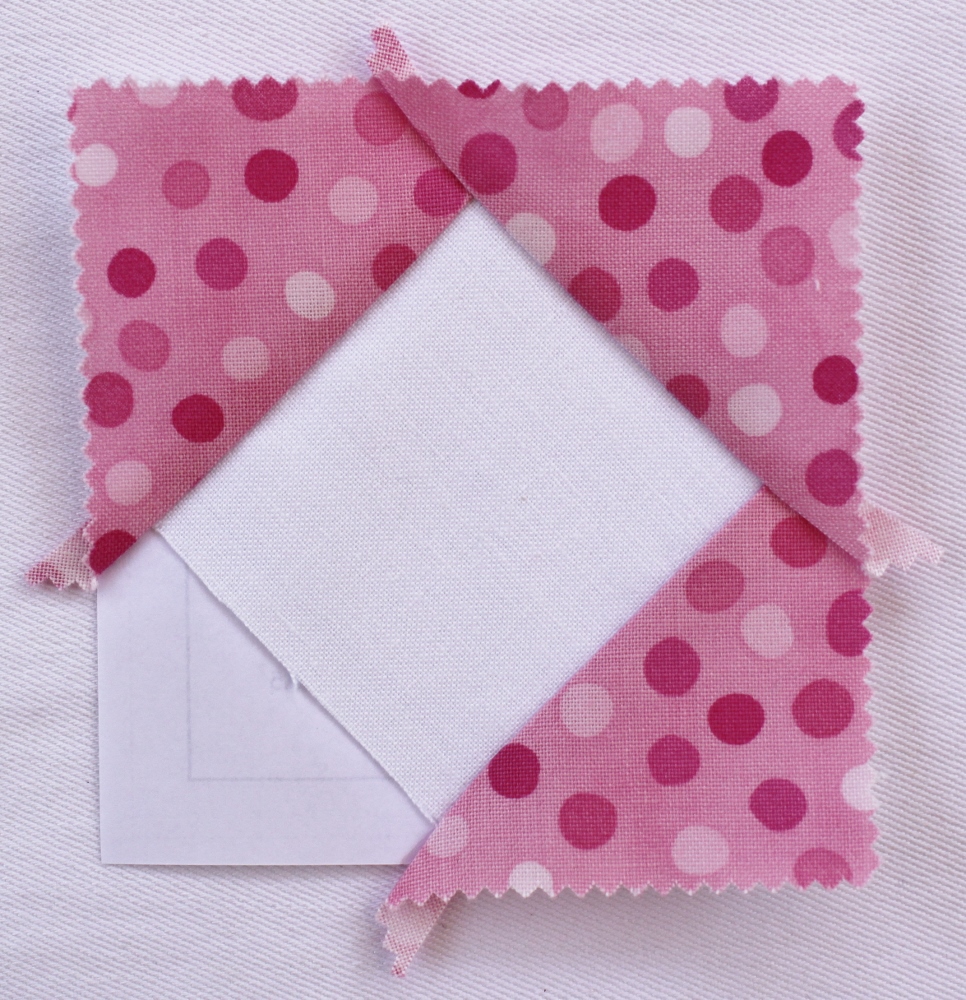
9. And finally, in same manner, cover area A5 with a fourth mini charm triangle:
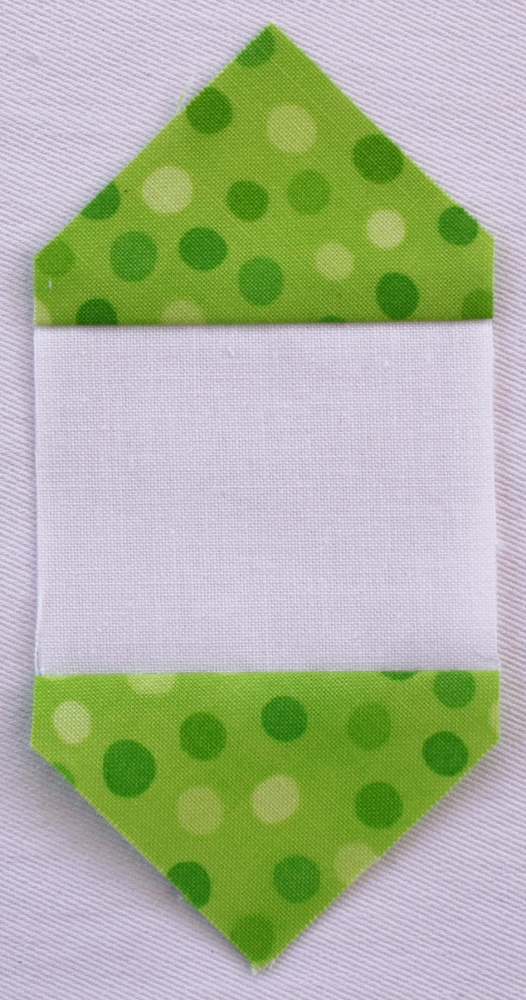
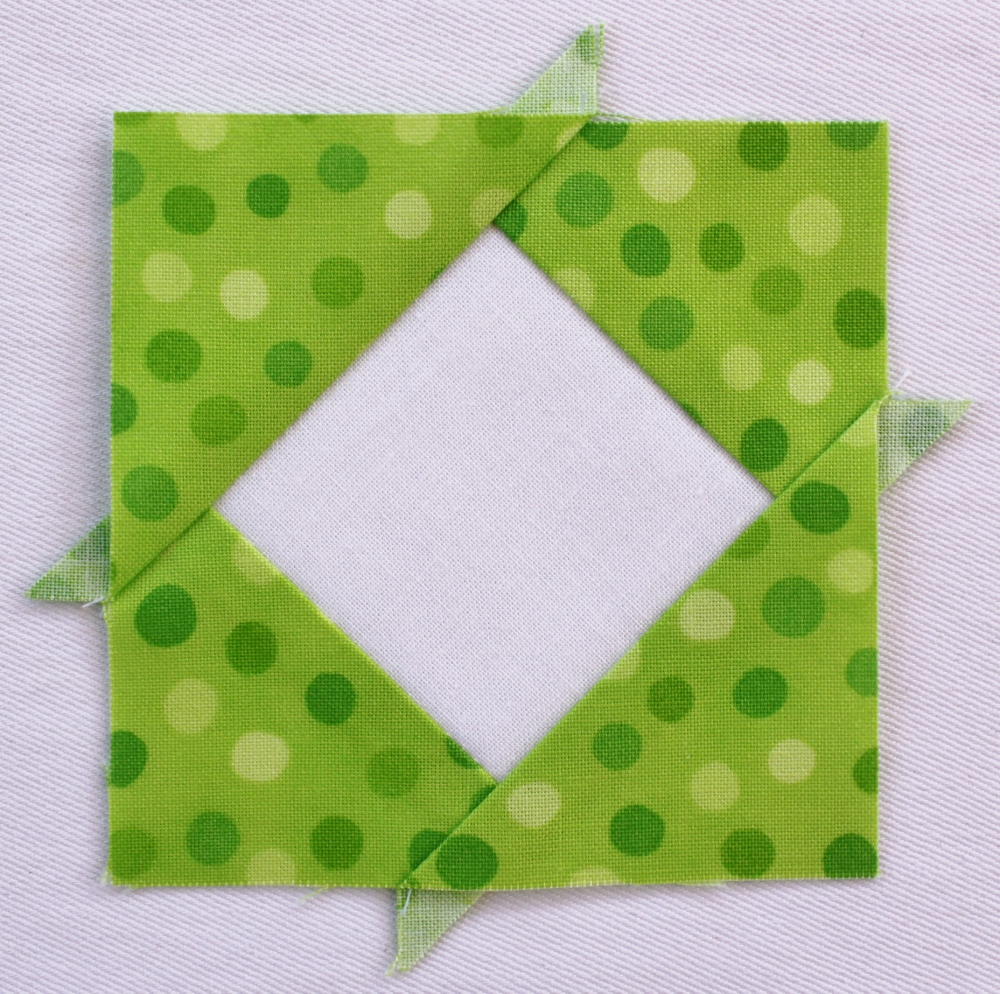
10. Flip work over and trim through all layers carefully along outermost line.
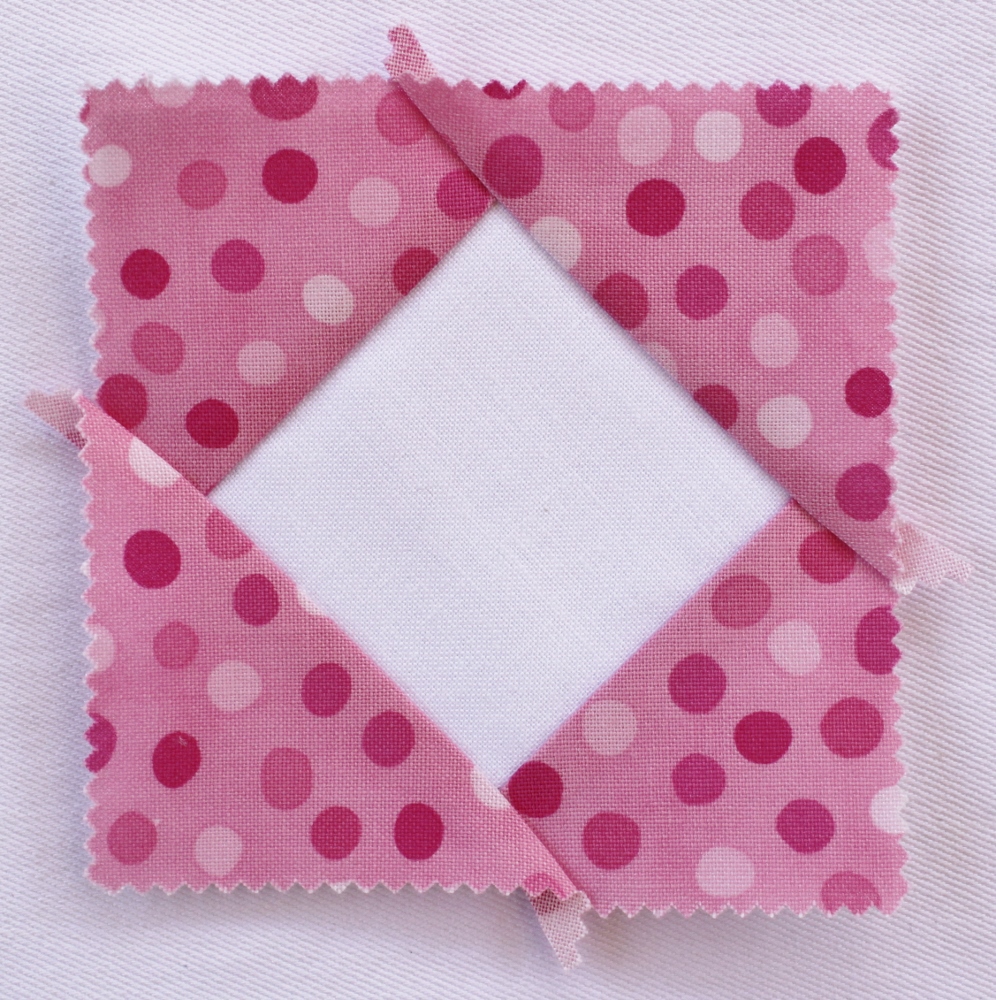
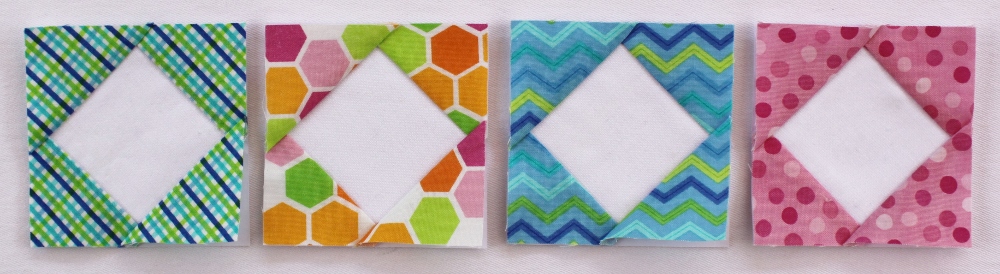
11. This is what your finished block should look like:

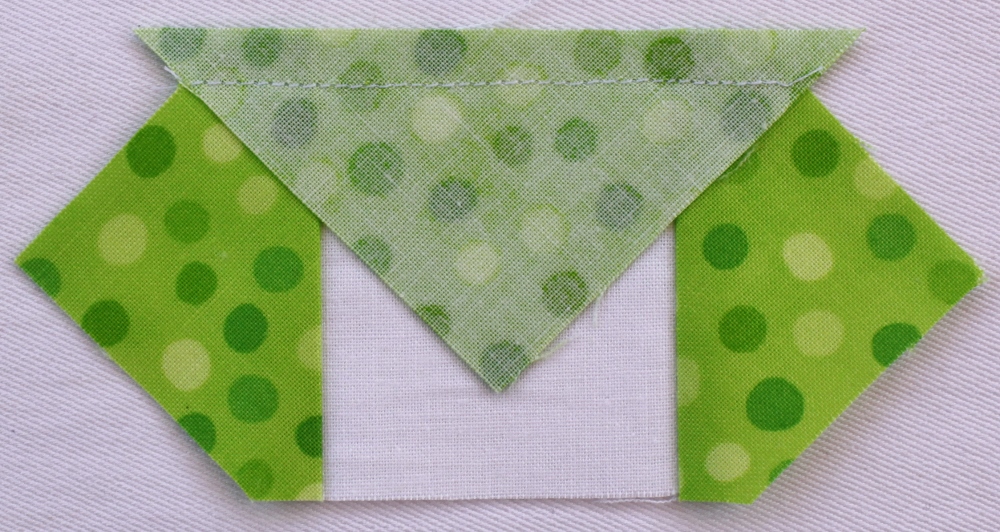
12. Repeat with remaining 35 white background 2 1/4" squares and 35 sets of mini charm triangles to make 36 Square in a Square blocks total.

Traditionally pieced Square in a Square blocks:
Note: this method will result in a white center square that is slightly smaller than the paper pieced blocks. The embroidered flower will still fit in the white center square, but when you stitch the blocks together, a tiny bit more mini charm fabric will show in between the points of the white center squares.
- For each block, gather 1 white background fabric 2 1/4" square and 4 duplicate mini charm triangles.
2. Matching centers, stitch 1 mini charm triangle top edge of white background 2 1/4" square. (Note: the ends of the triangle will extend beyond the 2 1/4" square).
3. Open and press the seam towards the triangle.
4. Stitch a second mini charm triangle to opposite side of white background 2 1/4" square.

5. Open and press seam toward triangle.
6. Trim the triangle ends even with the white background 2 1/4" square.
7. Stitch a third mini charm triangle to one remaining side of white background 2 1/4" square.
8. Open and press seam toward triangle.
9. Stitch a fourth mini charm triangle to remaining side of white background 2 1/4" square.
10. Open and press seam toward triangle.
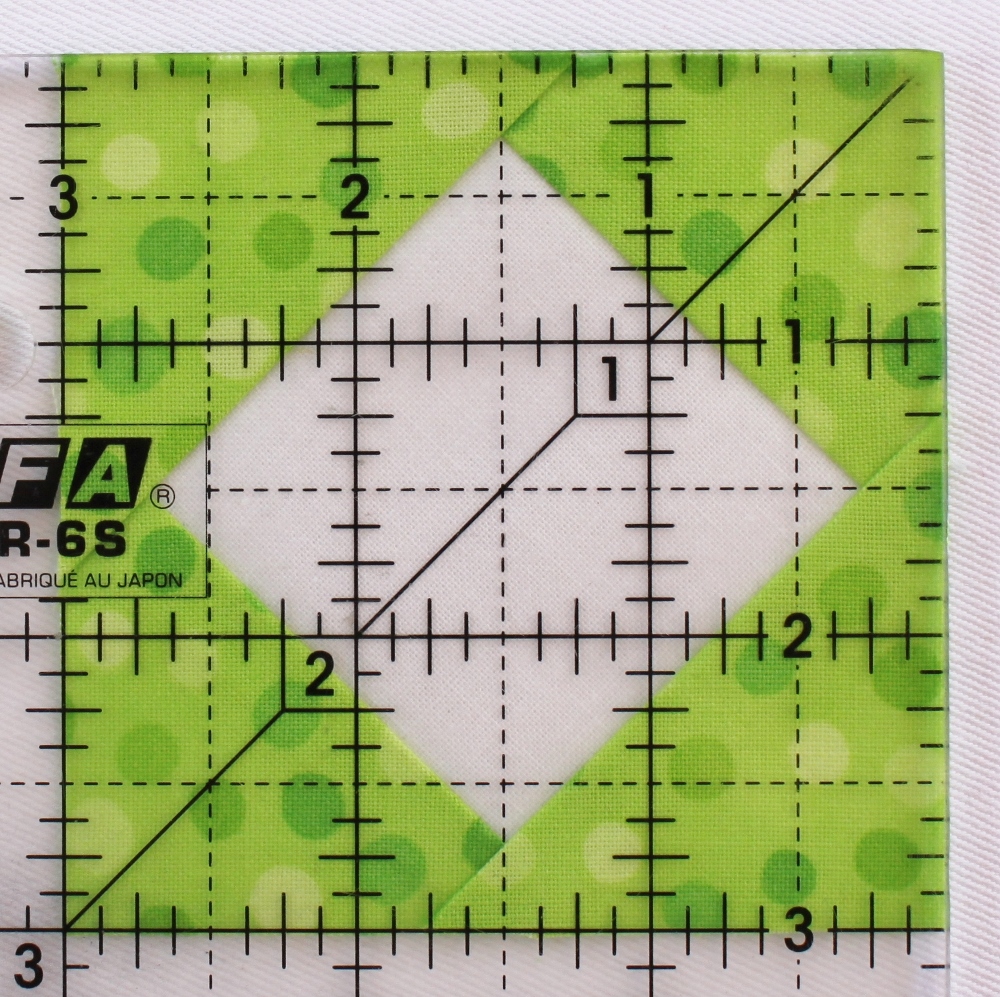
11. Trim block to 3" unfinished. For an accurate seam allowance, as you trim, be sure that the 1 1/2" lines on your ruler intersect with the corners of the white center square
ASSEMBLE QUILT TOP:
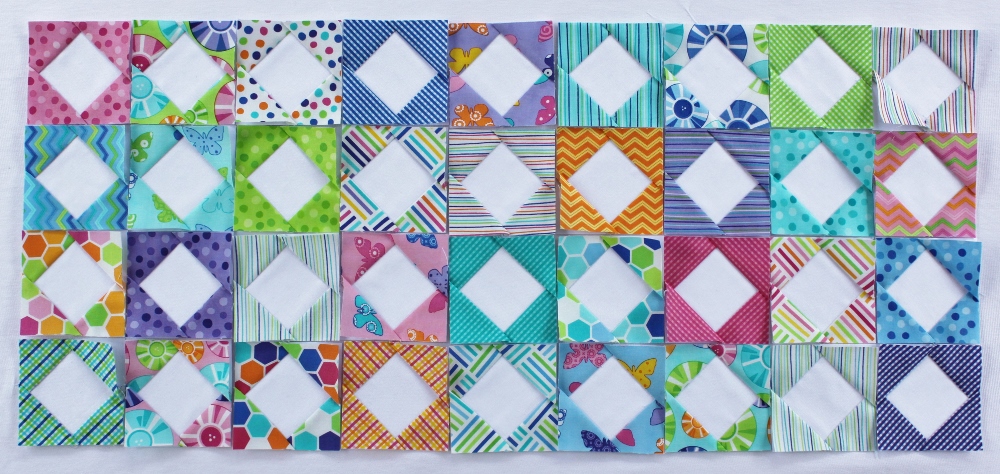
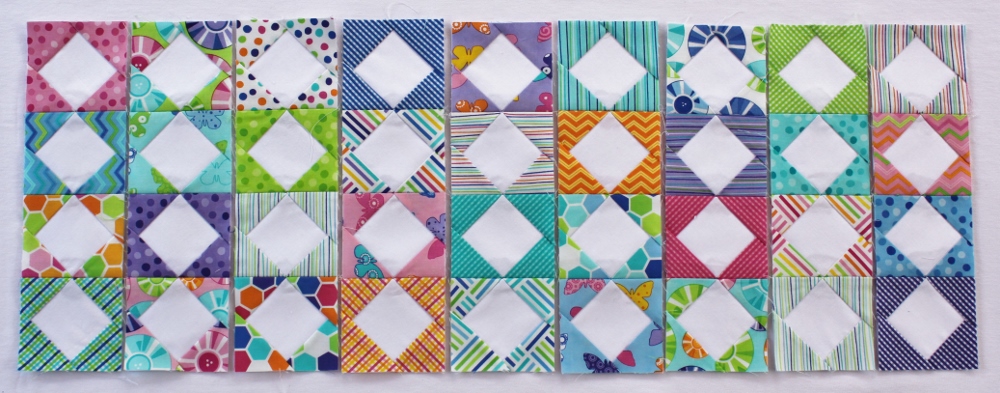
Referring to the project photo, lay out your quilt center on a flat surface before stitching it. When you're deciding on your layout, try to evenly distribute the different colors throughout the quilt center. I was having trouble trying to lay out the blocks and evenly distribute the colors while remembering which color flower I had assigned to each fabric, so I sketched a quick layout plan to help.

That little sketch resulted in this layout:
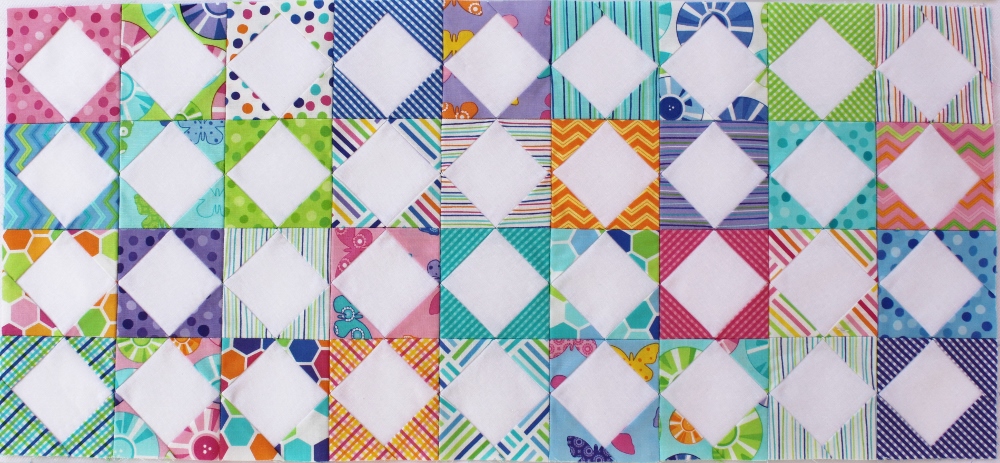
- Once you are happy with your layout, stitch blocks together in 9 rows of 4 blocks each, pressing seams open. Note: if you made your blocks using the paper piecing method, you should remove enough of the foundation paper to enable you to press your seams open.
2. Stitch together 9 rows and press seams open. Note: if you made your blocks using the paper piecing method, remove the remaining foundation paper from behind the blocks before pressing the seams open.
3. Stitch 1 border fabric 1 3/4" x 23" strip to each long side of quilt center. Press seams towards the border fabric.
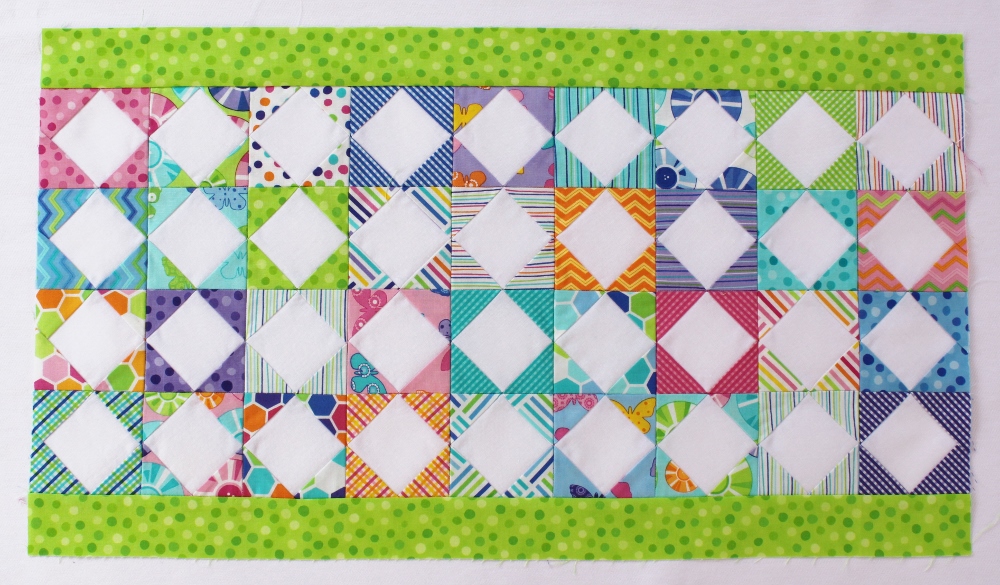
4. Stitch 1 border fabric 1 3/4" x 13" strip to each short side of quilt center. Press seams towards the border print.

EMBROIDER QUILT TOP:
- Using a light box or other light source and a washout marking pen, trace a flower in the white background of each Square in a Square block. You can find the flower template here.
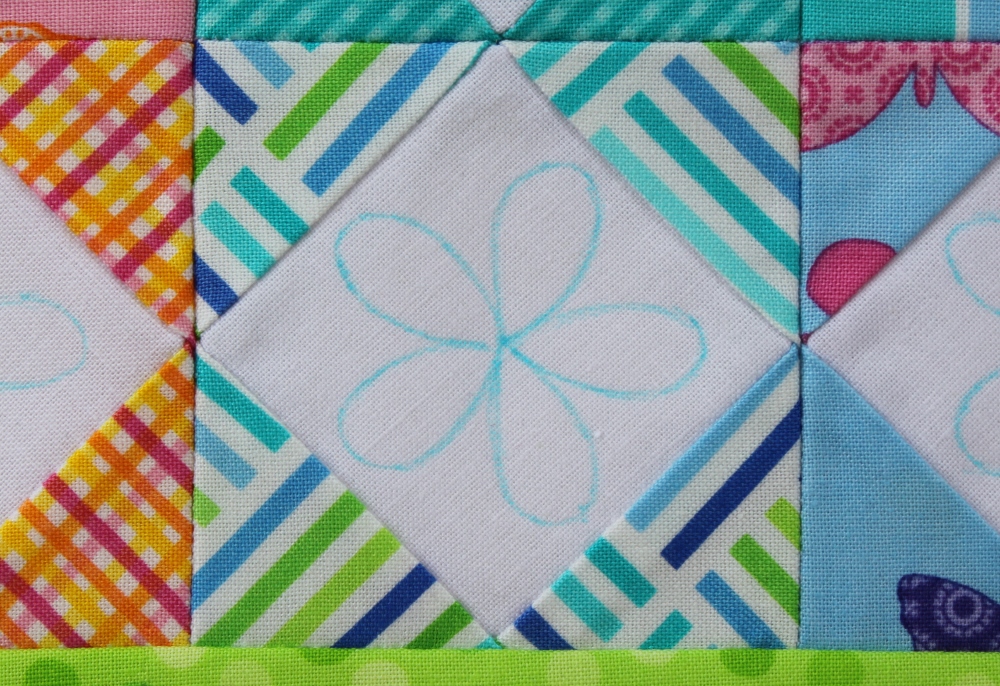
2. Layer the marked quilt top with batting ONLY and baste. Because this is a small piece, I used spray basting adhesive to baste my quilt. It really holds your work still during the embroidery.
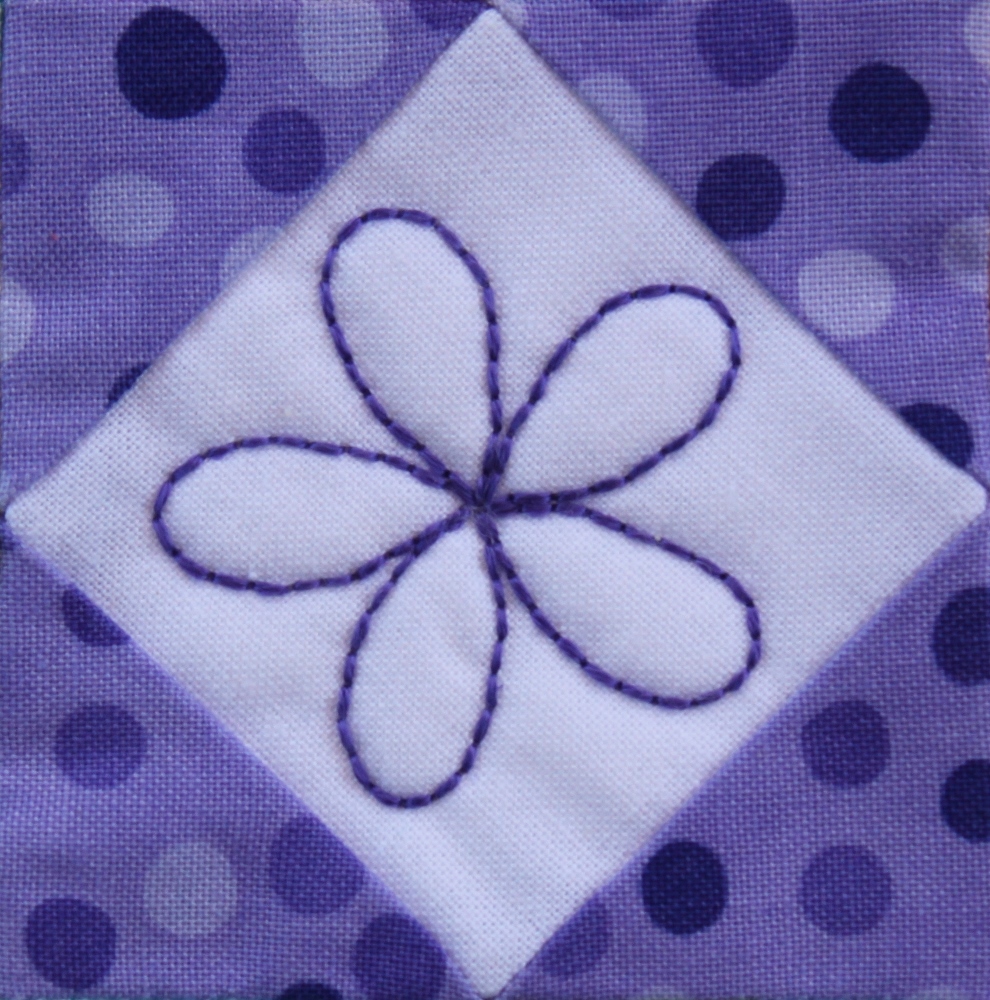
3. Then the fun part: using two strands of embroidery floss and a backstitch, embroider each of the 36 flowers. Here's my charming rendition of the backstitch:
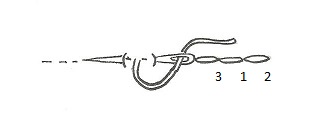
Working from right to left and following the marked line, bring your needle up at point 1 and down at point 2. Then move slightly left and bring your needle up at point 3 and then back down again at point 1. Continue in this manner, keeping your stitches as even as possible, until you've stitched the flower. Knot or bury your floss ends in the back of your work.
FINISH QUILT:
After you've embroidered all of your flowers, carefully wash out marking pen. Once you are sure that all of your marking is removed, gently press your embroidered quilt top/batting. Layer the embroidered quilt top/batting with backing fabric and baste—once again, I used spray basting adhesive. Then trim your quilt through all layers, bind, and quilt if desired.
![]()
One colorful and Happy!! 13" x 25 1/2" table runner!

If you'd like to see another version of Happy!! made with "Meadowbloom" fabric by April Rosenthal for Moda, be sure to check out my blog.
Happy quilting and happy summer!
Jen Daly
{jendalyquilts.com}
![]()
Posted in: