Warehouses Closed June 6-13 For Exclusive Event
Hi-Tech Windmill Quilt
Hi-Tech Windmill Quilt
Published:
Sep 5 2016 - 23:00


It is day two! The day of the scraps! High-tech Windmill day! I am Elisabeth DeMoo and I am so happy to be here with you again. If you missed day one head over to the post from the 4th of September. You will need to complete all of the steps from day one so we will start at the same point. Our scraps (block b) are ironed flat. We now need to fill in the rest of the block. I used a different white fabric for this because I wanted to see the variation. This quilt finishes at 65" x 65". Here is a breakdown of the quilt.
![]()

31.5” of a white on white fabric
18" of Bella Solid - teal
18" of Bella Solid - yellow
21" of Bella Solid - orange
Starch
Cleaning Wipe
![]()
- Sorting through your block b (scraps for day 1), group like-colors in sets of four - you will need a total of 9 sets.
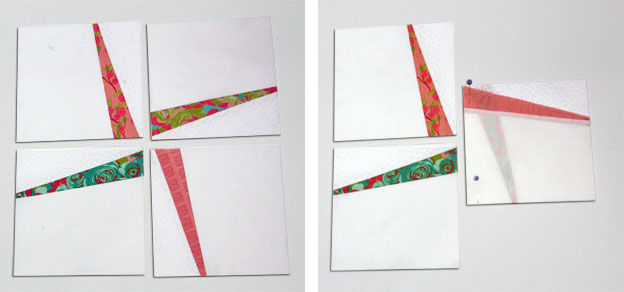
- Cut 36 - 3.5” x 10” rectangles. Pin and sew a white rectangle to the color edge of block b. Open, starch and press flat. Do this for a total of 36 times.

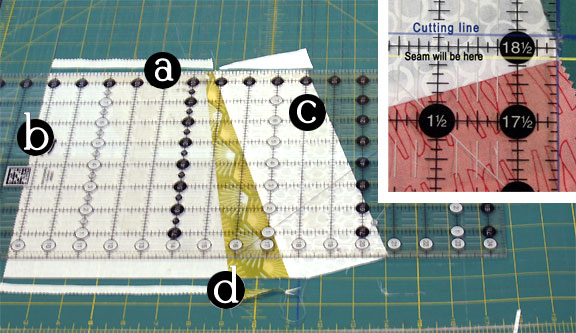
- Place block on the pencil drawn box (from day one that measures 9.25”) on your cutting mat. Make sure side A is fully covered with fabrics. Then check your bottom and make sure that that it is on your bottom mat line. The goal is to have .25” of white before the color start on your top right edge. Cut side A and then side D. Adjust the top if needed to achieve the .25” goal. Cut on the mat top line and then cut on the mat bottom line. The size of the block is now 9.25”. Do this for a total of 36 blocks. Then wipe clean your mat taking off the color pencil lines.
- Line up the thicker color edge of a block to the newly added top white edge. Pin and sew two like-colored blocks together. Open, starch and press flat. Do this for a total of 18 half high-tech windmill rectangles.
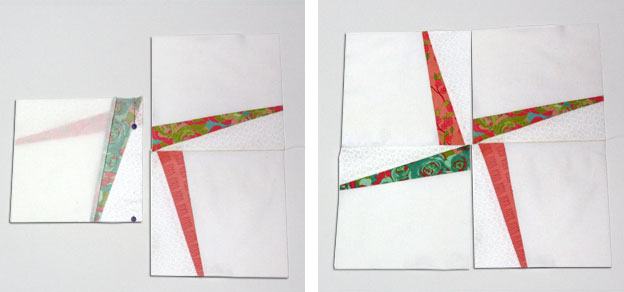
- Line up the thicker colored edges of two like-colored half high-tech windmill rectangles together. On the long side of that edge, pin and sew. Open, starch and press flat. Do this for a total of 9 high-tech windmill blocks.
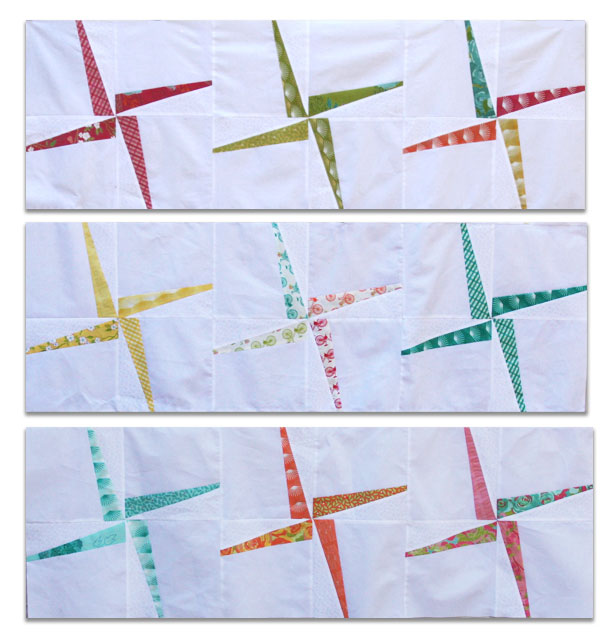
- Lay out your rows. Each row will have 3 high-tech windmill blocks. Now is the time to decide how you want your colors to be placed. I had one mostly white block so I put that in the center. Taking pictures with your phone can help you see the colors and remember what you liked and didn’t like.
- Pin and sew three high-tech windmill blocks together to form rows. Open, starch and press flat.
- Pin and sew your rows together. Open, starch and press flat.
- Create your rainbow border. Cut 6 - 3.5” strips of the teal Bella Solid Fabric (remove the salvages). Sew the short edges together, making sure that all of your seams are on the same side of the long strip. Iron all seams flat. Pin and sew the large strip to the top edge of your quilt. Cut off the extra strip about an inch away from the quilt edge. Pin and sew the long strip to the bottom edge of the quilt. Open the top edge, starch and press flat. Open the bottom edge, starch and press flat.

Trim so there is a straight edge where the quilt meets the strip edge. Pin and sew the large strip to the right side edge of your quilt. Pin and sew the large strip to the left side edge of your quilt. Open the right side edge, starch and press flat. Open the other left side edge, starch and press flat. Trim so there is a straight edge where the strip meets the strip edge. Do this for a total of three colored edges (last edge might need one more strip).


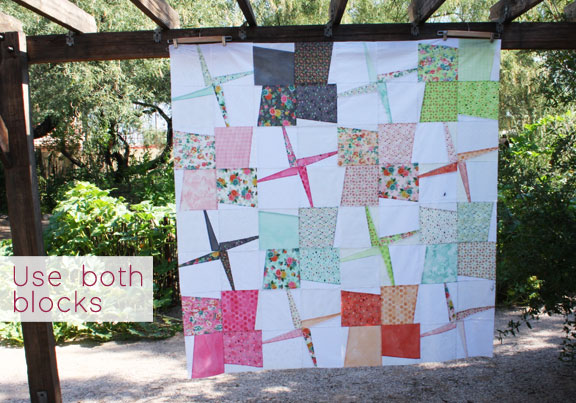
As you can see there is even a 3rd quilt possibility. I made the quilt above with both blocks in the same quilt. I hope you like this quilt set. I had so much fun making it.
![]()
This quilt finishes at 65" x 65". Quilt as desired and bind.
Elisabeth DeMoo
{brownbirddesignsquilts.com}
![]()
Posted in: