Welcome to Moda Fabrics!
Thicket of Stars Quilt
Thicket of Stars Quilt
Published:
Sep 21 2016 - 23:00


Hello all, and welcome back to the Bake Shop! I'm happy to be back with a lovely black and white quilt, featuring the adorable Thicket fabrics by Gingiber. This makes a twin size quilt, and would be great for the child who's outgrown their crib and wants something a bit more grown up! These are lovely fabrics, and I hope you enjoy this project.
This quilt/project finishes at 68" x 80".
![]()

1 Fat Quarter Bundle Thicket by Gingiber
1 WOF Panel (includes eight animal panels)
4 yards background fabric White
2.5 yards backing fabric, 108 inches wide
1 yard binding fabric
Half Right Triangle Template*
(Lazy Girl and Bloc Loc both make templates with the 2:1 ratio or print out the provided template in the Printer Friendly Version)
![]()
Cutting directions:
Select the fat quarters with black background fabrics, and, from four different fabrics, cut 4 strips 4.5 inches by ~22 inches.
I used a template for a Half-Rectangle Triangle (HRT) to cut the triangles. Use the provided template; label one side with Side A, and the other with Side B.
Take a 4.5 inch strip, and lay the template on one end, lining up the end of the fabric with the long edge of the template.
Cut the fabric along the right edge of the template.
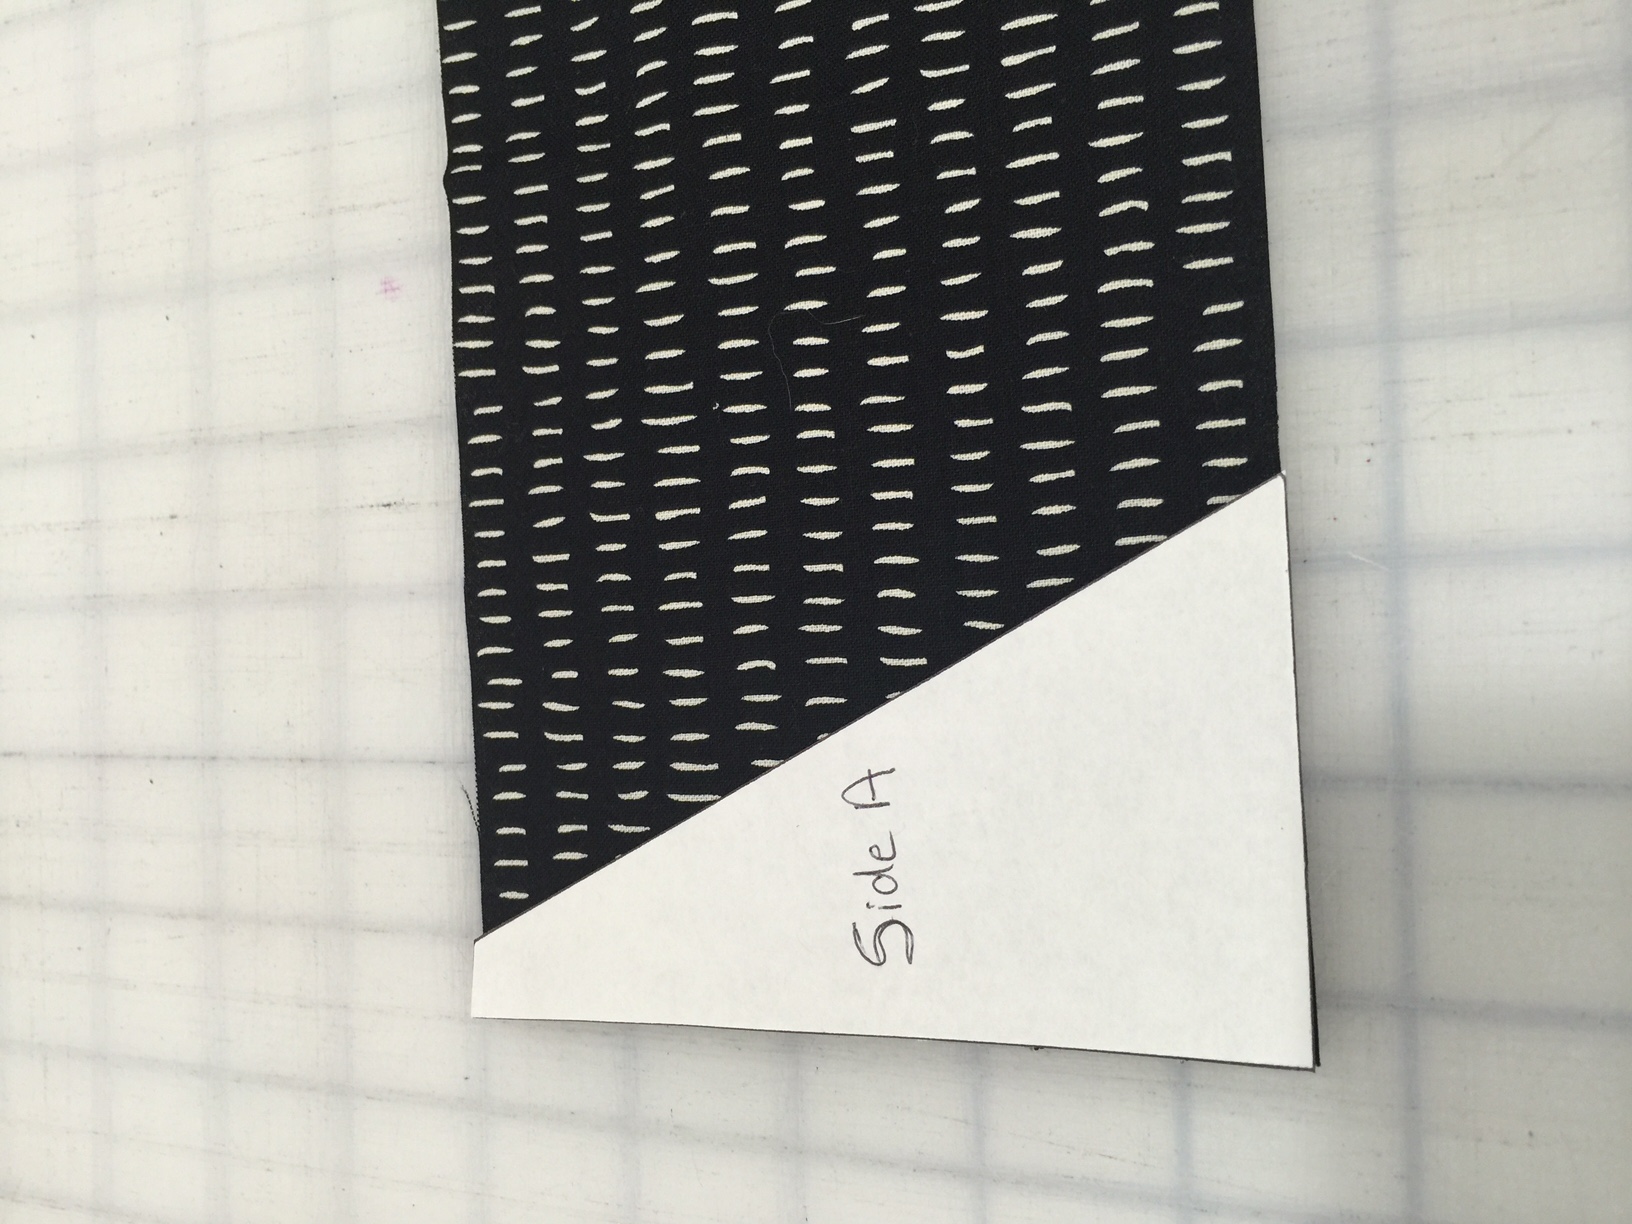
Next, rotate the template 90 degrees. Line up the angle of the fabric with the angle on the template. Cut a total of 48 triangles using side A.
Next take another strip of black fabric and turn the template over, so Side B is up.
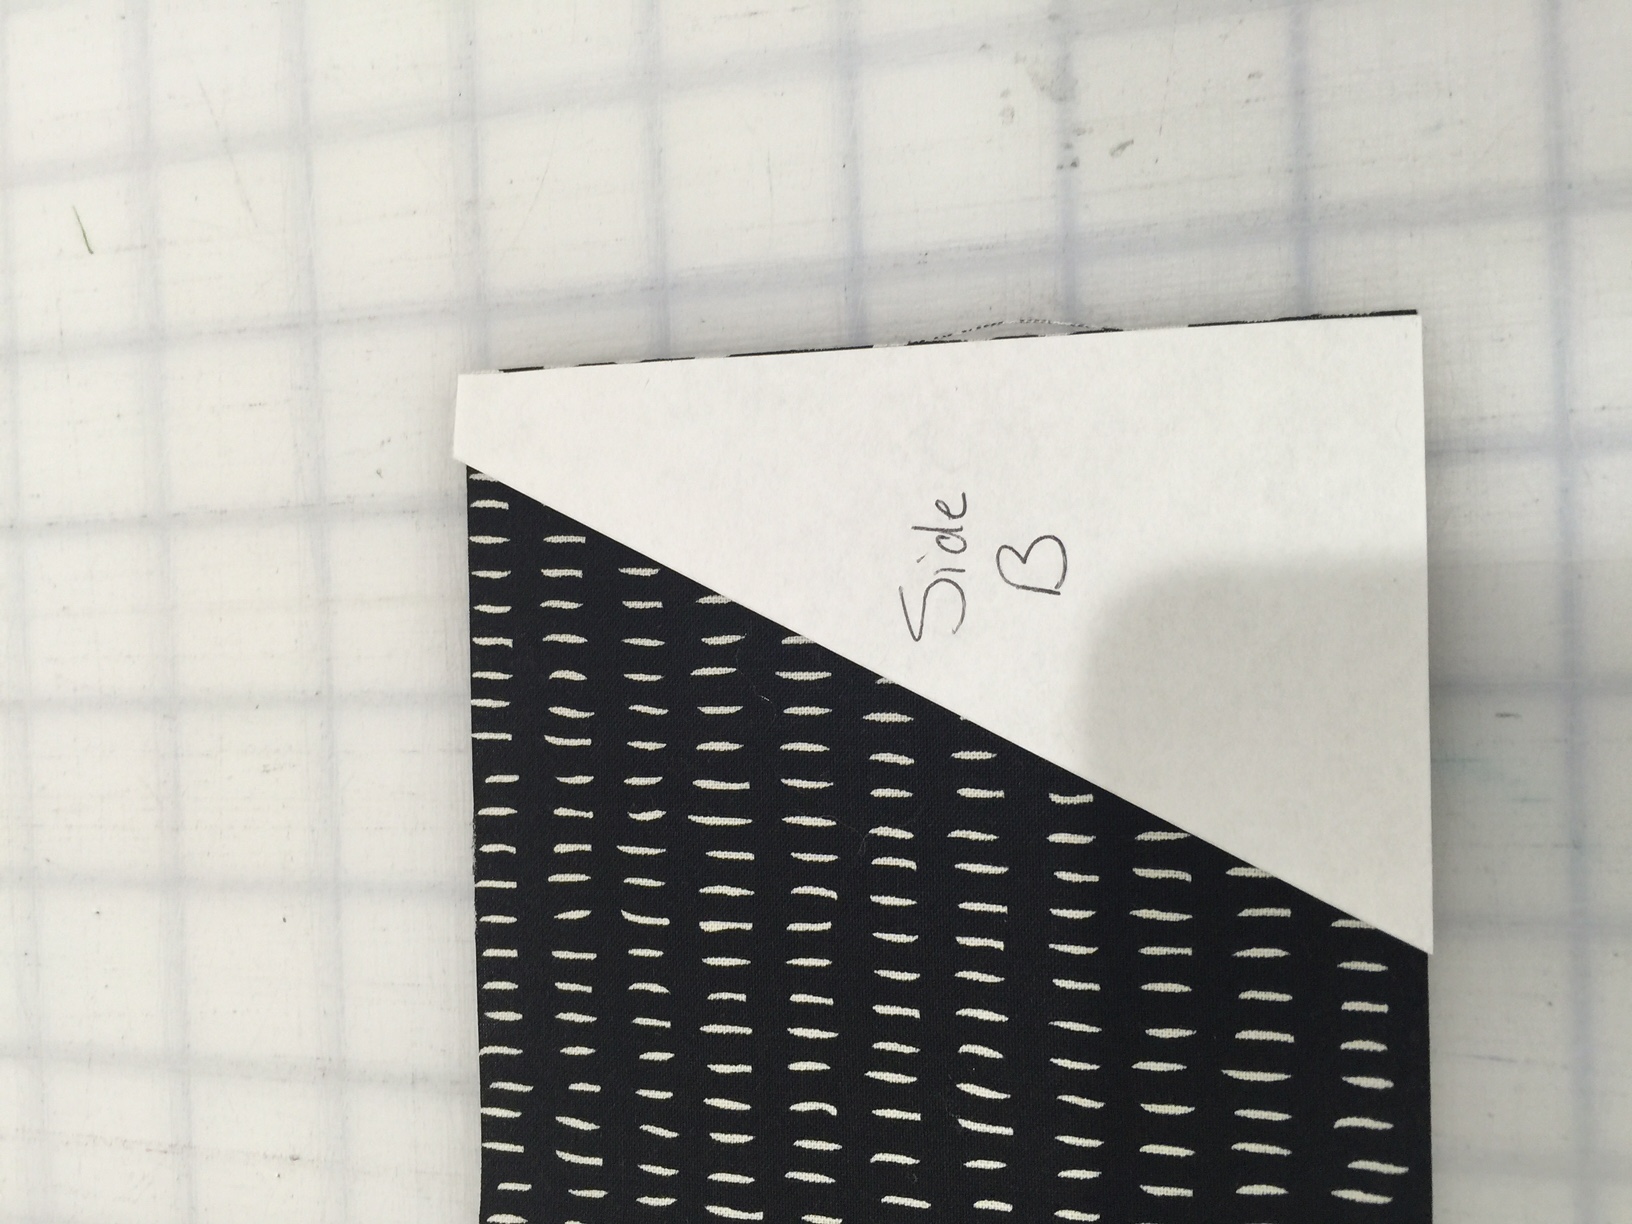
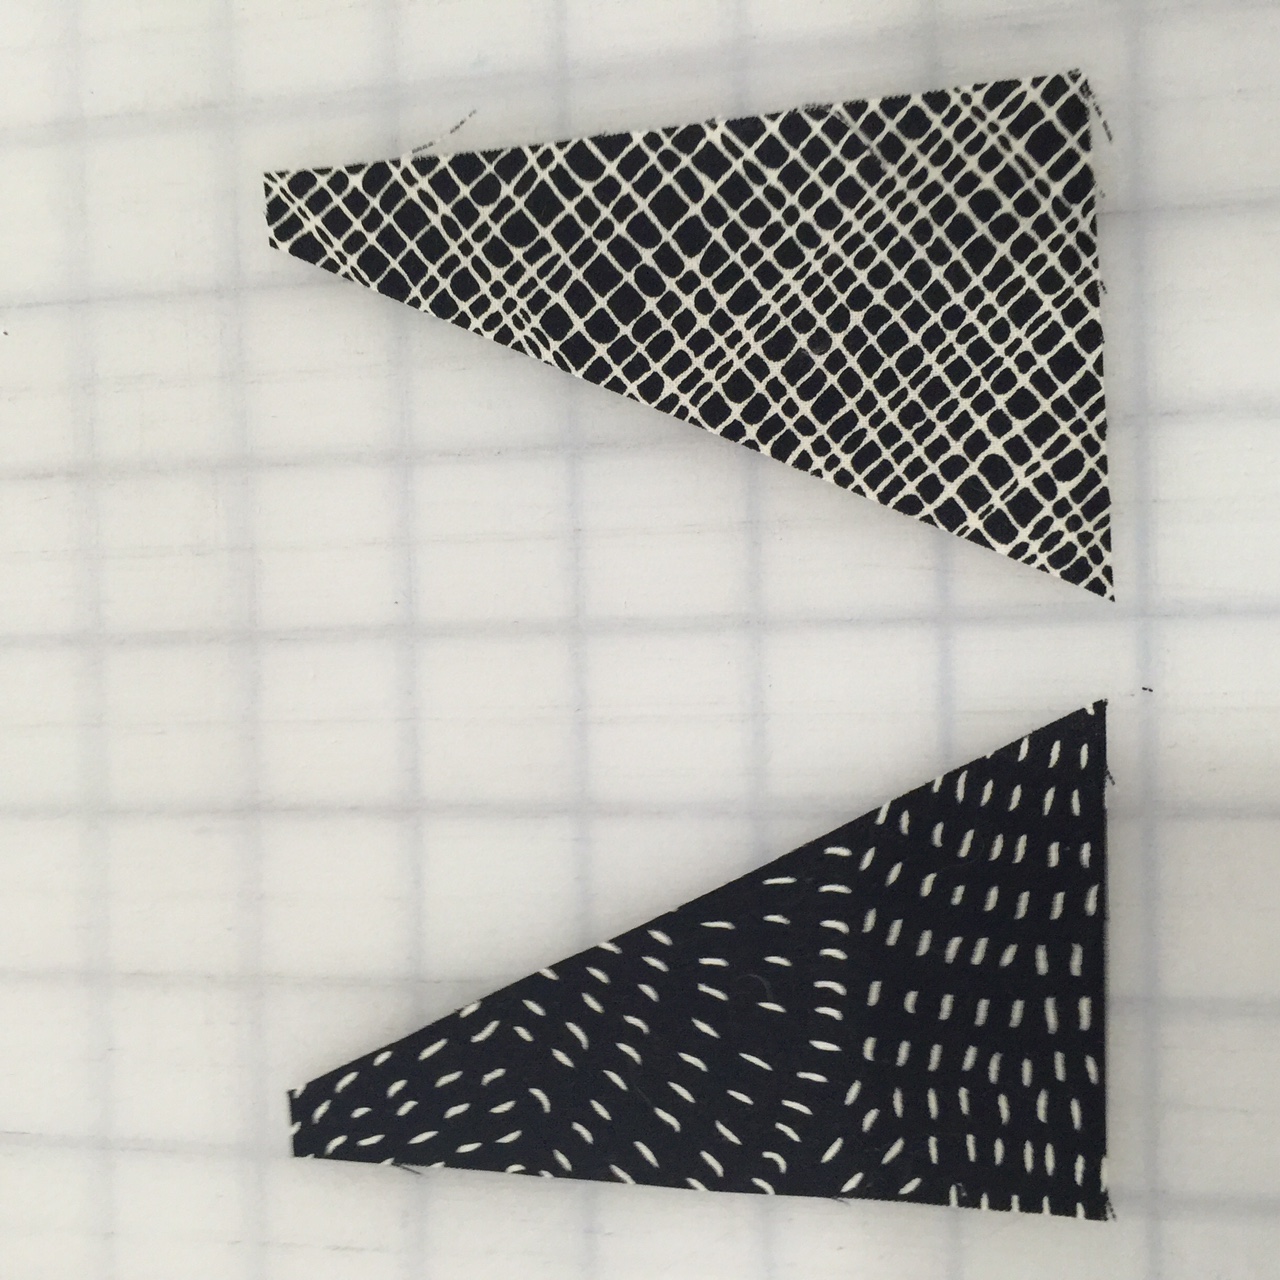
Cut another 48 triangles exactly the same way. These are mirror images of the first 48 you cut.
Take your white background fabric, and cut 27 strips 4.5 inches by WOF.
Cut 96 background triangles using the ruler. (If your background fabric is not reversible, you'll need to cut half of them with the fabric upside down.)
From the remaining strips, cut pieces 4.5 inches by
2.5 inches (8 pieces)
4.5 inches (24 pieces)
6.5 inches (12 pieces)
8.5 inches (18 pieces)
16.5 inches (2 pieces)
18.5 inches (4 pieces)
24.5 inches (2 pieces)
28.5 inches (2 pieces)
The easiest way to cut those is to cut the longest piece you can from each remaining piece, till you have cut all your pieces.
Cut one final background piece 8.5X12.5 inches
Take your panels, and cut eight 8.5 inch squares, centering the square on the animal.

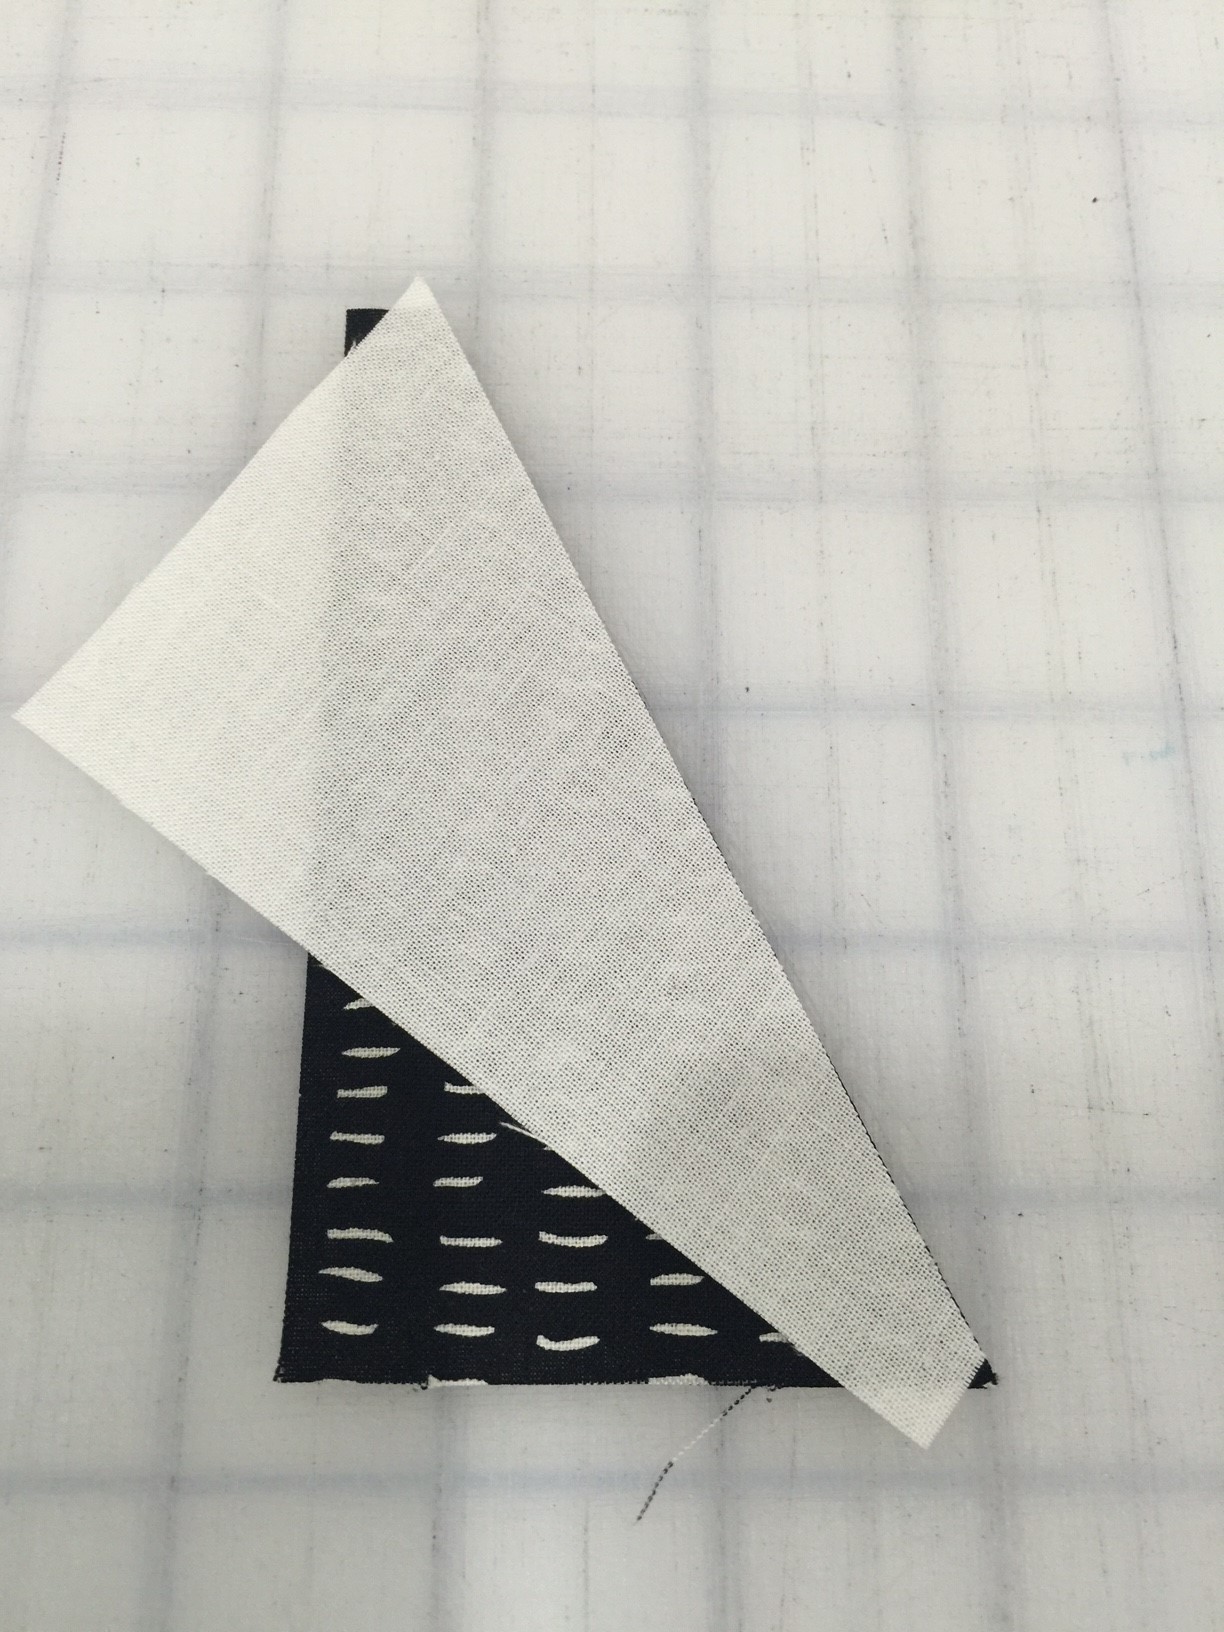
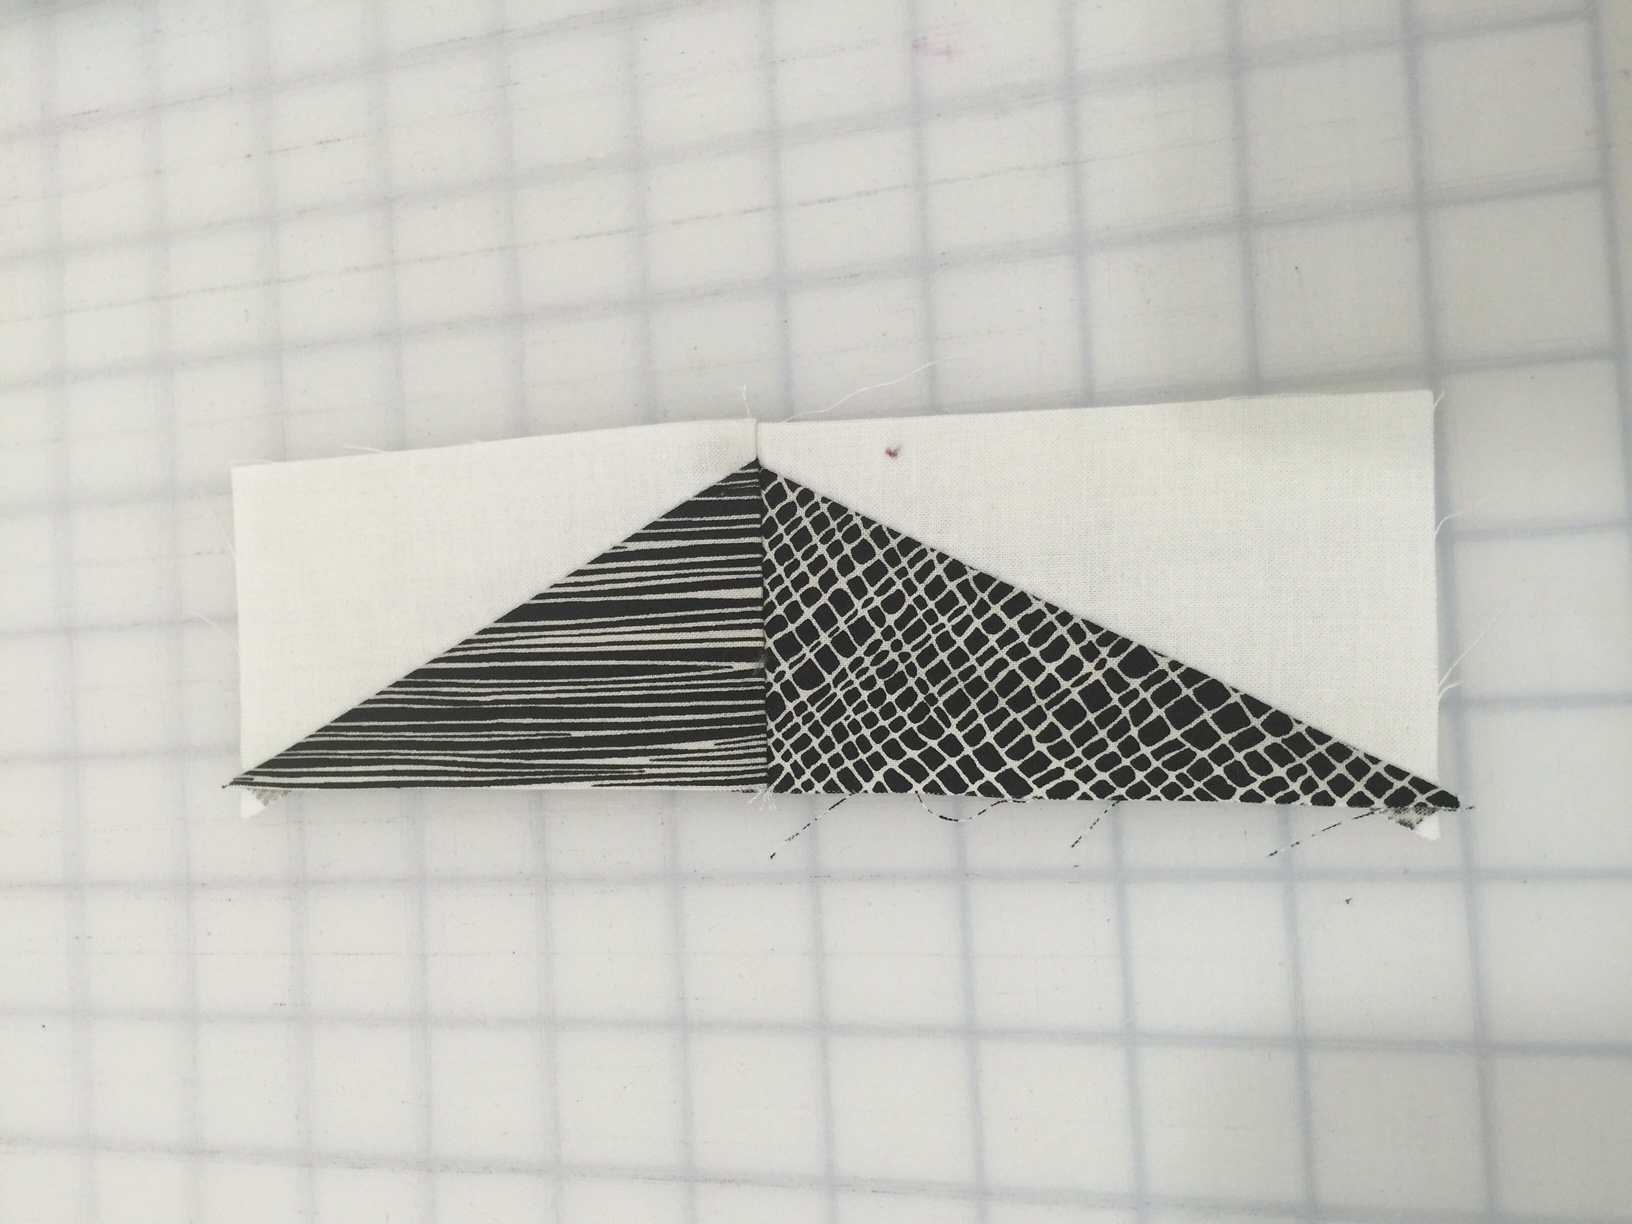
Take all of your triangles, and sew a black triangle and a white triangle together to make a half-rectangle triangle (HRT). Note that the pieces do NOT align all around; if you sew them with the pieces aligned, you'll end up with kite shapes, and not rectangles.
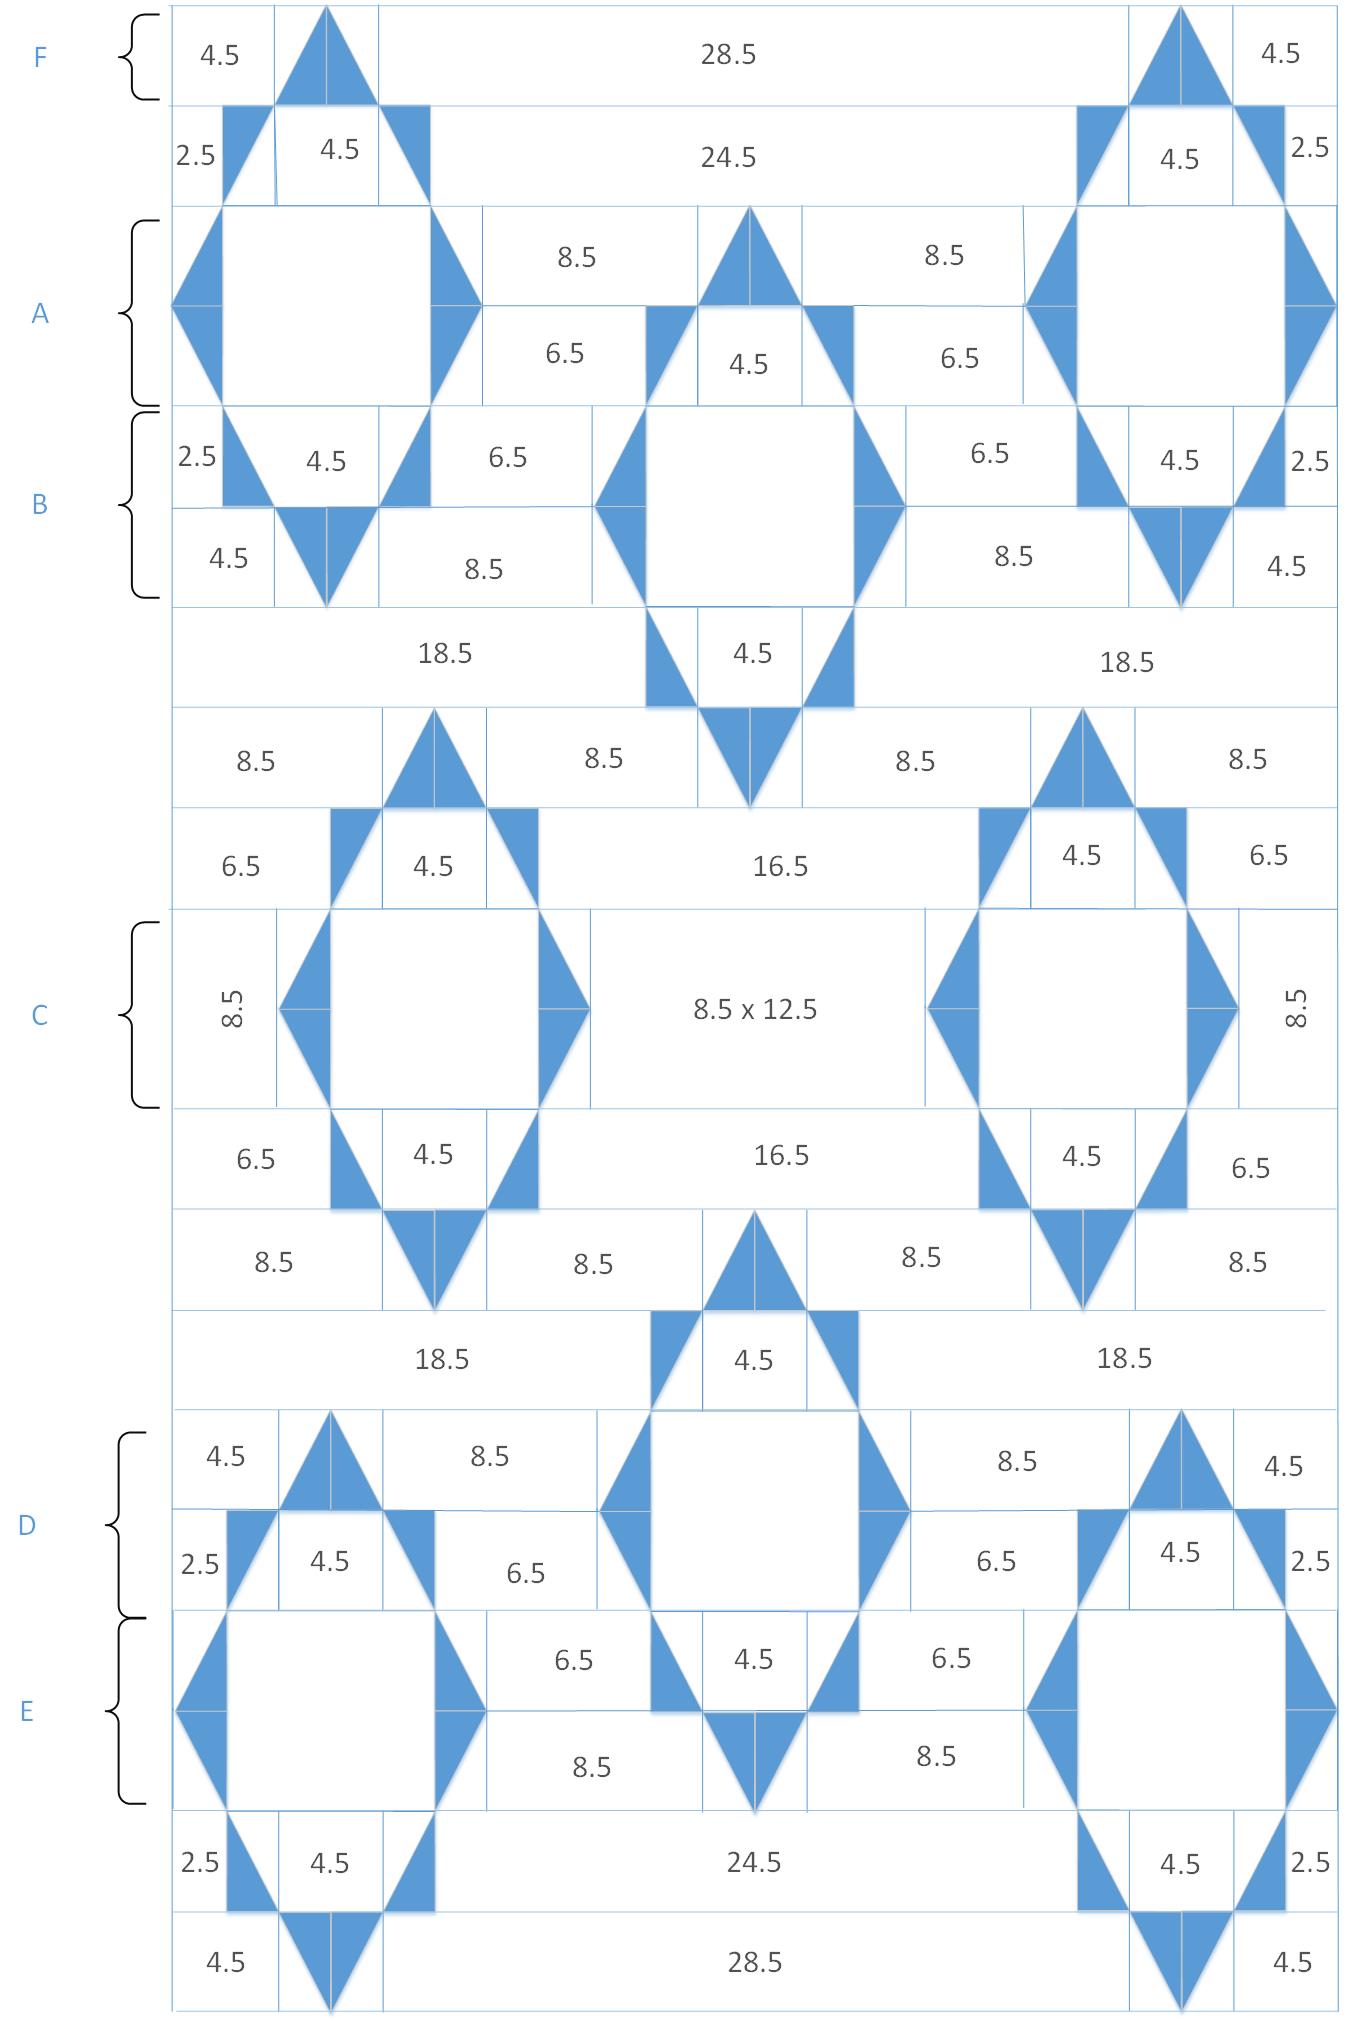
The center portion of this quilt is going to be constructed in rows.
First start with row A, marked on the chart.
Working on the areas inside the squares:
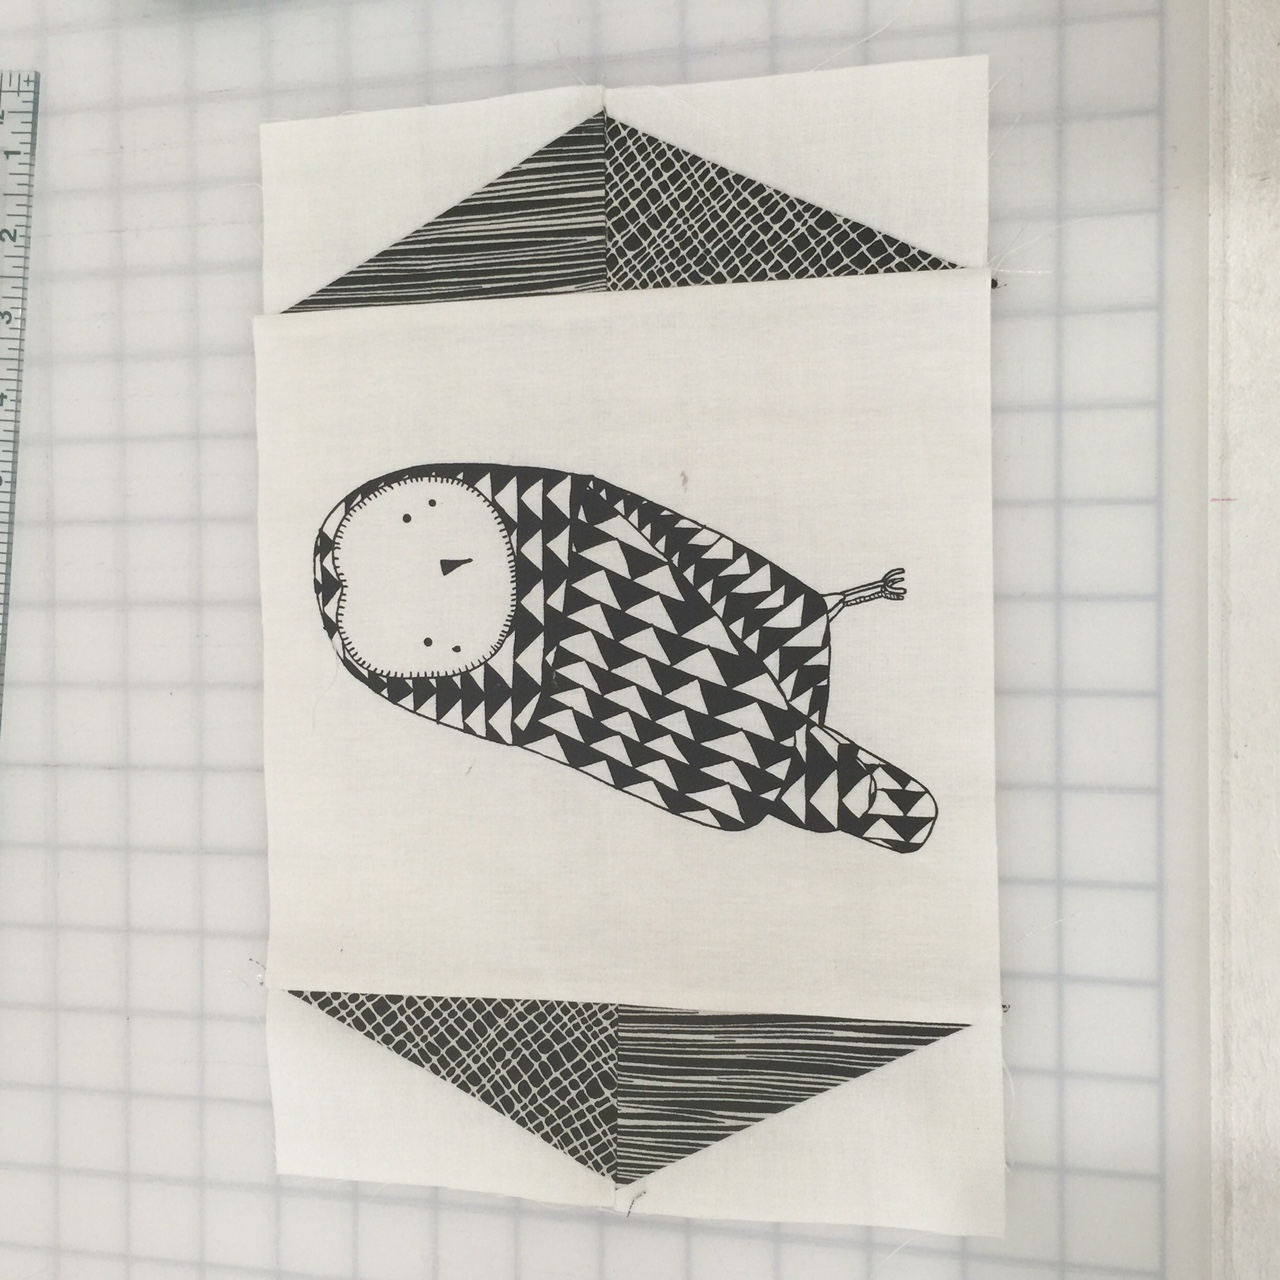
Select two of your animal squares.
Take two mirror image triangles, and sew them together along the short, black edge.
Repeat with two more mirror image triangles. Sew them to either side of an animal square, with the black edged towards the animal. Repeat so you have two panel pieces with triangles on both sides.
Again constructing the area in the square below:

Sew 2 8.5 inch rectangles and two mirror image half rectangle triangles (HRT's).

Sew two 6.5 inch rectangles, one 4.5 inch square, and two mirror image HRT's as shown above.
Sew the two pieces you just constructed together as indicated in the chart. Sew one of the animal squares to either end, to complete Row A.
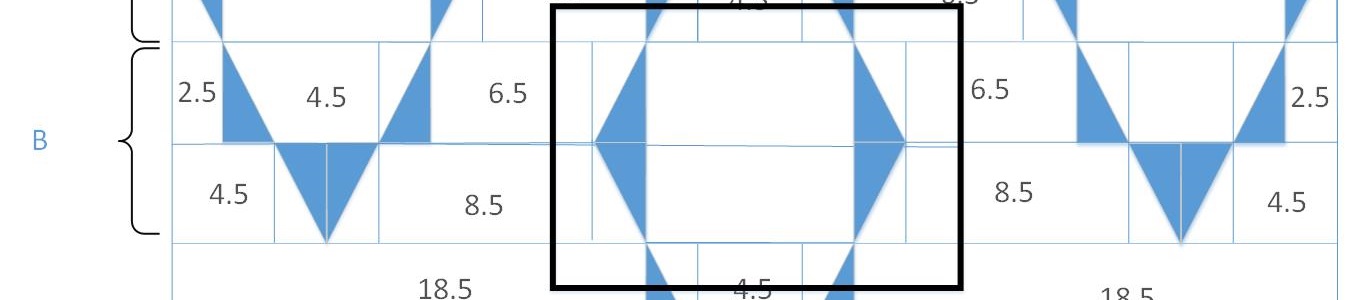
For Row B:
Repeat the first step of Row A. Take two sets of mirror images of the half-rectangle triangles, and sew onto the sides of one of the animal squares.

Construct the top of the left side of the row, using two HRT's, a 2.5 inch piece, a 4.5 inch piece, and a 6.5 inch piece.

Construct the bottom portion, with a 4.5 inch piece, two HRT's, and a 8.5 inch piece. Sew the top and bottom half together.

Repeat with the top and bottom half of the right hand side of Row B, and sew together to complete the side.
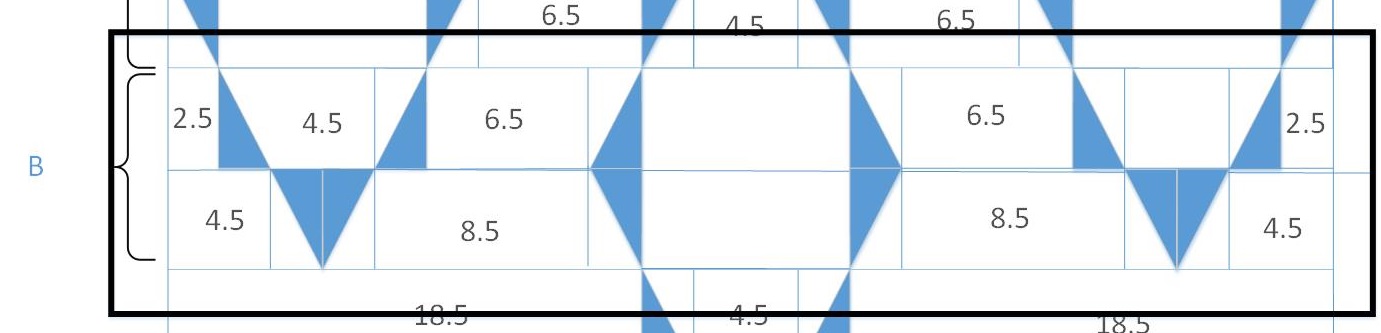
Sew the three pieces together to complete Row B. Using the diagram as a guide, sew Row A and Row B together.
Repeat the process to complete Rows C, D and E. Sew Rows D and E together.
The remaining rows can be constructed one at a time.

Using two 4.5 inch squares, four HRT's and a 28.5 inch piece, construct Row F. Working your way down the diagram, complete each row and add it to the quilt. Sew in the completed "double" rows as you work your way down the quilt.
Once you've completed the center portion, it's time to add the side borders.
Take eight more 4.5 inch x WOF strips of your background. Pair them up and make four long strips. Sew one long strip to either side, trimming to size.
Take your black fat quarters, and cut four more 4.5 inch strips. Cut forty triangles.
Take four WOF background strips. From two, cut another 40 triangles. From the remainder, cut forty pieces 2.5 inches x 4.5 inches.
Sew your forty black and background triangles together as before. Alternating a HRT and the background rectangles, sew two side strips. Align all the HRT's in the same direction.

With the points of the triangles pointing away from the center of the quilt, sew a border onto the long edges of the quilt. Take your two remaining background strips, and add to the long edges of the quilt. Trim to length.
Layer, baste and quilt as desired. I did straight line quilting, echoing the angles of the HRT's and emphasizing the diamond shapes formed by the stretched octagons.

Cut 8 binding strips to your preferred binding width, and bind.

![]()
This quilt finishes at 68" x 80".
Stop by and see some additional photos on my blog, http://quiltingintheheartland.blogspot.com.
Brenna Goode
{Quilting in the Heartland}
![]()
Posted in: