Warehouses Closed June 6-13 For Exclusive Event
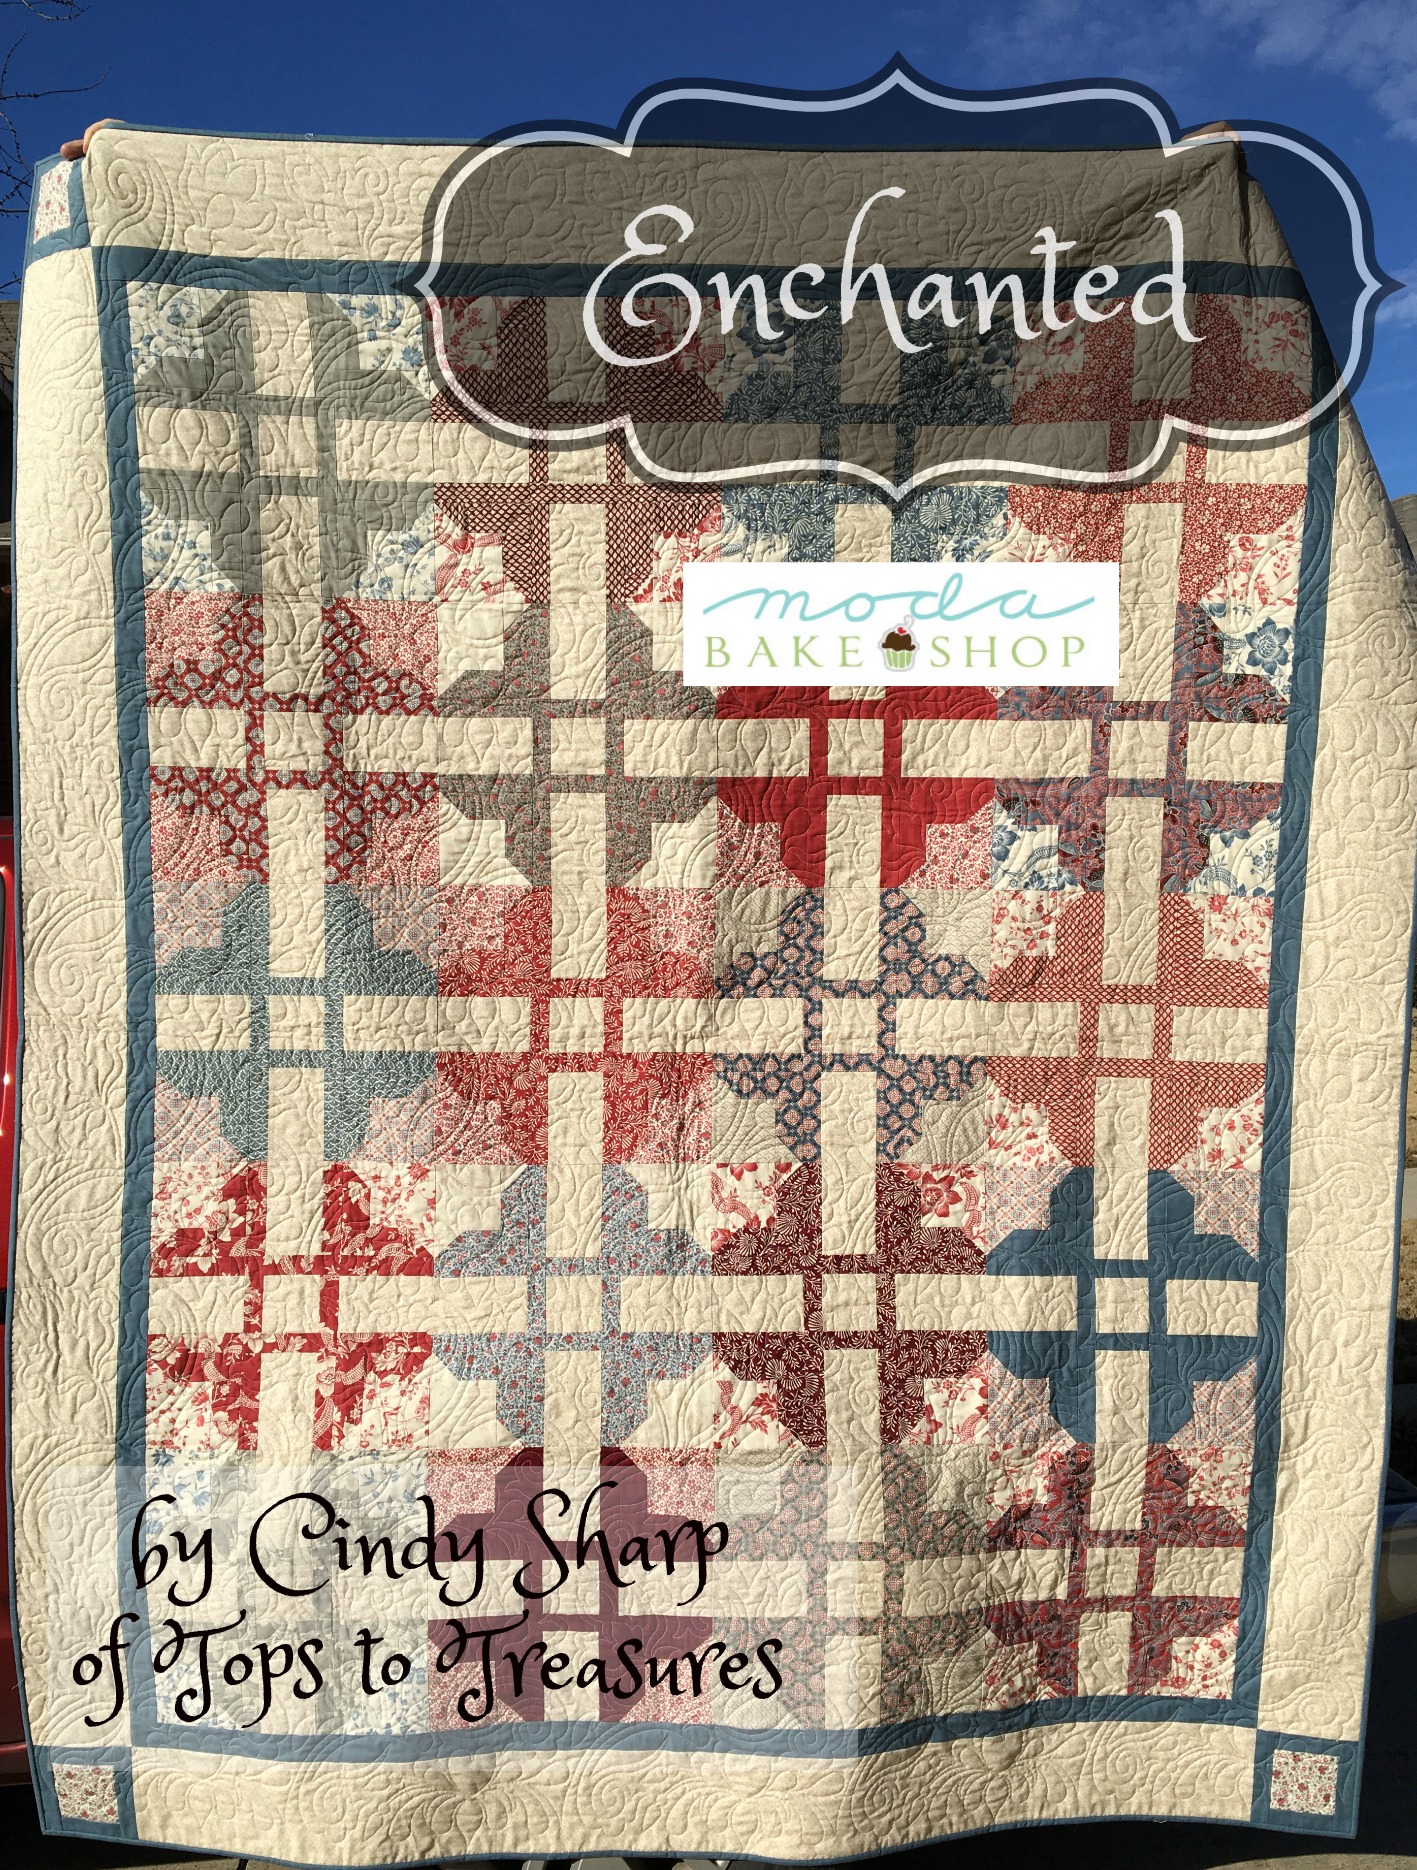
Enchanted Quilt
Enchanted Quilt
Published:
Jan 2 2017 - 23:00
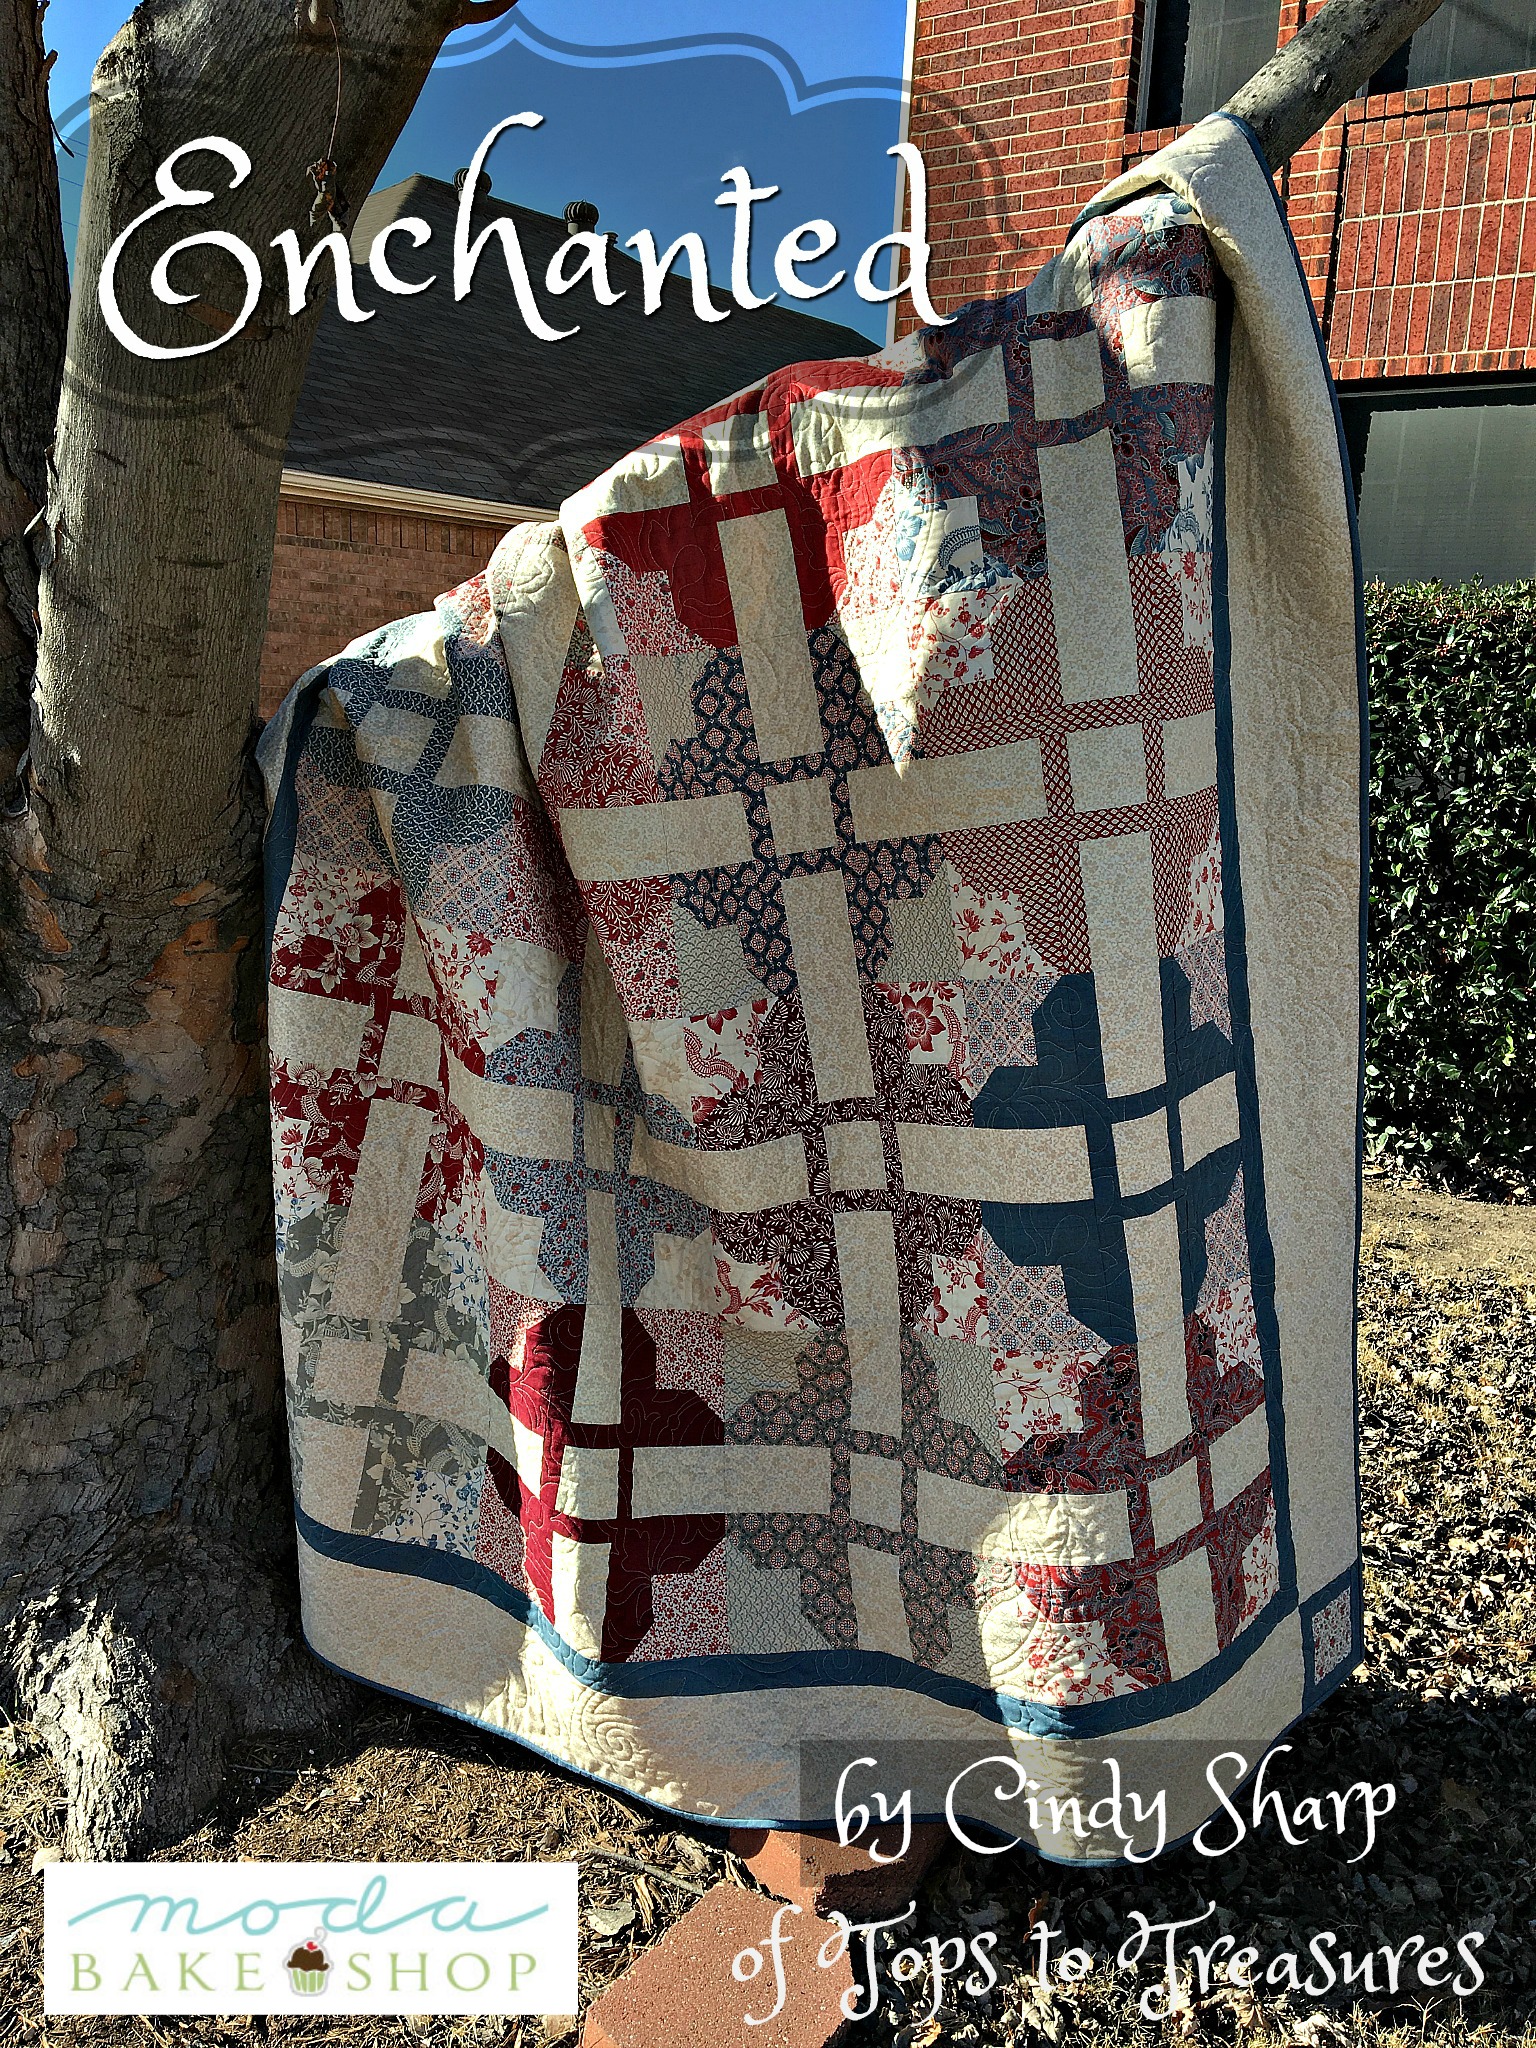

Something about French General always captures my imagination. I sigh and think what pretty fabric it is. I admire the soft pallet, pet the beautiful florals and soft prints, and then scoot off to the bolder offerings. I think it comes from spending my life surrounded by men. There is not much room for girly fancies when you are busy chasing brothers and/or sons. However, times are changing. My three sons are nearly grown. My husband (also from a household of many sons) has outgrown the idea that decorations need to be manly. And, wonder of wonders, my oldest son is getting married. Suddenly there is room for pretty dresses and subtle colors. Our home has been enchanted!
 I love this photo....I can hear the frogs and fishes singing "Go on and kiss de girl!"
I looked enchantment up in the dictionary. I was looking for something a little more substantial than the images that a love story bring to mind.
 definition according to Websters
I think Websters dictionary defined it perfectly. I might add under Full Definition, " 3: the power of Pondicherry by French General"
I have made this quilt from 20, 15" finished blocks in a grid of 4 x 5 blocks, with two borders. The clover like design of the blocks creates a beautiful secondary pattern of Arabesque shapes reminiscent of an enchanted carpet.

The quilt, as described below finishes at 74" x 89", perfect for a twin sized bed.
![]()
1 Fat Quarter Bundle {Pondicherry by French General}**
3 1/2 yards background, and outer border fabric {SKU 13785.14 Pearl tone on tone}
1 1/2 yards inner border and binding fabric {SKU 13529.153 Indian Blue solid}
5 1/2 yards backing fabric {SKU 13780.19 Dove large floral}
20 quart sized zip lock baggies, or seal-able envelopes. (one for each block)
**Using a fat quarter bundle will supply you with a large range of coordinating fabrics. This is great when you want to make something scrappy with a sophisticated pallet. However, this quilt does not require that much fabric. If you were to cut all of the fabric in a fat quarter bundle into pieces for these blocks, I think you would have enough blocks for two quilts. Of course, you could always make a bigger quilt. Keep in mind that if you choose to do this you will need more yardage for the background, borders, binding, and backing. Another option would be to make this quilt from yardage (rather than a Fat Quarter Bundle). In that case the fabric requirements for the blocks in this quilt break down as follows:
- Blue - 1 1/2 yards
- Low Volume Blue - 3/4 yards
- Red - 1 1/2 yards
- Low Volume Red - 1 yard. (you use a tiny bit more of this as it is used in the corner stones of the outer border.)
![]()
This quilt finishes at 74" x 89".
![]()
Cutting Directions: This quilt's impact comes in part from the placement of colors. If you look closely at the drawing you can tell that the quilt is an ornate checker board of blues and reds. Each square has both a "solid" fabric (some of them are indeed solid, but many simply read dark) and a "low volume" fabric in the same colorway. "Low volume" here refers to fabric that is mostly white or off white with one other color creating a dominant design....like traditional red work or toile.
The first thing you need to do is sort your fat quarter stack into five piles: blue, low volume blue, red, low volume red, and other. You can get more than one block out of each fat quarter. Using more fat quarters will yield a scrappier quilt. In my quilt I cut one block from each solid fat quarter, and two blocks from each low volume fat quarter. I also combined the blues and grays into the blue group and the reds and cranberries into the red group. Using this method you will need 10 blue/gray solids, 10 red/cranberry solids, 5 blue/gray low volume, and 5 red/cranberry low volume.
Because color placement is key, I found it easier to cut one block at a time. However, since all of the blocks have the same background in them it is easiest to cut all of this fabric at one time.
Background fabric -
- 20, 3 1/2" x 3 1/2" squares (1 for each block)
- 80, 3 1/2" x 5 1/2" rectangles (4 for each block)
- 7, 6" x width of fabric (WOF) for outer border.
Inner border -
- 8, 2" x WOF inner border fabric.
Setting Squares -
- 8, 1 1/2" x 6" rectangles inner border fabric
- 8, 1/2" x 4" rectangles inner border fabric
- 4, 4" x 4" squares low volume of your choice
Per block - for 20 blocks, 10 blue/gray and 10 red/cranberry
- Solid -
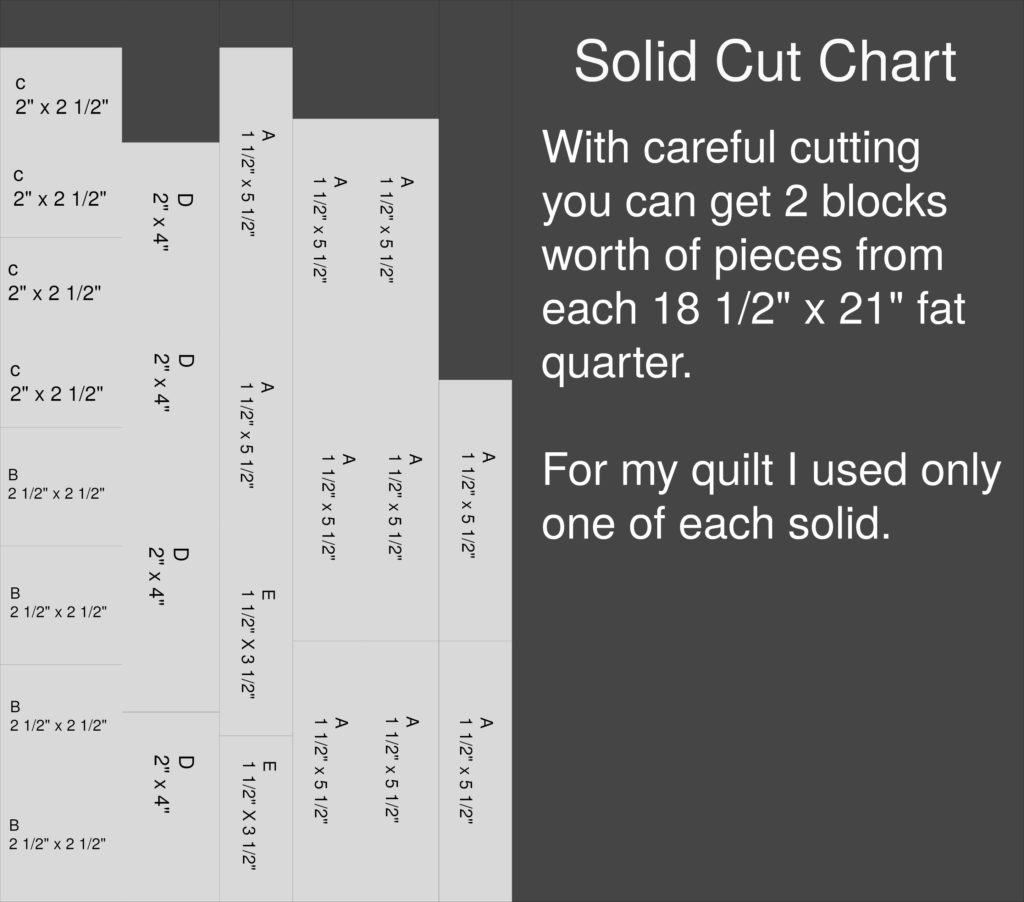
- A - 10, 1 1/2" x 5 1/2" rectangles
- B - 4, 2 1/2" x 2 1/2" squares
- C - 4, 2" x 2 1/2" rectangles
- D - 4, 2" x 4" rectangles
- E- 2, 1 1/2" x 3 1/2" rectangles
- Low Volume
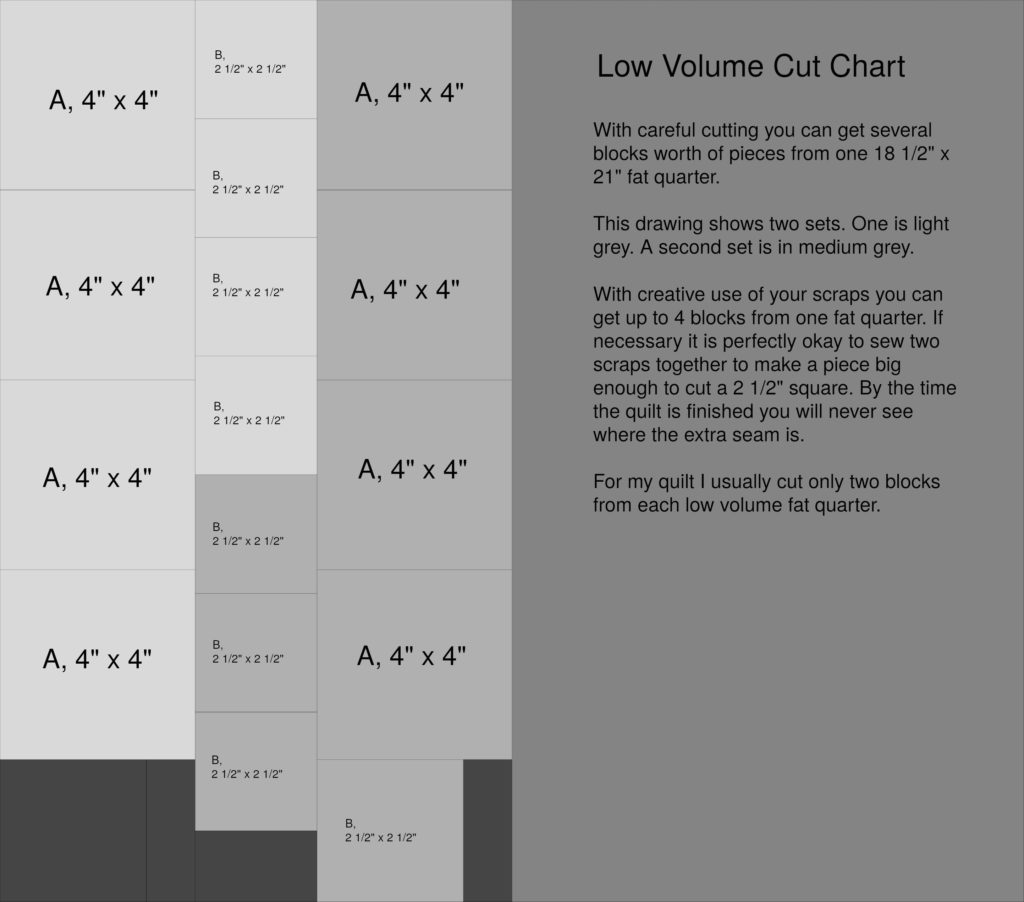
- A - 4, 4" x 4" squares
- B - 4, 2 1/2" x 2 1/2" squares
- Once you have cut all of the pieces I highly recommend placing the pieces for each block in a separate close-able baggie or envelope. Do not forget to add the background pieces.


Sewing Directions: Use a 1/4" seam allowance throughout.
The Blocks: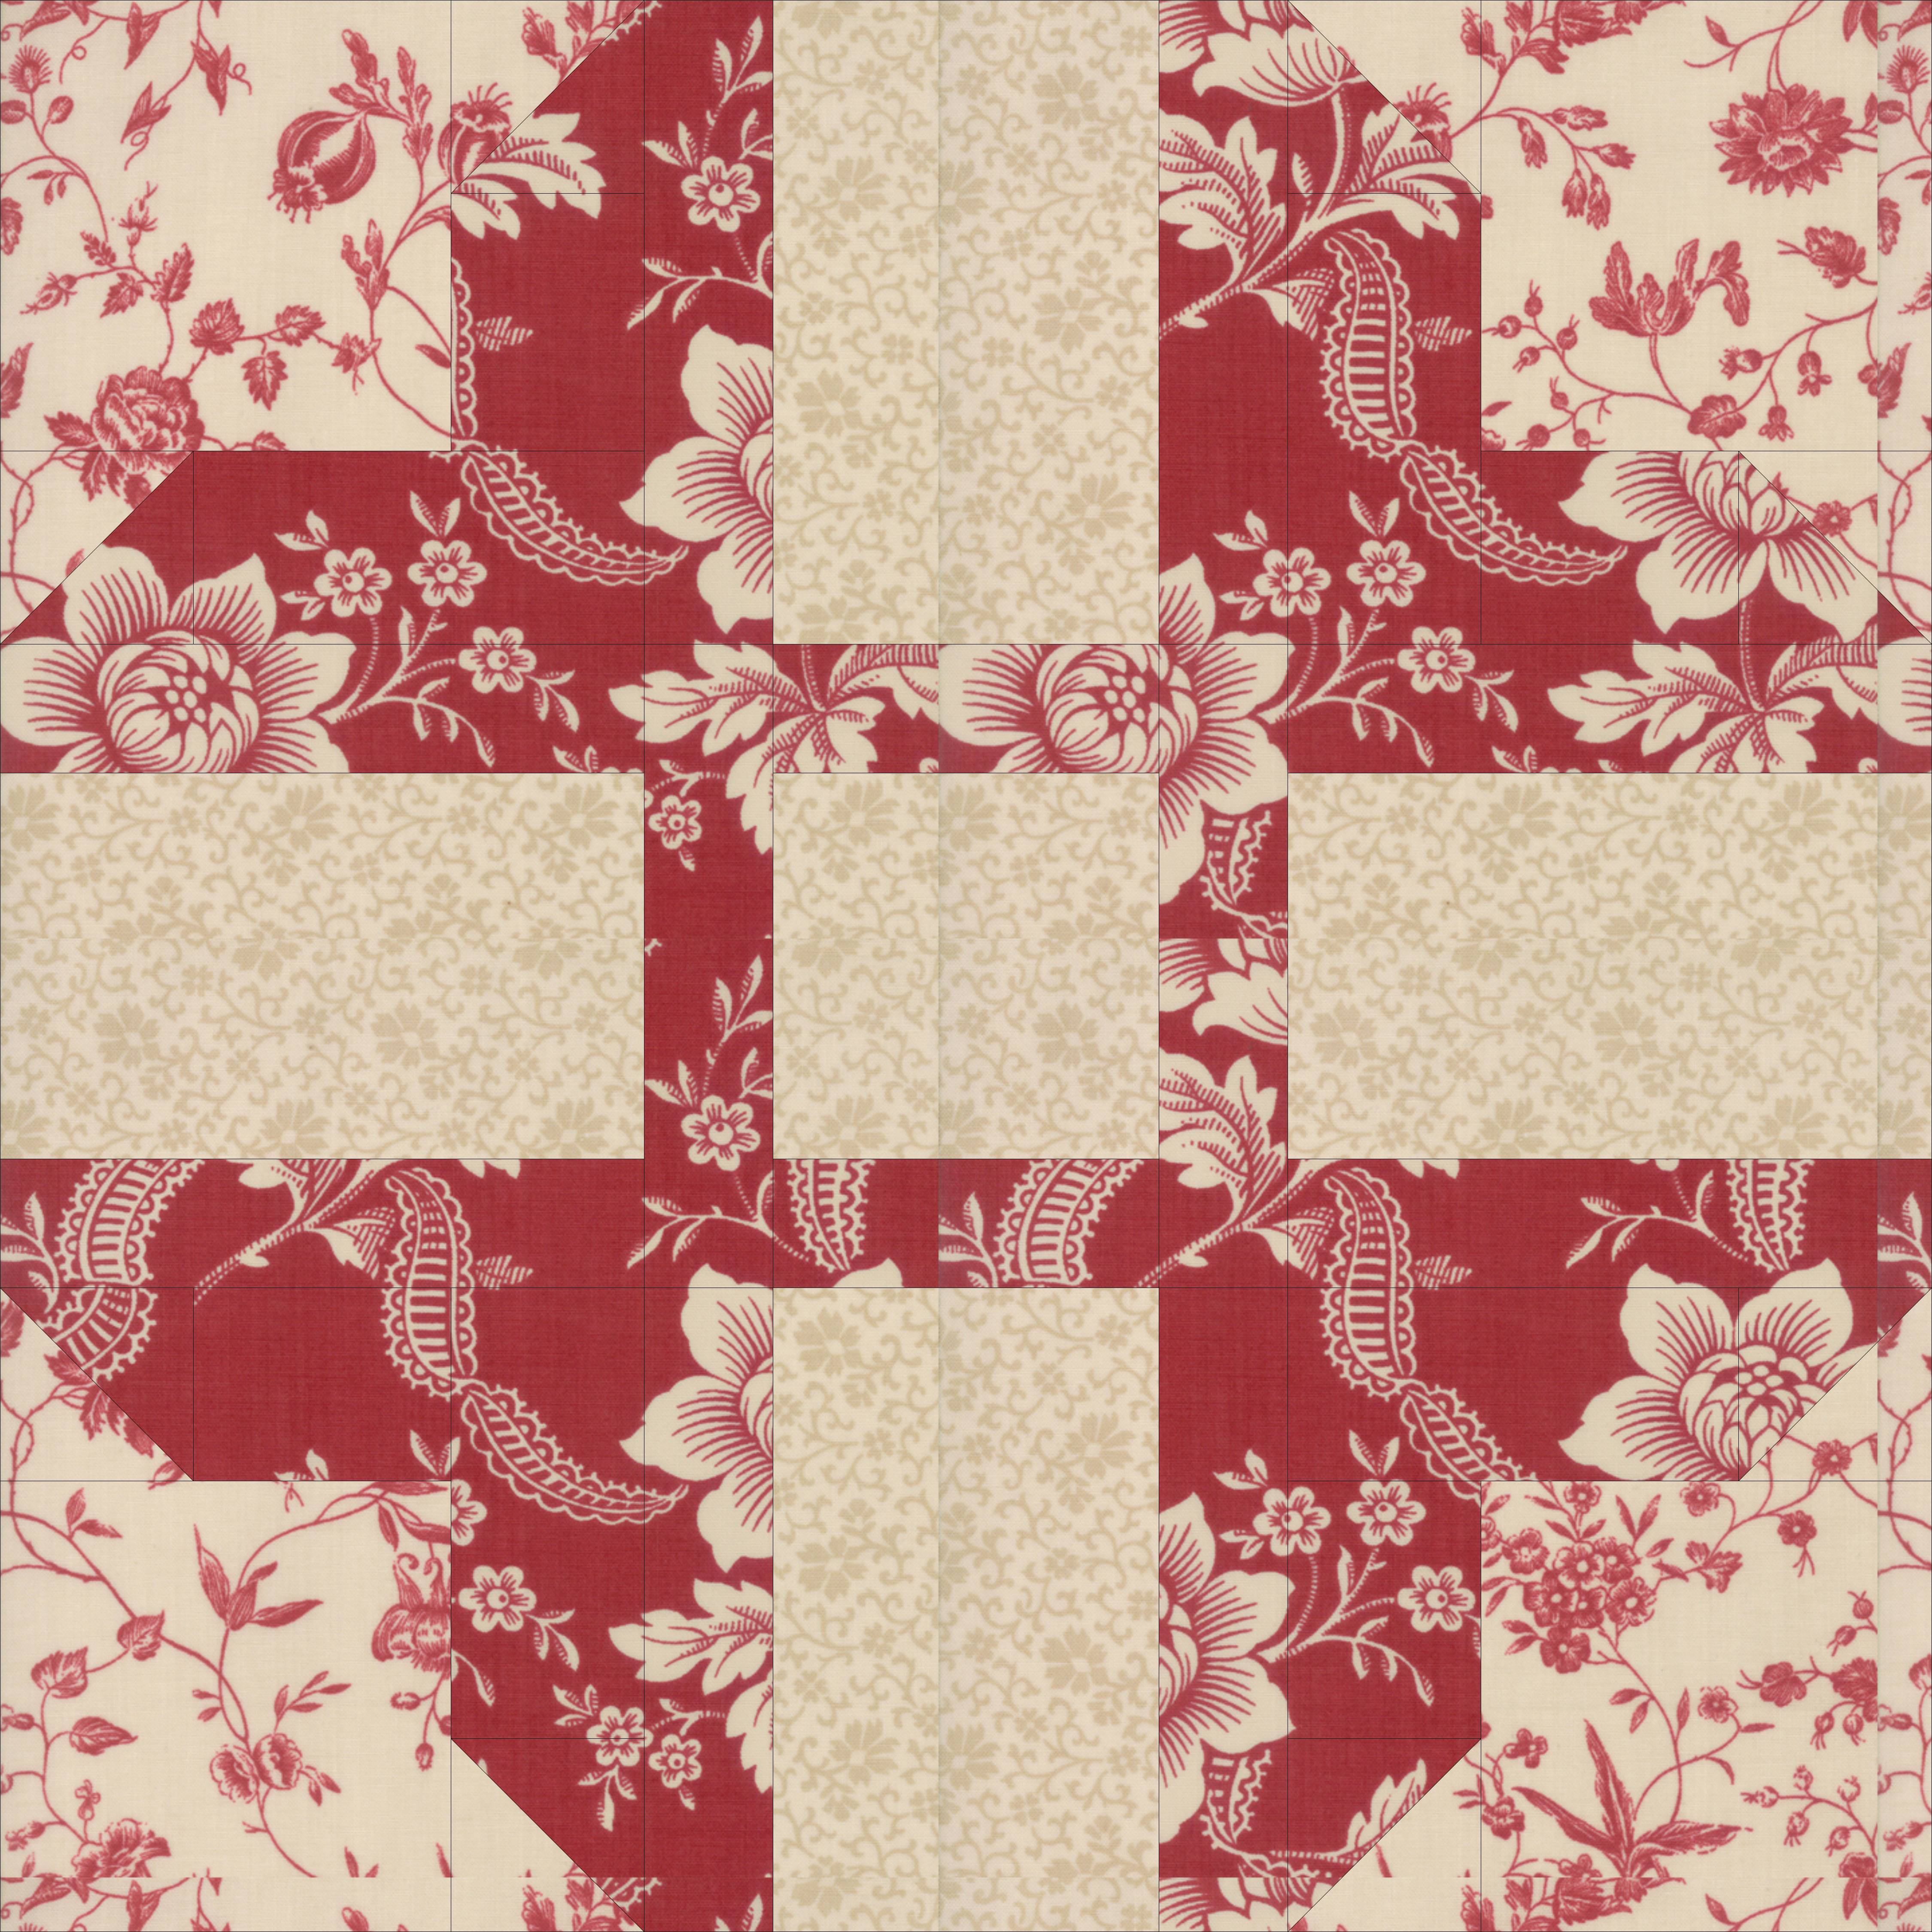 You need to make 20, 15" finished blocks. When you measure them, before sewing them into the quilt top they will measure 15 1/2" square.
Each block is constructed as a 9 patch. There are 4 corner patches, 4 side patches and 1 center patch. All 9 of these patches measure 5" finished. When you measure them, before sewing them in to the quilt block they will measure 5 1/2" square.
The following directions will lead you through the construction of one block. You will have to repeat it 20 times to have enough blocks for this quilt.
Center Patch - This will look like a square in a frame
- Gather
- 1. 3 1/2" x 3 1/2" square of background fabric
- 2, 1 1/2" x 5 1/2" rectangles of "solid" fabric
- 2 1 1/2" x 3 1/2" rectangles of "solid" fabric
- Sew 1, 3 1/2" rectangle each to opposite sides of the 3 1/2" square.
- Iron seam allowances towards the rectangles.
- Trim unit to 3 1/2" x 5 1/2". Be careful to trim in a symmetrical manner.
- Sew, 1 5 1/2" rectangle each to the long sides of unit.
- Iron seam allowances towards the rectangles.
- Trim unit to 5 1/2" x 5 1/2"
Side Patches - These will look like 3 long bars.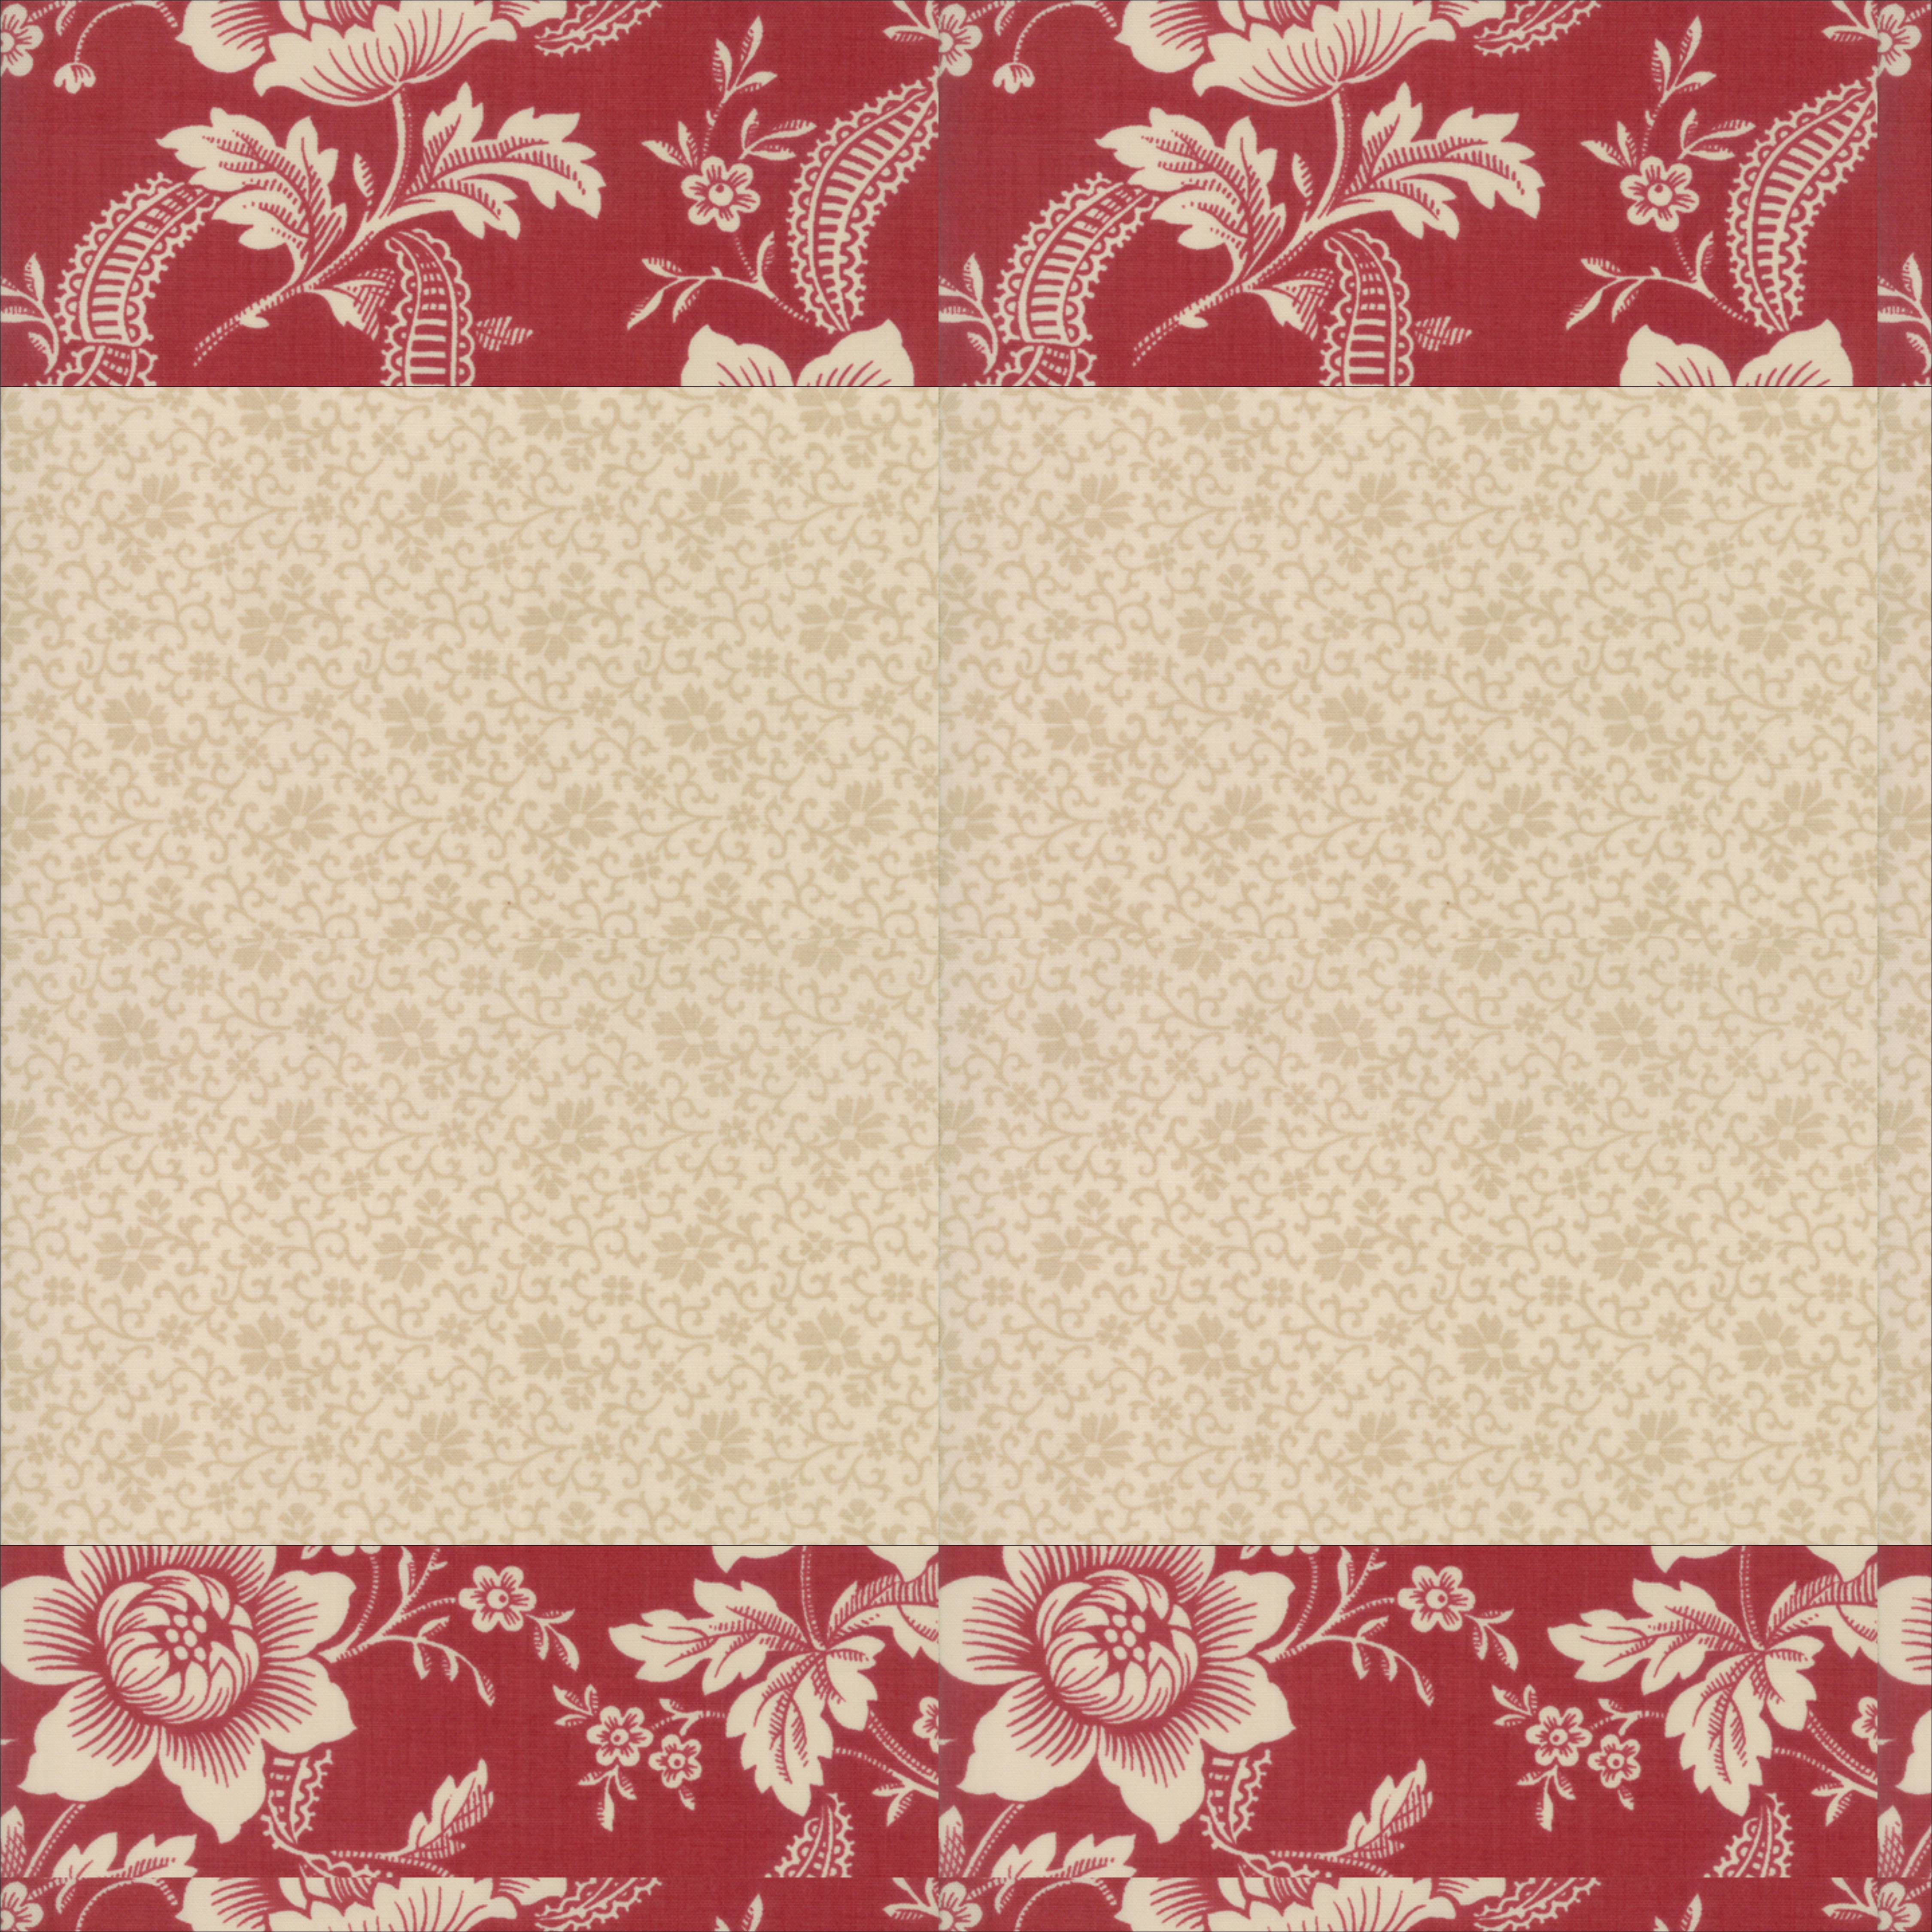
- Gather (one set for each of 4 units)
- 1, 3 1/2" x 5 1/2" rectangle background fabric
- 2, 1 1/2" x 5 1/2" rectangle "solid" fabric.
- Sew 1 solid rectangle each to the long sides of the background rectangle.
- Iron seam allowances
- for 2 of the 4 units, iron the seam allowances towards the background fabric.
- for the remaining 2 units iron the seam allowances towards the "solid" fabric.
- Trim unit to 5 1/2" x 5 1/2" Be sure to trim the units symmetrically.
- Repeat 3 more times for 4 units.
Corner Patches - I am not sure how to describe this block.... angry bird....old fashioned photo mount...a half square triangle with a triangle taken out of the center of it's dark side.
- Gather (one set for each of 4 units)
- 1, 4" x 4" square low volume fabric
- 1, 2 1/2" x 2 1/2" square low volume fabric
- 1, 2 1/2" x 2 1/2" square solid fabric
- 1, 2 1/2" x 2" rectangle solid fabric
- 1. 2" x 4" rectangle solid fabric
- Make half square triangles (HST)
- Take both 2 1/2" squares.
- Draw a line across the diagonal on the back of the low volume piece.
- Place squares, right sides together, and sew 1/4" to each side of the line you just drew. (Yes, sew twice. Once on each side of the line)
- Cut on the line. You will have 2 HST units
- Iron seam allowances open.
- Trim units to 2" x 2" squares. Be sure to trim the units symmetrically.
- Make side units
- Sew one HST to the long solid rectangle, as described in the diagram.
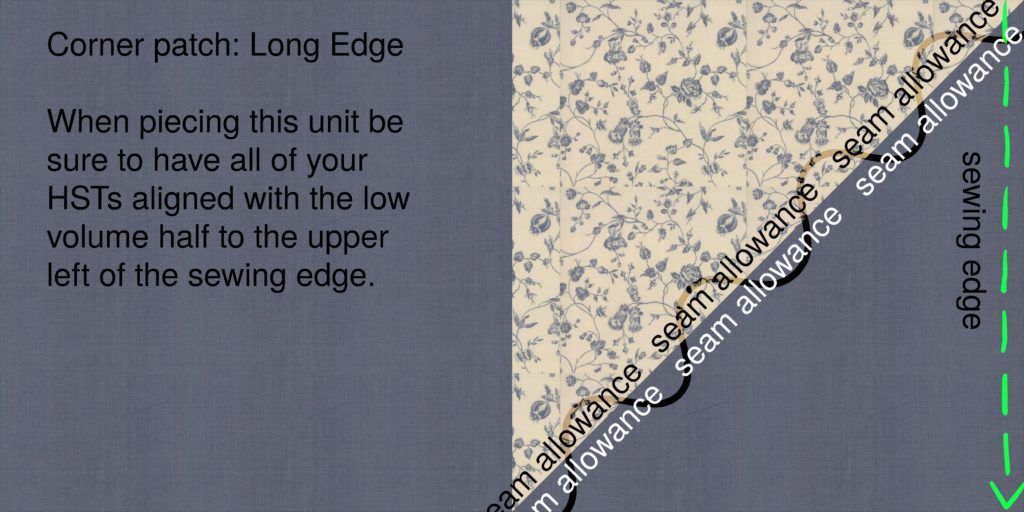
- Trim unit to 2" x 5 1/2"
- Sew remaining HST to the short solid rectangle as described in the diagram. (NOTE: your short and long units will be the same colors. I drew them in different colors to accentuate the fact that they are different in construction. These drawings are NOT to scale.)
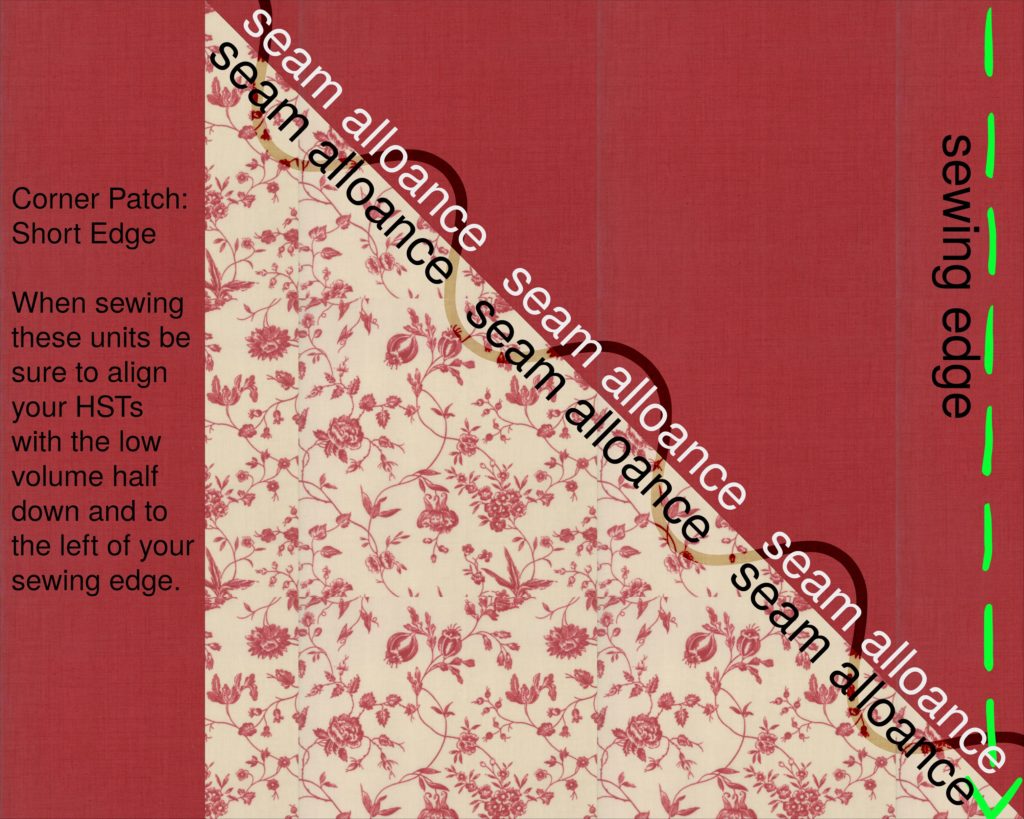
- Trim unit to 2" x 4"
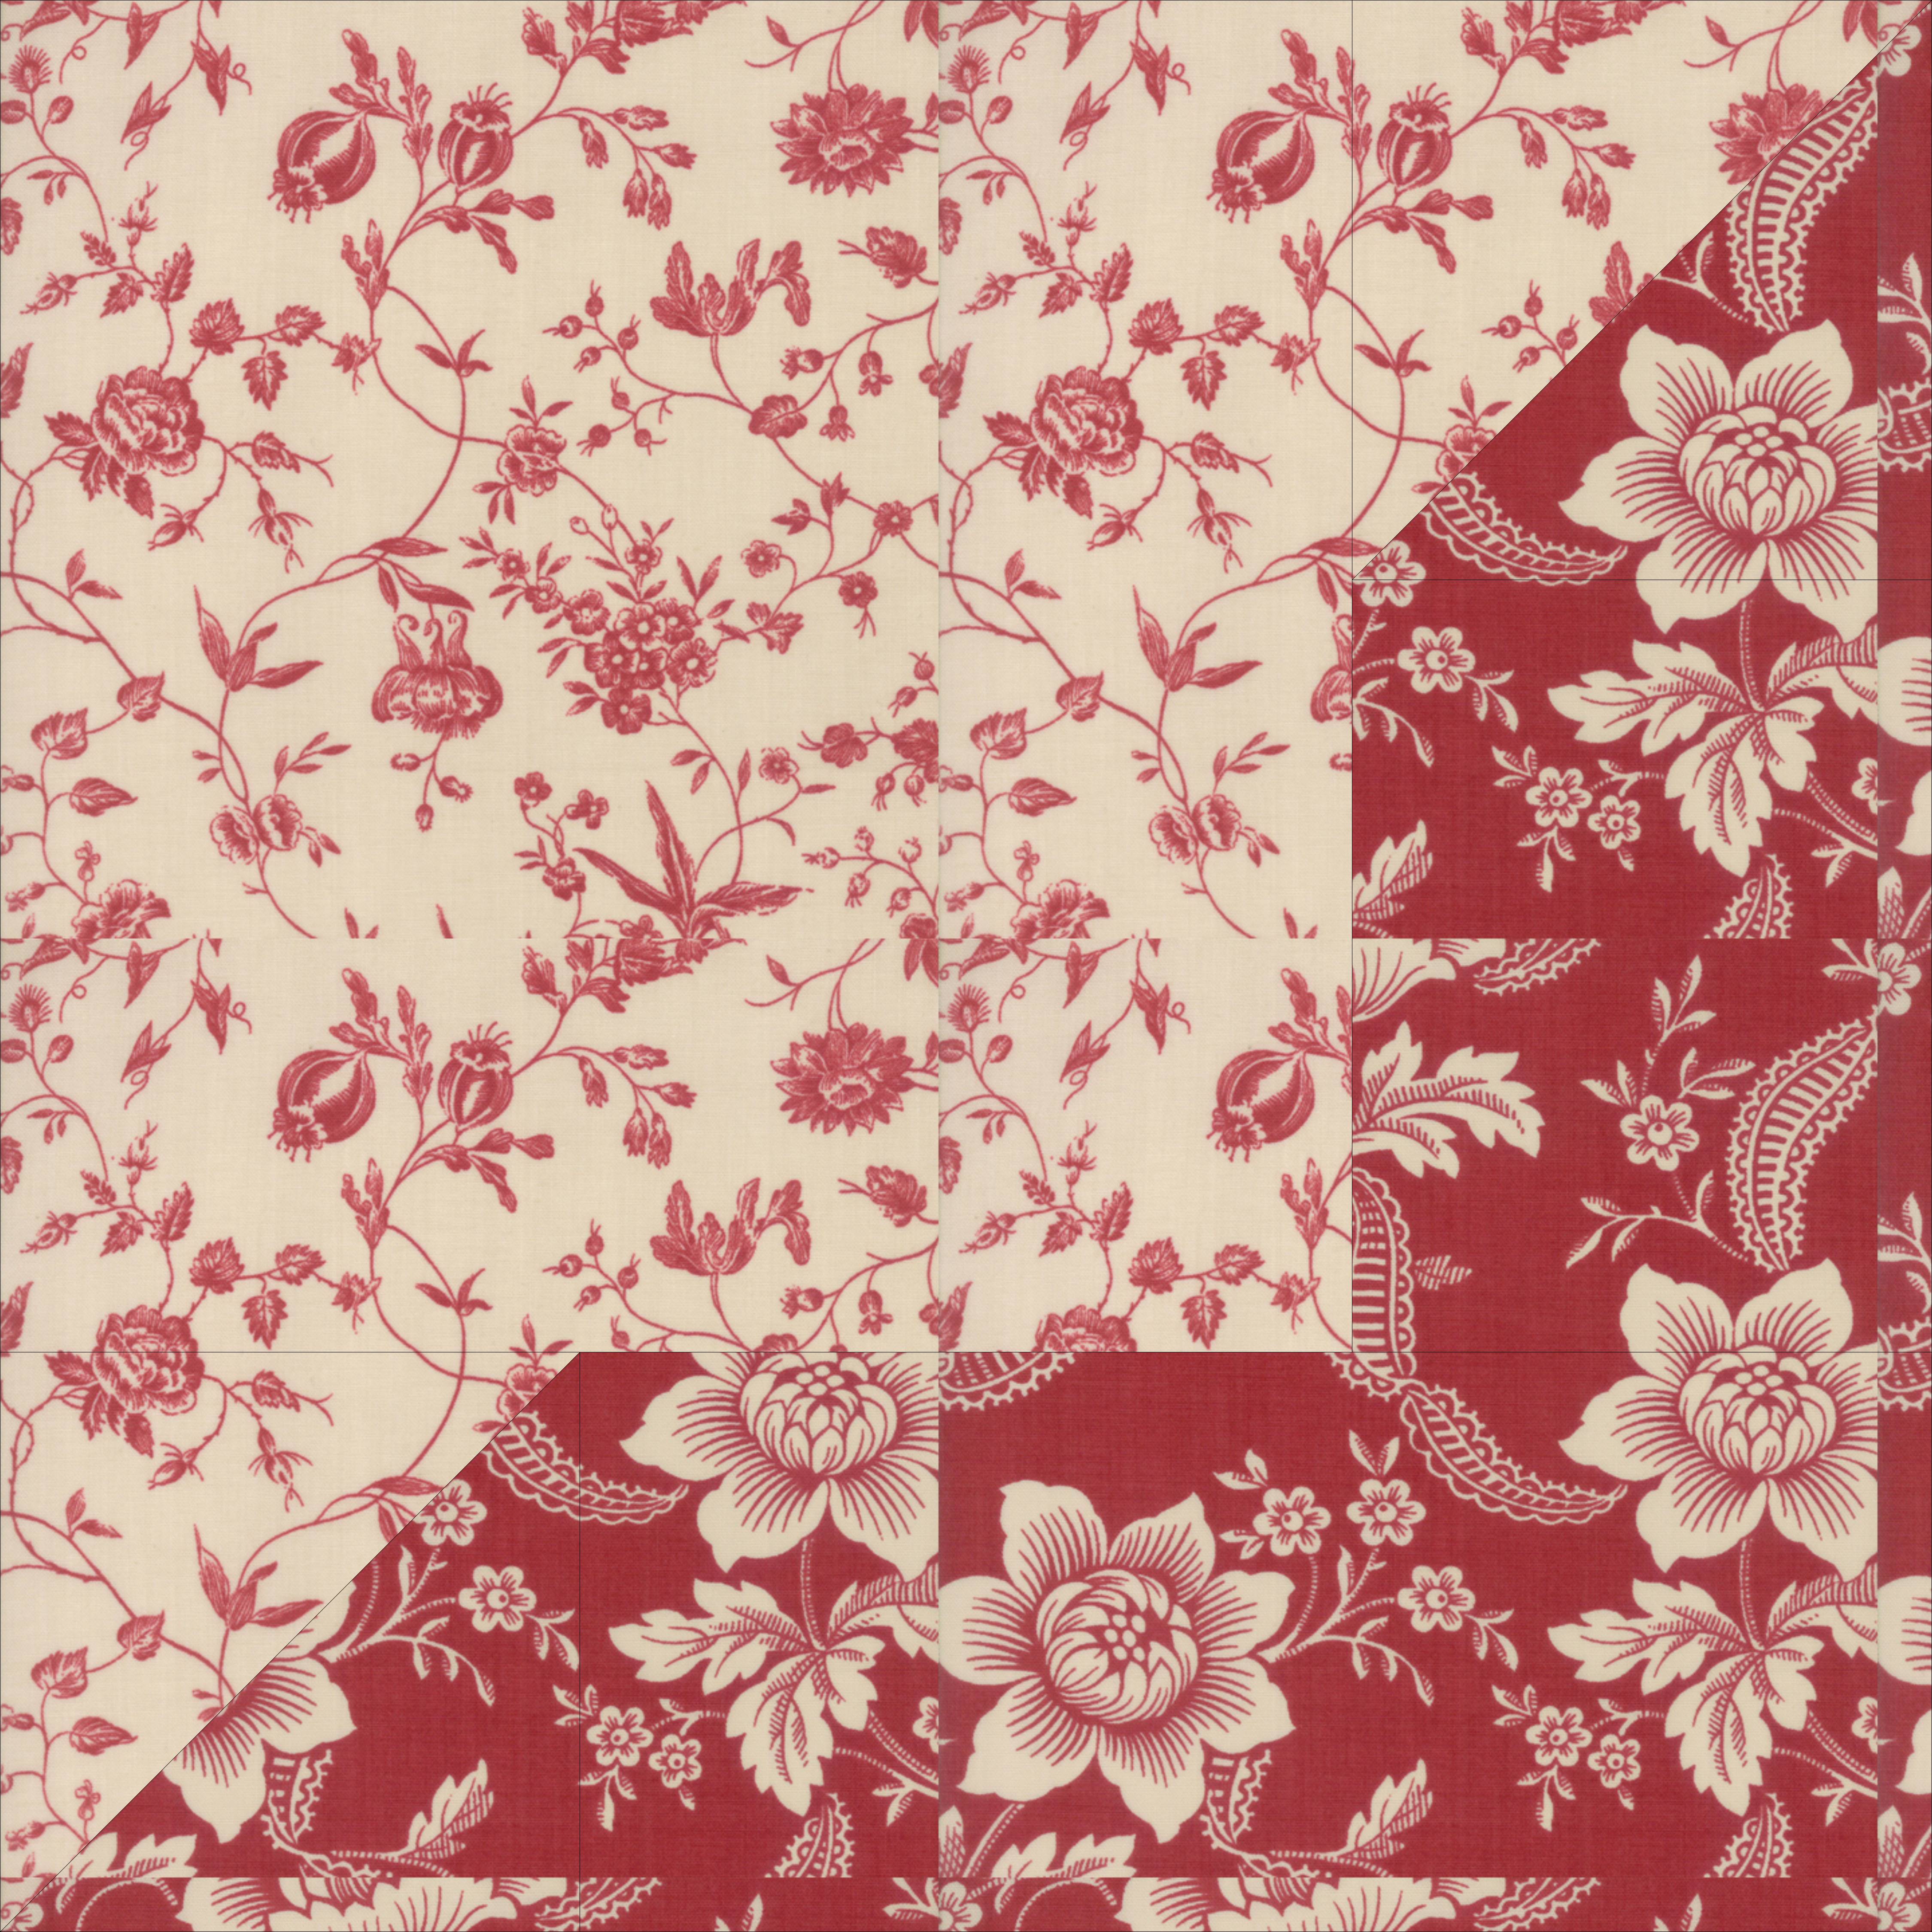
- Finish patch
- Sew 2" x 4" unit to one side of the 4" square.
- Iron seam allowance towards the background fabric.
- Trim unit to 4" x 5 1/2"
- Sew 2" x 5 1/2" unit to the larger unit so that the solid fabrics are touching, and the diagonals of the HSTs align.
- Iron seam allowance towards the solid fabric.
- Trim unit to 5 1/2" x 5 1/2". Be sure to trim symmetrically around the diagonal.
- Repeat 3 more times for 4 units.


Assemble Block -
- Gather
- 1, 5 1/2" x 5 1/2" center patch
- 4, 5 1/2" x 5 1/2" side patches (two with seam allowances ironed inward, and 2 with seam allowances ironed outward)
- 4, 5 1/2" x 5 1/2" corner patches
- Arrange patches on the table next to you or a design wall or on the floor in front of you. You need to see them as they are going to be in your finished block. Make sure that all of the pieces are aligned correctly.
- The side patches should all look like roads leading towards the center.
- Their seam allowances should line up with those of the center as illustrated by the big black arrows in my drawing.
- The corner patches should all have the solid corner closest to the center of the block.
- Sew patches into 3 rows of 3 patches each.
- Iron seam allowances towards the side patches.
- Sew rows together to make blocks. Make sure that the center stays in the center.
- Iron and fan seam intersections so that they are as flat as you can make them.
- Trim block to 15 1/2" x 15 1/2"
Setting Squares....Border corner blocks - There is a corner stone, or setting block in each corner of the outer border. These blocks are just like the centers of the larger quilt blocks, only a little bigger.
- Gather (one set for each of 4 units)
- 2, 1 1/2" x 6" rectangles inner border fabric
- 2, 1 1/2" x 4" rectangles inner border fabric
- 1, 4" x 4" square low volume of your choice
- Sew 1, 4" rectangle each to opposite sides of the 4" square.
- Iron seam allowances towards the rectangles.
- Trim unit to 4" x 6". Be sure to trim symmetrically.
- Sew 1, 6" rectangle each to the long sides of the unit.
- Iron seam allowances towards the rectangles.
- Trim unit to 6" x 6"
- Repeat 3 more times for a total of 4 units.
The Top
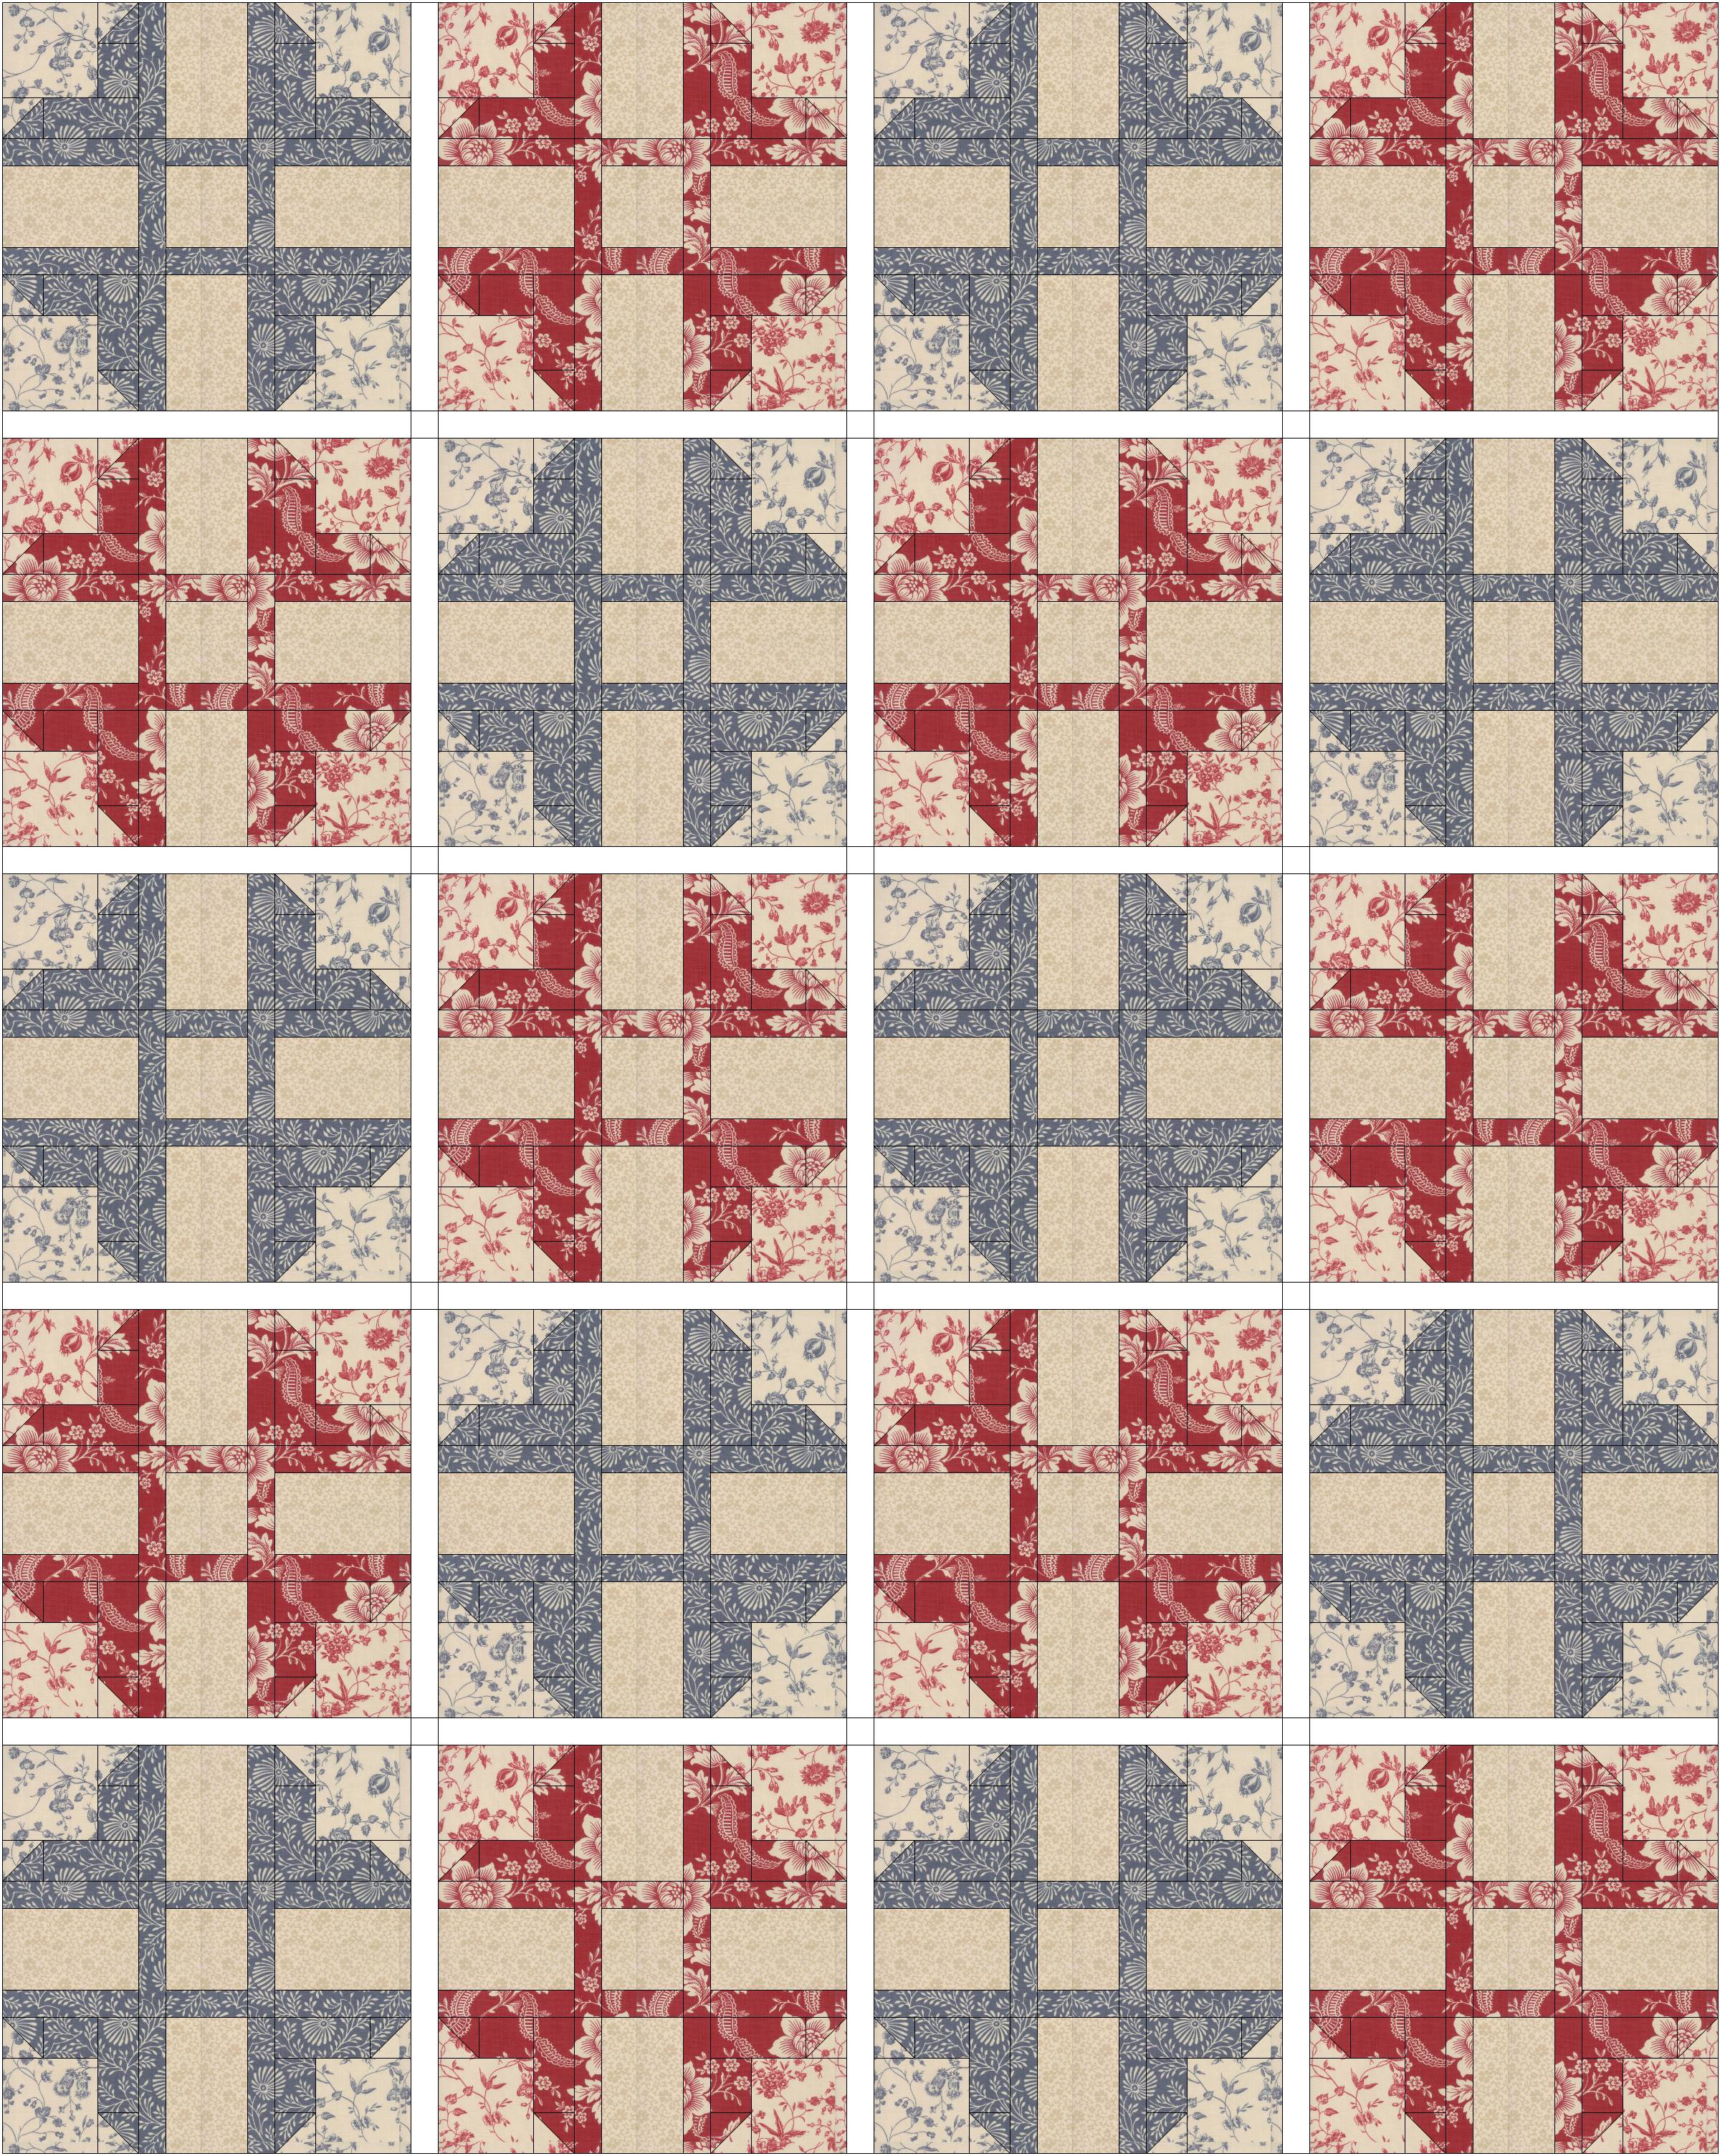 For ease of drawing this illustration show only two red and two blue fabrics. Your quilt will likely have many more. Doesn't the quilt look pretty in a less scrappy arrangement?!
The center -
- Gather
- 20 blocks, 10 red/cranberry and 10 blue/gray
- Arrange blocks on a design wall, or floor, or bed - the idea is to get them all out in front of you - in a checker board of red/cranberry and blue/gray. Play with the blocks until you have them just the way you like them. I have found it helpful at this point to step away from the blocks. Stand across the room and look at them. Walk around them. View them from different angles.
- Taking a picture of them with your phone is also helpful. Aside from making it easier to see the whole top at one go, you can also share it with your friends on social media. Mine always find something that I did not see. Besides, it is fun to let your friends see what you are up to.
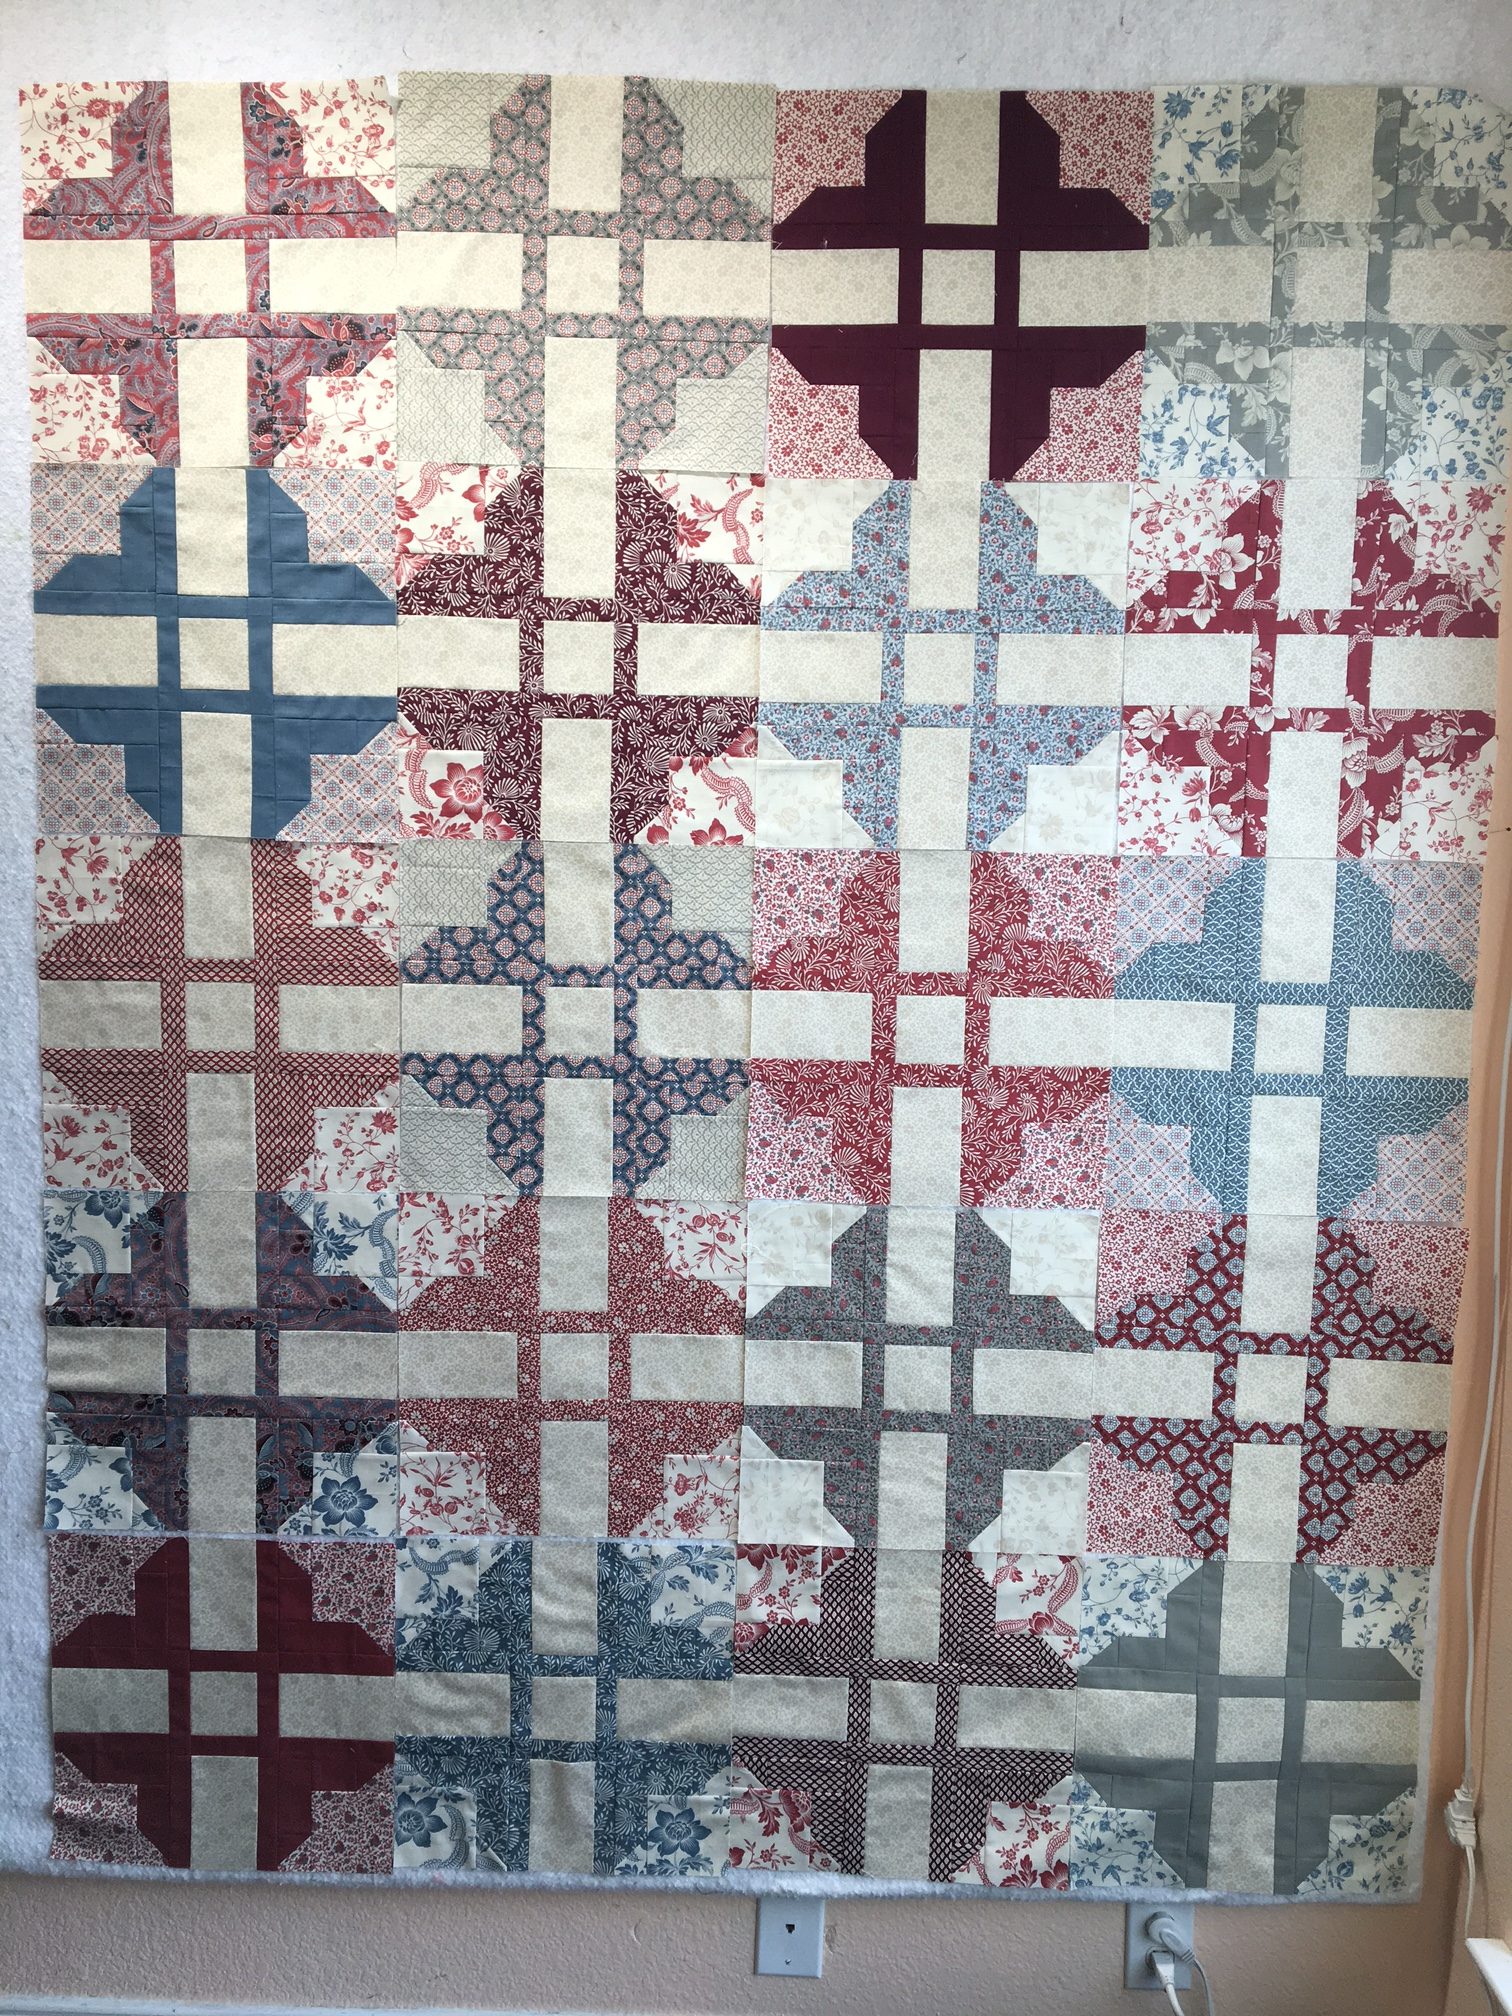
- Check out the photos below. You can see that a subtle change in your block arrangement can make a big impact in the overall appeal of your quilt.
 Arrangement 1
-
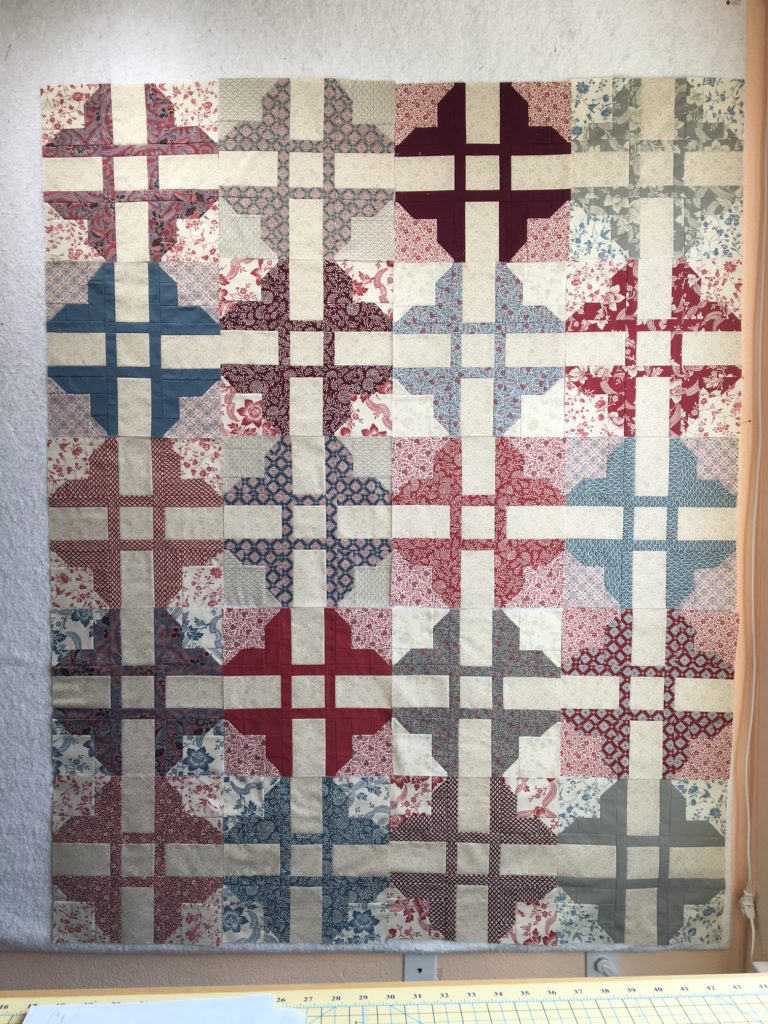 Arrangement 2
- Sew blocks together in rows of 4.
- Take special care to arrange the seam allowances so that they will snuggle. This is where ironing the side patches of your block in two different directions will come in handy. You should be able to turn a block 90 degrees to make the seam allowances line up. Once you have set the pattern all of your blue/gray blocks will end up oriented one way, and the red/cranberry blocks will be oriented the other.
- Finished rows should measure 15 1/2" x 60 1/2"
- Iron and fan seam intersections so that they are as flat as you can make them.
- Sew rows together to make center of top. It should measure 60 1/2" x 75 1/2"

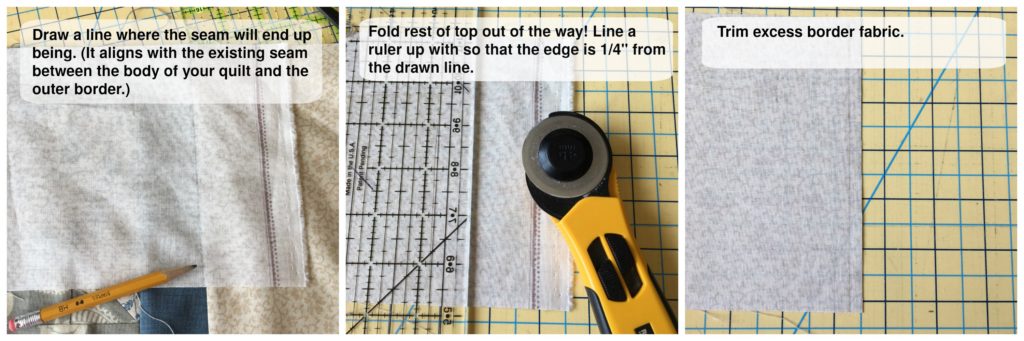
The Borders - There are probably as many ways to do this as there are quilters. I have found it works best for me to gently lay my border piece on top of my quilt center and let the machine pull the fabric through on its own. Make sure that your selvage is out of the way when you begin sewing. Trim the excess off at the other end. If you are careful to keep the edges aligned, you should be good to go. The border will be long enough, and you will not have ruffling that can occur when you try and pull the pieces.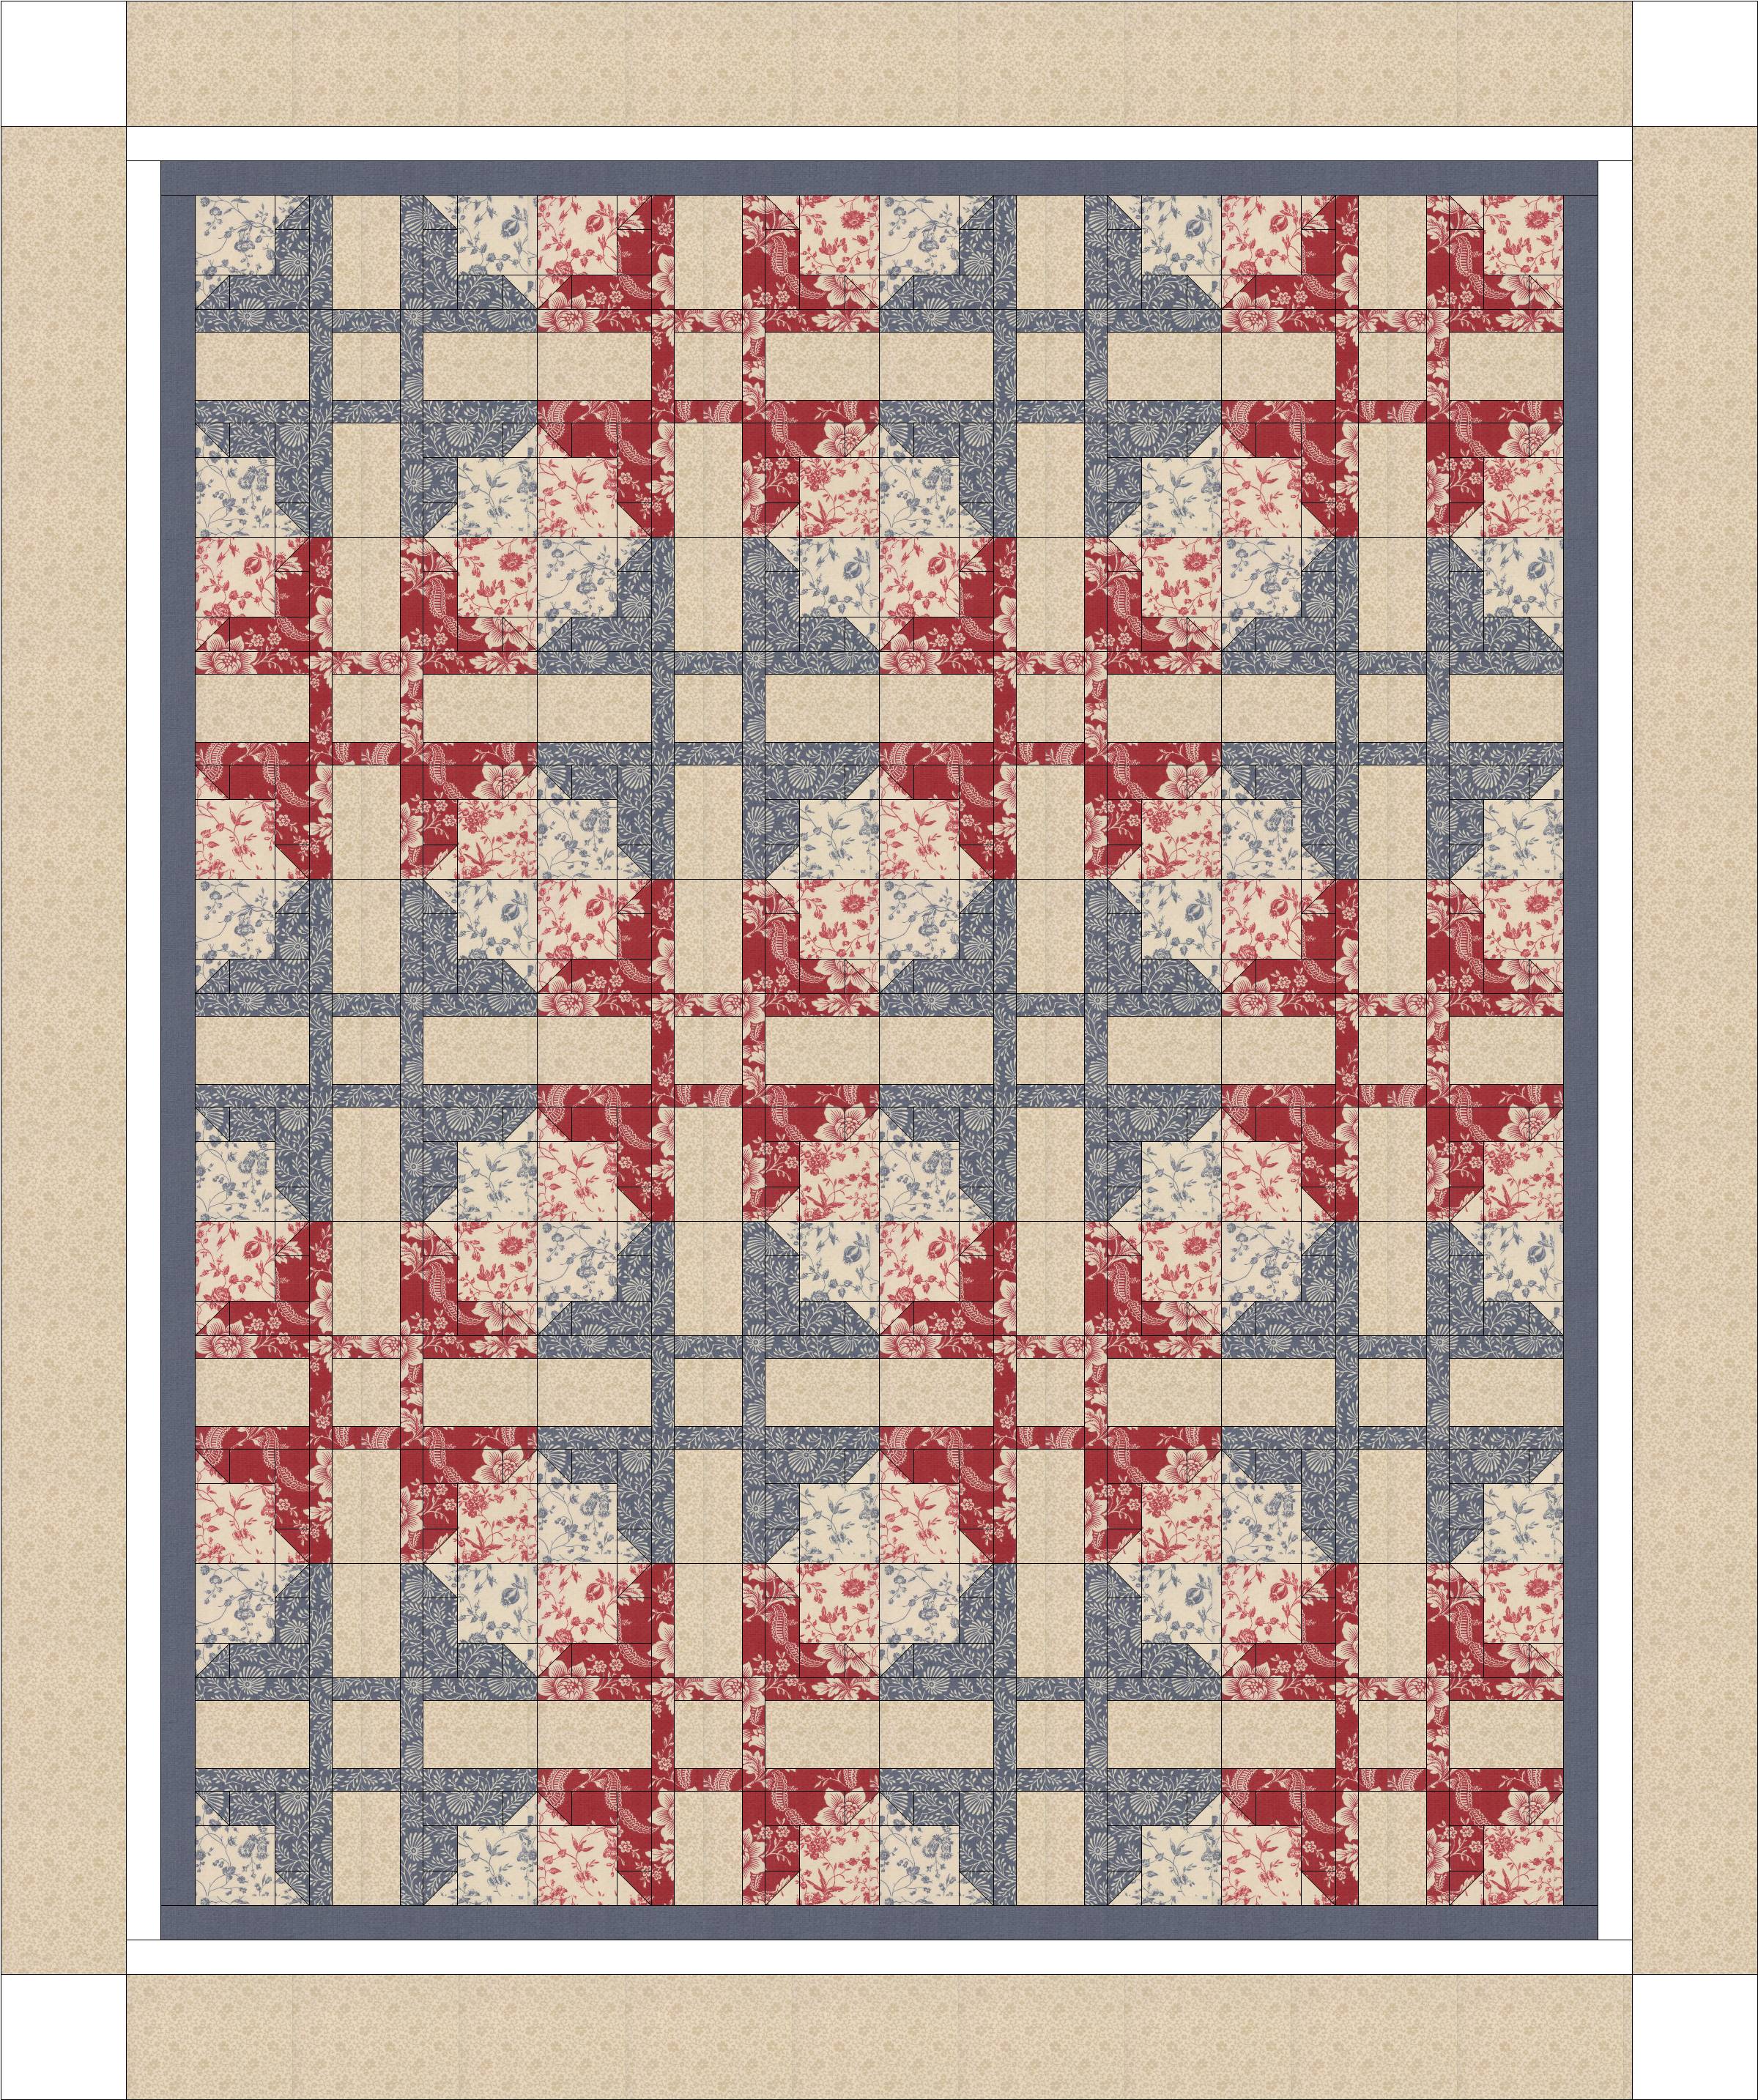
- Inner Border
- Gather
- 1, 60 1/2" x 75 1/2" center
- 8, 2" x WOF strips inner border fabric
- Sew 4 sets of 2 strips together along the short side.
- Iron seam allowances open.
- Sew one long skinny piece to each of the long sides of your top.
- Iron seam allowances towards the border.
- Trim excess.
- Sew one long skinny piece to each of the short sides.
- Irons seam allowances towards the border.
- Trim excess.
- Gather
- Outer Border
- Gather
- 1, center with inner border attached
- 7, 6" x WOF strips outer border fabric
- 4, 6" x 6" setting squares
- Long edges
- Sew 2 sets of 2 6" x WOF strips together to make 2 very long pieces.
- Iron seam allowances open.
- Sew one long strip each to the long sides of your top.
- Iron seam allowances towards the border.
- Trim excess.
- Short edges
- Sew 1, setting square to 1, 6"x WOF strip. I found it helpful to sew the seamless side of the setting square to the WOF strip. If you do this each time the end result is neater.
- Iron seam allowance towards the WOF strip
- Sew second WOF strip to end of unit opposite the setting square.
- Iron seam allowance open.
- Attach unit to short end of top, starting with the setting square - align intersecting seam allowances as you go. STOP sewing about 12" from end of edge.
- Lay your work out flat in front of you.
- Attach a setting square to newly trimmed end of border strip.
- Finger press seam allowance towards the border fabric.
- Continue sewing the border to your top.
- Iron seam allowance towards the outer border.
- Repeat process for opposite side.
- Gather

Congratulations - your top is now finished. Your next step is to quilt and bind the quilt as you like. I chose 100% cotton thread Signature in Ivory - it blended the best with all of the fabrics in my bundle and Paisley Brocade by Anne Bright. I would love to see how you finish your quilt. Please feel free to add pictures to my Tops to Treasures group on Flickr, or email me a copy. I can not wait to see them.
Don't forget to add a label to your quilt. I know, it seems like you have worked on this long enough, but someday you are going to wish you took a moment to document your efforts. All of the great artists sign their work. You should too.

I've enjoyed writing this recipe for you. I hope you enjoy it. Please feel free to stop by my blog or send me questions regarding this post. I will answer them as quickly as I am able.
Cindy Sharp
{Tops to Treasures}
![]()
Posted in:
Comments