Welcome to Moda Fabrics!
Let's Quilt It -- A Valentine For You!
Let's Quilt It -- A Valentine For You!
Published:
Feb 13 2017 - 23:00


Greetings Bake Shop readers and welcome! I'm Karen L. Miller of Redbird Quilt Co. and Karen's Quilts, Crows and Cardinals blog. I'm a designer, blogger, educator, and advocate for all things machine quilting. I'm so glad you're here!
Are YOU ready for a little Free Motion Quilting fun? I'm excited to share this sweet Valentine recipe focused on honing your FMQ skills on a home machine.
We've packed free motion pebbles, echo quilting, feathers, and matchstick quilting all into this petite 11" Valentine. Now run to pull out a couple of fat quarters, a 7" fabric scrap, some batting and thread and let's get started!!
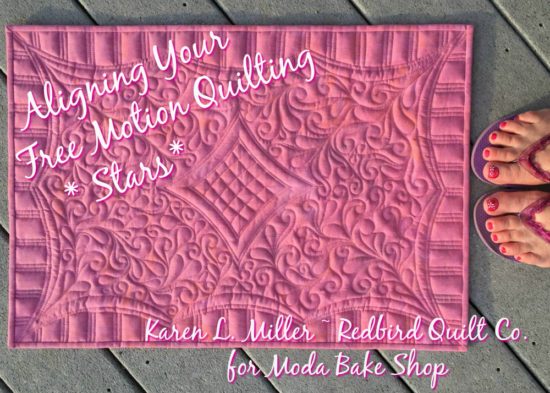
If you missed my previous Bake Shop Basics post about Free Motion Quilting (FMQ) you can review it by clicking the image below or here ===> Aligning Your Free Motion Quilting Stars
Creating and finishing a quilt at home is very rewarding... Will you give it a try ?
As with any recipe -- be sure to review all the steps before cooking!! This way you're sure to have the necessary ingredients, required steps, and expected results before you begin.
Need a warm-up session ? It's a great idea to practice new motifs on paper or a white board before you stitch them. I use a portable white board and dry erase markers to practice.
 If you have a tablet or an iPad -- they work great too! Really in a jam to draw? I've drawn designs on a mirror with dry erase marker and sketched a few paper plates too !! So much fun!

Be sure to leave time to warm-up on your machine! I encourage new quilters to quilt their name in cursive. It gets you fired up and allows you to test the machine, fabric, and thread tension at the same time. It's simple, fun and you already know how to write your name in cursive -- so why not stitch it! Give it a try. Once you've quilted your name move on & try one of your new motifs.
I'm really very excited to share this recipe with you. Free Motion Quilting (FMQ) is my passion and it's great fun to share it with others. So thanks for joining me & welcome!
![]()

The Perfect Fabric Choices:
- 1 -- Fat Quarter Moda White Paper Grunge 30150-101 for Background (cut at least 13.5 inches square)
- 1 -- 8" Square Moda Raspberry Grunge 30150-253 for Heart Applique
- 1 -- Fat Quarter Moda Fabric of your Choice for Backing -- from my stash I used a beautiful floral print from the Rouenneries Deux line by French General (cut 16" square or 3" larger than background fabric)
- 50" inches of 1.5" strips of coordinating fabric for Binding (I used Raspberry Grunge)
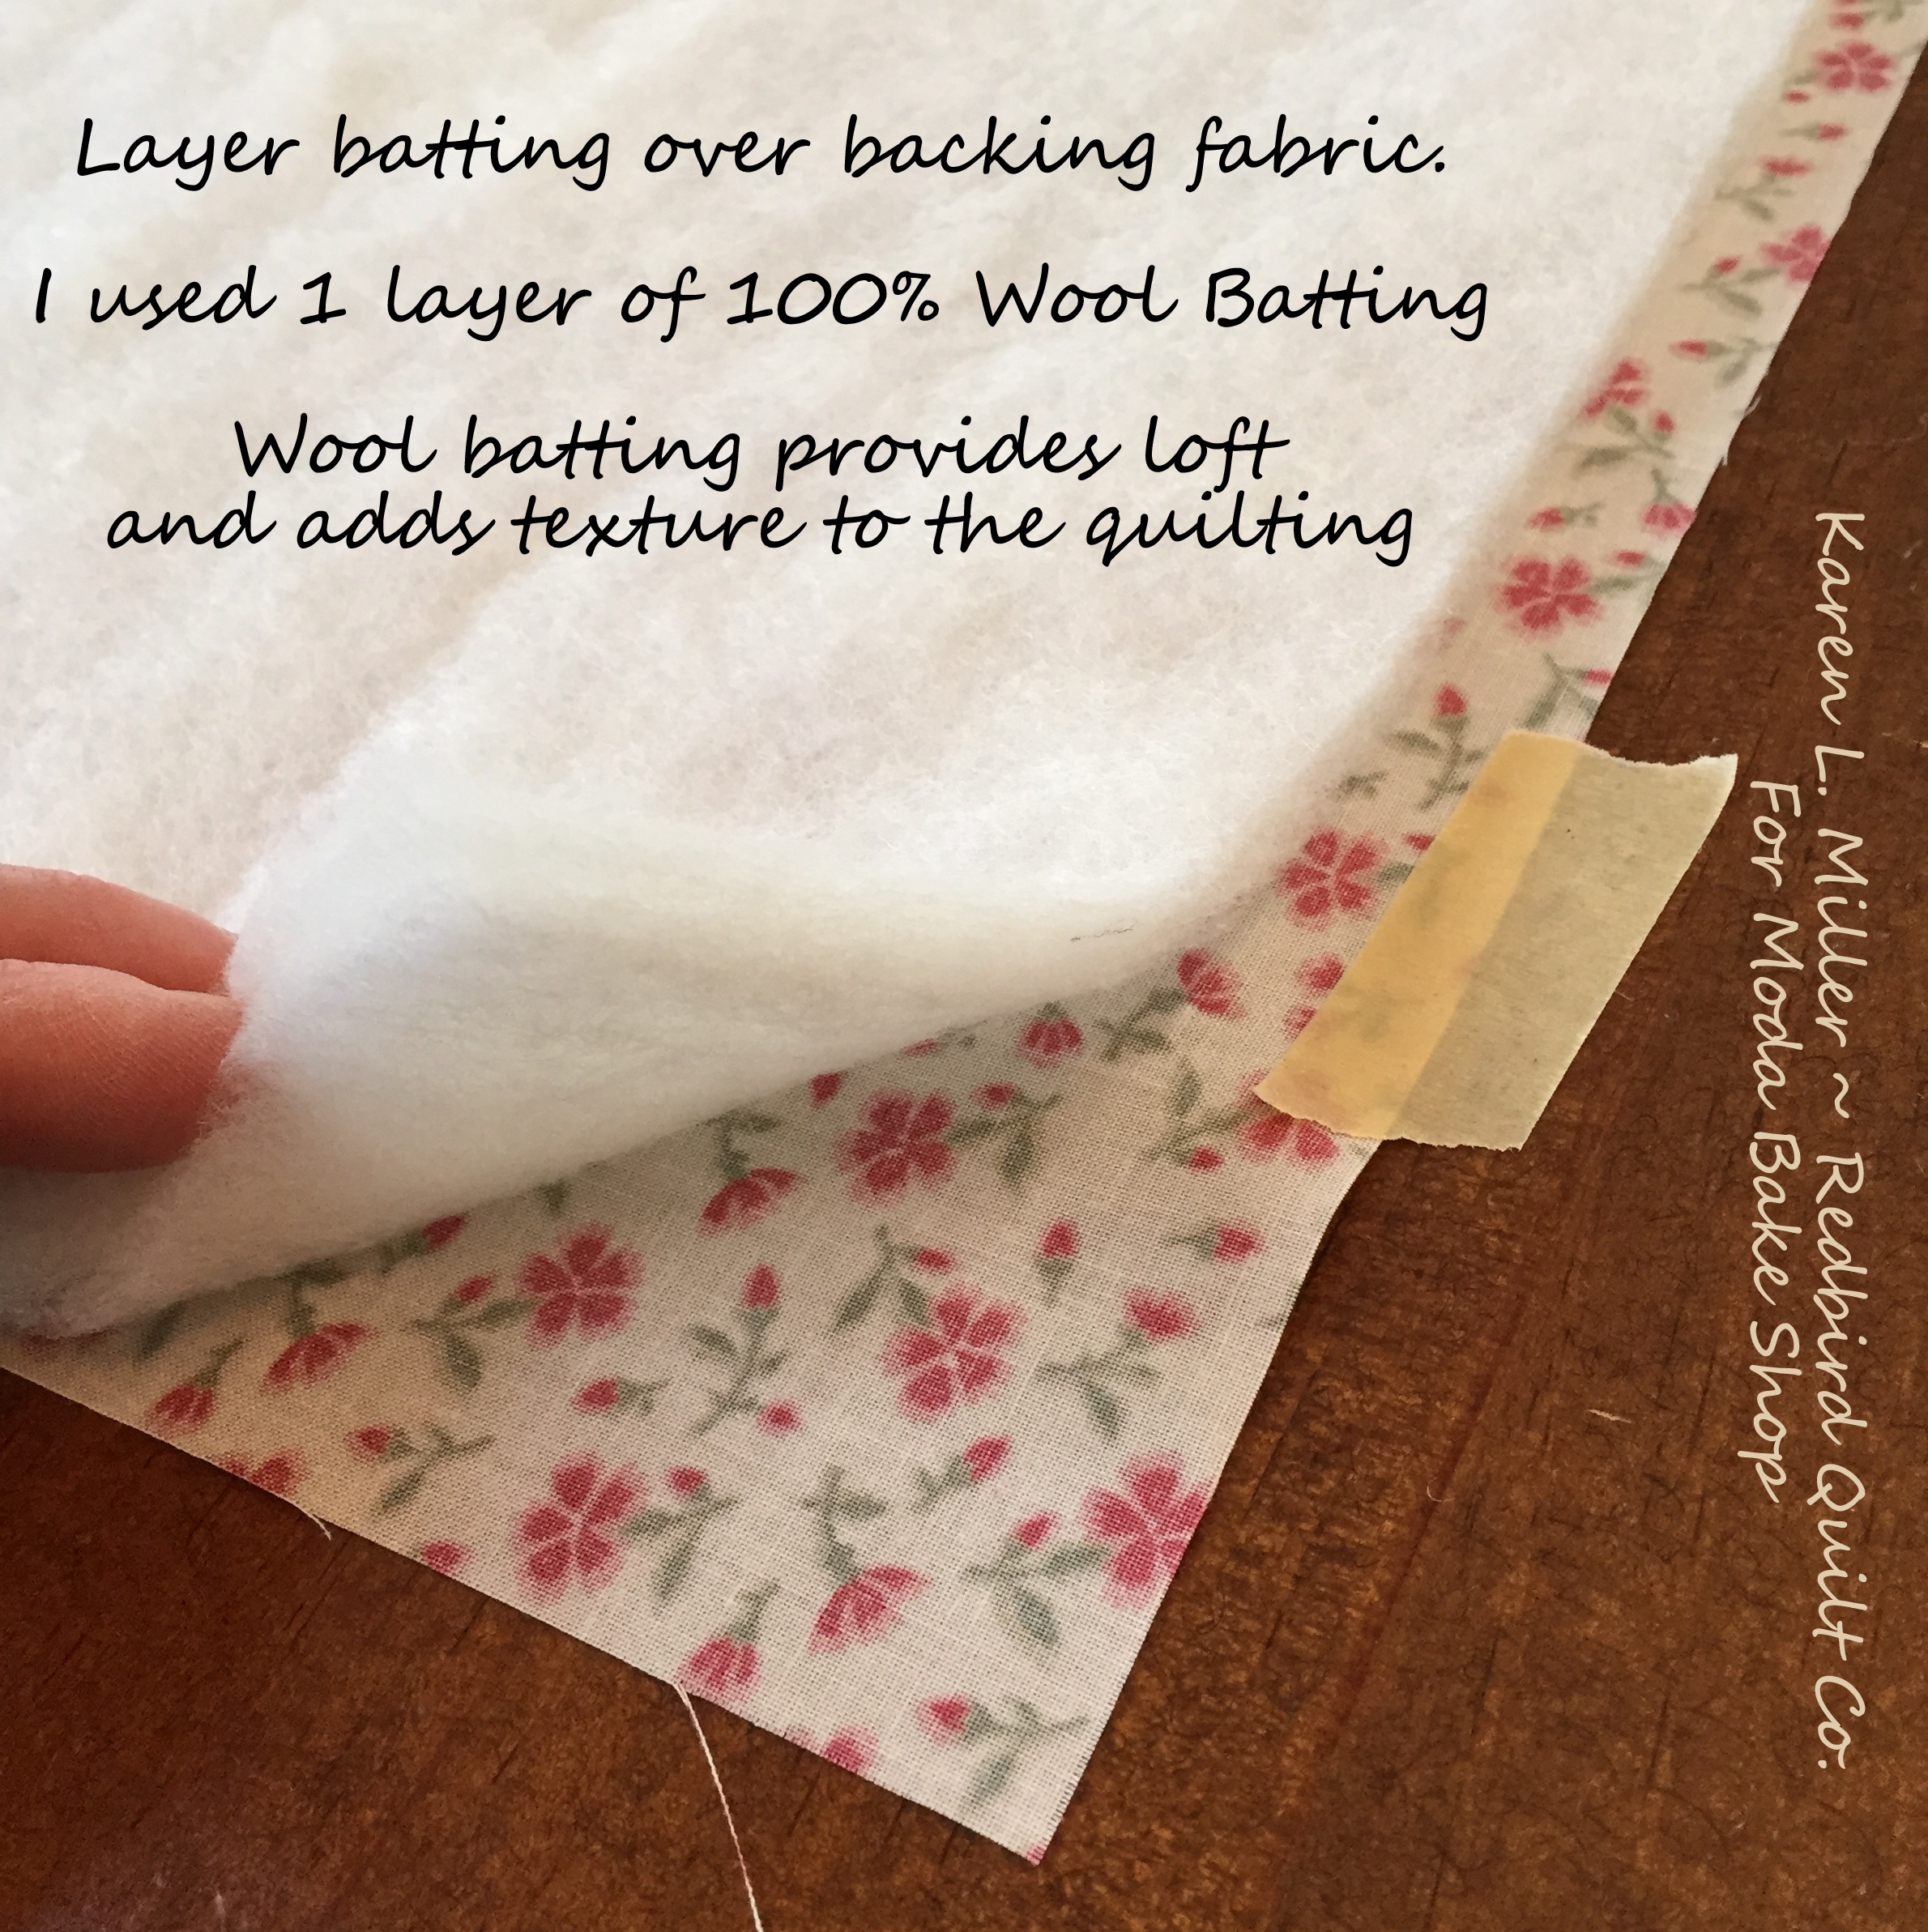
- 1 -- Fat Quarter 100% Wool Batting for Quilting (cut 16" square or 3" larger than background fabric)
The Perfect Thread Choices:
- Aurifil 40Wt Thread Color #2600 for background quilting
- Aurifil 40Wt Thread Color #2479 for heart quilting
- Aurifil 50Wt Thread #2615 for the bobbin
- Aurifil 50Wt Thread #2452 for applique, piecing, and hand stitching the binding
Some Really Awesome Tools:
- Supreme Slider™-- so your quilt sandwich glides easily across the top of your machine
- Machingers Quilting Gloves - to control the quilt sandwich
- SewLine™ Fabric Pencil and/or Air or Water Soluble Marking Pens -- Yes -- we do a bit of marking
- Curved Basting Pins - I like to Pin Baste but you can spray or hand baste too
- Machine Needles - Microtex Sharps, Quilting or Top Stitch Needles are great for FMQ
![]()
Warning... a ton of pictures ahead!
It's not easy to share Free Motion Quilting details with still images...
So... bear with me as this tutorial is L--O--N--G !!!
If you're already comfortable with the process -- you can breeze right past the details and stitch out the design. Either way -- I can't wait to see what you create...
Choosing Thread:
One of the first steps in any quilting project, after choosing pattern and fabric ;) , is choosing the right thread color and weight. For several years I've been quilting with Aurifil cotton thread and I've never been disappointed. This 2-ply thread comes in a variety of weights and endless colors -- for a cotton thread you can't beat the strength or sheen and you get all this with very little lint. You've got to give it a try!!
Choosing a thread weight ? When planning to quilt a dense motif, I lean toward using a finer weight thread like Aurifil 5oWt. If the planned motif is sparse, I may choose a heavier weight thread like Aurifil 40 or 28Wt -- they add a bit of boost to the "quilty" stitches. Sometimes the availability of "just the right" color sways my decision. While preparing for this project I was fortunate to have just the right 40Wt threads on-hand. If you don't have 40Wt available -- use 50Wt instead. It will work just fine.
So what is "just the right" color... ? For each quilt I ask myself -- subtle or sassy ?? For a beginner I recommend subtle -- because when you use a high contrast (sassy) thread color your "glitches" are more noticeable. So... If you're new to FMQ, go easy on yourself and consider choosing a subtle color. In this recipe subtle worked great!! The texture from the wool batting and the pretty quilting were sweet enough for this Valentine.
Before making a final decision on thread color, unwind the thread from the spool and position it over the quilt fabric. Doing this gives you a better representation of how the thread will look once quilted. If you're really NOT sure what color to use, do a little stitching on a scrap piece of your fabric. Use what grabs YOU... It's your project and a representation of your taste -- there is no right or wrong.

Fabric Choices matter too....
Have I mentioned that I LOVE Grunge ? Grunge gives your project texture, color, and a bit of a sassy without going overboard. I also love that it's solid enough to allow your FMQ stitches to shine!! It's not too busy and not too bland. I just really love working with it. The variety of Grunge colors available from Moda Fabrics is amazing - if you've not seen them all -- check them out here and talk to your local shop about getting them in. You won't be disappointed. Have I mentioned how much I LOVE GRUNGE ??
Any color , any day -- Grunge all the way!!

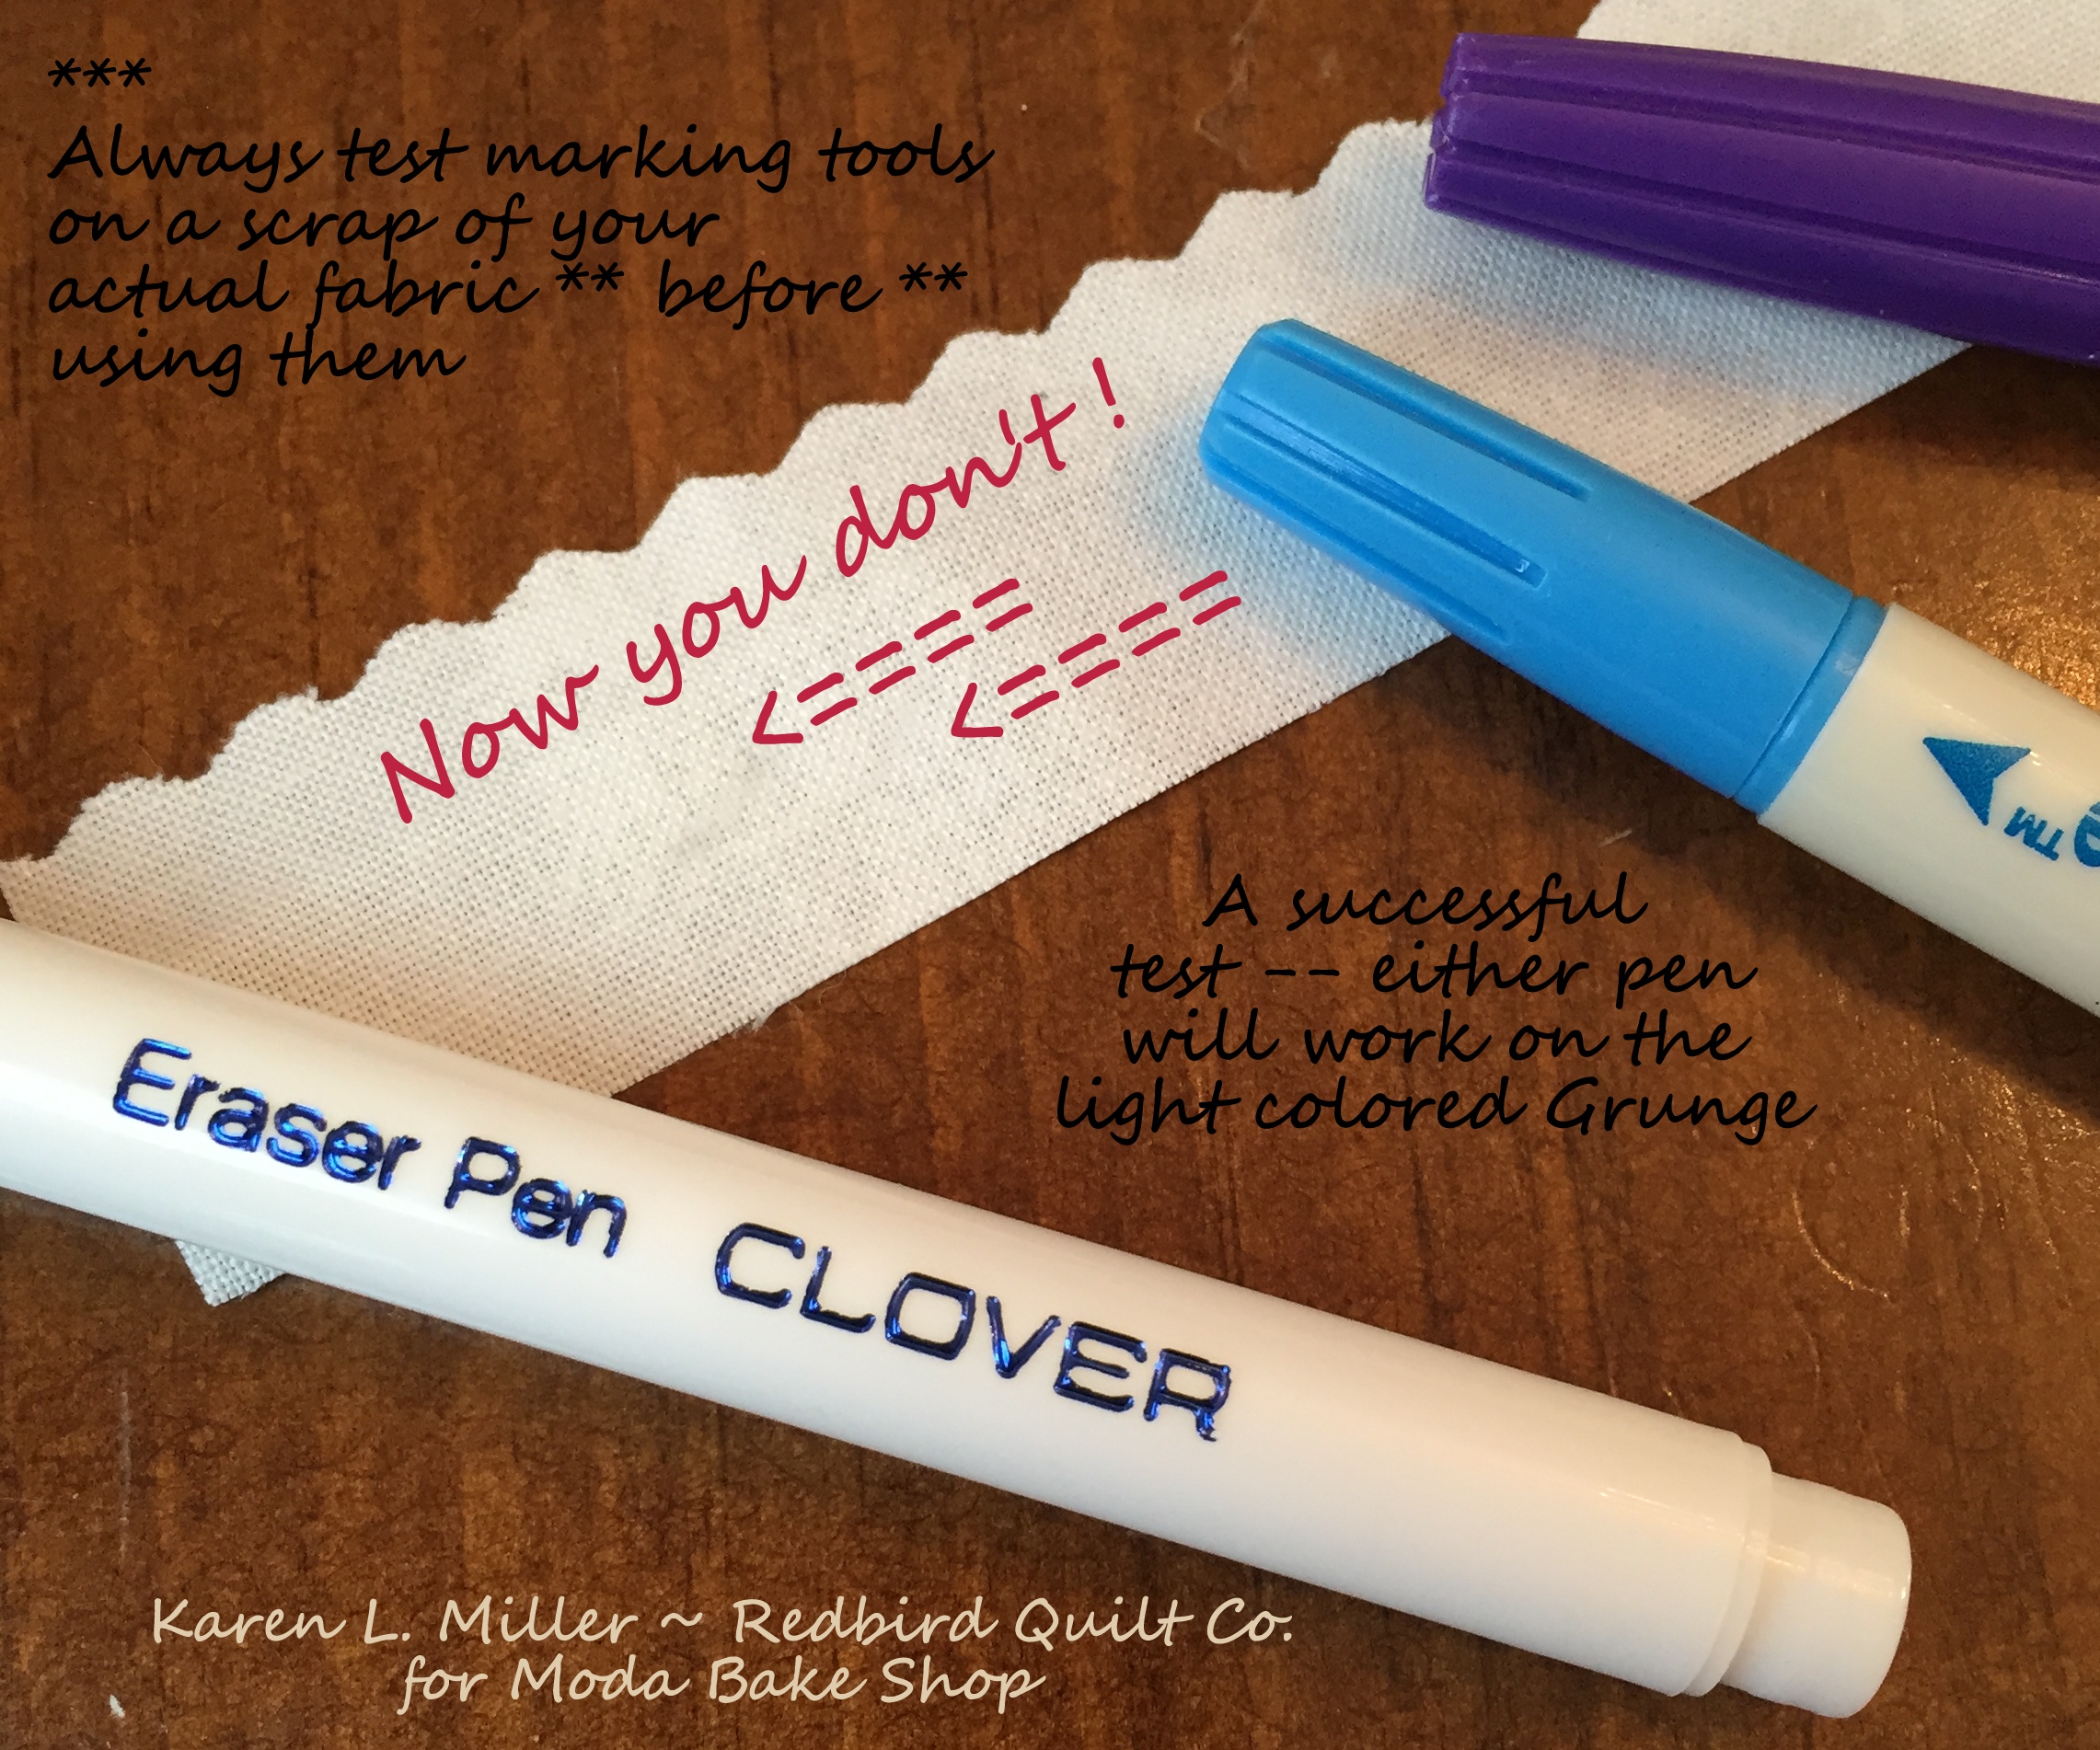
Let's chat Marking Tools...
To successfully stitch our Valentine mini we'll do a bit of marking on the quilt top. I have several "go-to" marking tools including Sewline Fabric Pencils, the Clover Hera Marker, the standard Water and Air Soluble pens and plain old tailors chalk.
For this recipe though, we'll be using a Water Soluble (blue) pen and the Sewline(TM) fabric pencil. Using the blue (water soluble) pen allows you to mark a registration line today and have it still be there tomorrow. Alternatively, the air soluble (purple) pen will disappear overnight -- or sooner under damp or humid conditions.
So... for our background marks we'll use the blue pen and for marking on that beautiful Raspberry Grunge we'll use a white Sewline Fabric pencil. You'll love using both!

It's important to ALWAYS test marking tools on a swatch of your quilt fabric BEFORE marking the actual quilt top. Some marking tools remove easier than others. You don't want to ruin a quilt with a marker that doesn't disappear when treated with air, water, or by brushing it away.
One more thing about marking tools... a few years ago Karen McTavish introduced me to the Clover Eraser Pen and I've not stopped using it since. If you want your blue or purple marks to go away immediately without wetting the quilt top, just swipe them with the tip of a Clover Eraser Pen -- voila -- it's gone! Test this on your fabric swatch too!! Do make sure you're comfortable with it.
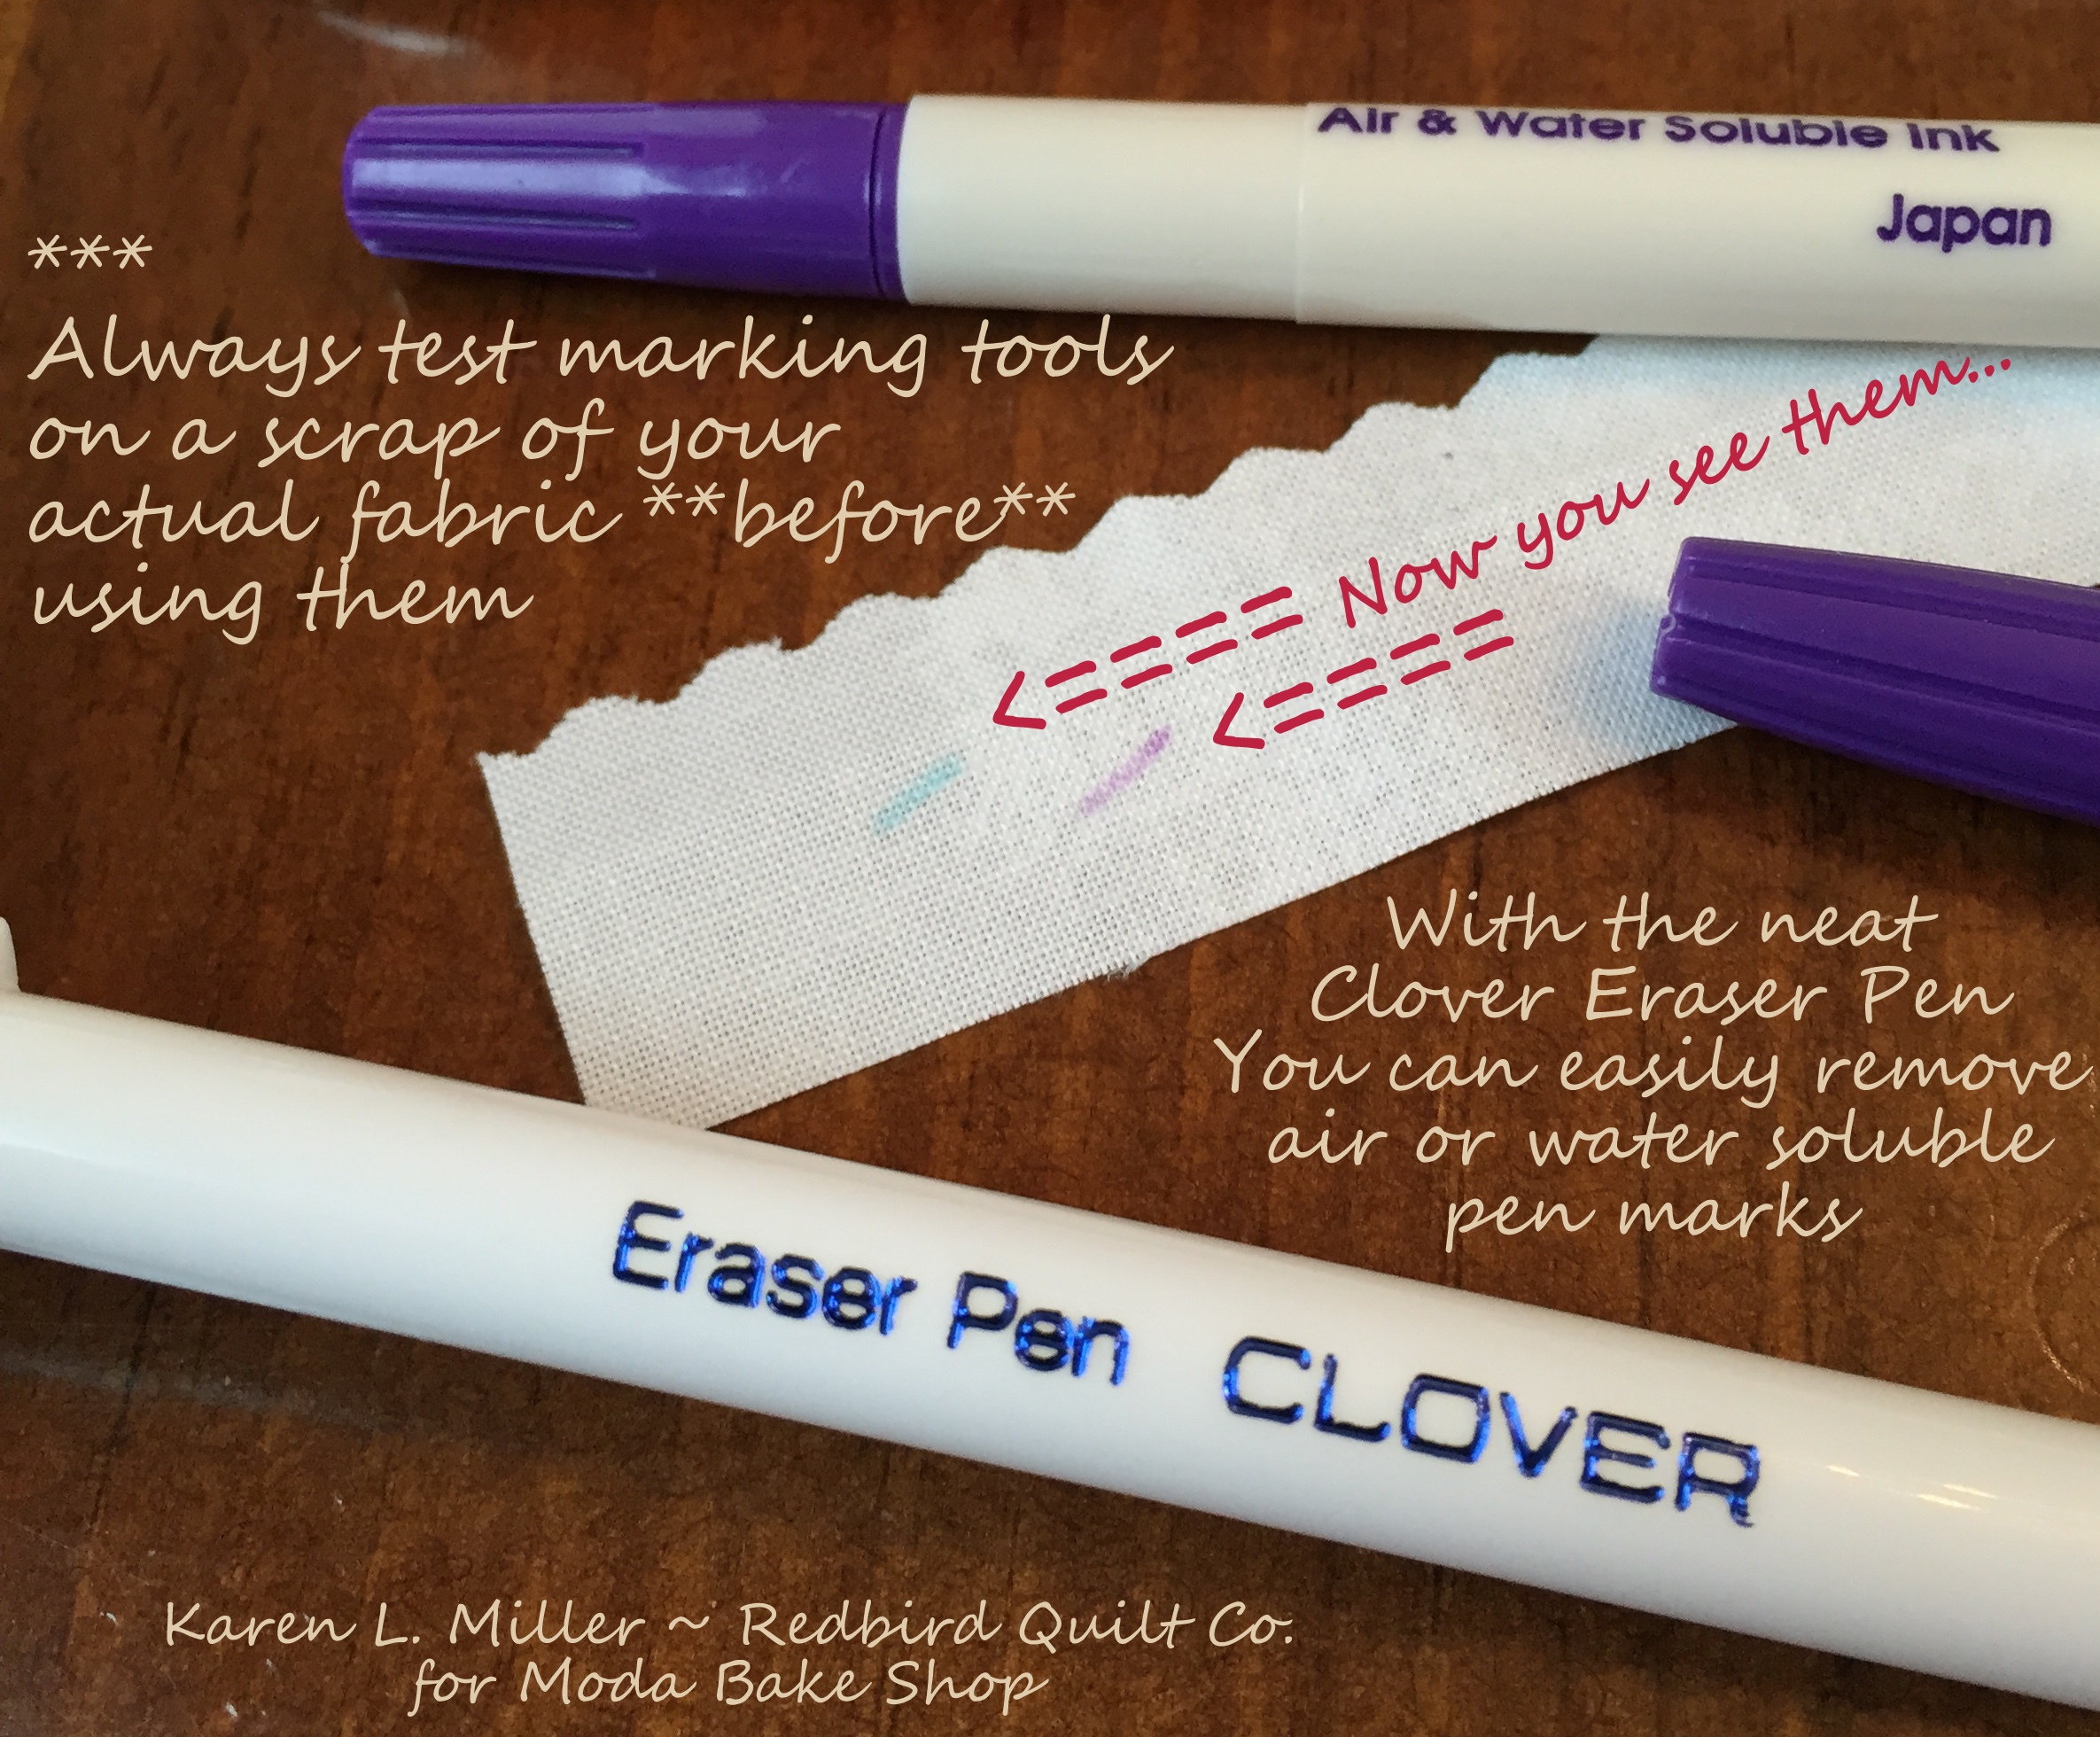
See them disappear !!
Let's Get Started --
Prep Background and Heart Applique:
I cut my background fabric 13.5" square. Why ? you ask... Well -- that's a great question. I wanted to suggest a size that is easy to manipulate. If you want to make your quilt a little larger, go for a 16" square background -- but do remember to increase the size of your backing and batting accordingly.
Begin by cutting and pressing the background fabric. Next, fold it in half once diagonally and finger press the fold. Unfold and refold on the opposite diagonal. Finger press that fold too. Folding of the fabric diagonally creates registration marks that aid in placement of the heart applique.
Prepare the heart applique using the large heart template from the downloadable PDF. I cut the large heart (about 6.5") out of heat resistant template plastic and prepared a turned edge applique (starch and press). I then hand stitched the applique to the background fabric using a 50Wt Aurifil thread -- so fine the stitches disappear into the fabric! Use an applique method of your choice to prepare and attach the heart, on point, to the background fabric.

On my sample, the heart was centered on the background fabric which resulted in some pretty tiny feather plumes at the top of the heart. Consider positioning your heart a tad lower than center.

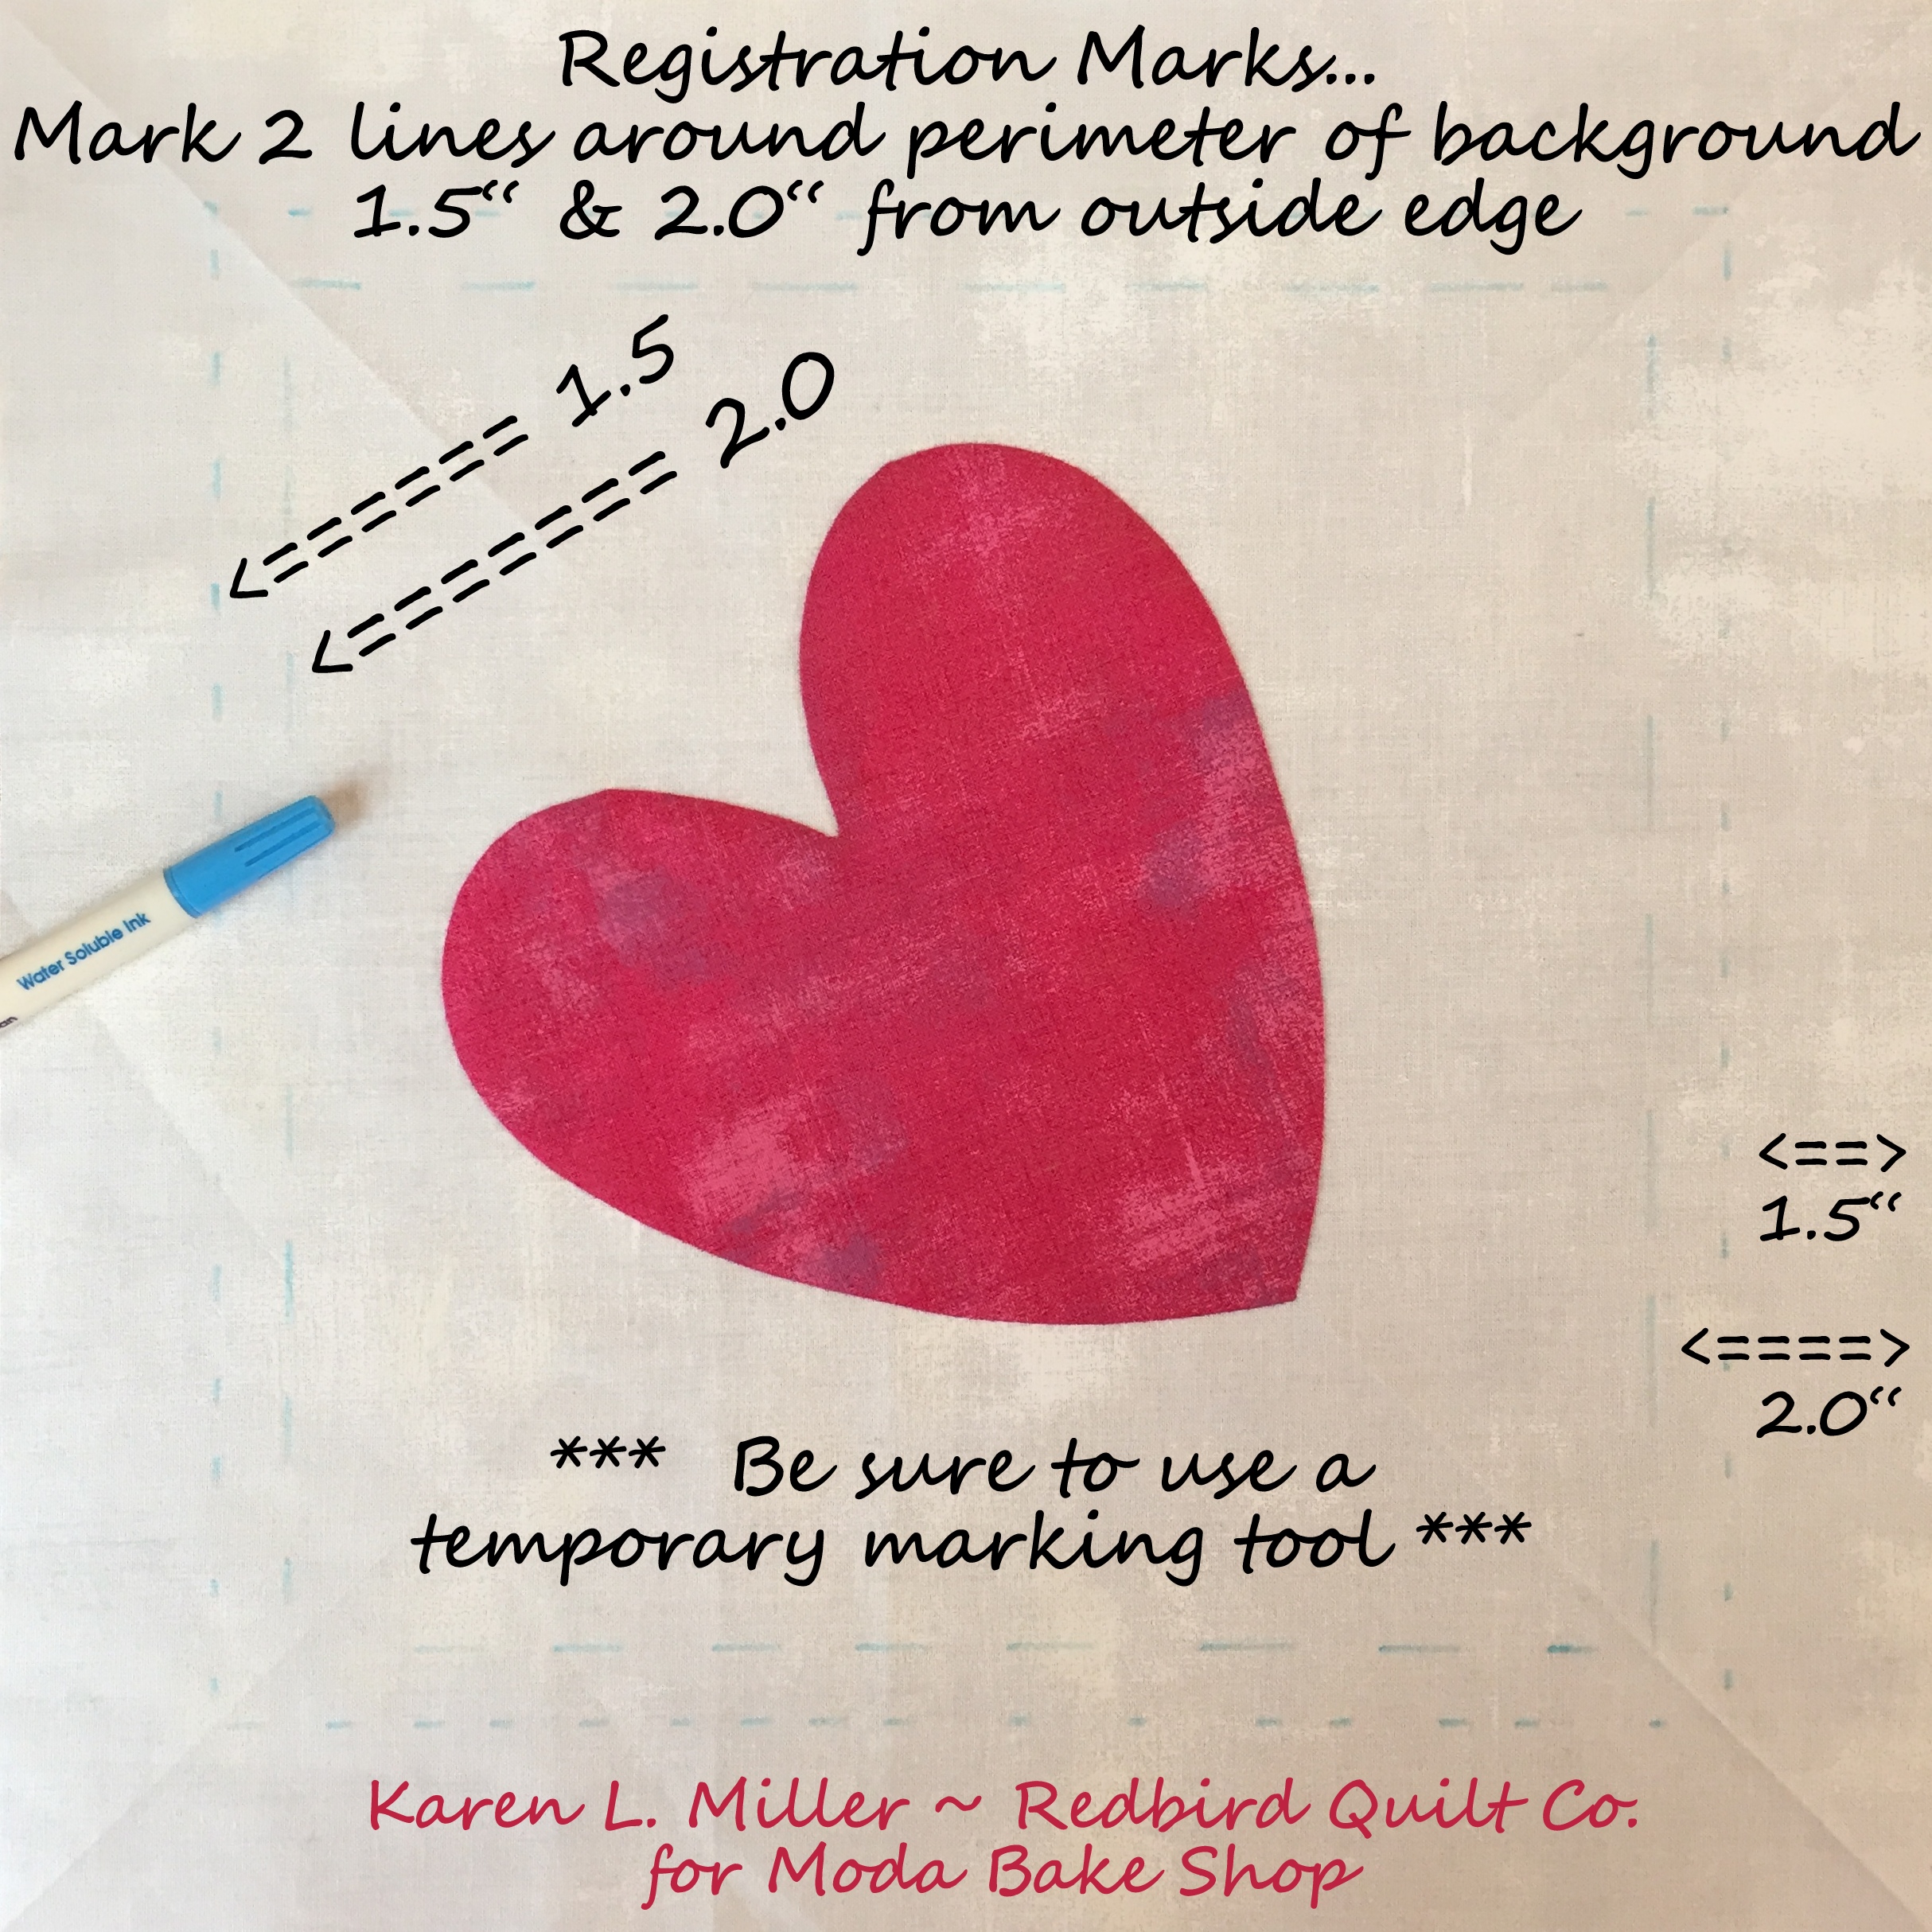
Once the heart is attached to the background fabric you'll want to use the blue (water soluble) pen to make registration marks that will aid the quilting process. Be sure to use a marking tool that is temporary and removes easily from the white background fabric.
Make the following registration marks:
- Mark 1.5" from the outside edge -- all the way around. This acts as the projected trim mark for squaring up when we're done quilting. We're leaving the quilt sandwich larger than the trim mark so we have something to grip while quilting the last motif. It's convenient to make make the quilt top (batting and backing) just a little larger than your projected project size.
- Mark 2.0" from the outside edge -- all the way around. This mark will be the target for the FMQ Feathers. It's OK if we fall short of this mark as we will fill with echo and straight line quilting. But it's good to have a target.
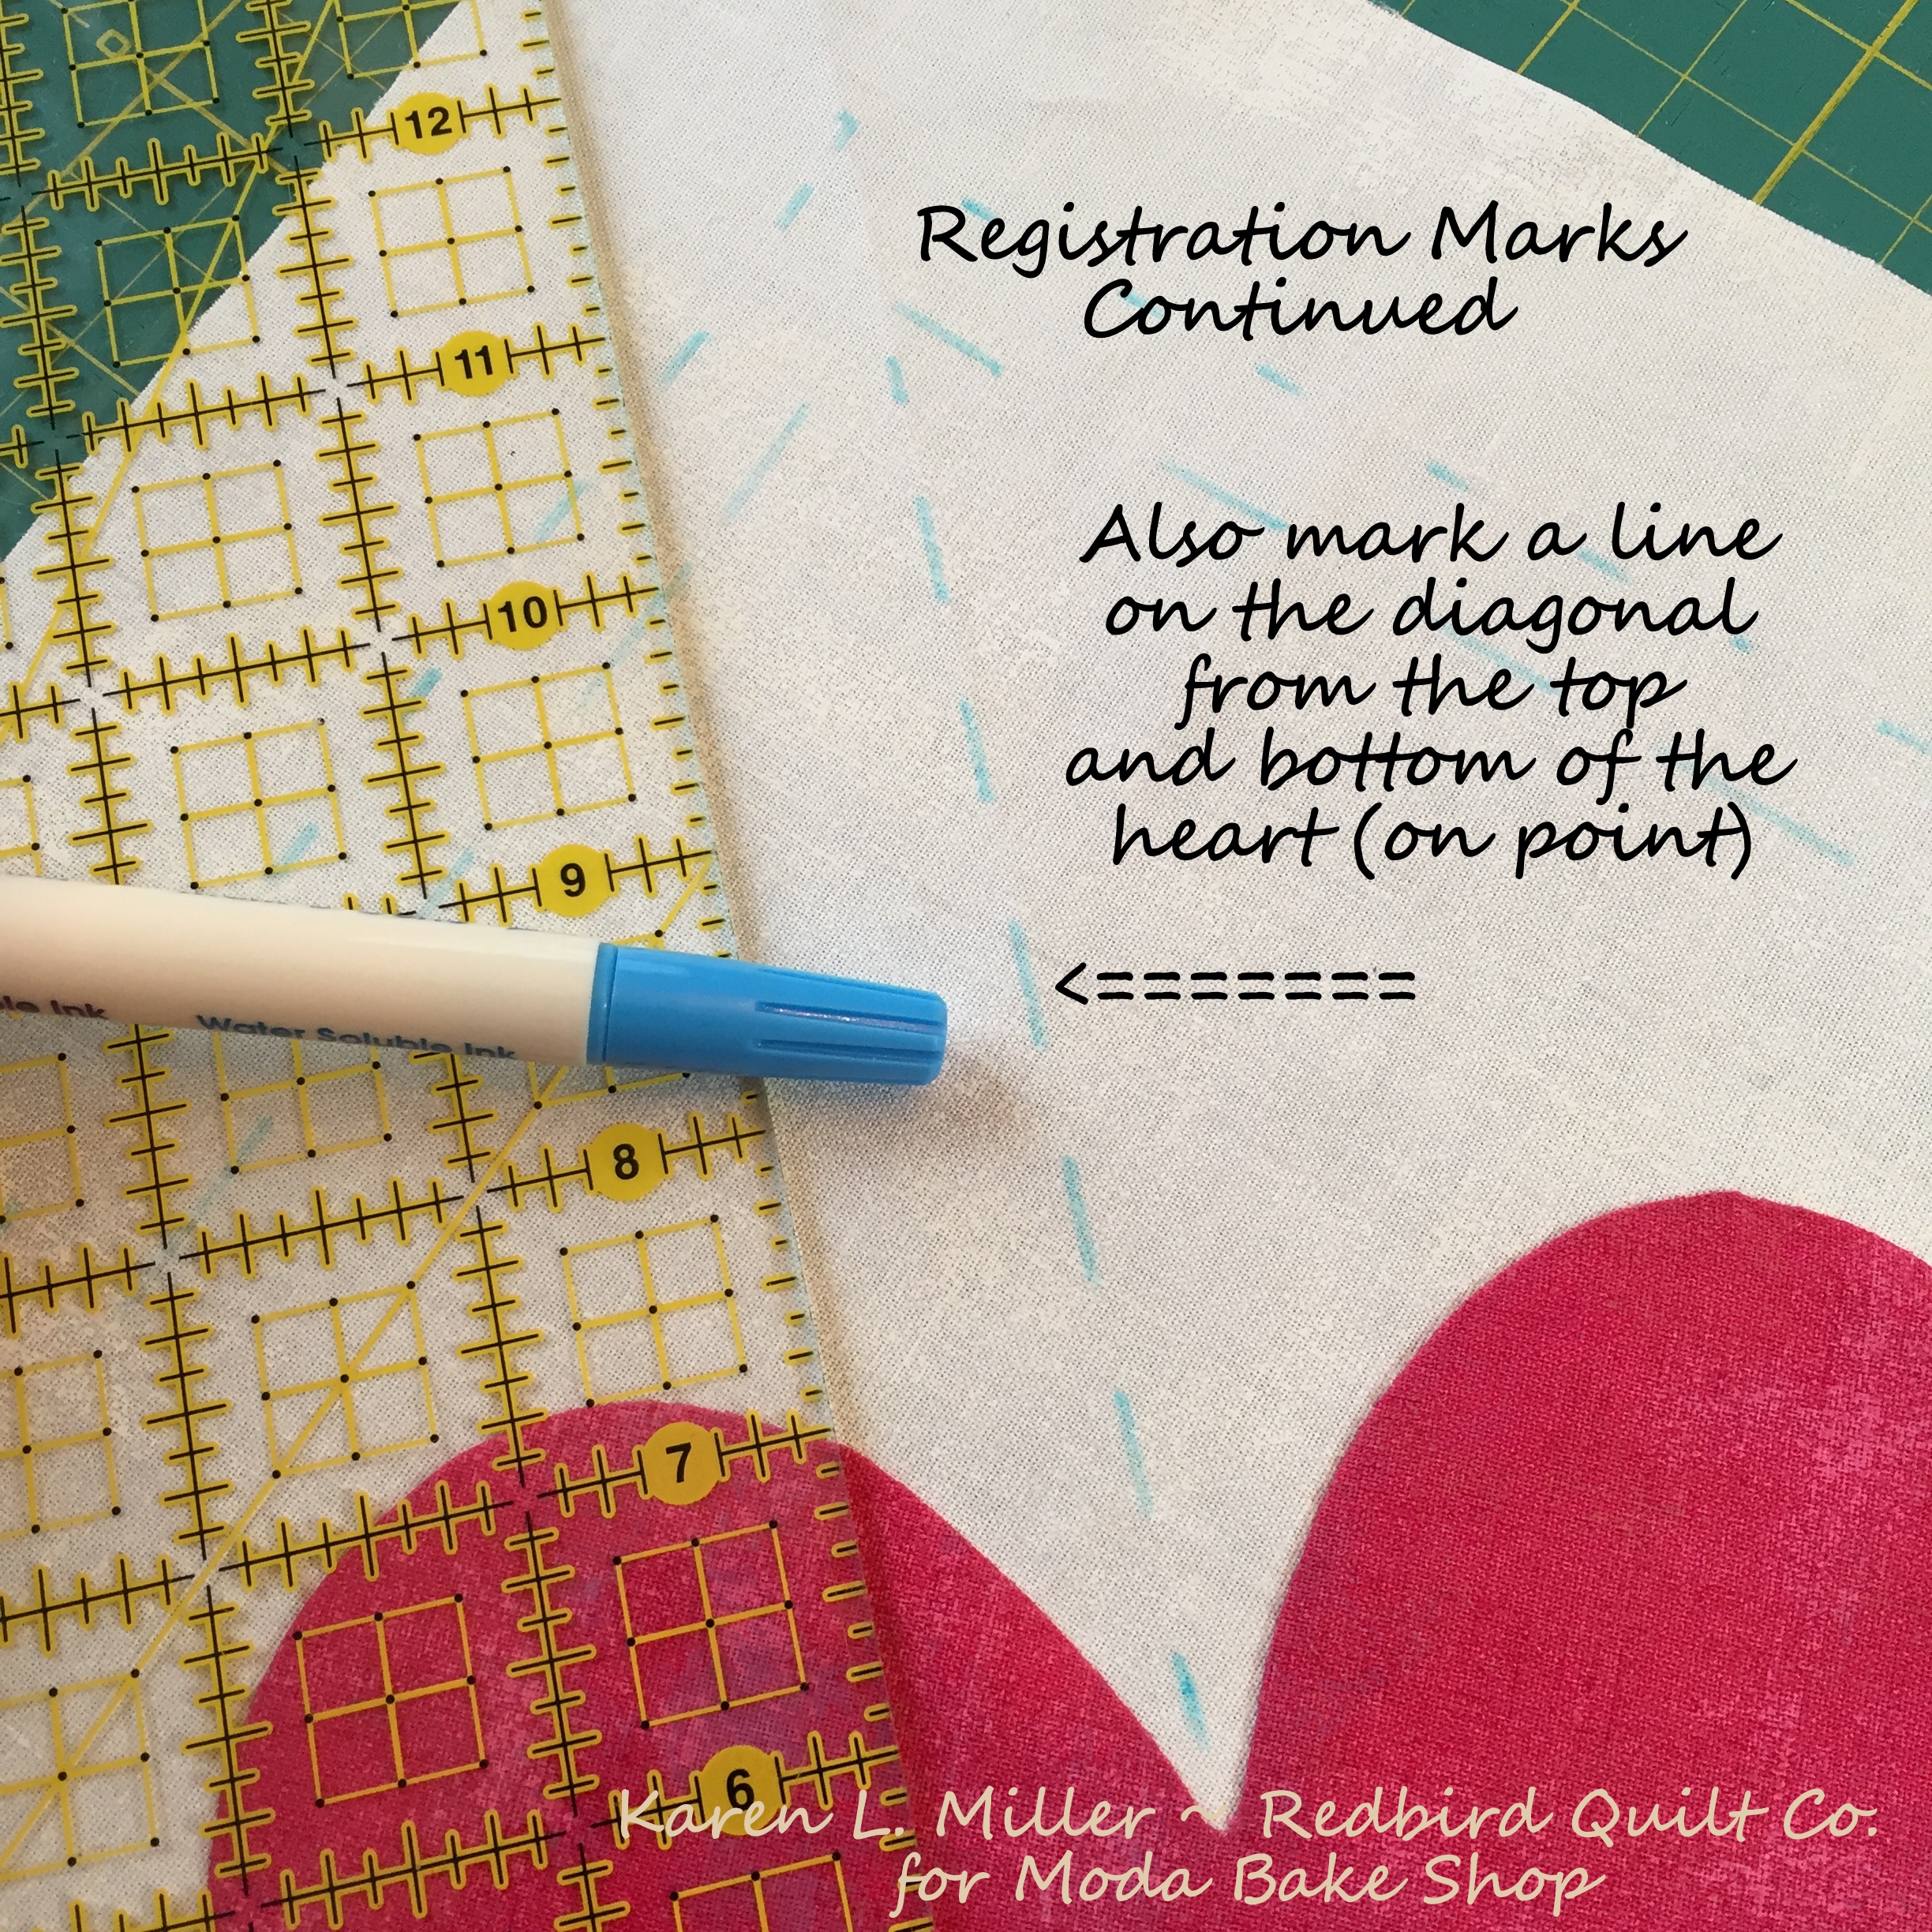
Here's a close up of the first 2 sets of registration marks:

- Next, mark the diagonal line to the top and bottom of the applique heart
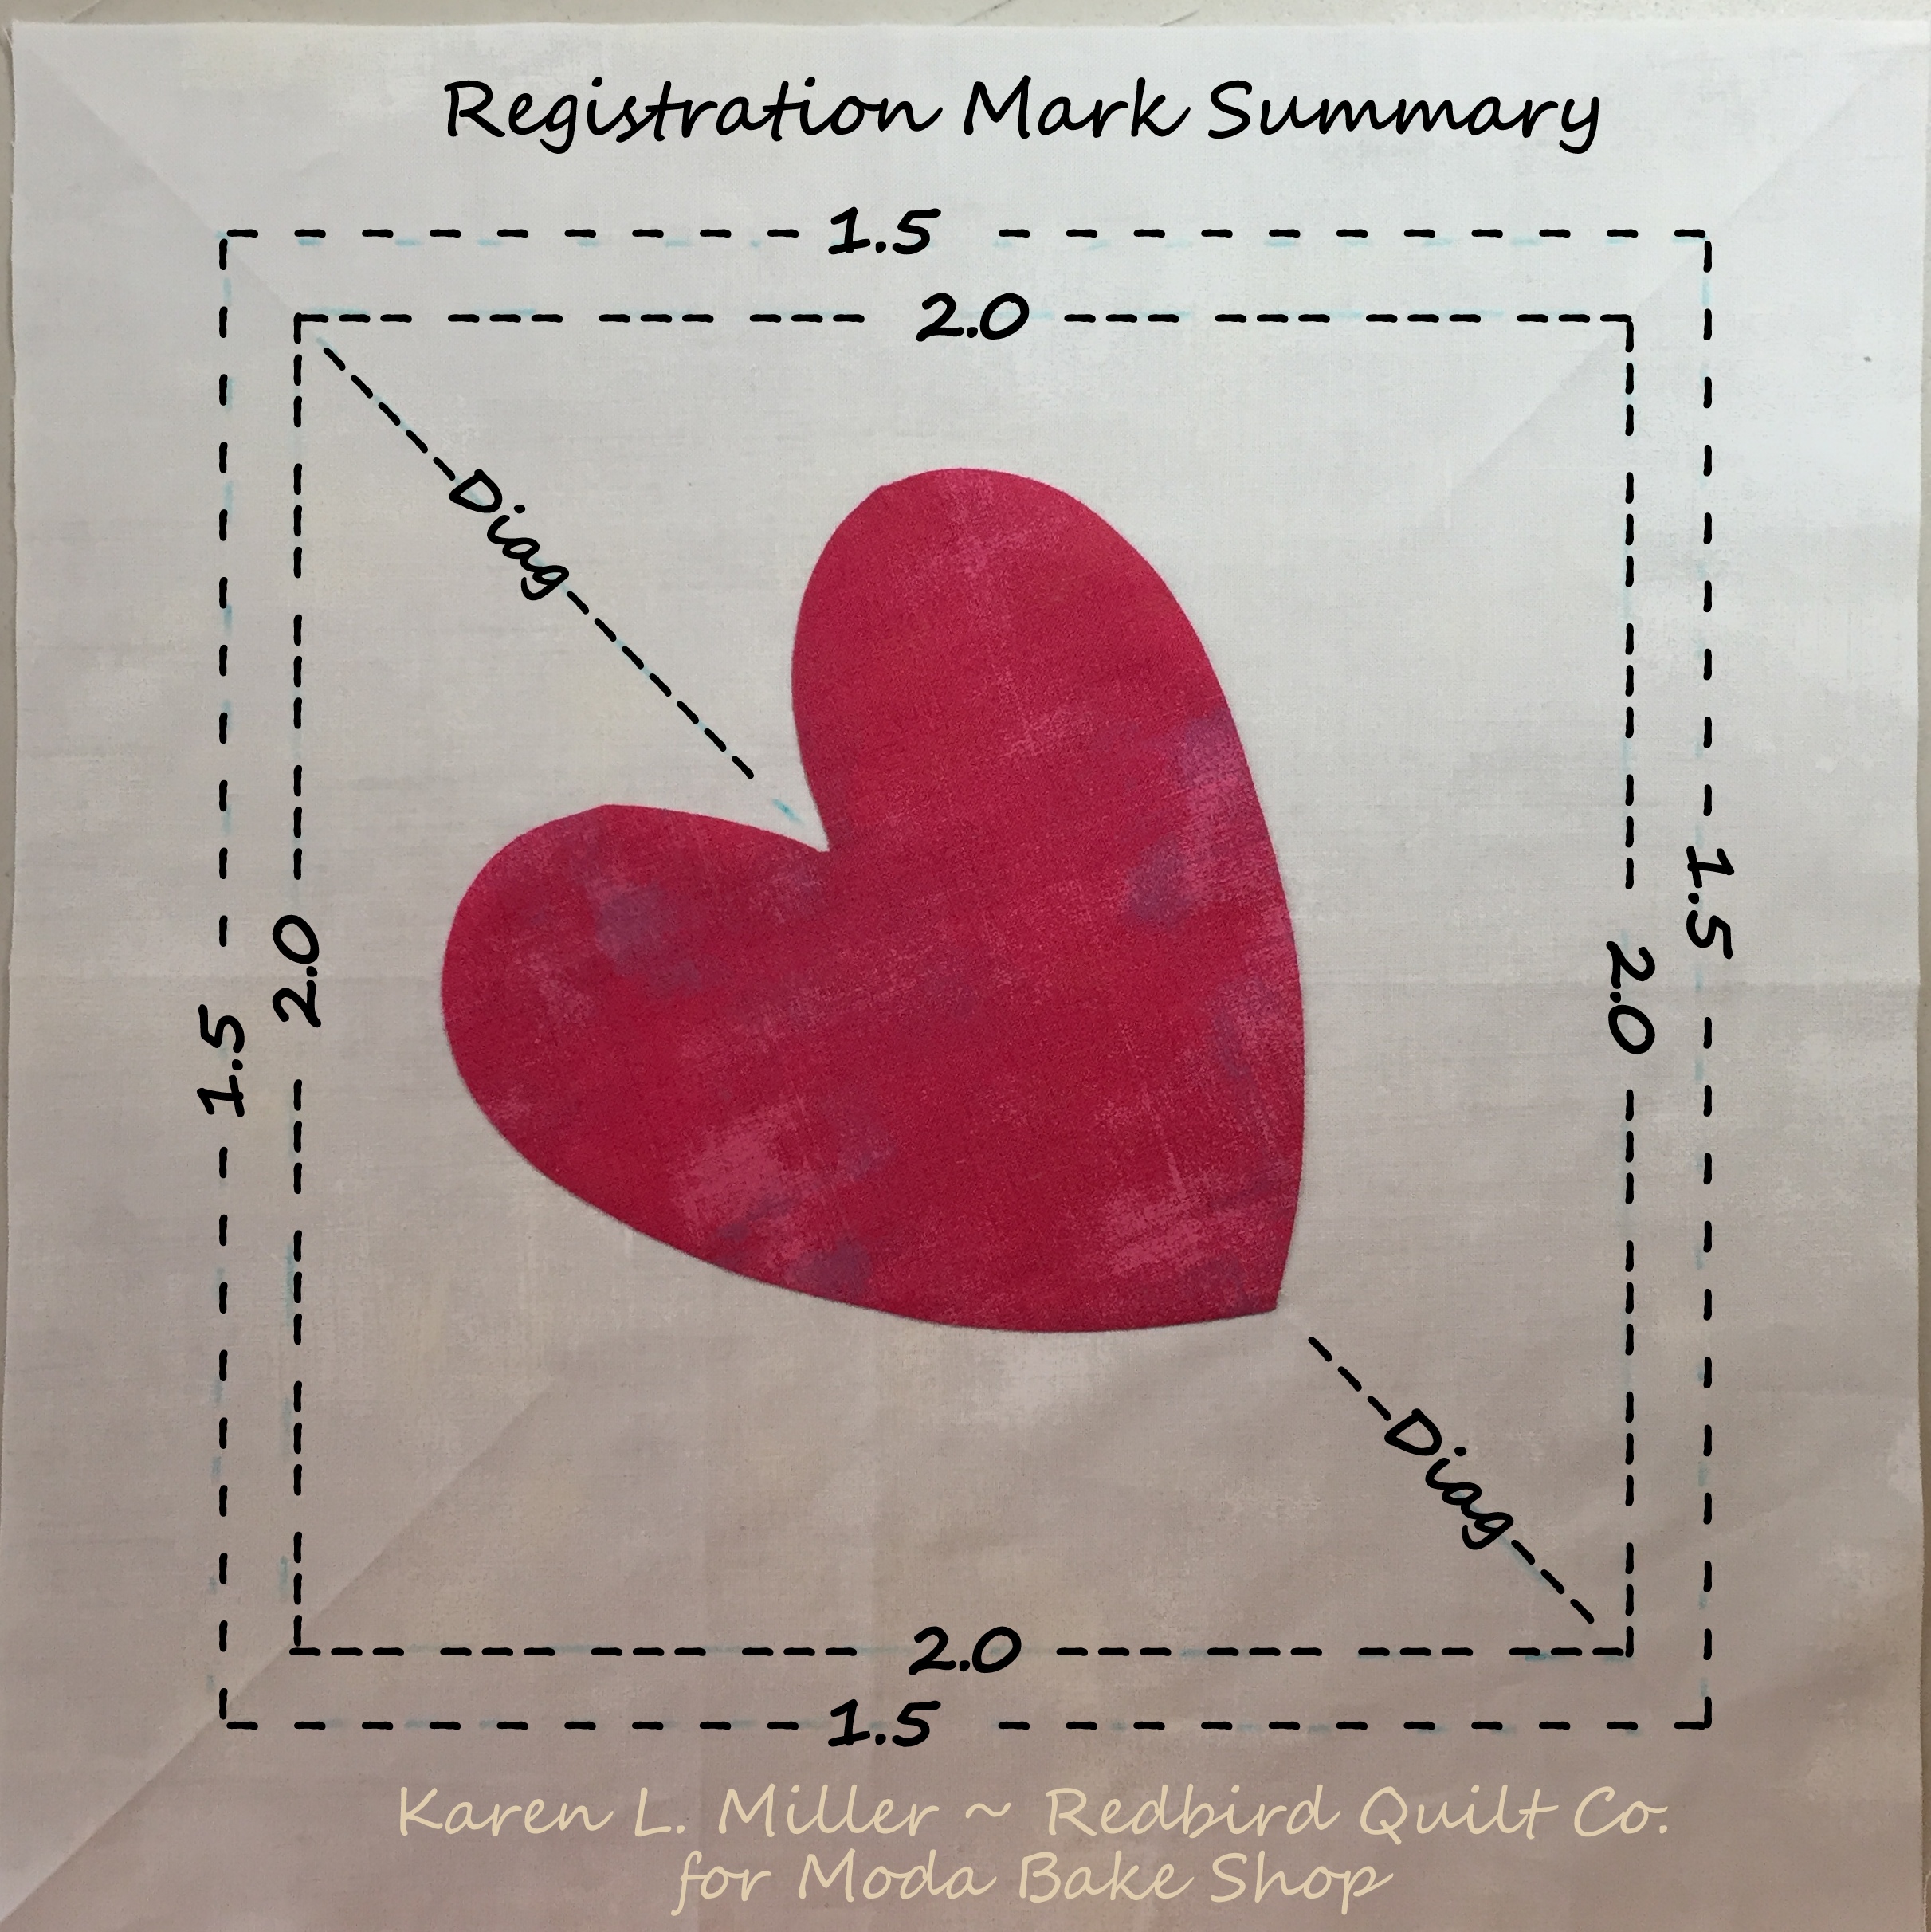
Here's a summary of the reference marks:
Yippee!! Now let's choose some backing fabric...
Choosing a Backing Fabric:
I like to choose a backing fabric that will "get along" with the quilt top and planned thread colors.
Generally, I match my bobbin thread color to the top thread color. Doing this minimizes the risk of seeing pesky little tension issues. With this in mind, I'm look for a backing fabric that complements the bobbin (and top) thread. Also, I'm usually searching for something pretty so I can use the quilt on either side and smile.
Depending on the overall size of the quilt top, cut the backing and batting AT LEAST 2" larger than the quilt top. If the quilt is queen or king size I would add at least 4" to the overall size of the batting and backing. If you increased the size of the quilt top from the original 13.5" be sure to increase the size of your batting and backing accordingly.
For this recipe, I used a 16" square piece of backing fabric. Knowing it would get trimmed off during the squaring process, I left the selvage on the backing fabric.

Layer and Baste the Quilt Top:
For a quilt this size, I'll use a table top to layer and baste.
Remember to place the backing fabric right side down for this step. Smooth the fabric and tape all around. You want the backing fabric to be taut but not stretched.

Next, add the batting and smooth from the center out.
Now add the quilt top, right side up. Because the quilt is small, a handful of pins is plenty for basting. I prefer to use curved quilting pins -- they make it much easier to pin through all layers. See the marks below for pin placement. On a larger quilt sandwich I would place pins a fist width apart.
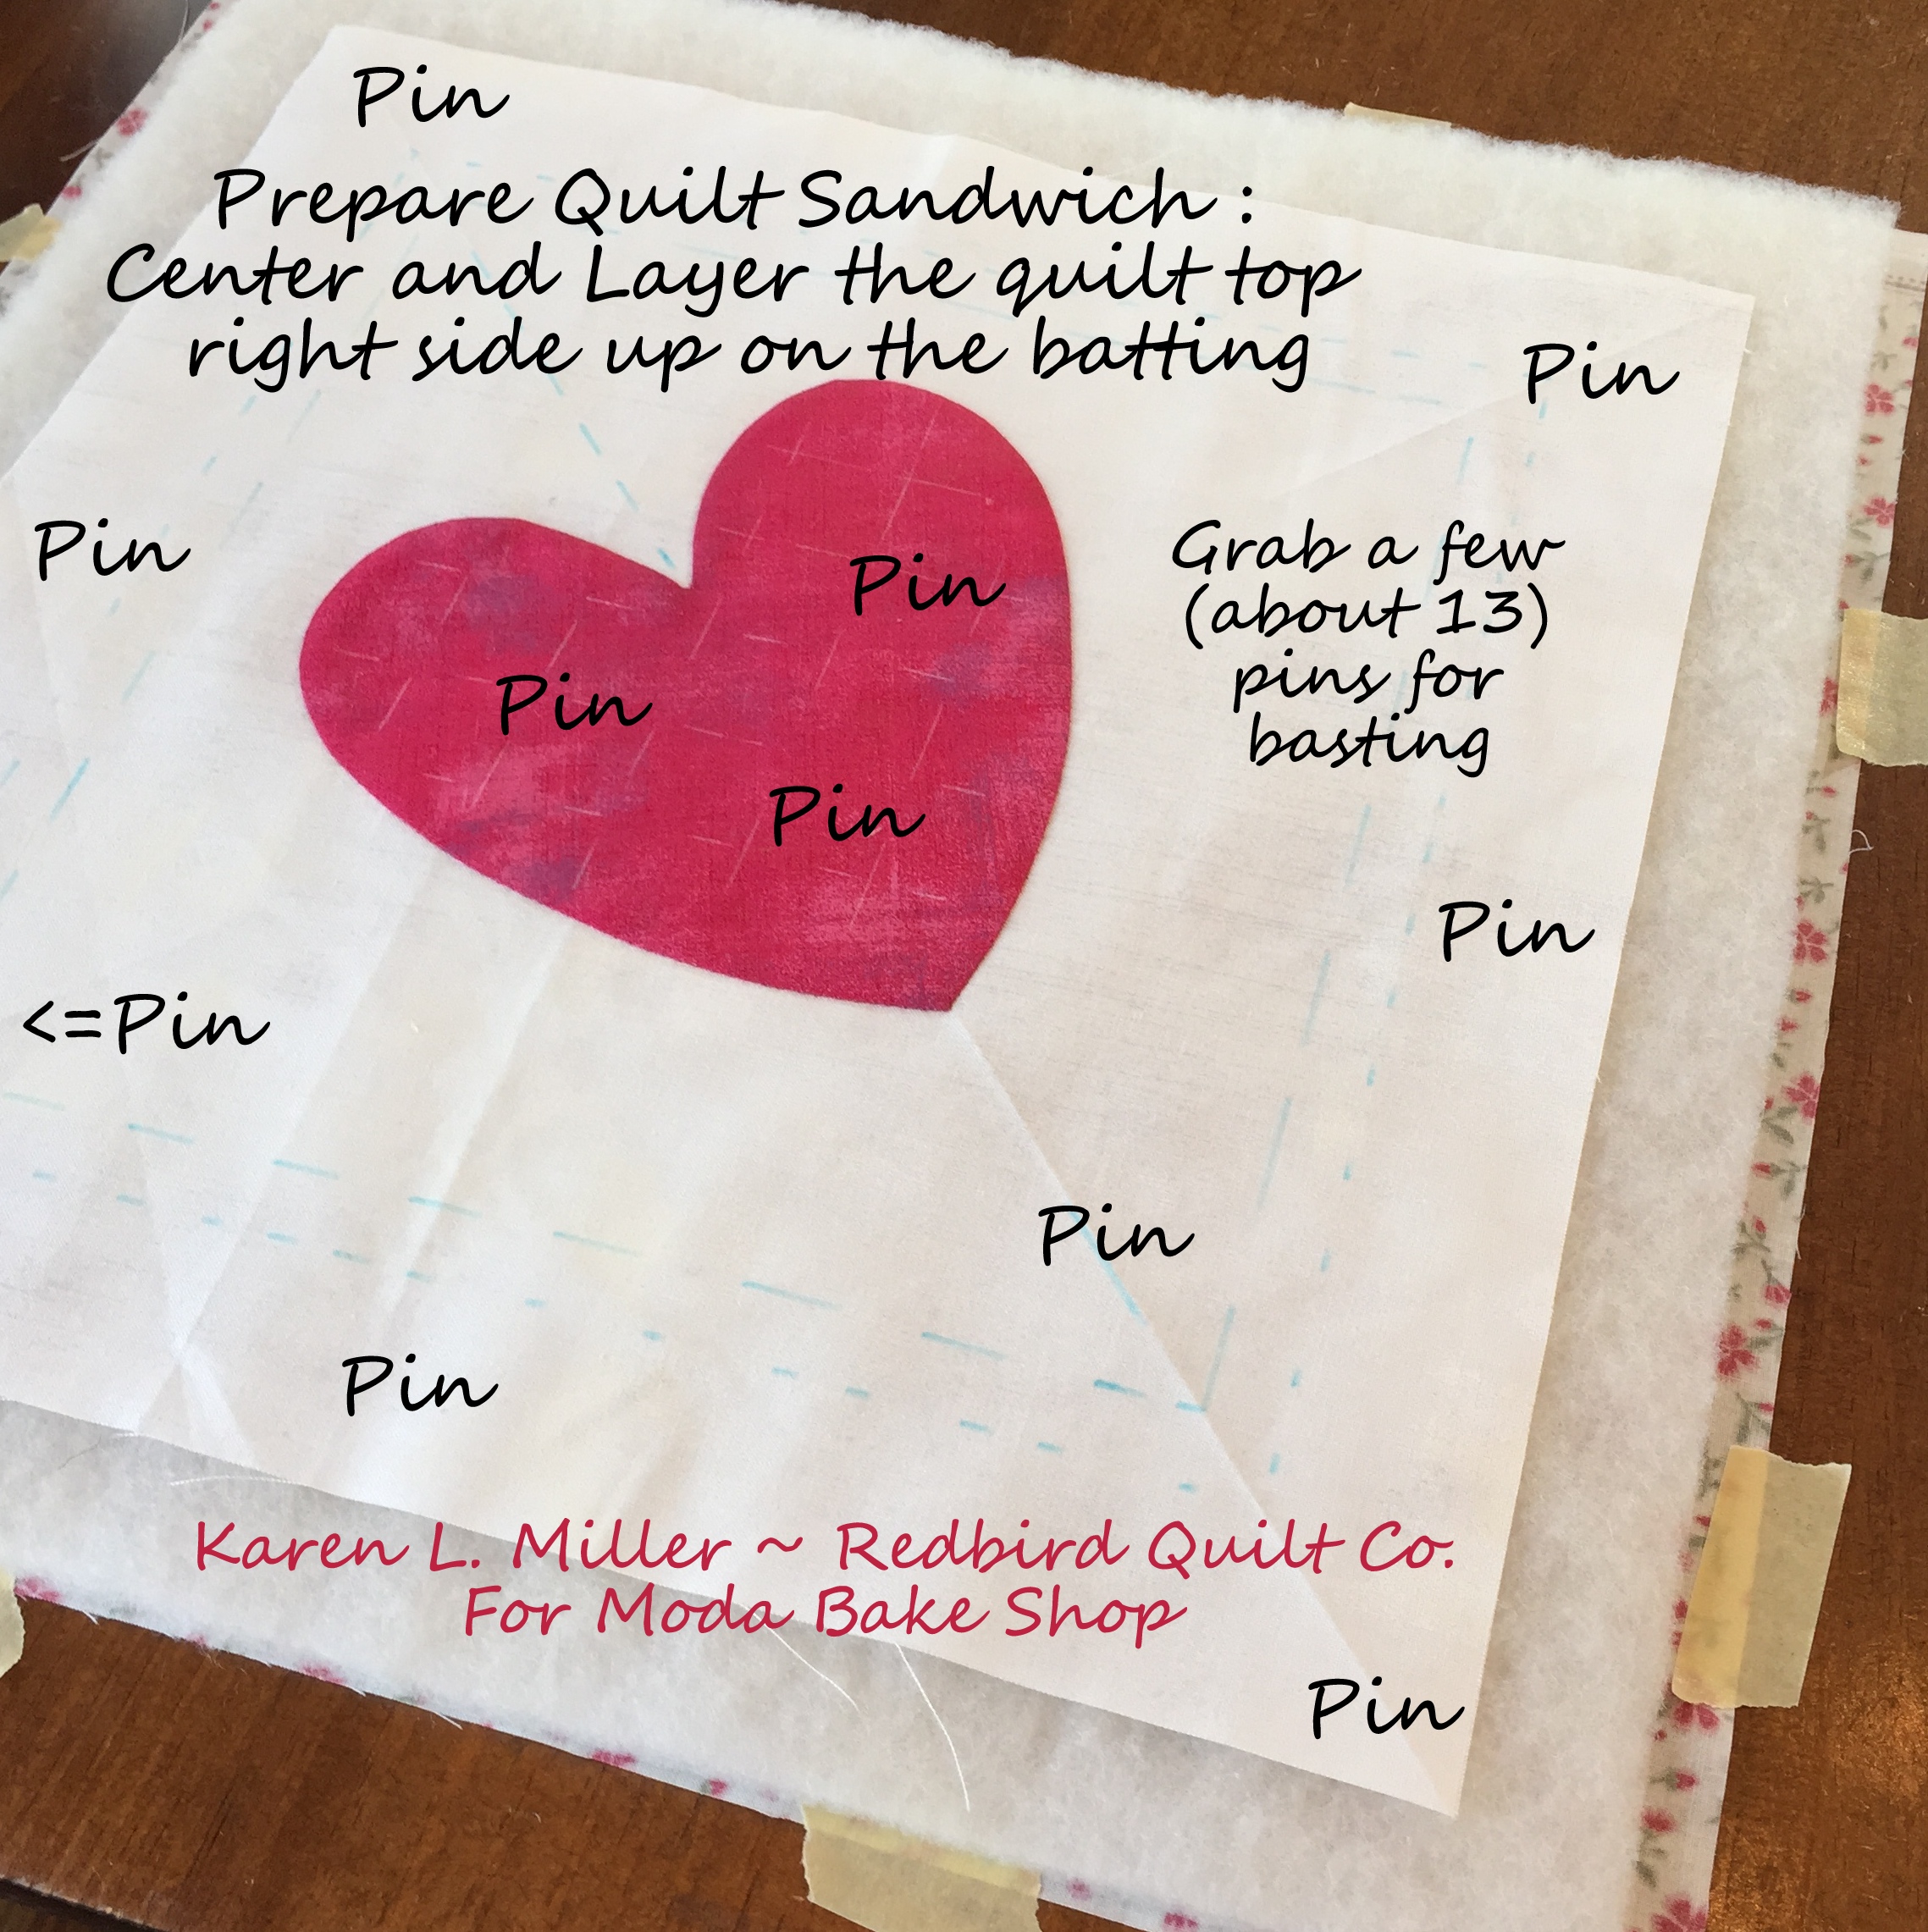
Begin pinning in the middle of the quilt and then smooth outward and pin until you've reached the outer edge. I place the pins through all 3 layers but I do NOT close them at this stage.

How to use the Kwik Klip:
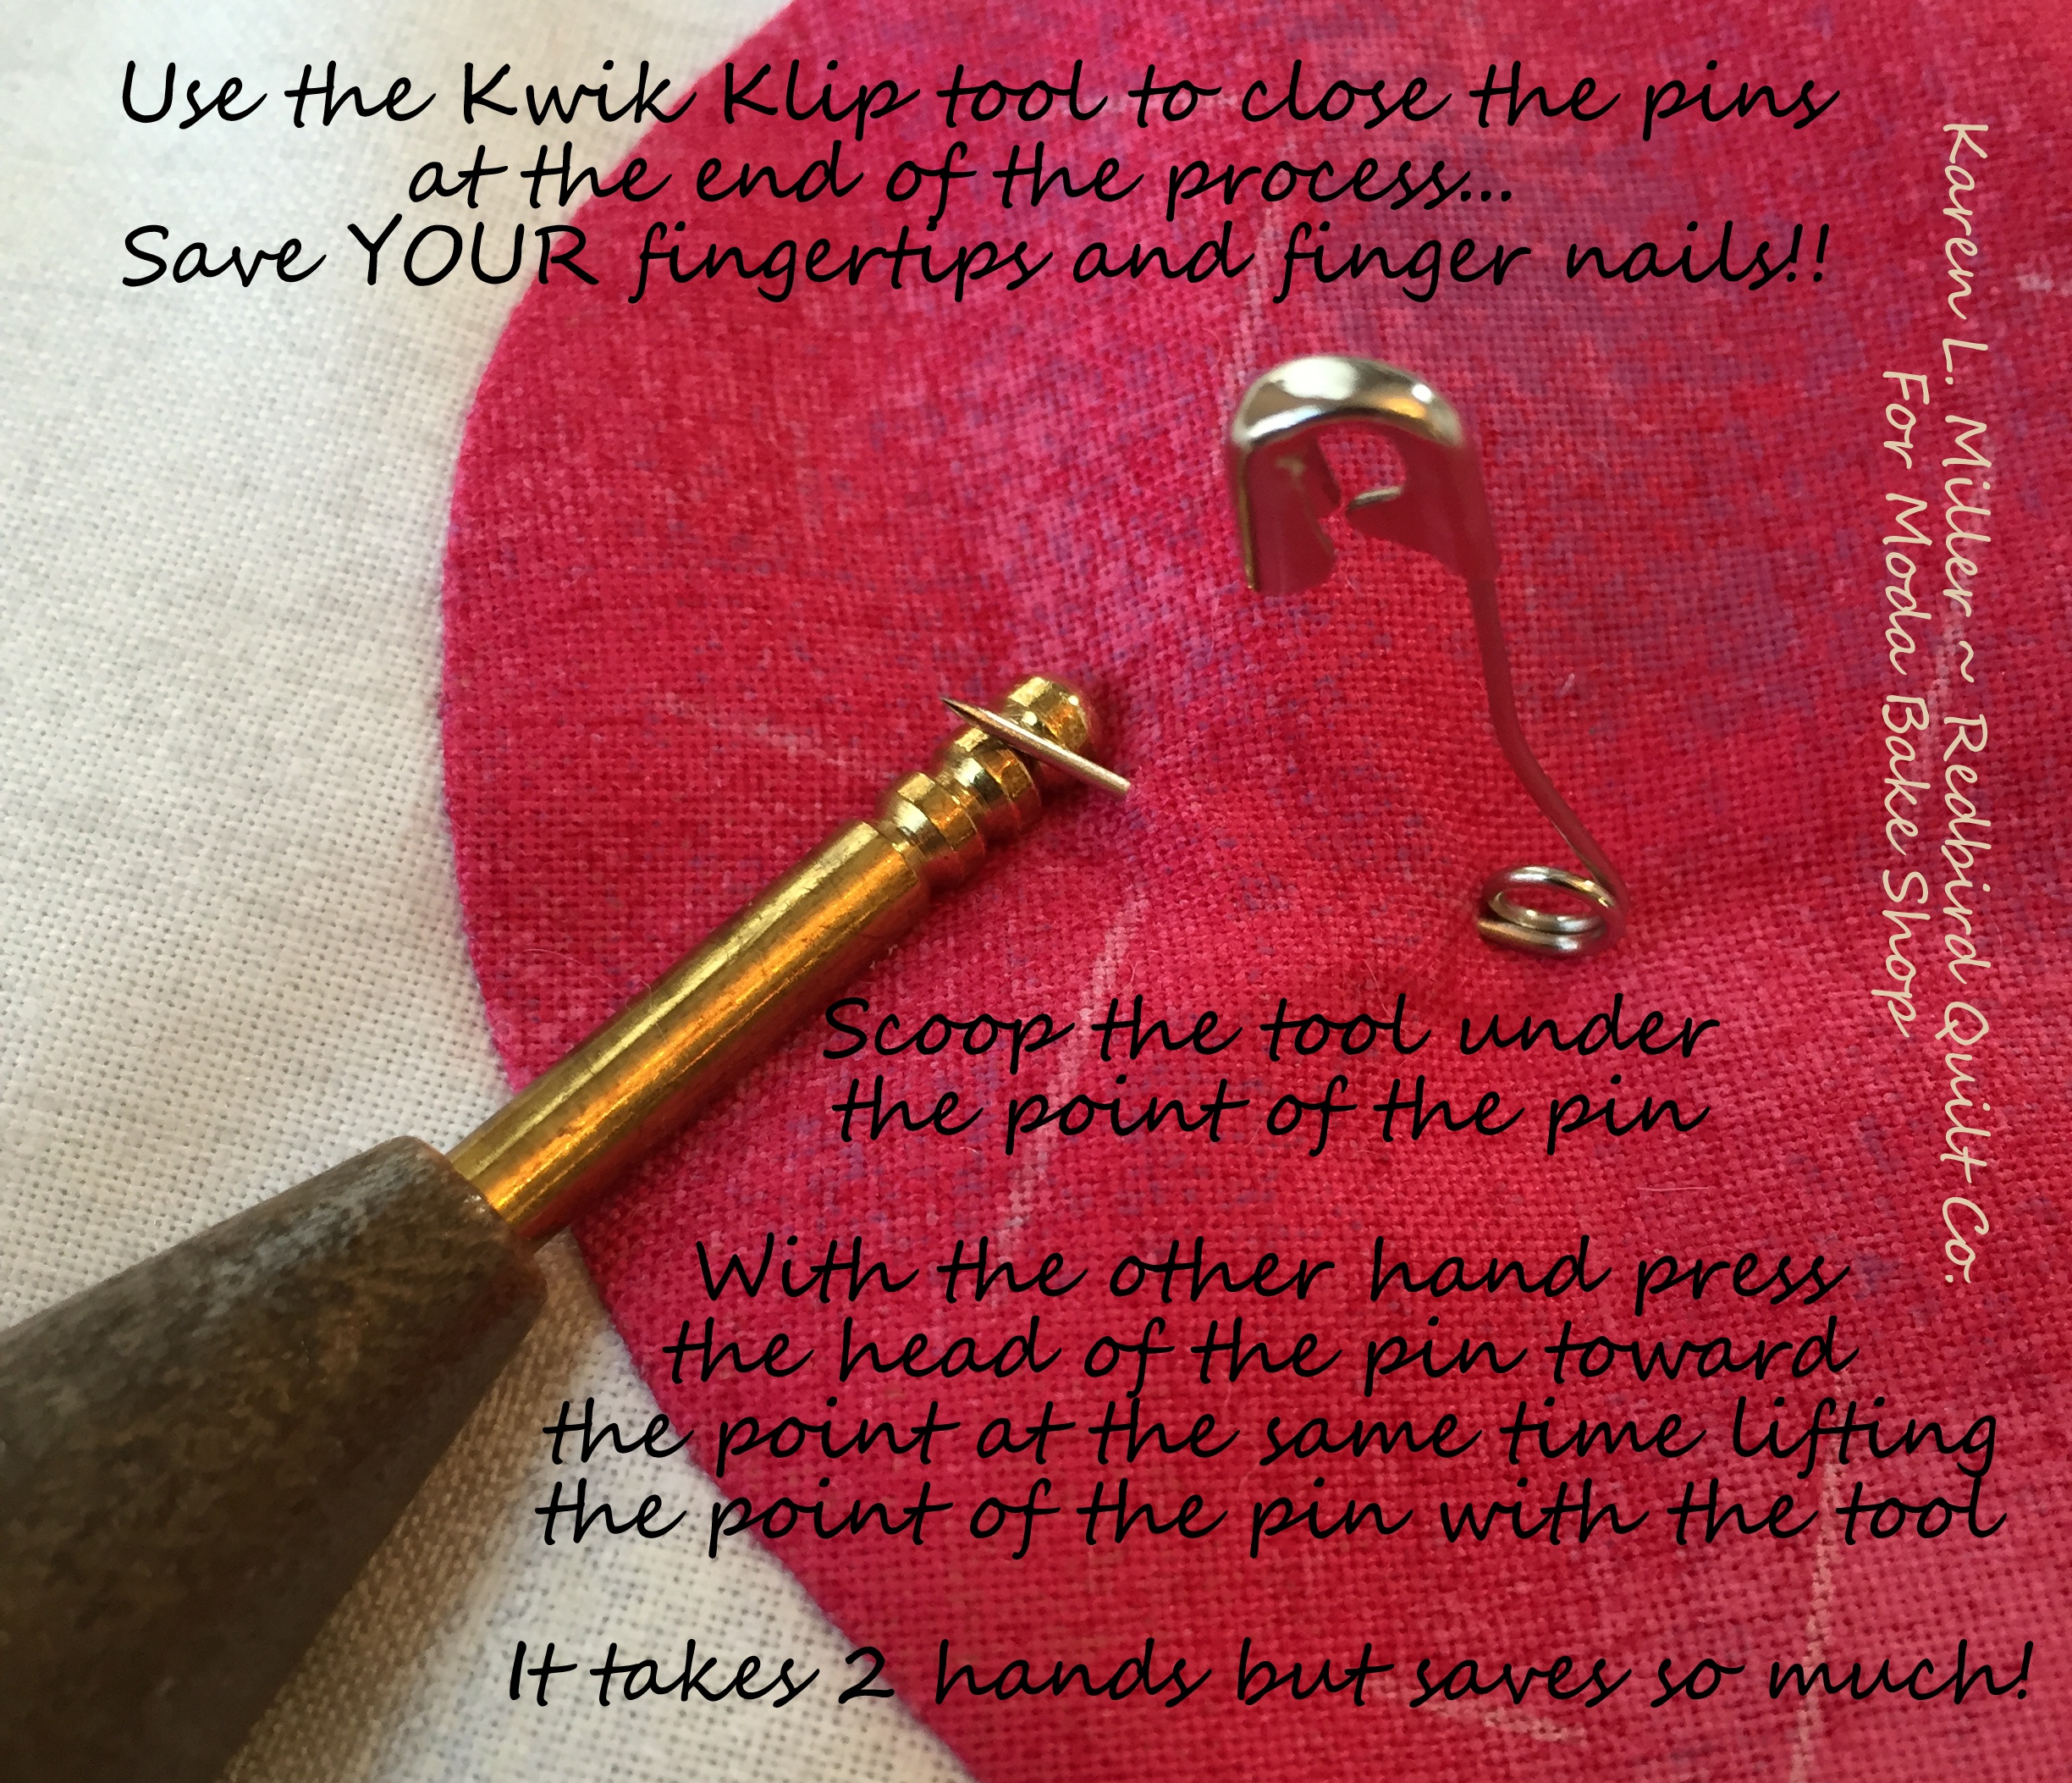
All pinned and ready to go!! Woohoo!!
Readiness Check - Review the Basics:
Before you begin quilting be sure you've addressed the basics (you can review more "basics" here).
- Design doodled on paper or a white board
- Machine cleaned and serviced
- New "right sized" needle installed (I used a 90/14 Top Stitch Needle)
- Warm-up session complete using similar fabric, batting and thread -- this will also assure your machine tension is acceptable
- Bobbins wound and ready
- Quilting gloves available
- Feed dogs down or covered
- Supreme Slider on machine bed -- or bed prepared with silicone spray
- Rounded foot installed on machine
- Good lighting in place
- Foot pedal secure on the floor
- Family is out of sight, quiet, and preferably busy preparing dinner and cleaning the house {{{ ;) ;) }}}

Let's Do Some Free Motion Quilting:
Ok then -- let's begin by positioning the needle at the bottom of the heart (Never-mind that I failed to do this for the picture (it was late) !!)
Starting at the bottom of the heart will allow you to transition to subsequent motifs without cutting your thread.
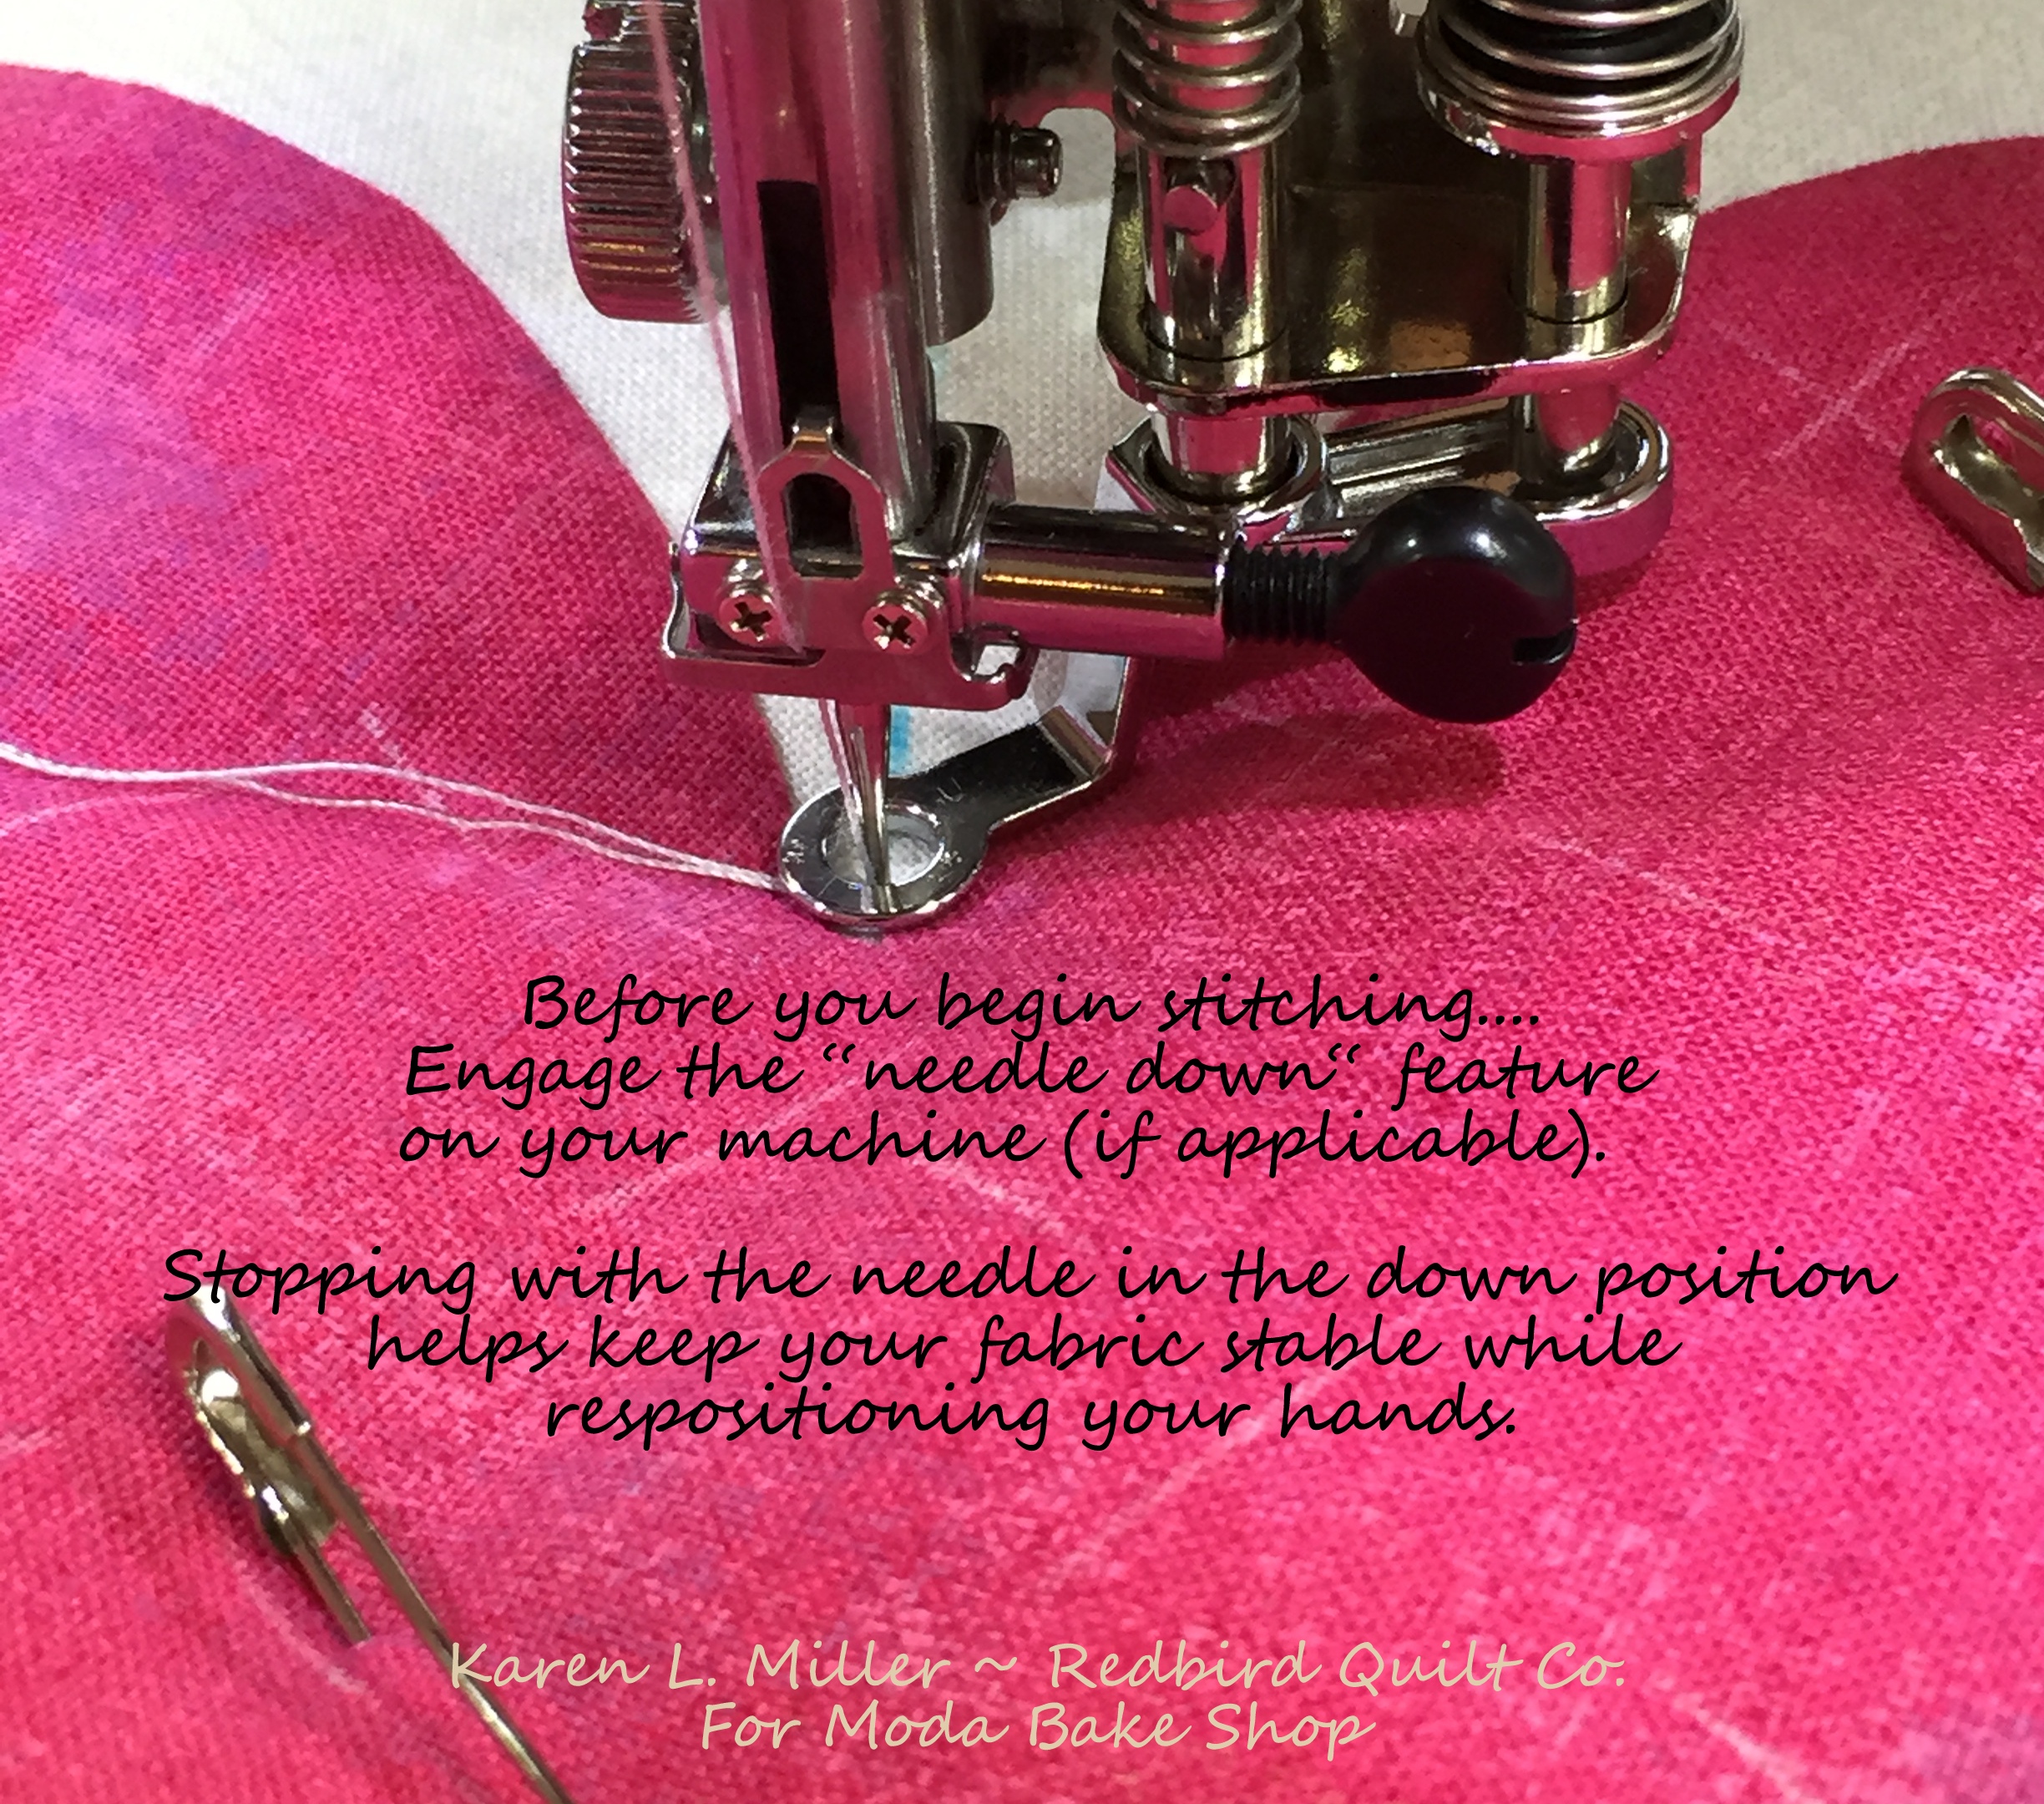
Needle positioned at the bottom of the heart ? Let's bring the bobbin thread to the top.
Bringing the bobbin thread to the top allows YOU to control what happens to it and helps avoid birds nests on the back of the quilt. We won't be covering the steps necessary to bury these threads. If you're preparing a quilt for a judged show you may want to look-up and practice that method.
It's really simple to bring the bobbin thread to the top -- after positioning the needle where you would like to begin stitching:
- Hold on to the top thread
- Take one stitch (ONE down and up with the needle)
- Pull the top thread until the bobbin thread comes up
- Pull a few inches of both thread and move them to the side
- Take a few stitching in place to "lock" or knot your threads

Once the bobbin thread is pulled to the top and you've made a few "lock" stitches you're ready to begin.
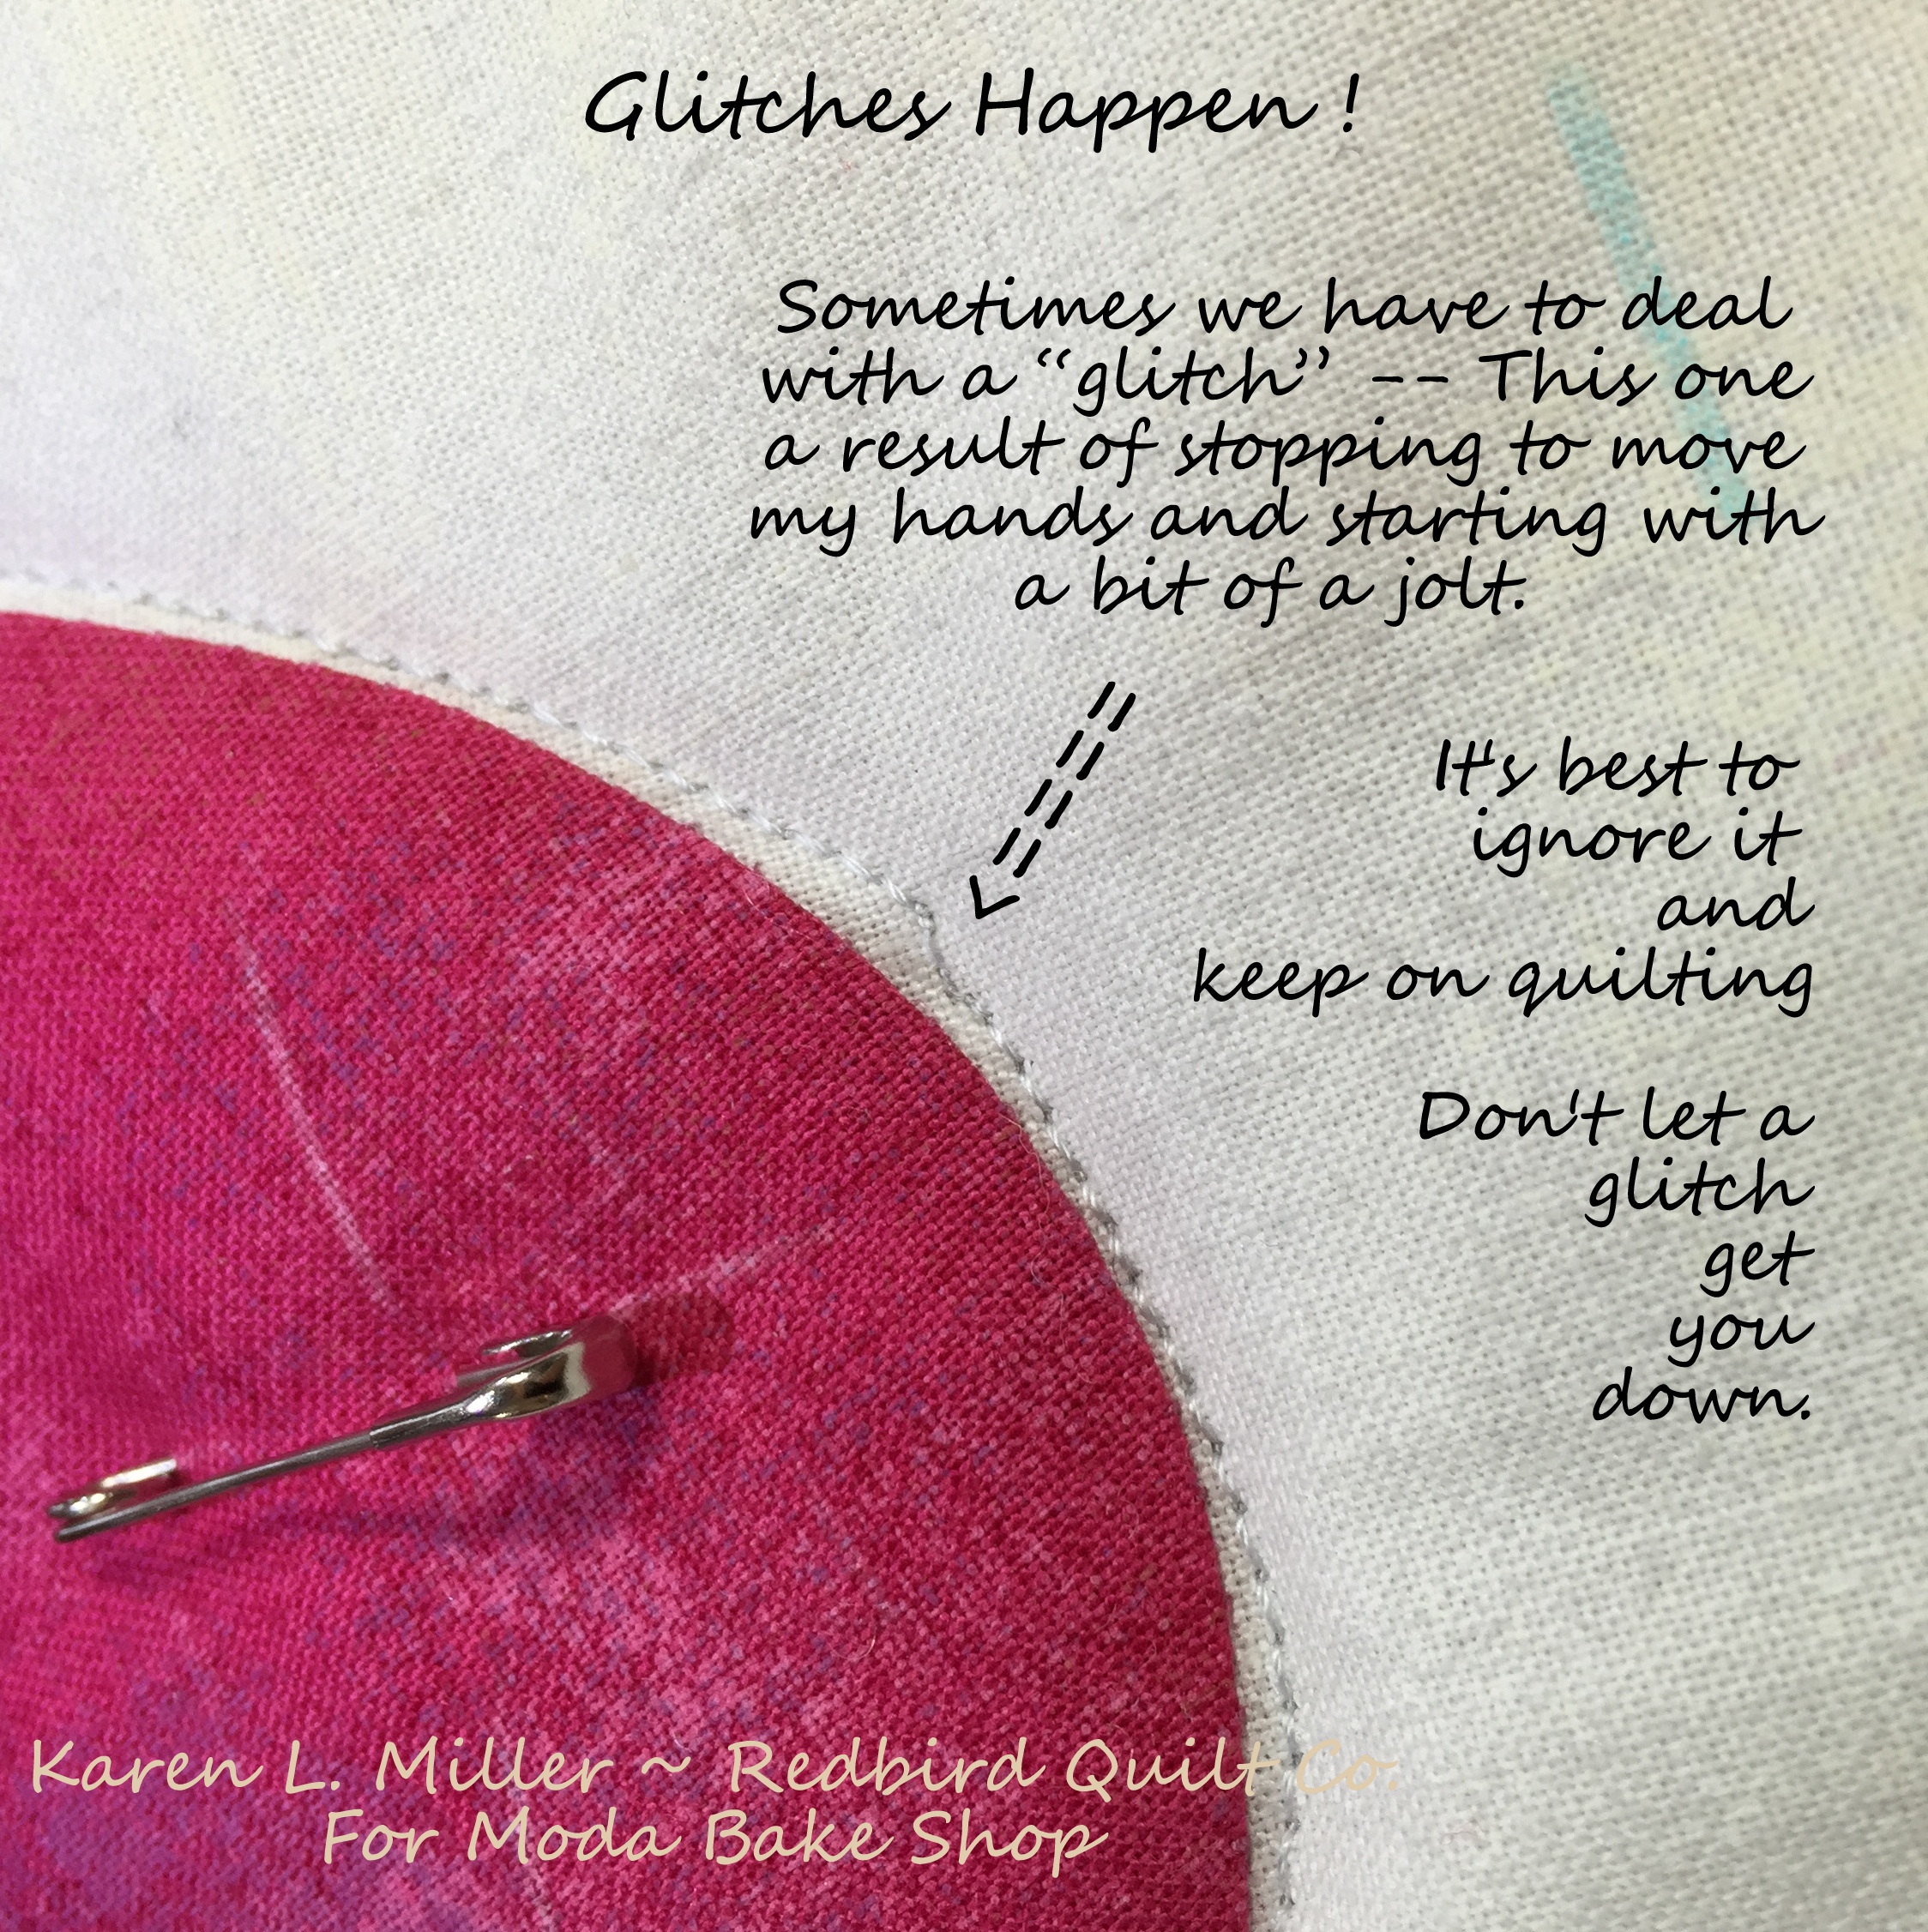
If your machine has a "needle down" setting, engage it now. Stopping with the needle in the down position minimizes the glitches that can occur while you're re-positioning your hands on the quilt top. It's a safe and effective way to keep the top steady while you're not stitching.
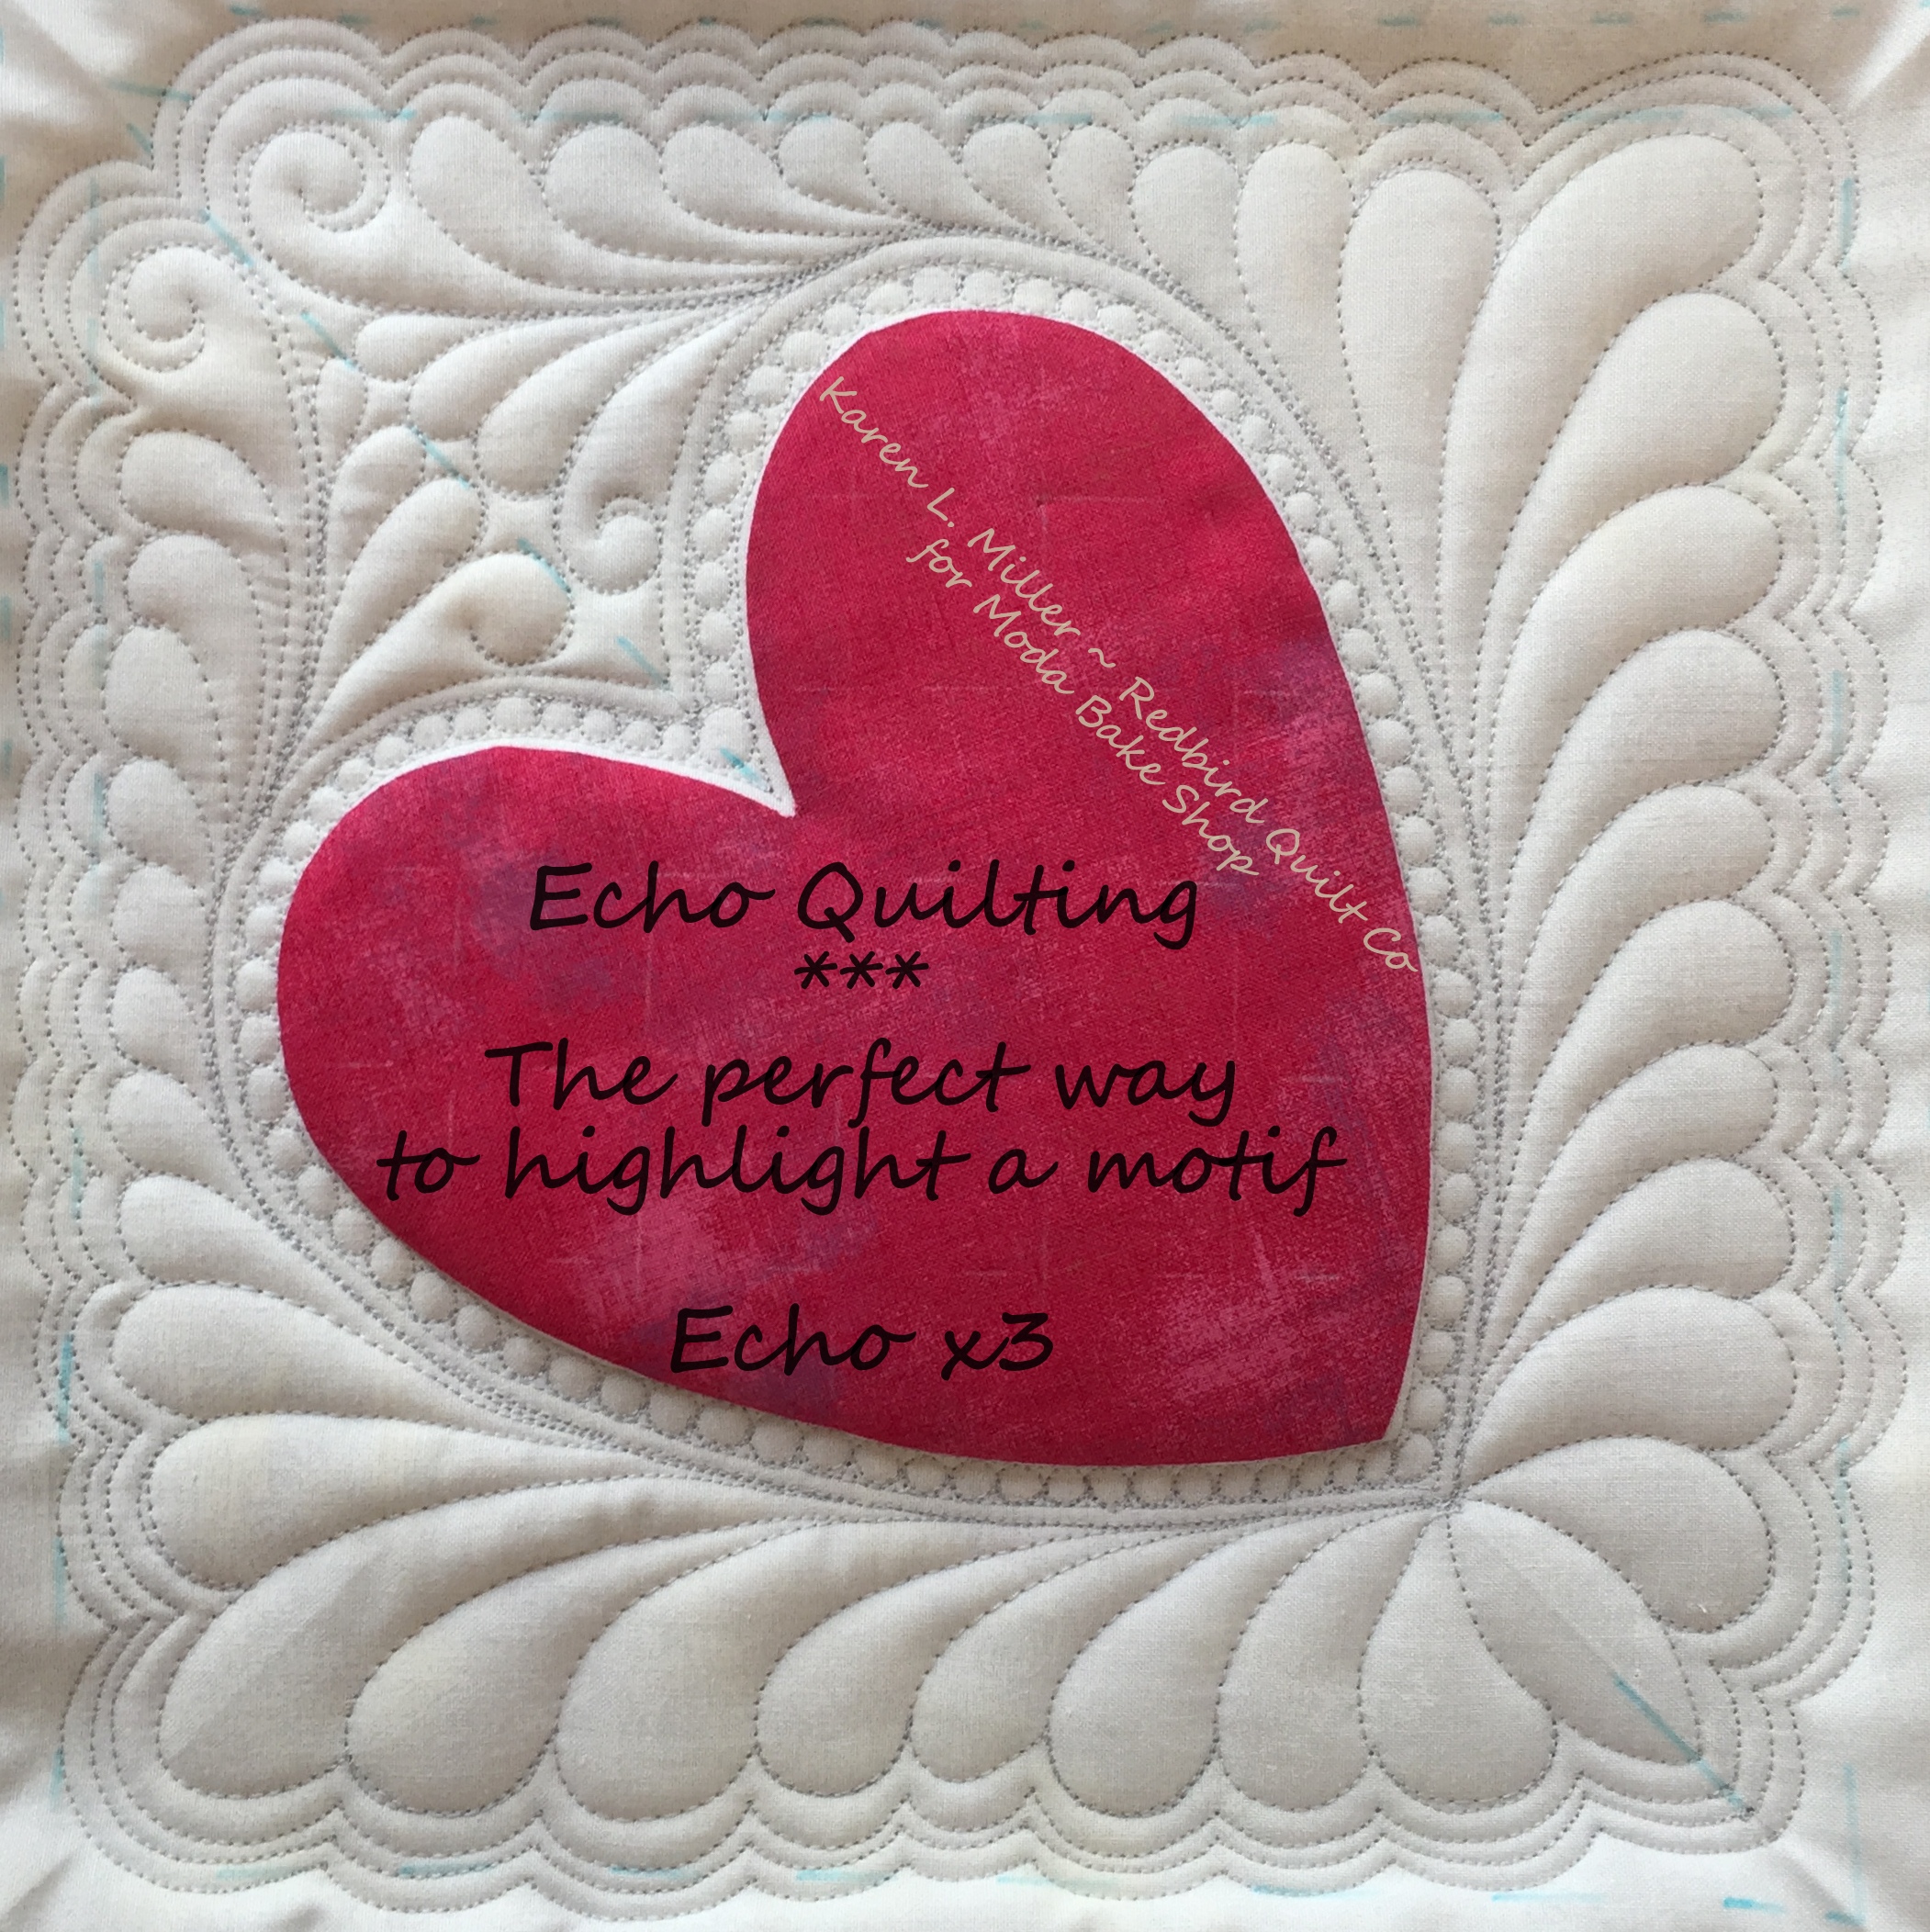
The first round of quilting involves echo stitching the heart approximately 1/8" away from the applique edge. Don't fret over being exact -- The Goal: Get one line of quilting around the heart.
Let's Talk Stitch Length:
Remember -- because your feed dogs are down or covered YOU are controlling the stitch length. As a beginner it's best to just roll with varying length stitches. Even today my stitch lengths vary. My rule of thumb is: If I can't place a finger or toe nail under the thread, it's acceptable {wink, wink}...
With that in mind though, here are a few tips: If your stitches are tiny you can increase them by either: 1. moving your hands faster while maintaining the same machine speed or 2. slowing the machine speed down while moving your hands at a consistent rate.
In my workshops I recommend adjusting the machine speed slower such that you can press your foot pedal to the floor while you're quilting -- therefore only worrying about your hand speed. The machine speed setting varies brand to brand (and machine to machine). Making the speed change takes one variable out of the equation and allows you to focus on adjusting the speed of your hands while knowing the machine speed will stay consistent.

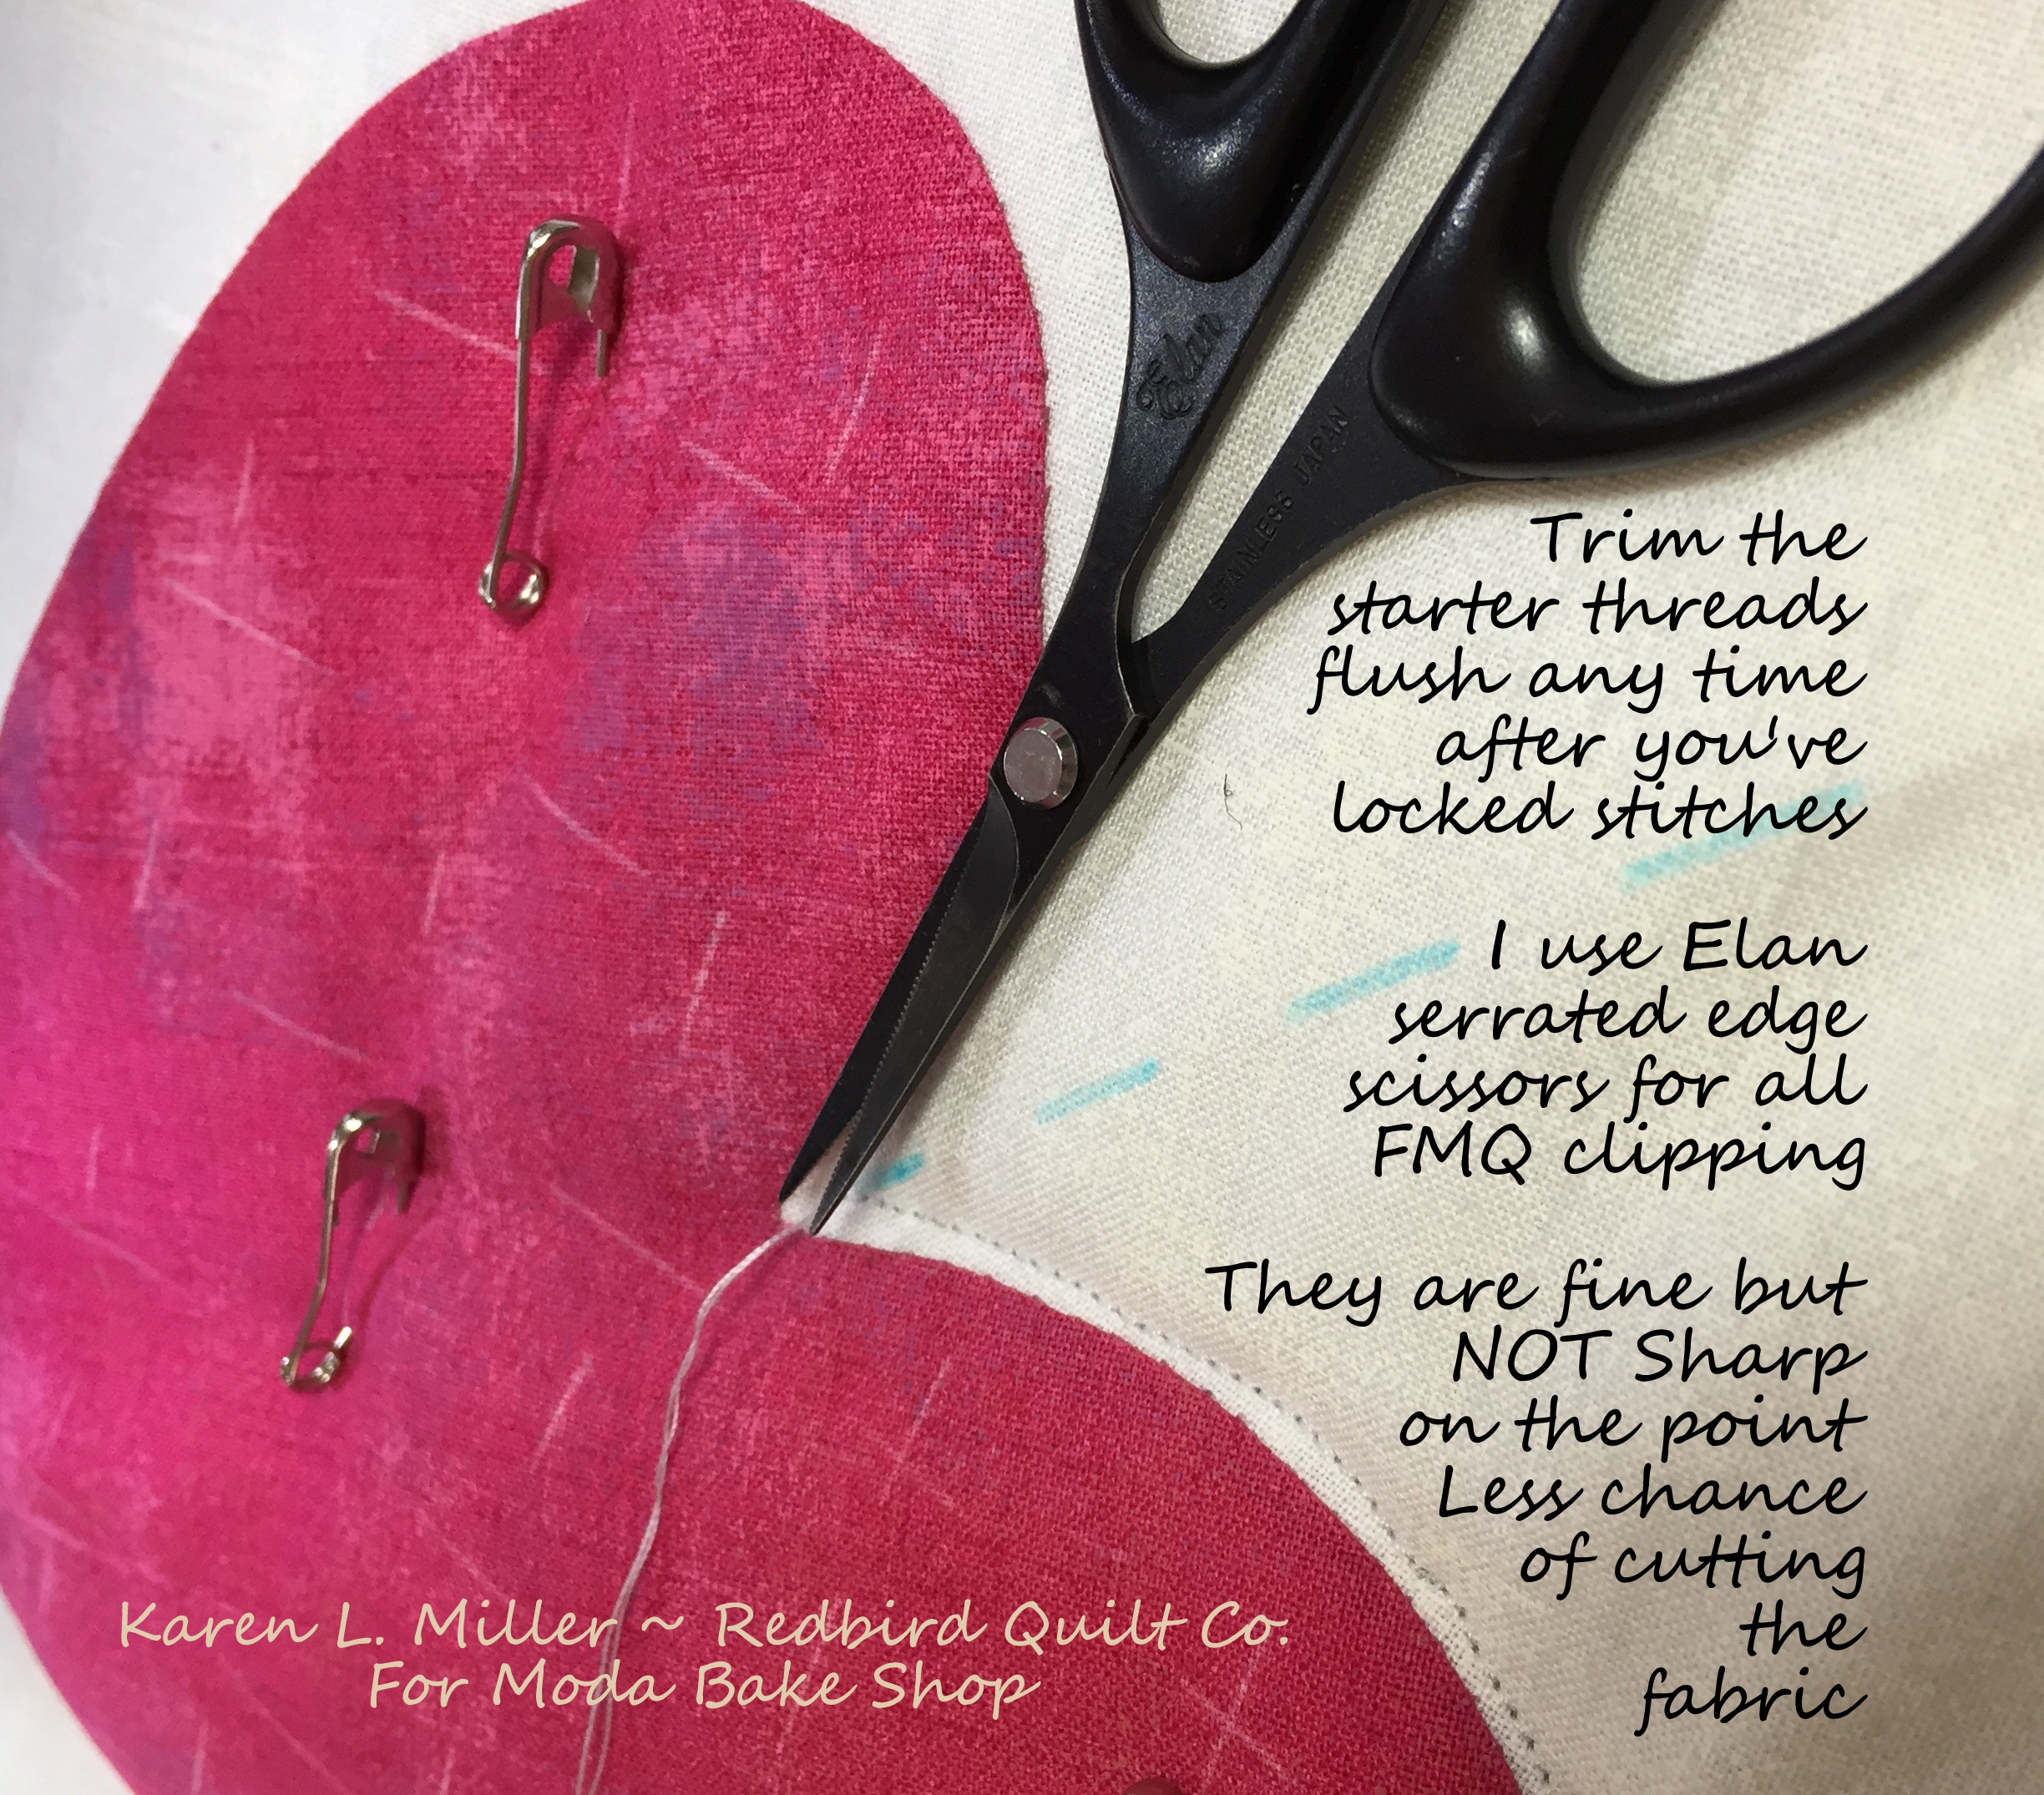
Before you go all the way around the heart with the first echo, stop and trim your starter threads flush with the quilt top. My favorite scissors for FMQ are Elan serrated edge scissors. The serrated edge works perfectly to grip thread and fabric but the tip is not so sharp that must worry about ripping or cutting the quilt top when reaching across the quilt top to trim threads.
Continue quilting around the heart -- about 1/8" away from the heart.
Glitches Happen... Don't worry too much about having everything perfect. It's all ok -- keep on quilting.
Jumping:
When you're done with the first echo around the heart and you return to the starting location, follow these steps to "jump" to the next motif.
- Take a few stitches in place to "lock" or knot your threads
- Lift the foot and the needle and move to the new location (about 1/2" up the diagonal)
- Put the foot and needle down and take a few stitches in place to "lock" or knot your threads in this location.
- Return later to trim the short "jump" thread on the quilt top and back.

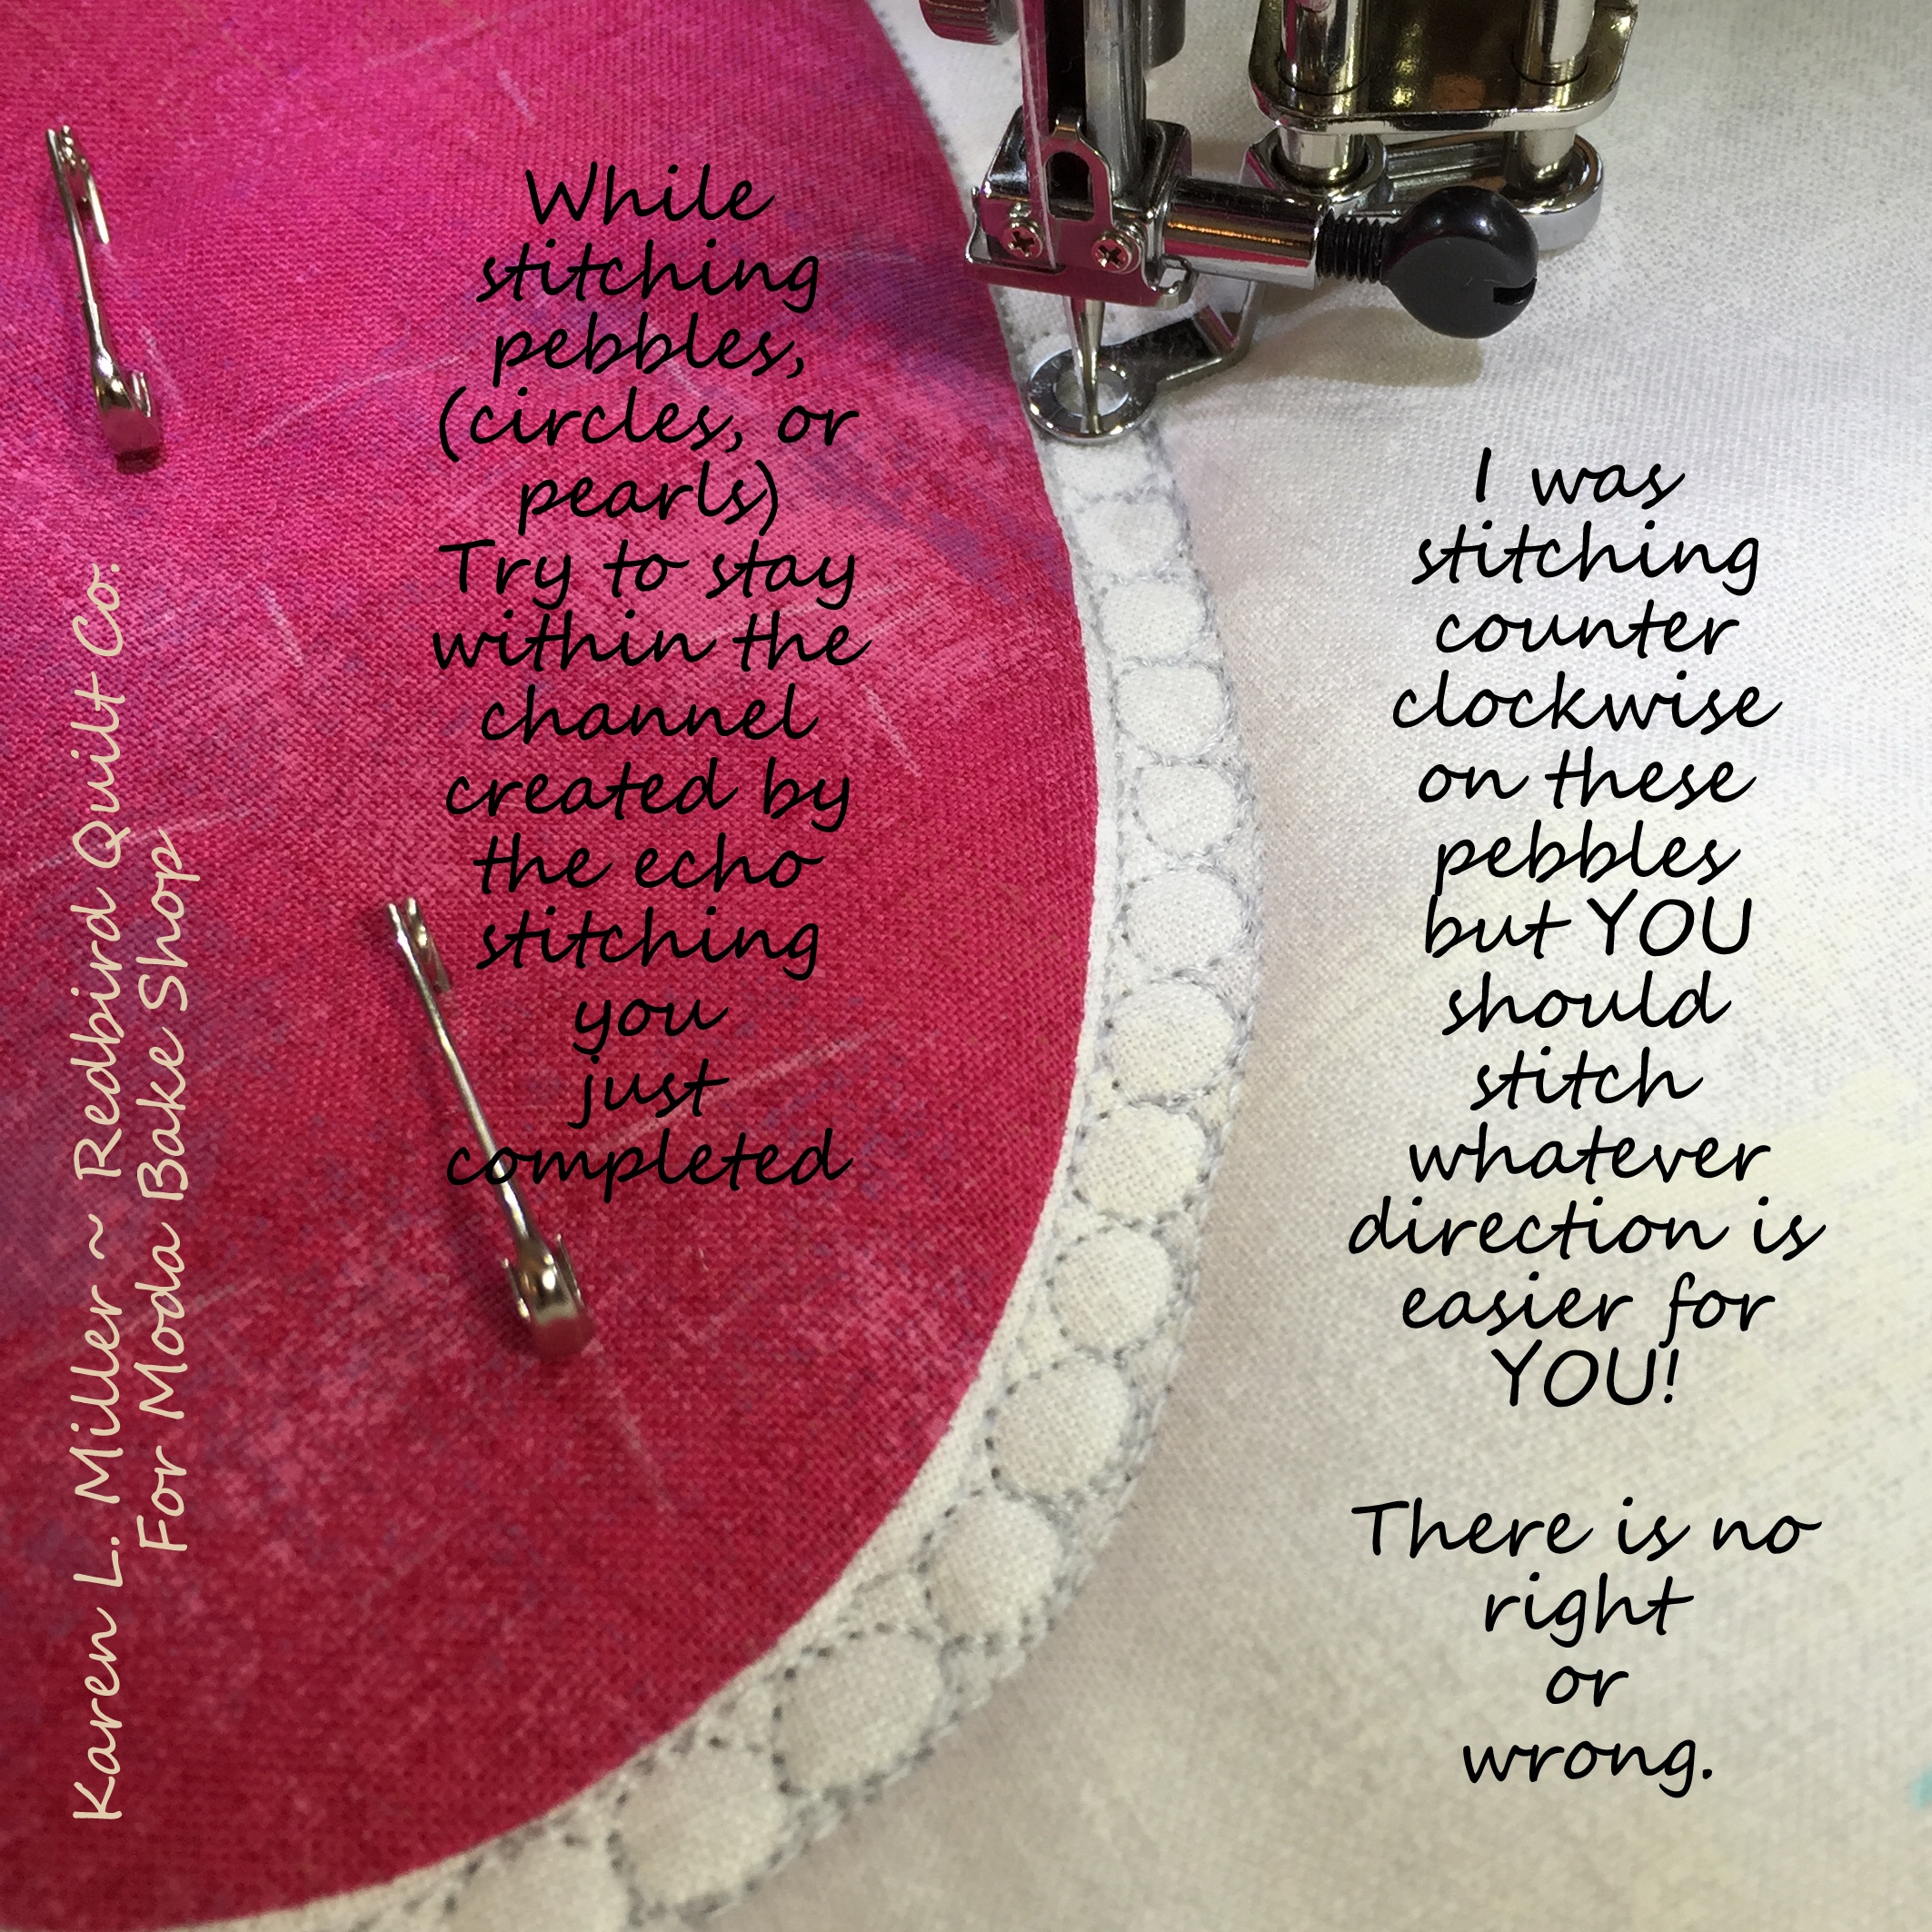
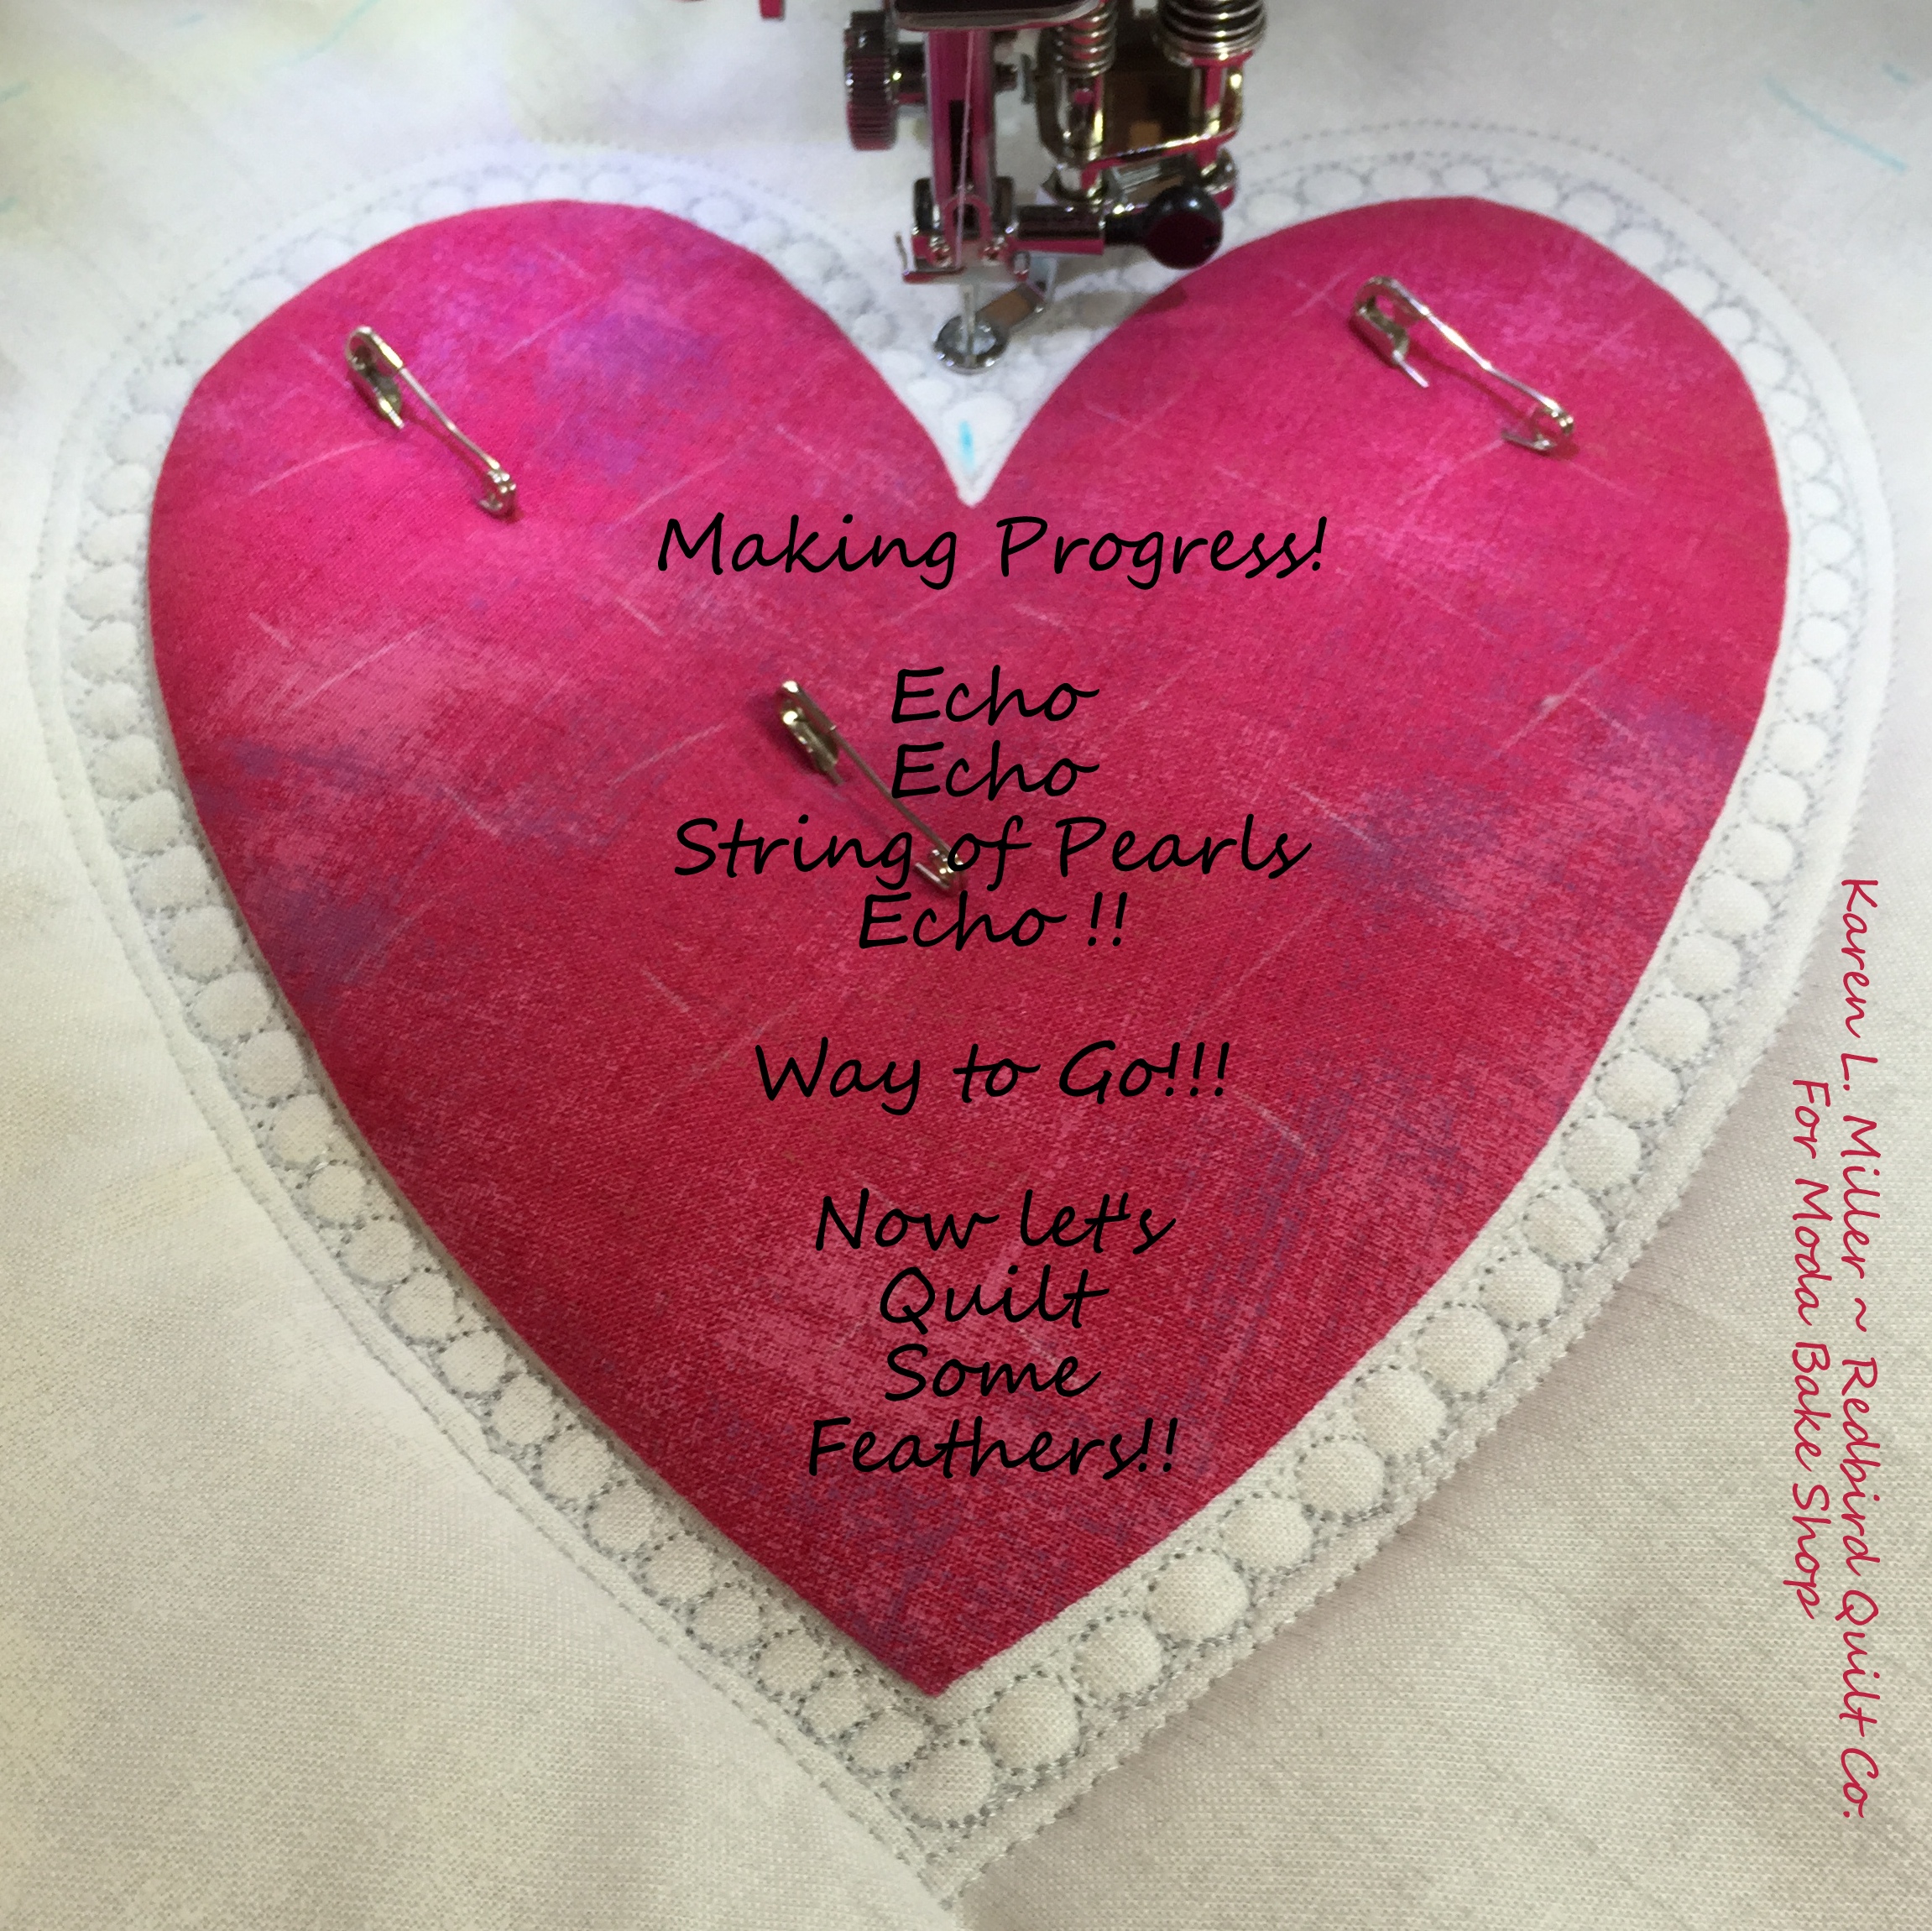
Once you've jumped about a 1/2" away from the first echo (on the diagonal ) complete a 2nd round of echo quilting about 1/4" to 3/8" away from the 1st round of echo quilting. This will create a "channel" that we can add some additional quilting too. It's one of my favorite "go-to" motifs.

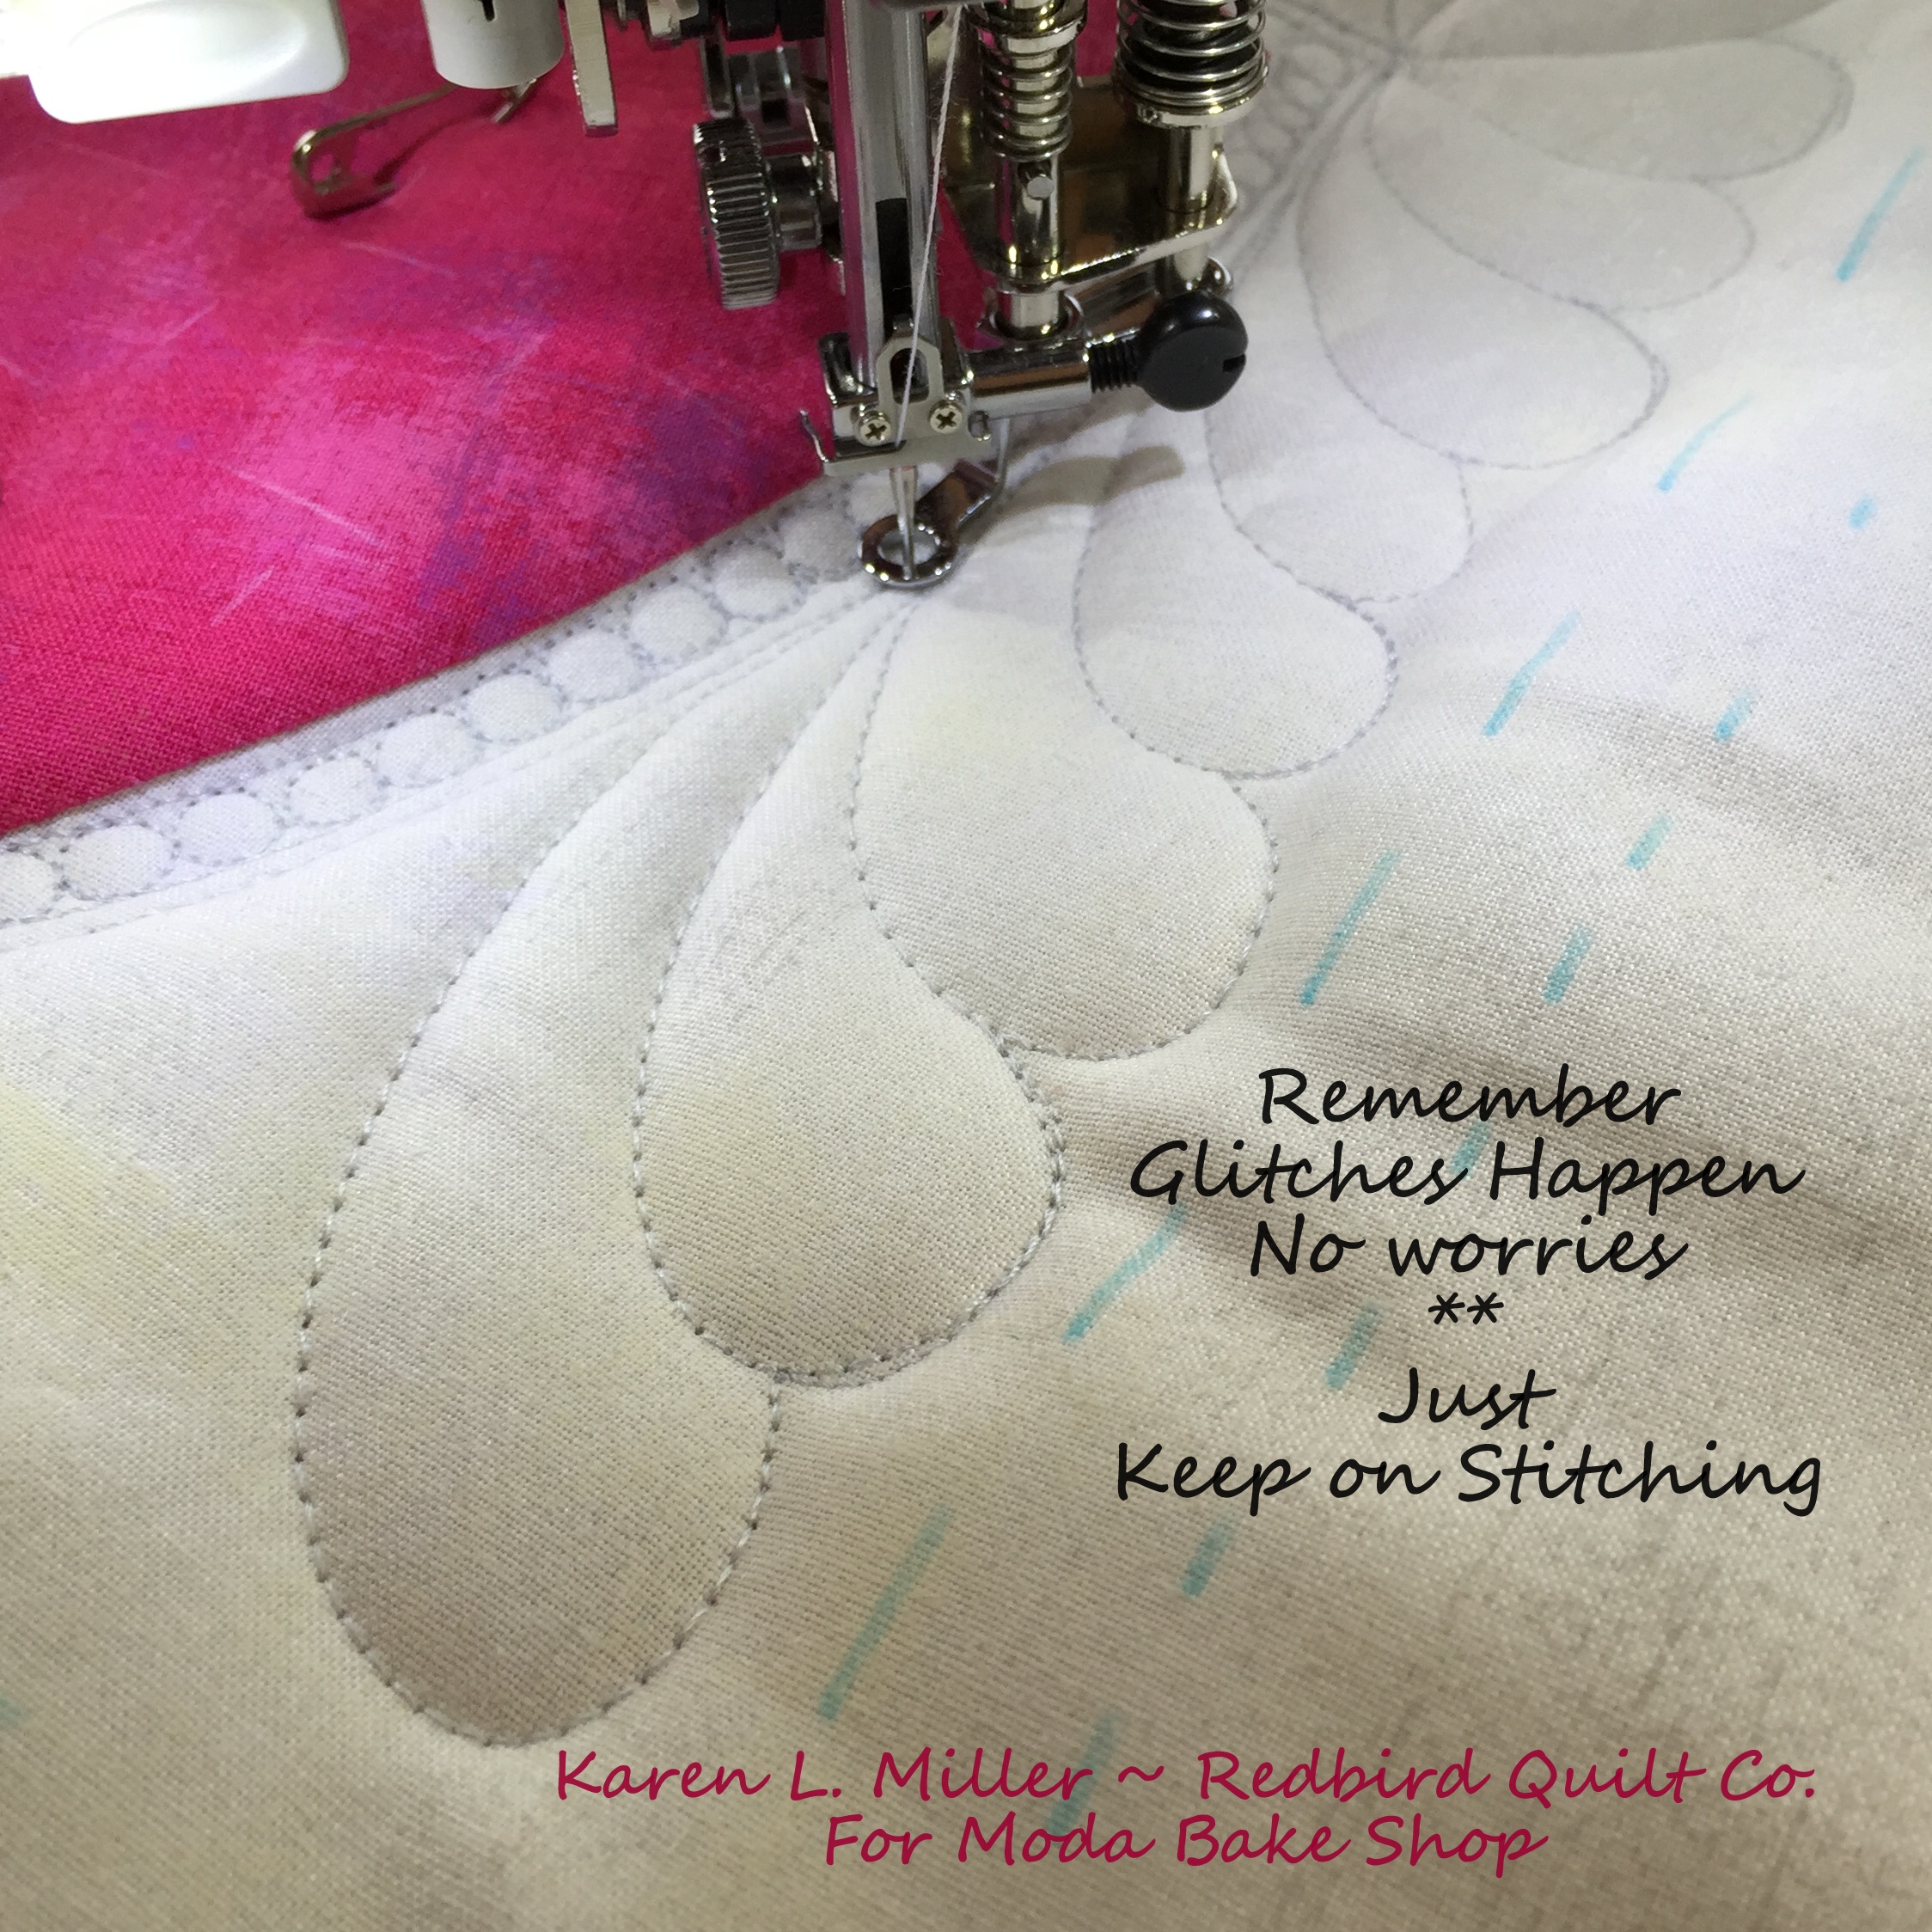
What's a channel without a filler -- we'd better add some pebbles:

Quilting Pebbles or Circles:
Quilting circles aka pebbles aka pearls is kinda fun actually. Personally, my circles come out more rounded if I quilt a circle rather than a figure 8. So I'll stitch a circle, then backtrack (or stitch on previously stitched line) to position myself to stitch another circle.
Once I get a routine going, like always working clockwise or always working counter clockwise, it pays off. It's like getting into the "groove". Find a direction (clockwise or counter clockwise) that is comfortable for you and go with it -- remember, once you stitch a complete circle continue on that circle (stitching on previously stitched lines) to position yourself to start the next one. This works if you're doing a channel of circles or if you're making a snow mound. Same rule of thumb. I tried to describe the process in the diagram below.
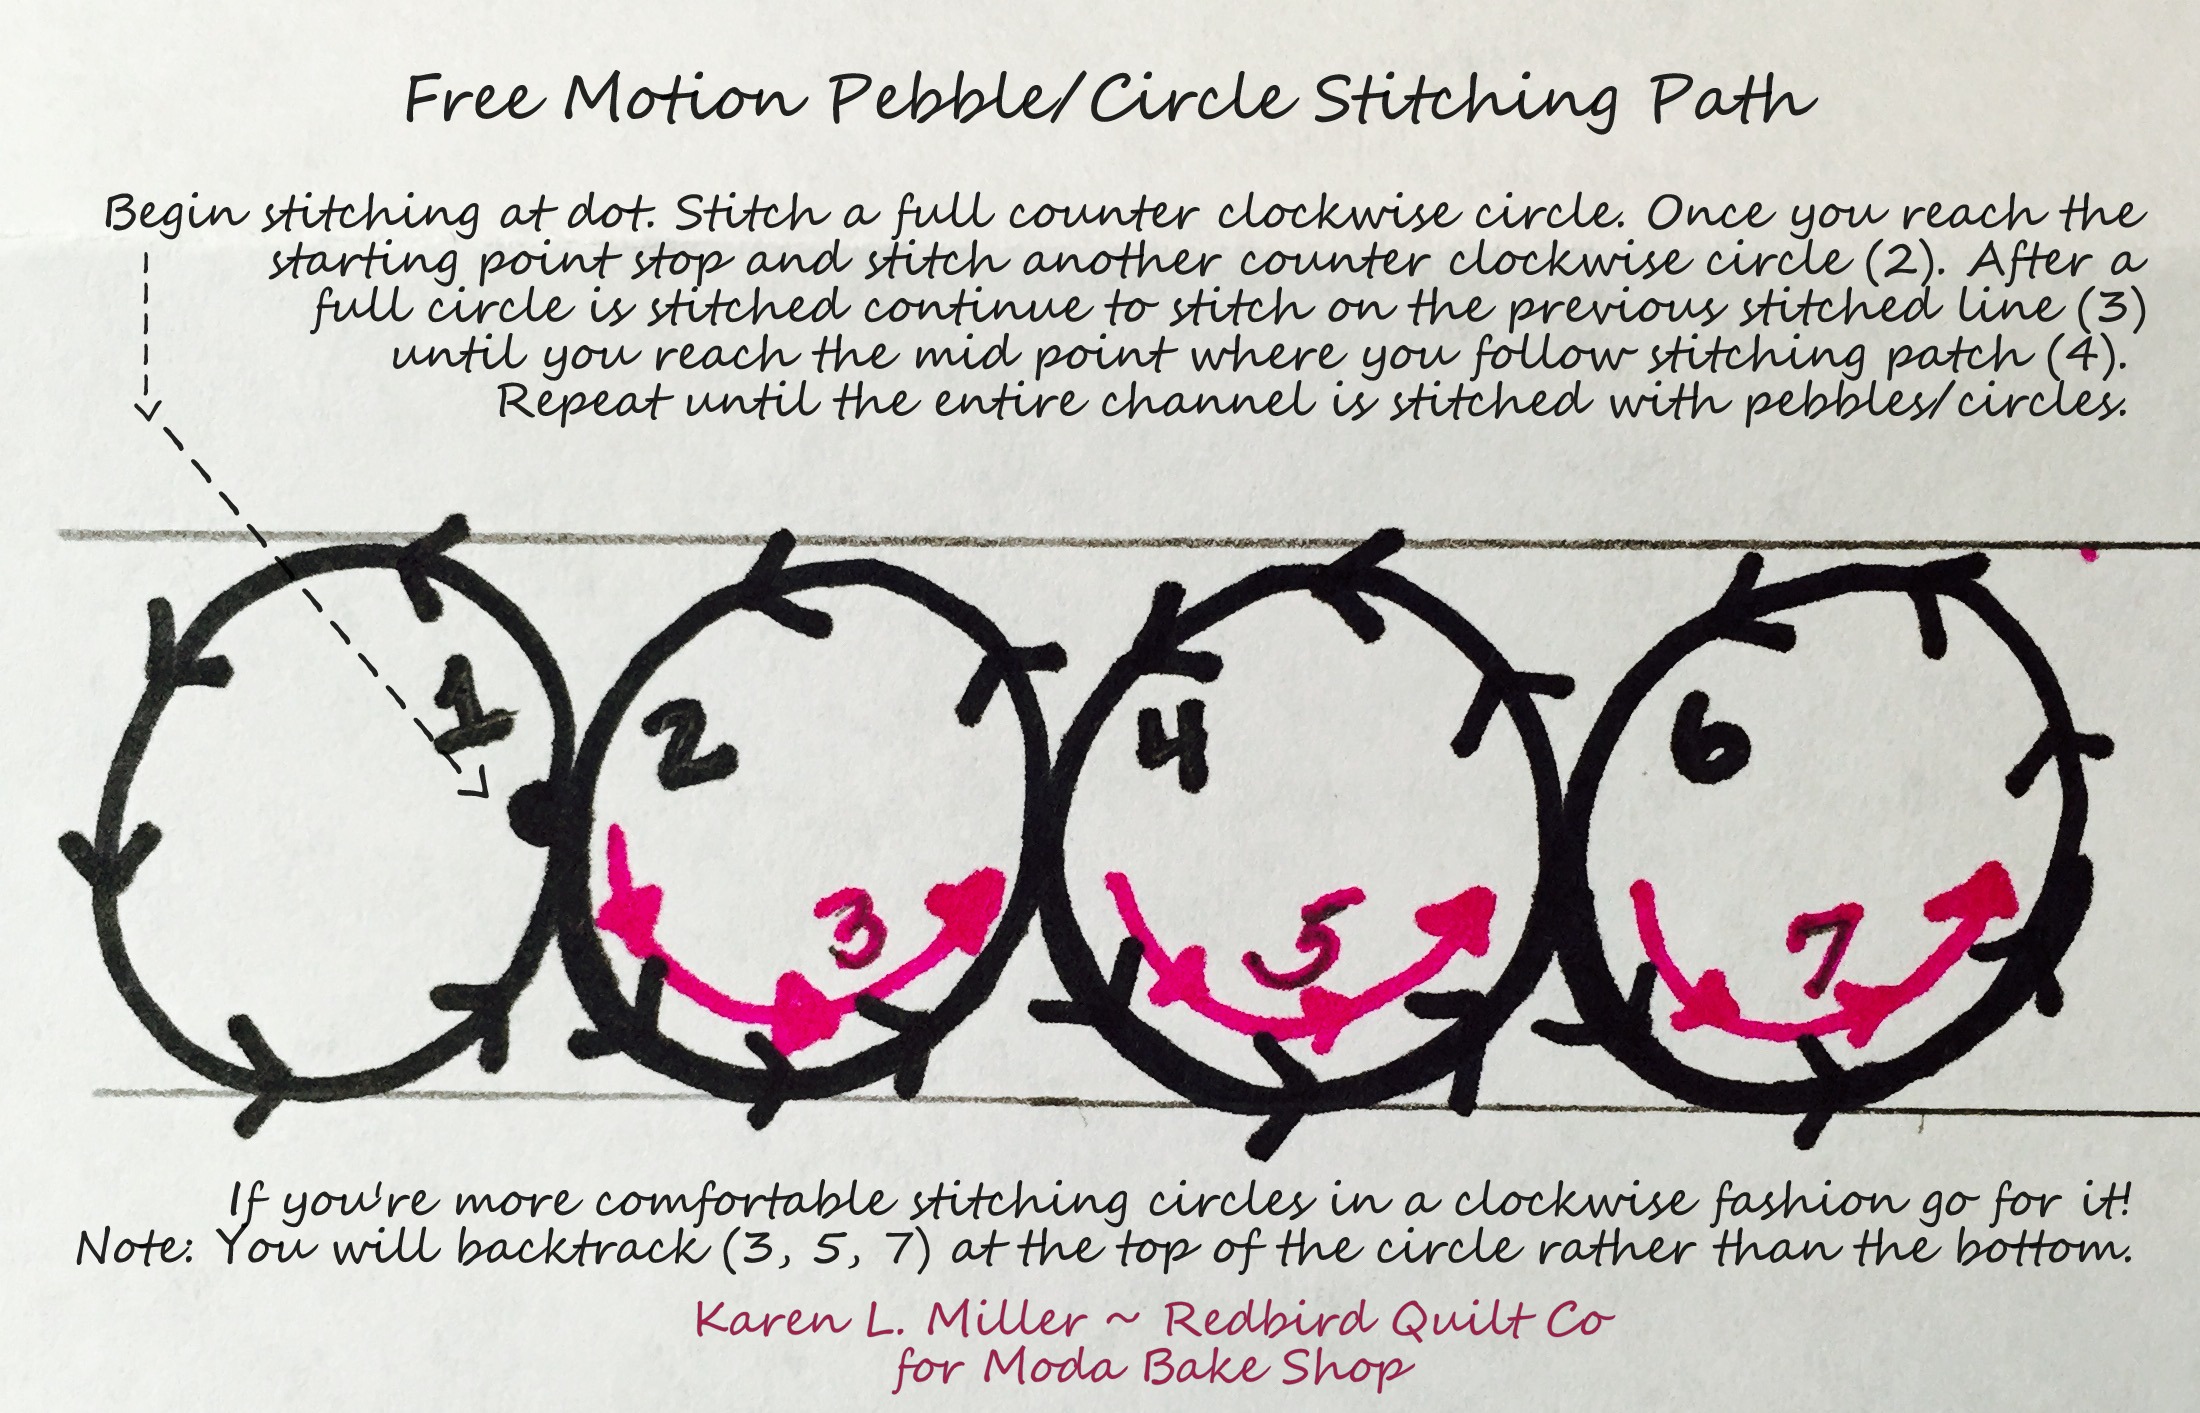
Now let's get that channel filled with pebbles. This makes a beautiful "string of pearls" and a beautiful delicate accent around the heart. When quilting pebbles or circles try to stay within the channel as best you can.
Remember -- the smaller the stitch the more rounded the pebble will be. If your stitches are long your pebbles may look more like cut stones ;) With a little practice, (on paper as well as fabric) they will become more rounded... You Can Do This !
Continue building that string of pearls...

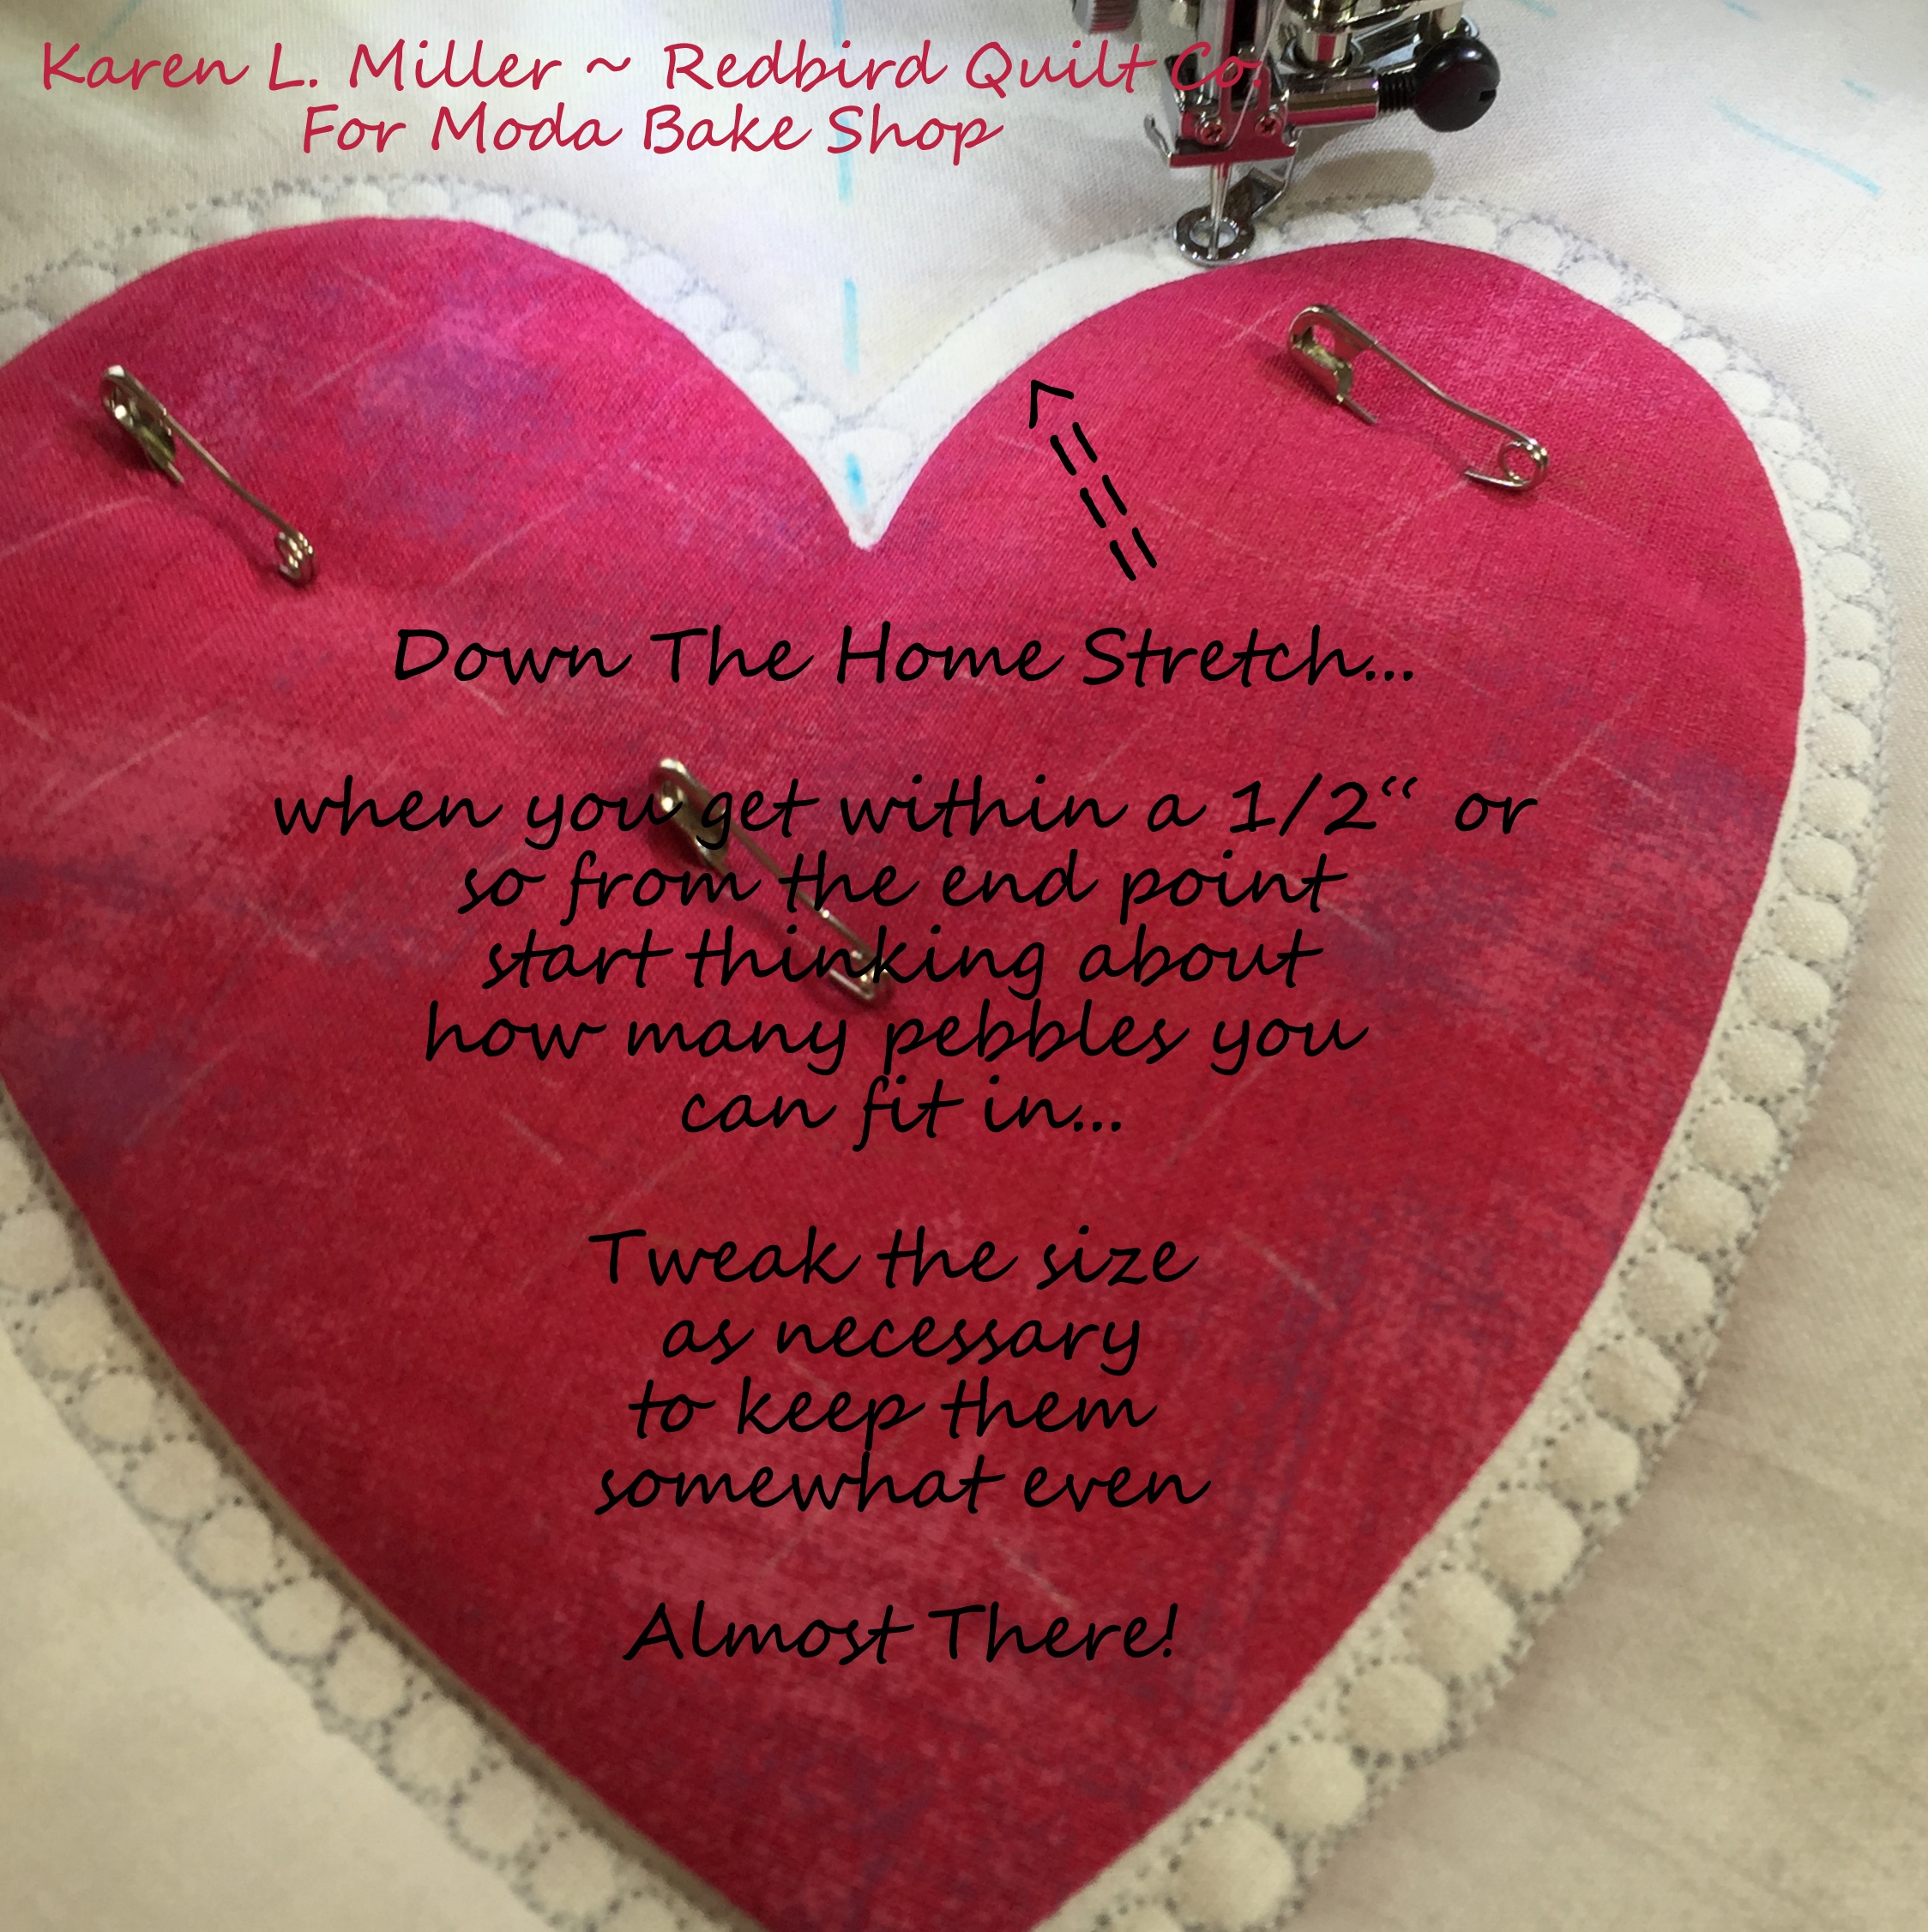
Planning ahead: As with most any FMQ motif, when you're almost done filling up the intended space pause and do some planning for how to complete the space. When stitching 1/8" pebbles, I'll begin to plan this about 1/2" away from the end. Try to determine how many pebbles will fill the space without having to "smush" or crowd the pebbles at the end. More experience here is better --don't give up on it -- it will come with time.
Pebbles are complete -- next step -- Let's "jump" another 1/4" or so on the diagonal and add round #3 of echo quilting.
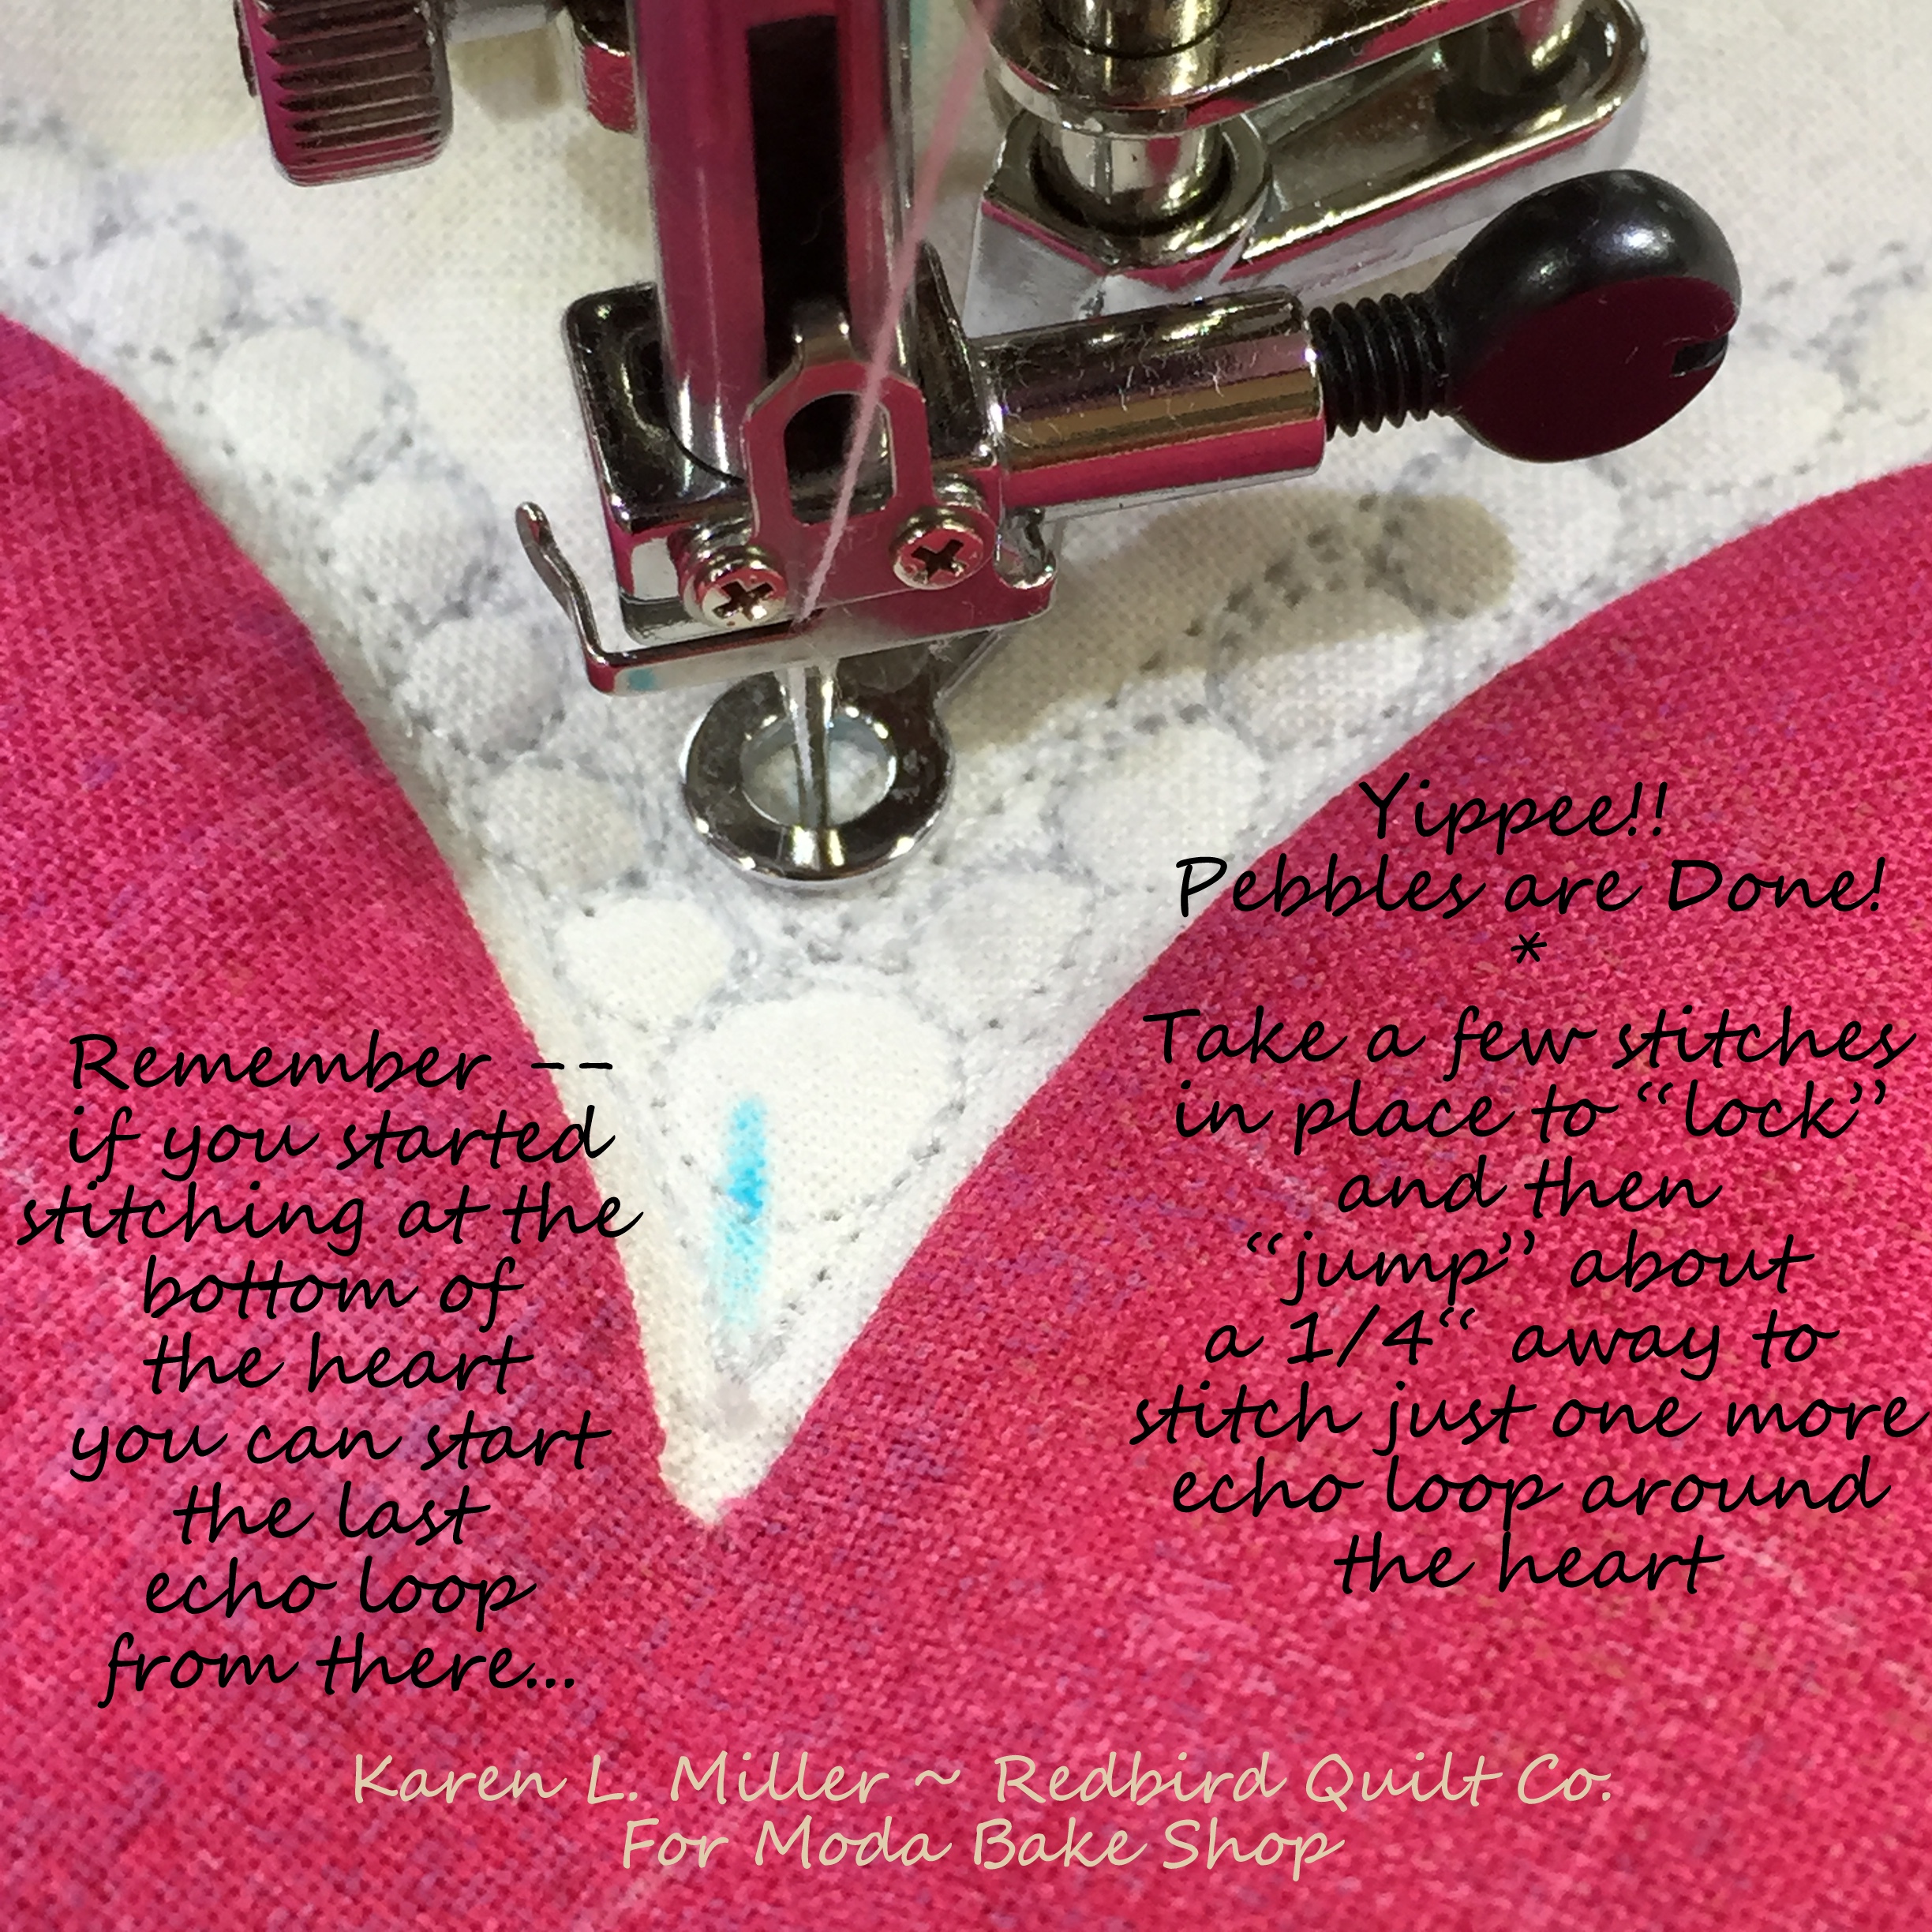
This is looking pretty sweet. You've mastered echo and pebble quilting so the feather creation can begin!
This 3rd round of echo quilting will act as the implied spine for the upcoming feather quilting.
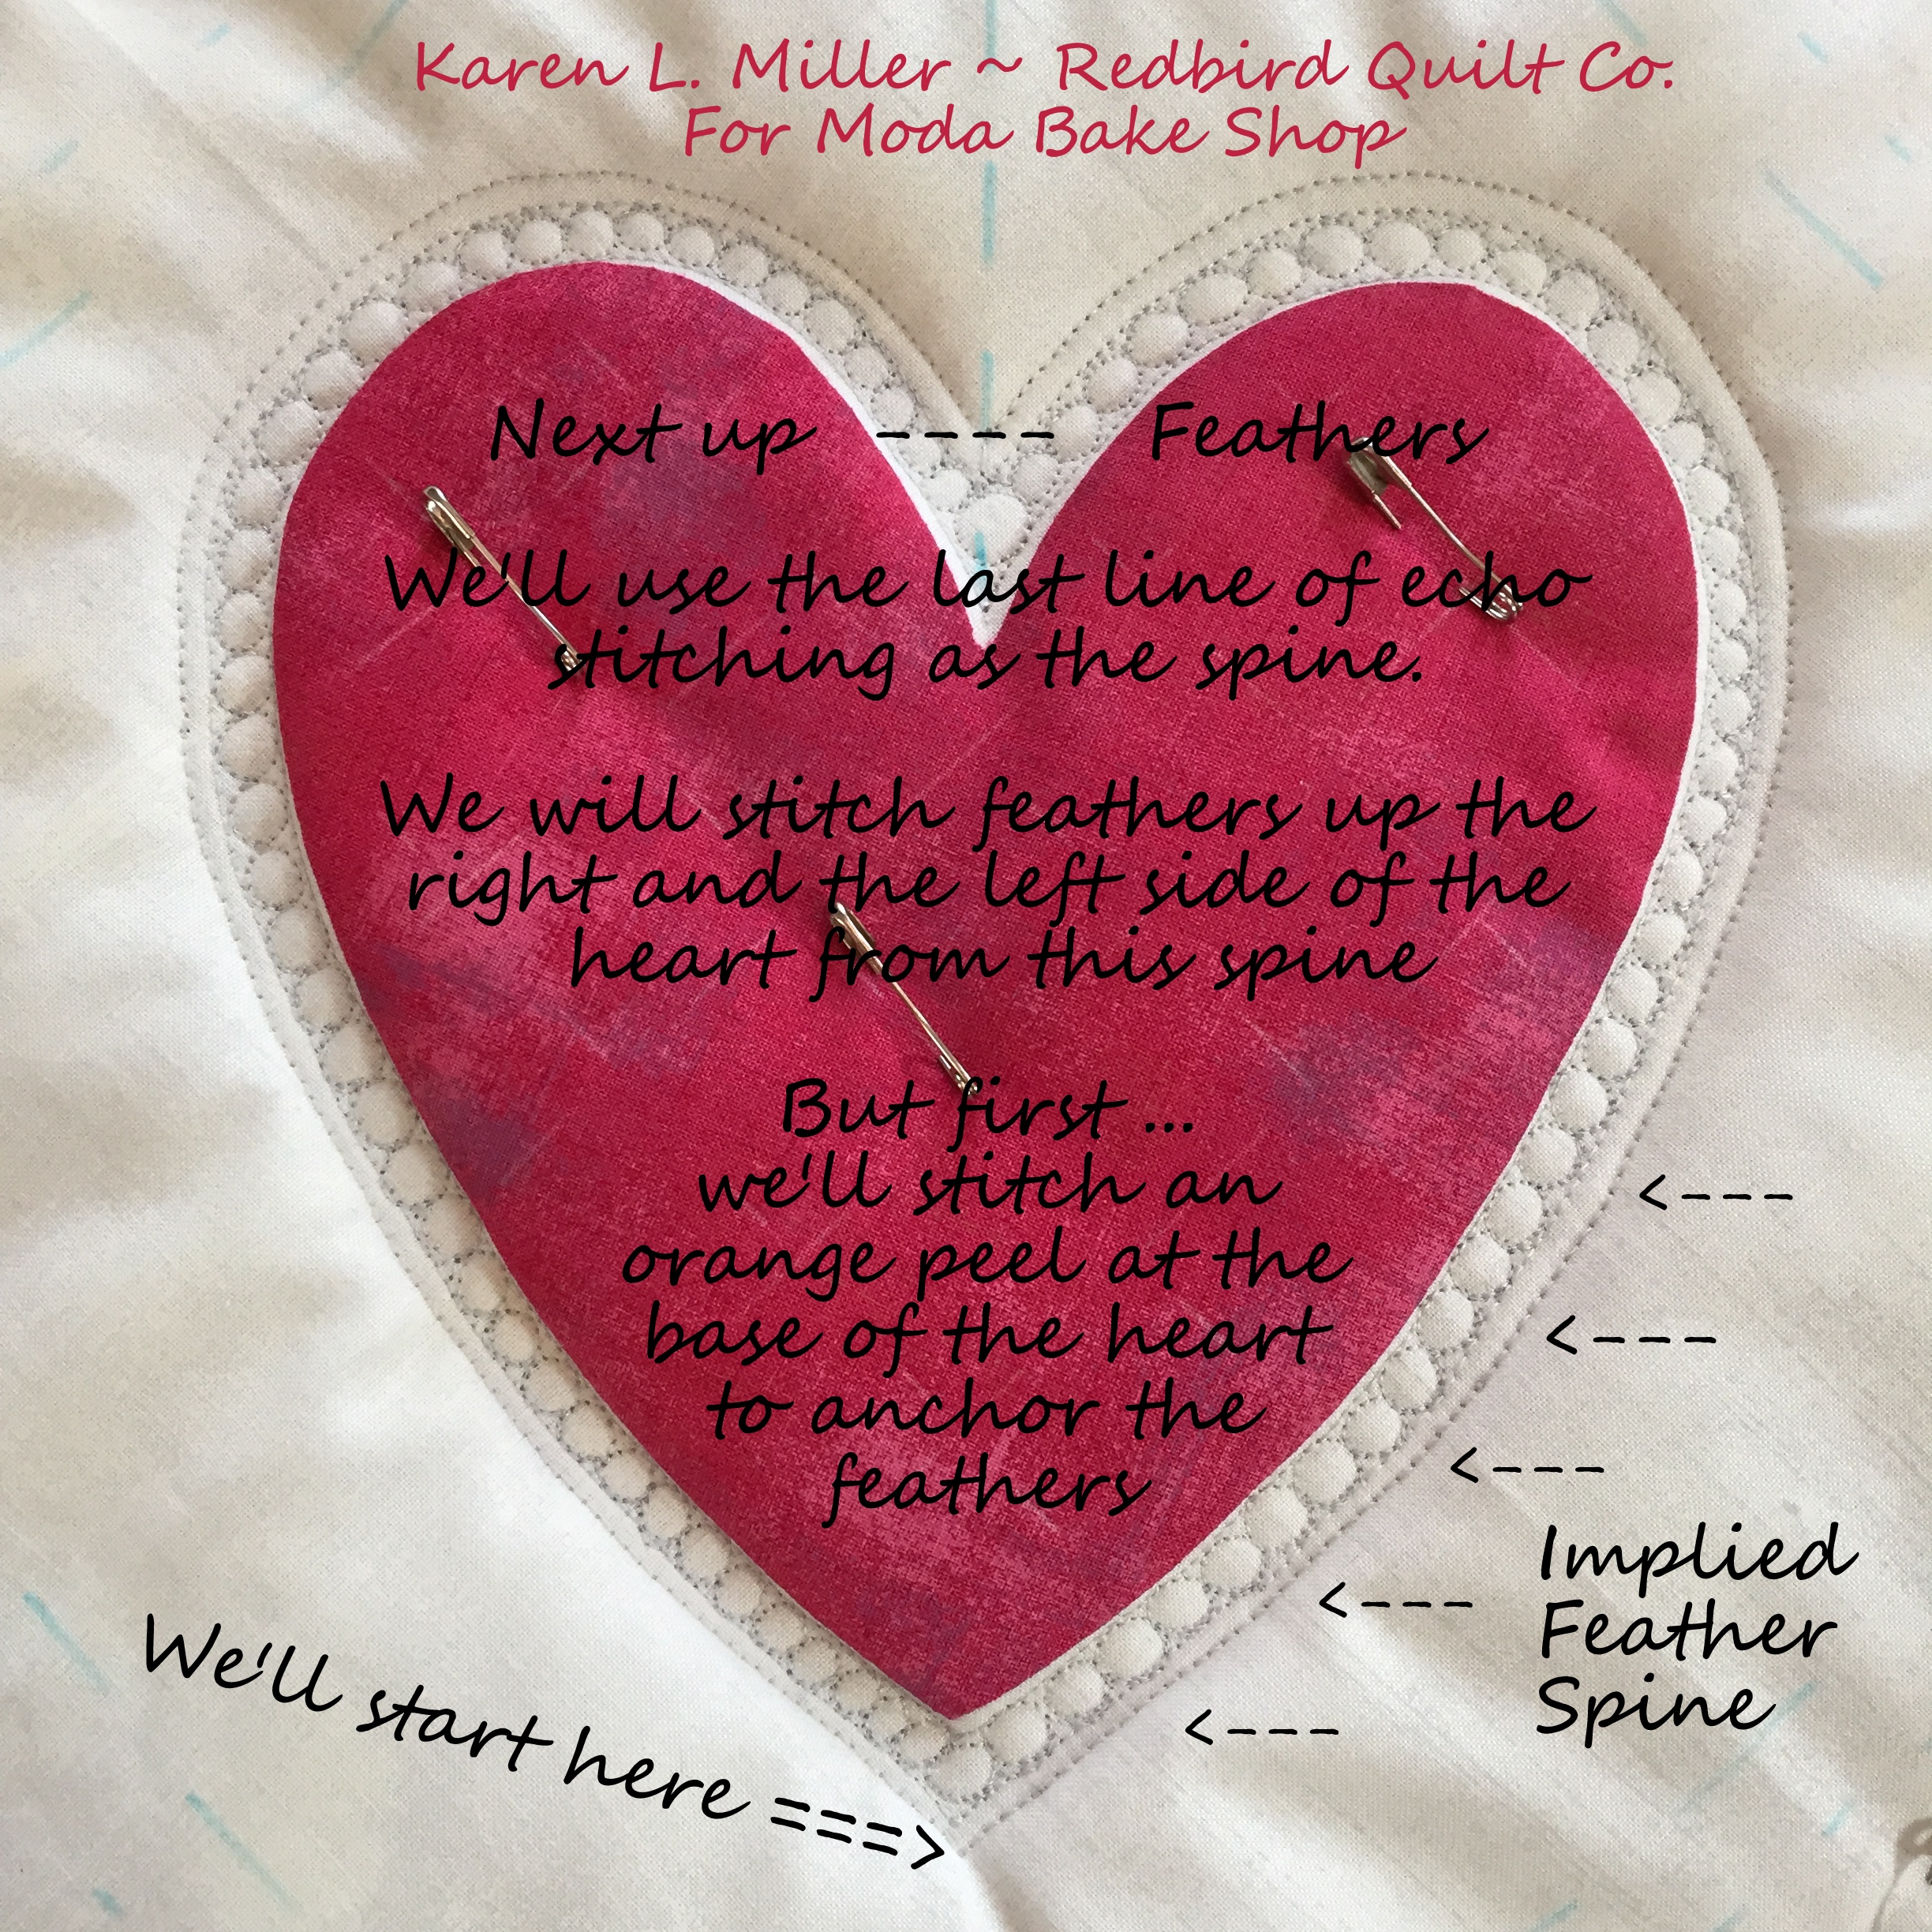
If you're not already there, you'll want to position yourself at the bottom of the heart. Bring your bobbin thread to the top and take a few stitches to "lock" them.
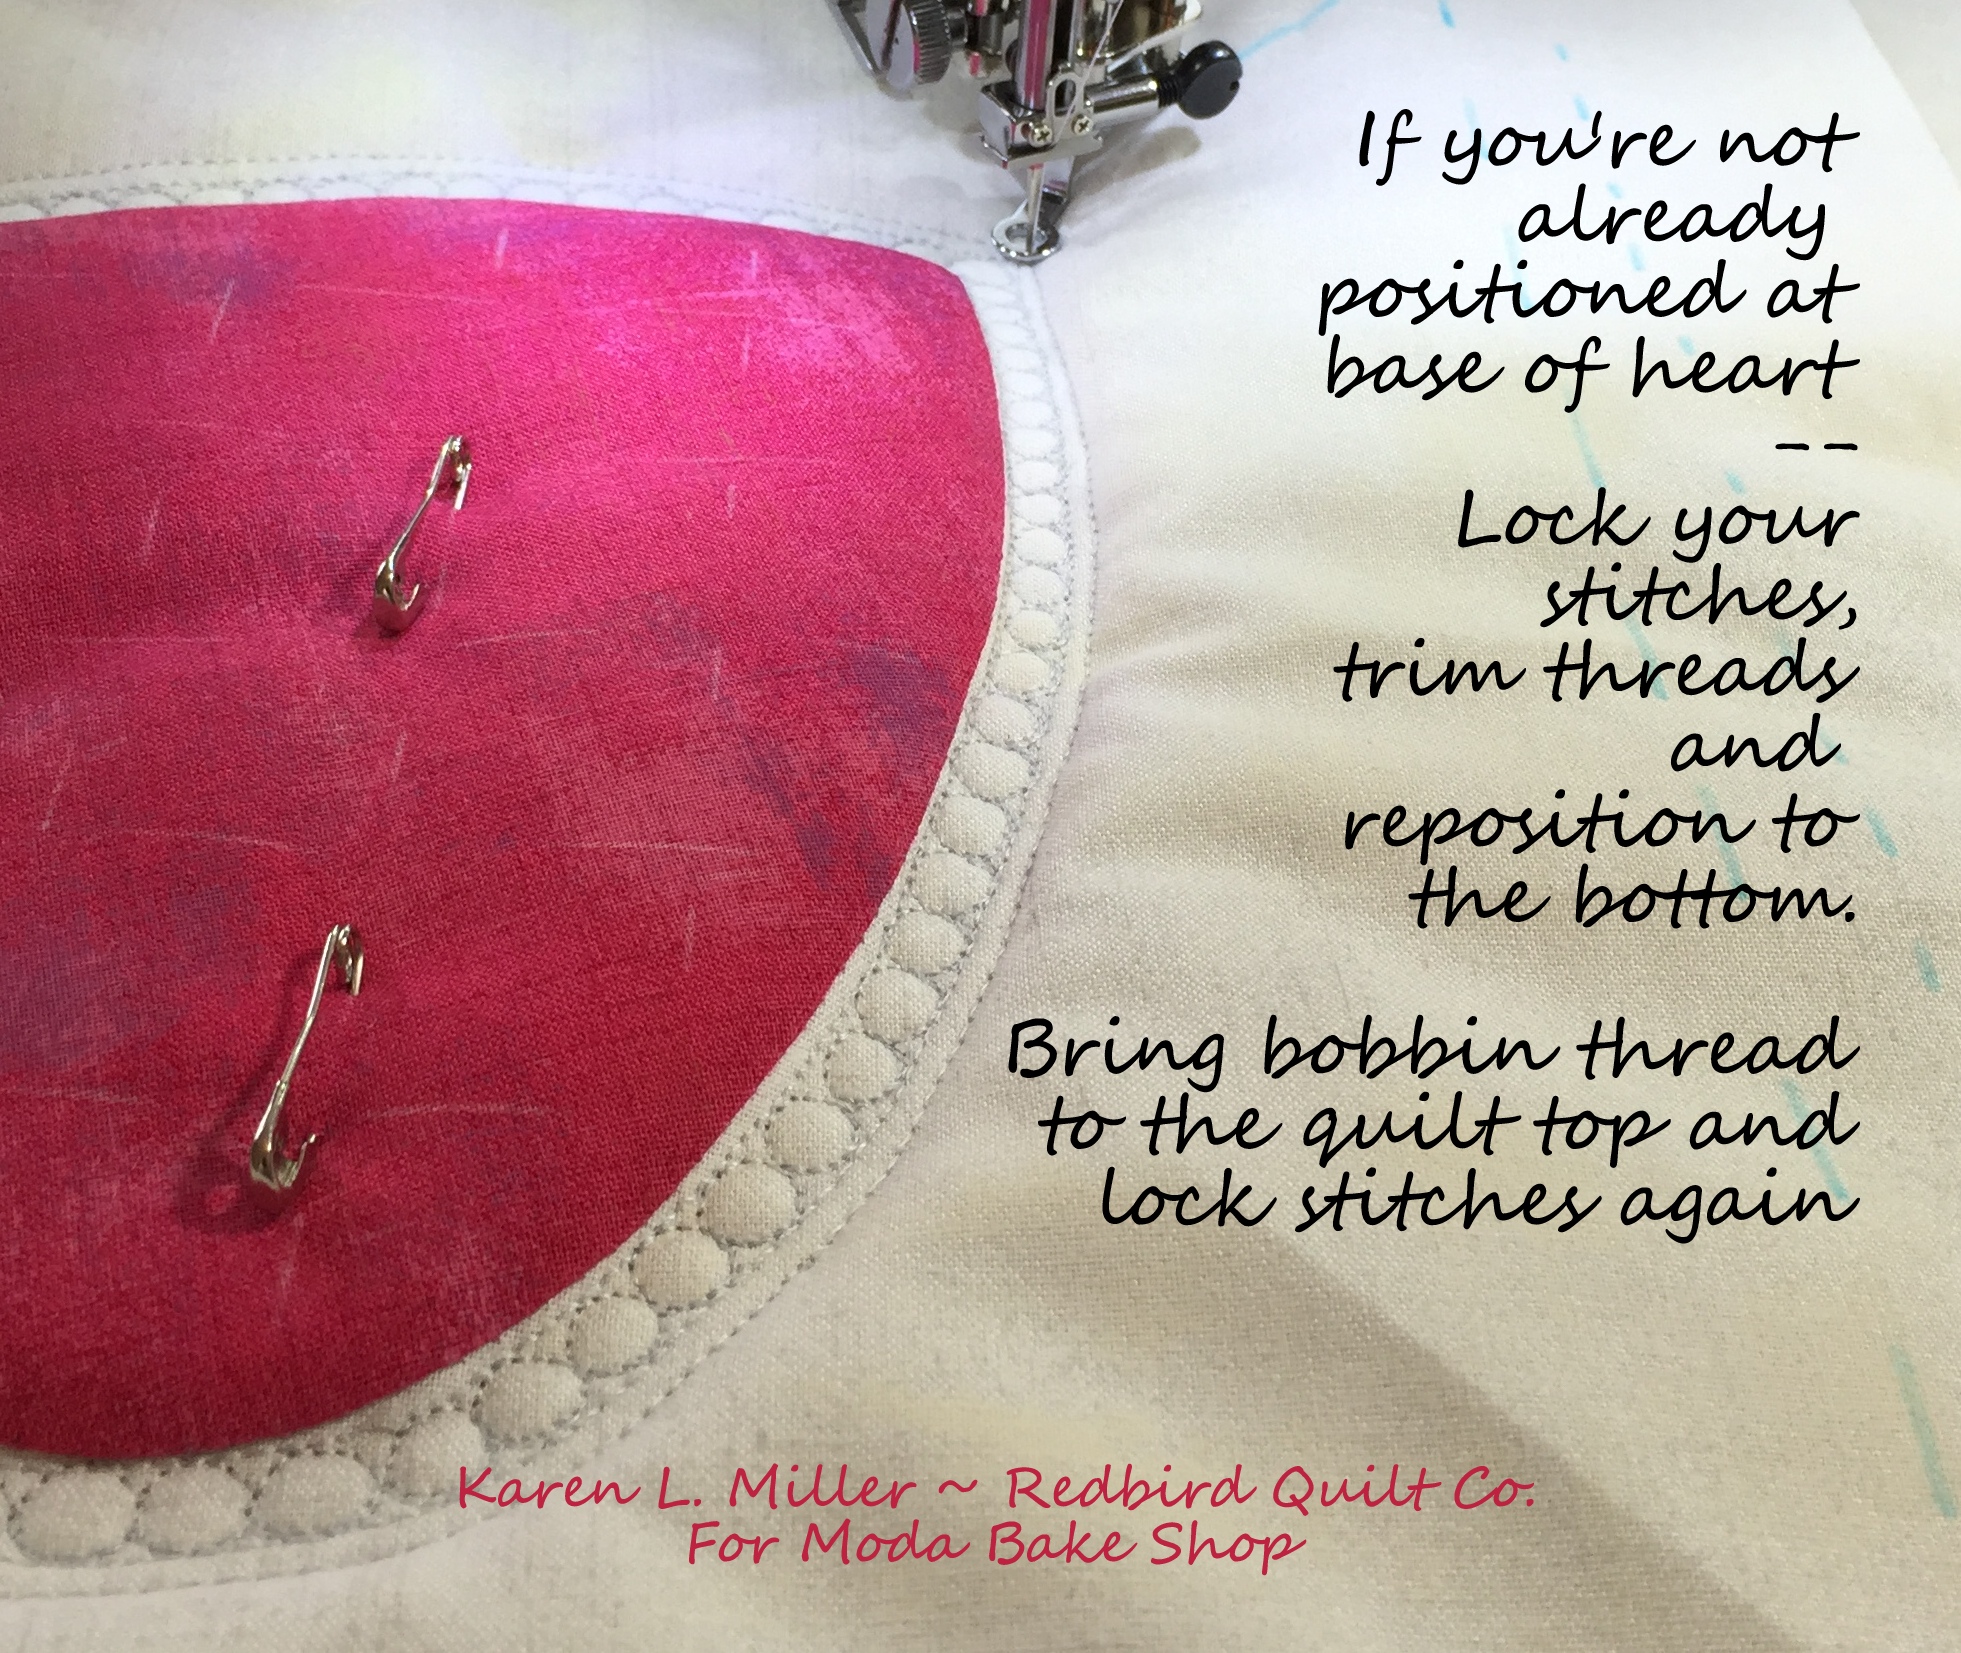
Now let's quilt an Orange Peel. The orange peel will act as a base for the subsequent feather quilting. When stitching the orange peel you can target the 1.5" registration mark but don't worry if you don't hit it. We'll be able to fill later with echo and matchstick quilting to even things out.
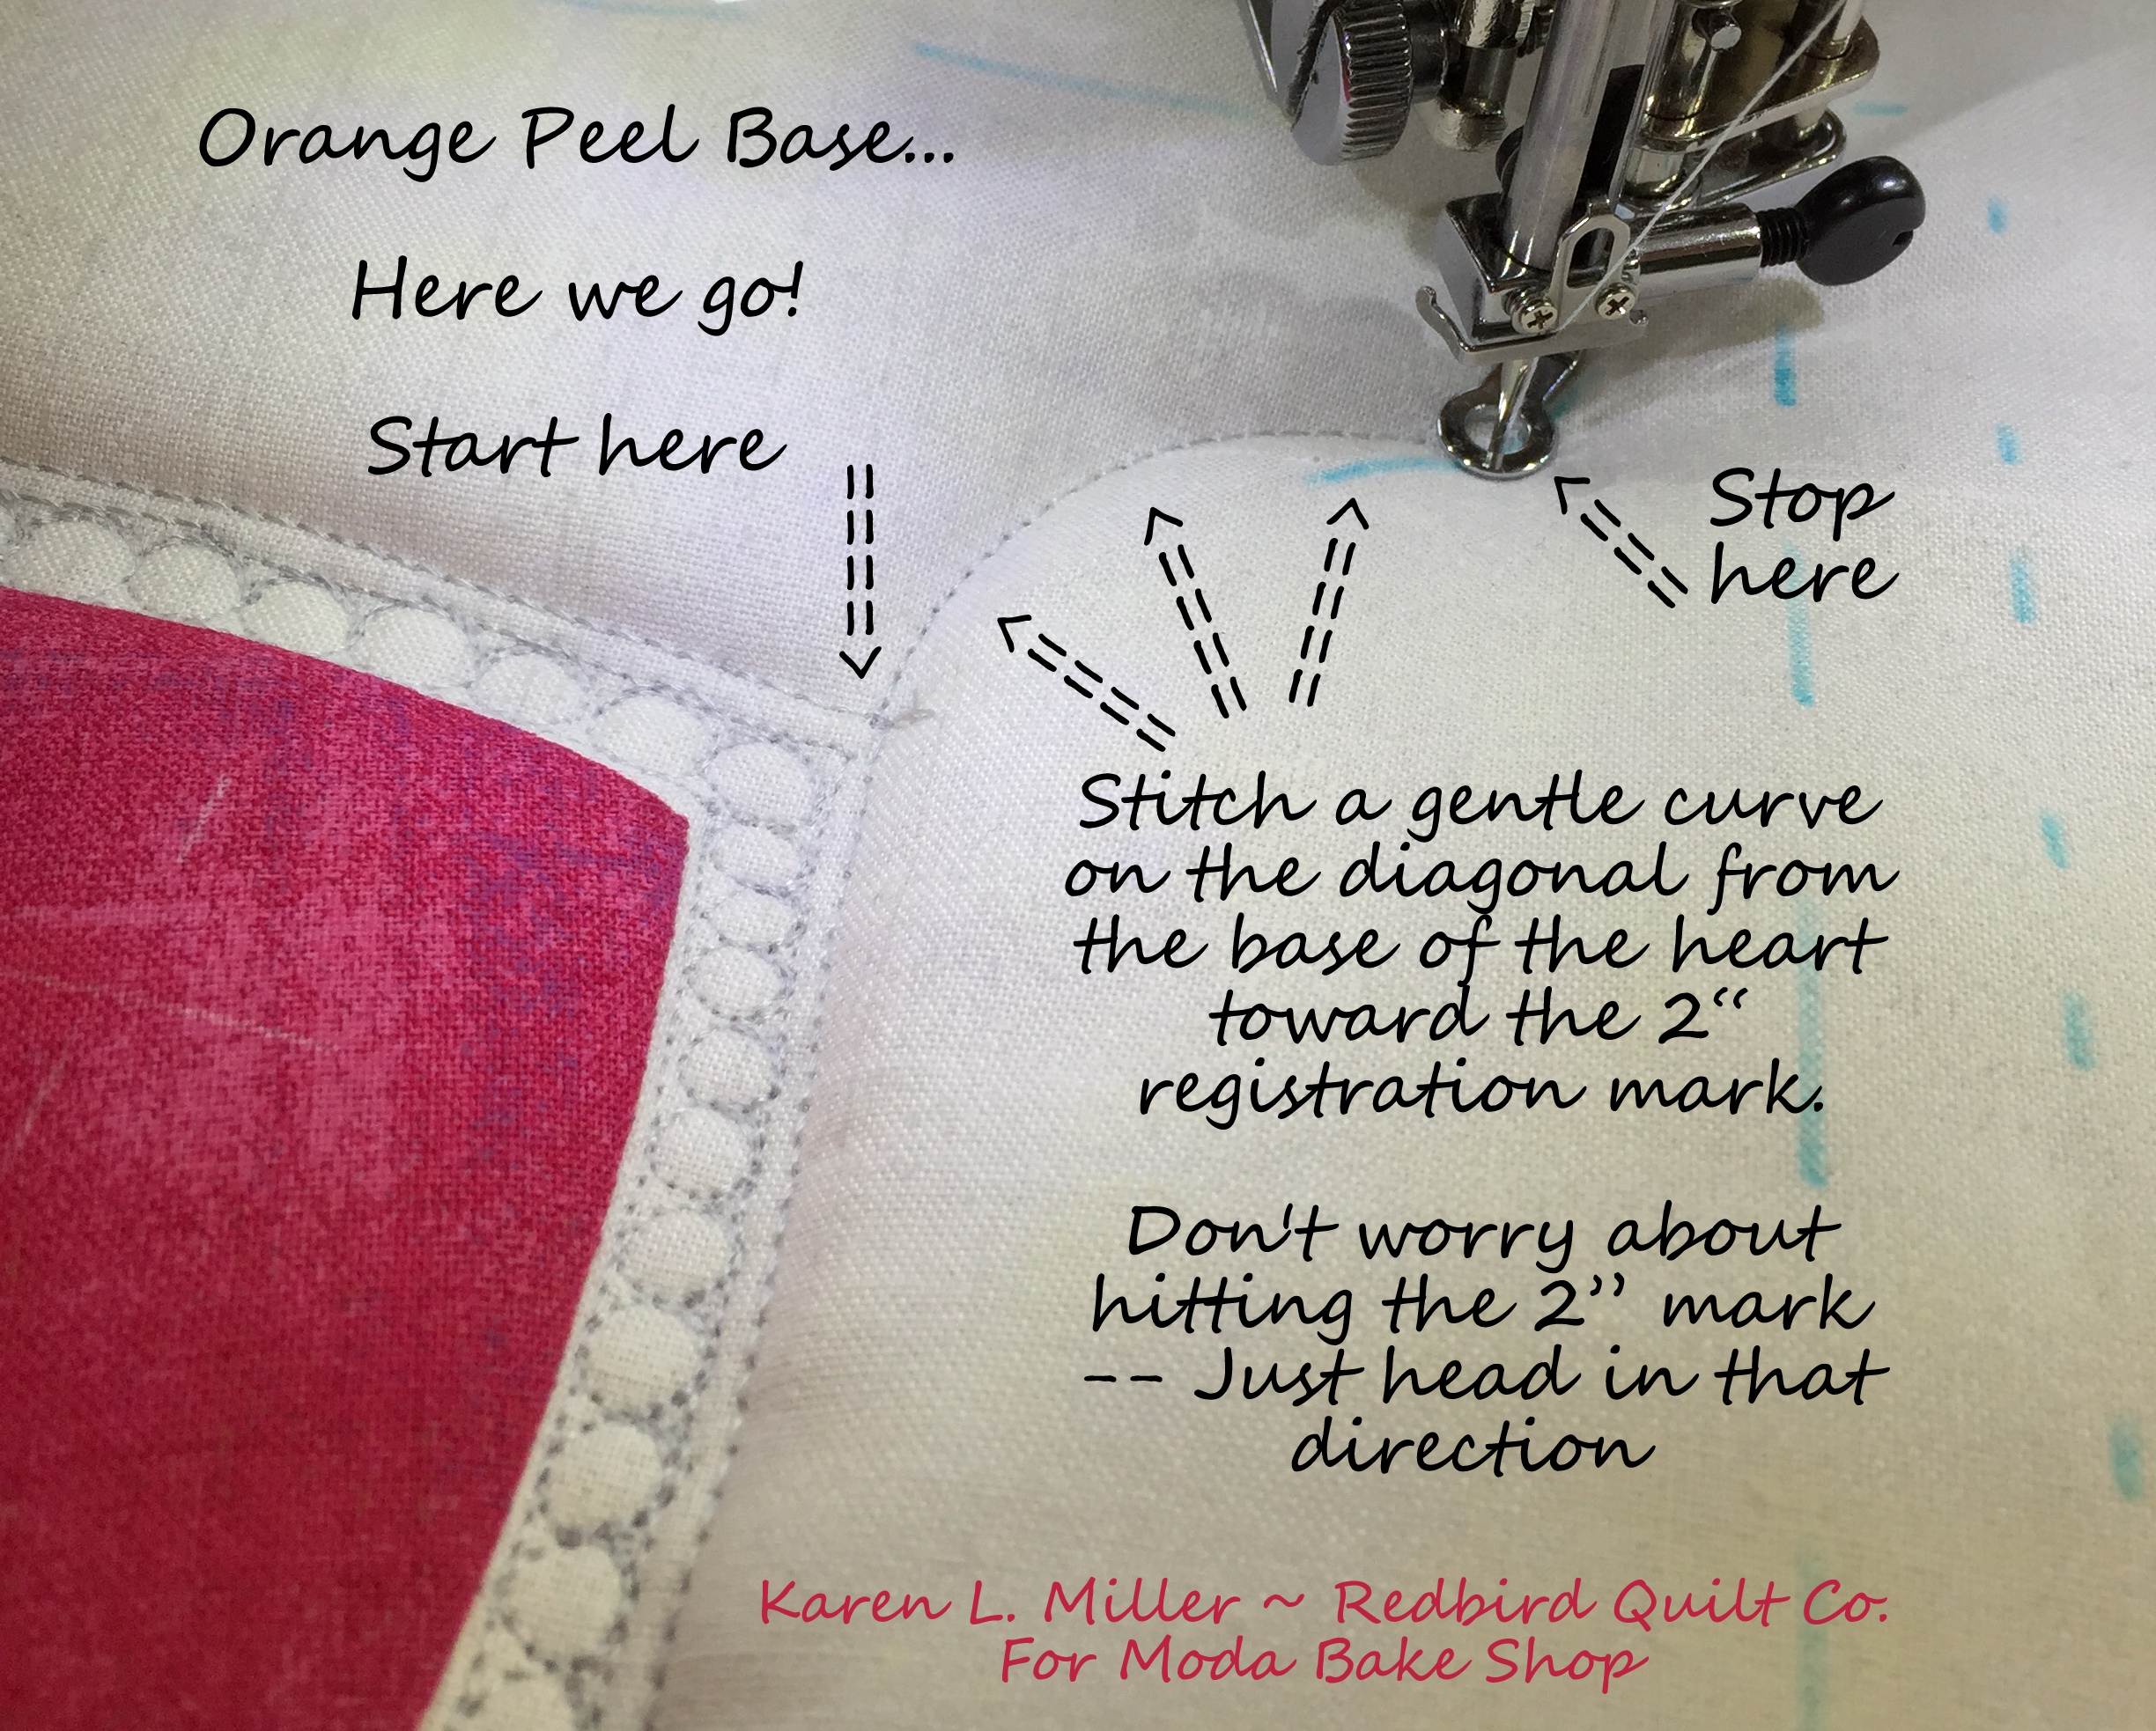
After completing 1/2 of the orange peel re-position your hands and quilt the other half, returning to the starting point.

Woohoo -- with the Orange Peel complete we're positioned to quilt feathers.
The 2 Step Feather Process:
I like to look at feather plumes as a 2 step process.
The first step starts at the spine. We leave the spine at a good angle and stitch a teardrop or paisley shaped motif bumping into a previous feather or, in the case of your first feather plume, you bump into the "base" orange peel motif. This first step is represented below in the black arrow for plume #1.
Once you bump into the base or the previous feather plume you're going to backtrack on the same stitched line to a point where you'll want to start feather #2 (see red arrows). When creating feather #2, bump it off of feather #1 and try to make a nice rounded end before tapering the feather plume back at the spine. This is another great motif to practice on paper or a white board. Practice really makes a difference -- draw them out.

Now repeat that 2 step dance up the spine...
From the spine you'll ALWAYS start a new feather plume. You'll bump into the previous feather and backtrack along your stitching path to a point where you'll start the next feather plume. Be sure to taper that feather plume back to the spine.

Some tips for a successfully Dancing the 2-Step... :
- Try to envision and stitch well rounded plumes. I actually picture quilting a swirl on the end of the feather to aid in making the plume well rounded.
- Always return your plume to the quilt spine tapering as you go. It makes them look more finished this way.
- When you're at the spine you'll ALWAYS be creating a new feather plume.

You can do this!!!
As you continue to dance and move toward a larger negative space in the corner, you'll need to lengthen the reach of your feather plumes to fill the space. Remember you're targeting the 1.5" registration mark but you don't have to hit it -- it's just a guide.

Dancing the 2 Step continues as you fill the space on the right side of the heart.

Here you'll need to make your way around the top of the heart -- keep hugging that spine and making rounded plumes.

As you get closer to the top of the heart the negative space narrows. You'll need to quilt some pretty tiny plumes. Again -- keep hugging that spine when you start and envision those well rounded ends.

Whew -- we're getting to some open space again.
When I reach a point like this I'll pause and ponder how to fill the space. Where the needle is positioned (below) my thoughts are: we have one more feather to finish to get back to the spine. Can I fit another 2 step dance in the remaining space ? If not maybe I'll just fill the space with a swirly feather-type design. It gives me a little flexibility and may help avoid making a wonky feather ;)
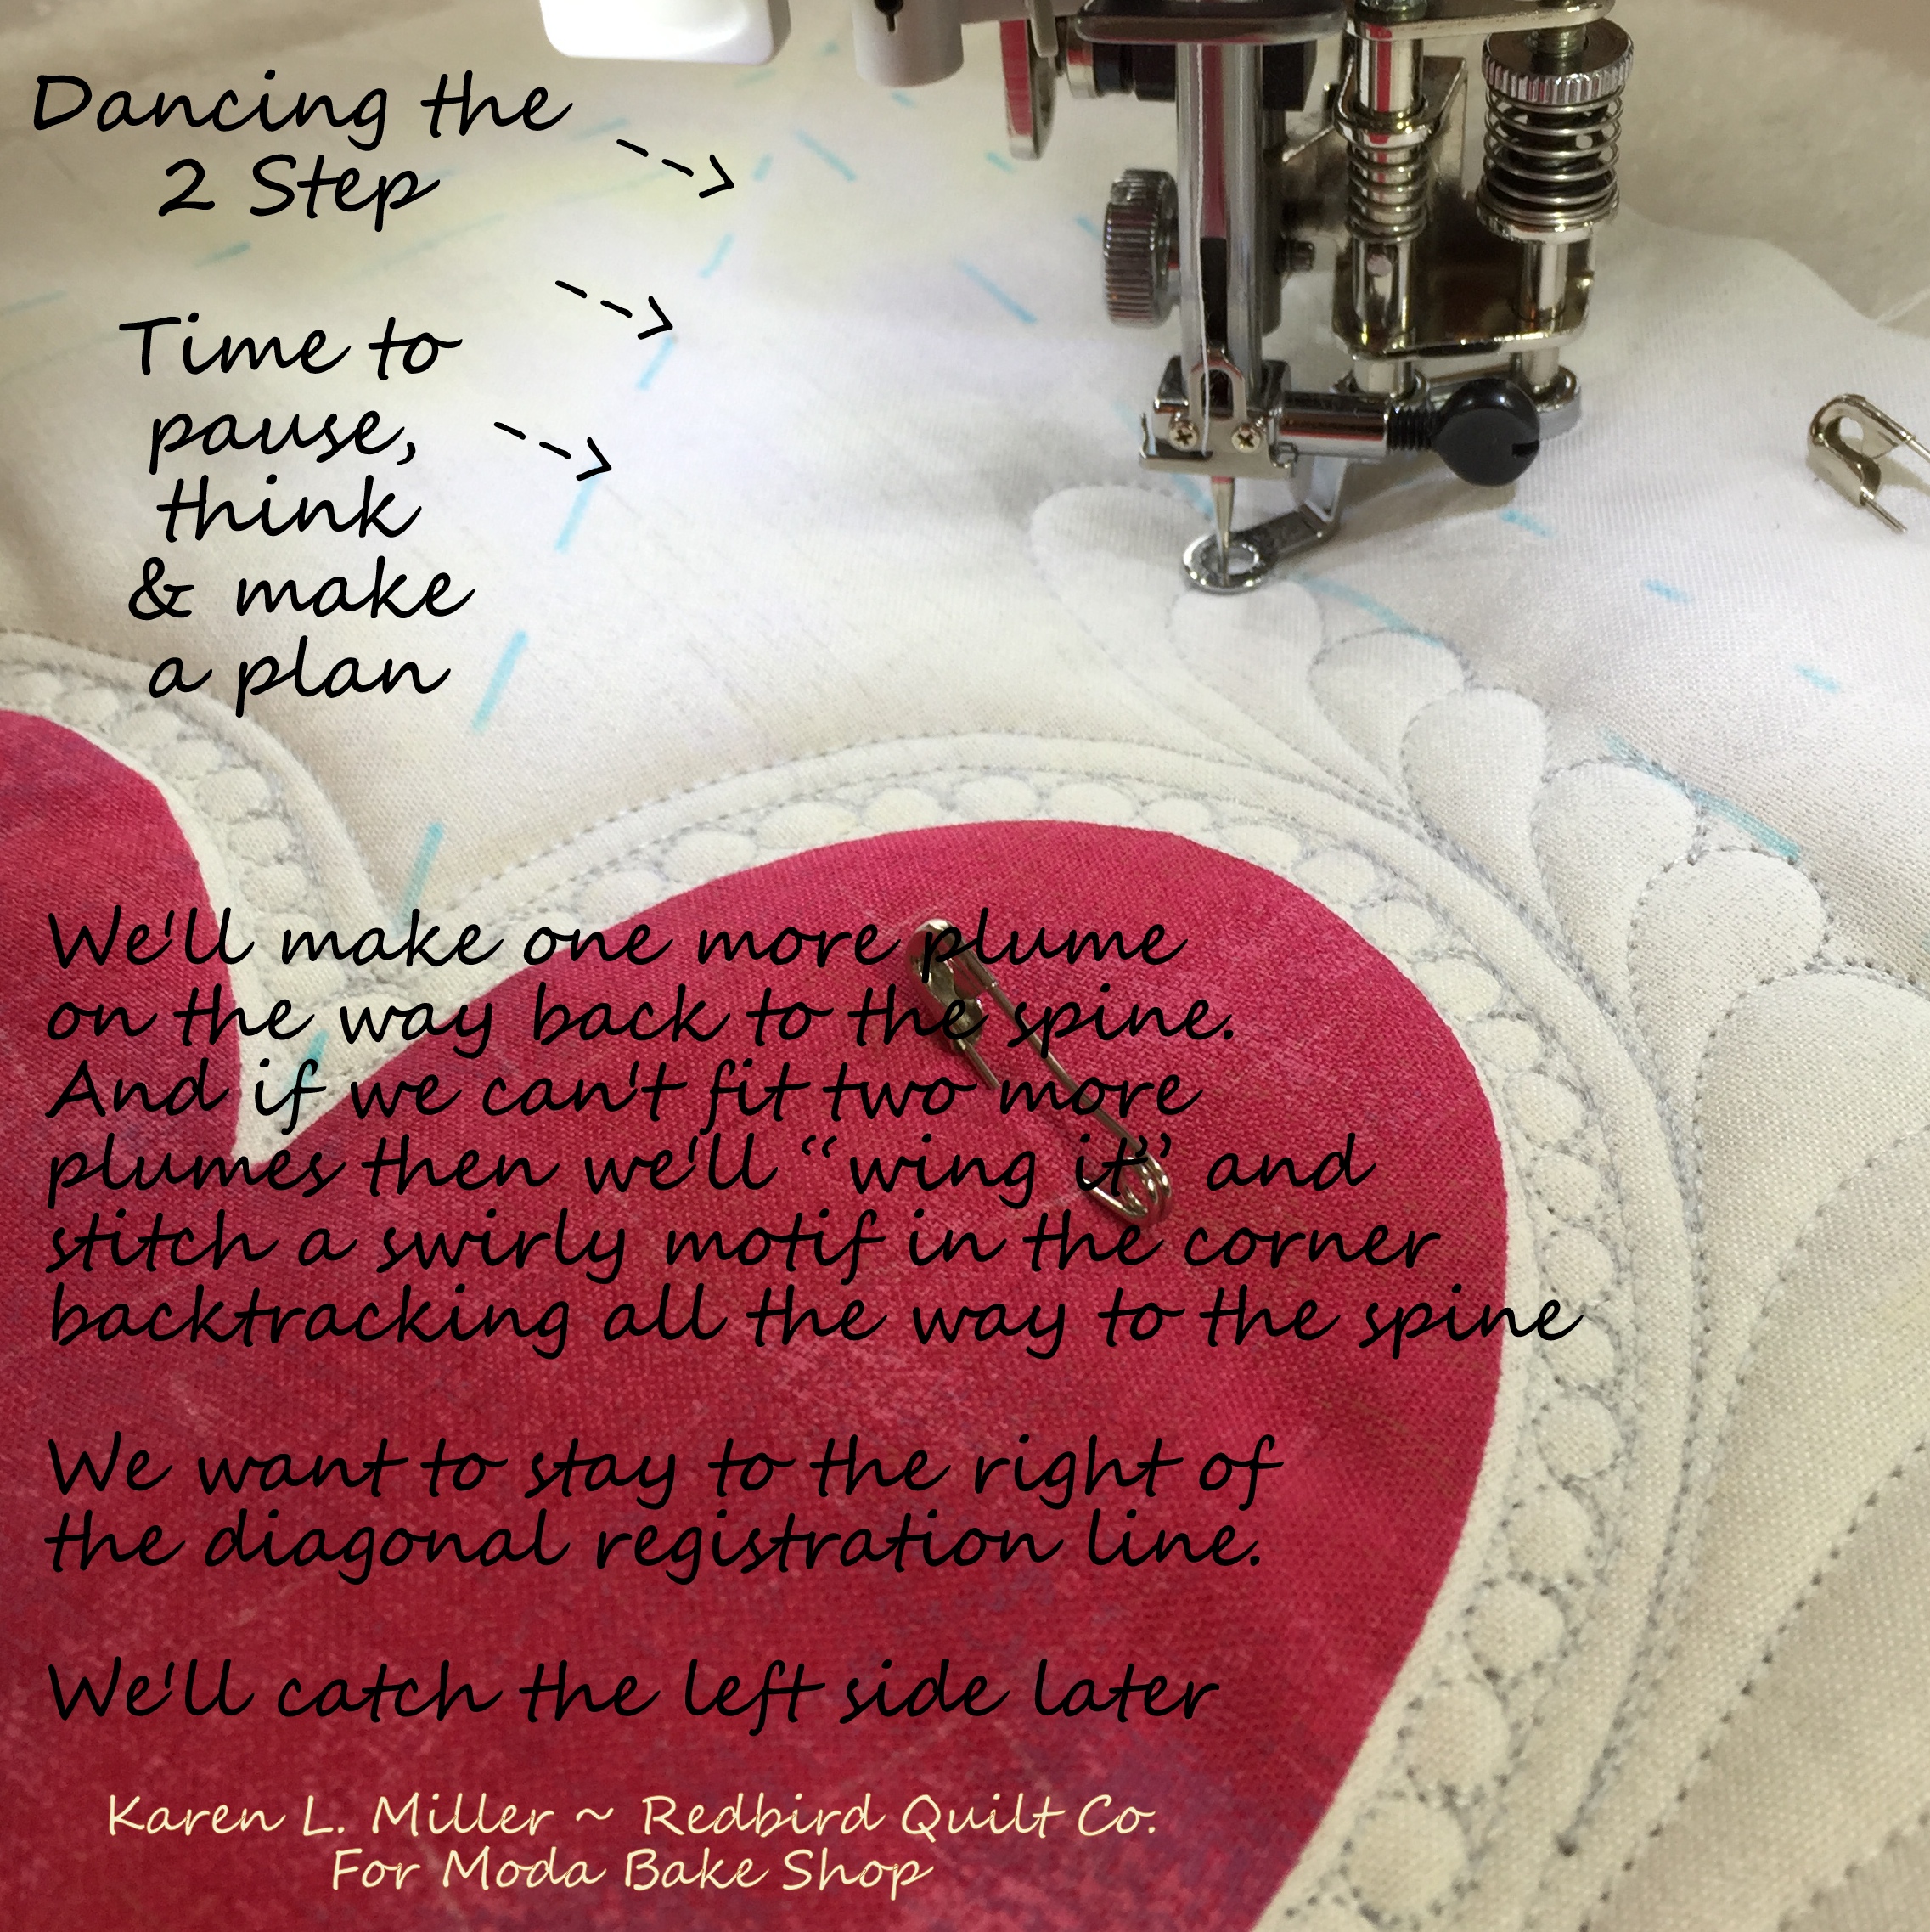
Ahhh -- That was a good choice. Notice how the swirly feather-like design gave us more flexibility in filling the space ? We could stretch it out and make it bigger than the feather we were stitching. I'm happy!!
That swirly design worked for the top of the heart -- maybe we should use it in this other funky space. It will again give flexibility and it will balance the design a bit.

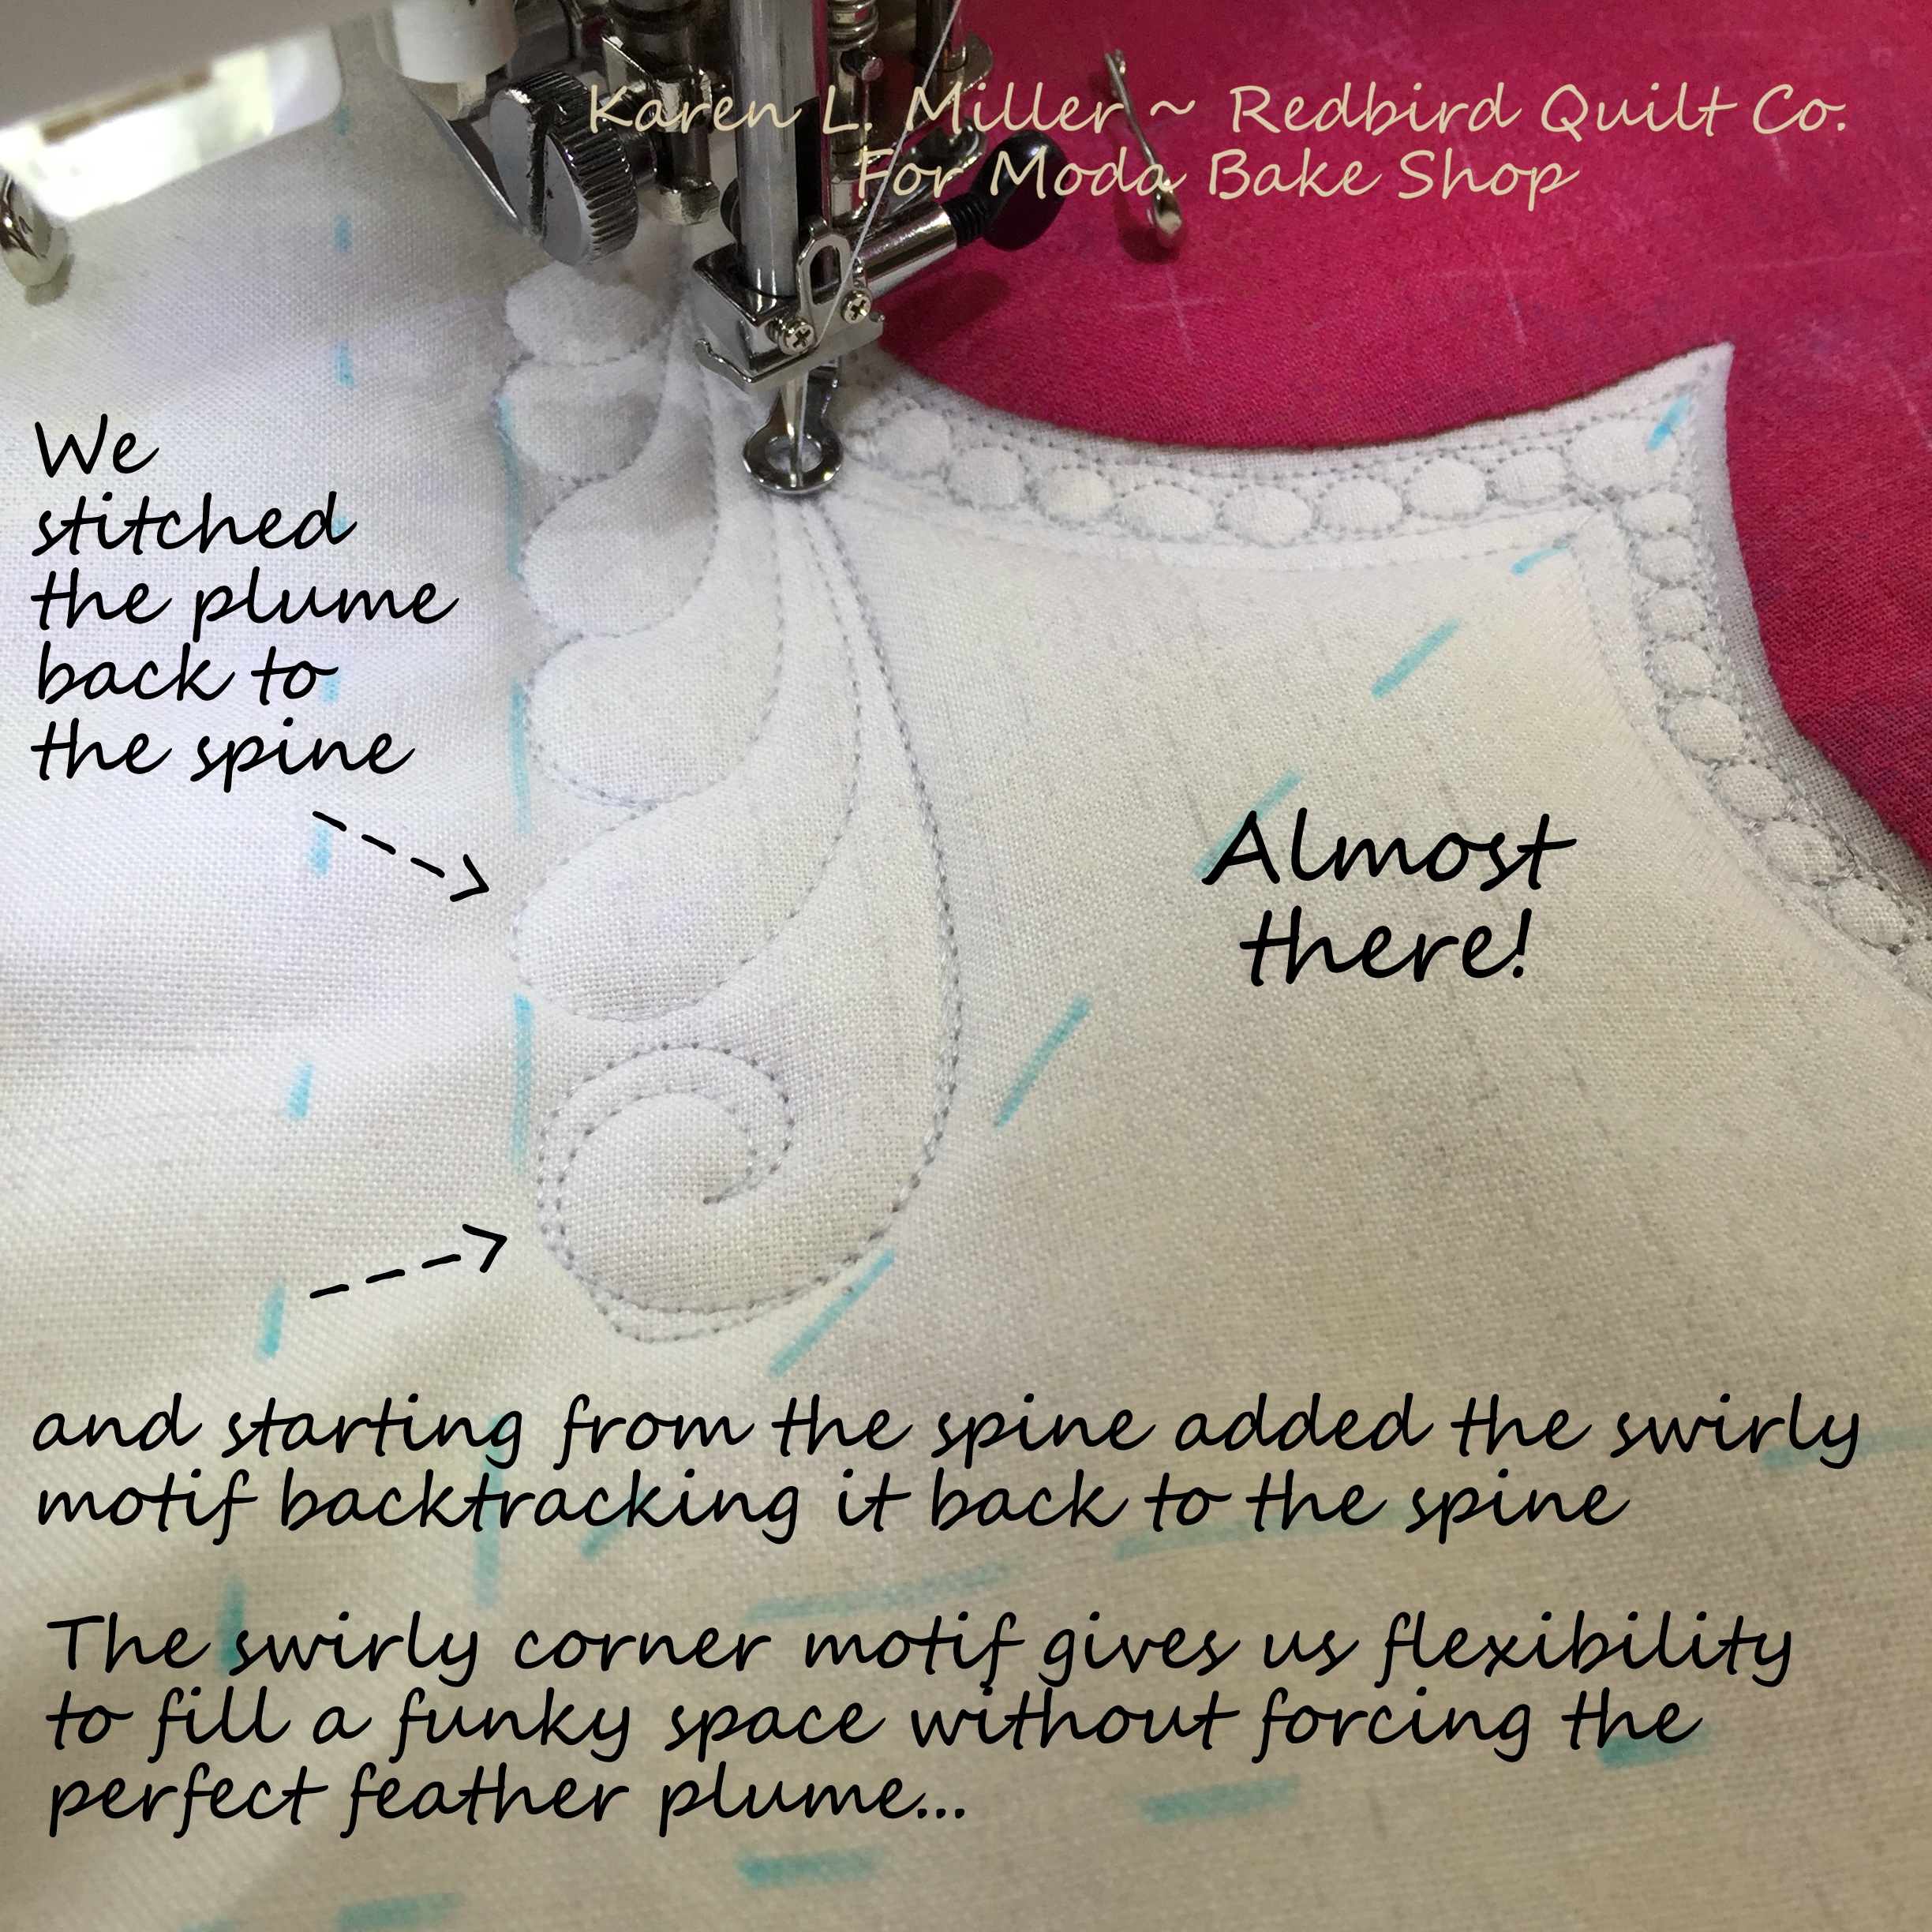
OK -- Just a little gap to fill. One 2 step dance and one "extra" feather should do the trick. Since we've lost the original spine we'll need to start using a new one. The swirly feather above can now be used as the spine...

Last plume -- you're not going to bump and backtrack here -- just stitch a feather from beginning to end and return to the "spine".

So Exciting! We've finished feathers on one side of the heart.
At this point I'll backtrack or "sneak" down the spine to get positioned to stitch the other side.

OK now -- repeat the steps - different side. It seems whenever I switch sides I have to retrain the brain. But... Don't worry if the left and right sides don't match -- they'll be beautiful regardless.

Eh -- they're not perfect but hey -- they're hand made.... Keep on quilting !
Here we are on the top left of the heart -- YOU KNOW what to do...

Now the Happy Dance !! We've finished both sides with feathers.
To even-out the backtrack stitches, I'll stitch down the spine to the bottom of the heart (like on the opposite side).

Next 3 steps we will be echo quilting.
One thing I love about echo quilting feathers is that you can "fix a flat" around your plumes. If you had a feather plume that wasn't well rounded, make the echo of that feather rounded anyhow. It kinda covers up that glitch without ripping any threads.

Here's the first round of echo quilting completed.

Echo 2 more times -- for a total of 3 echoes around the feathers. No need to worry about making the distance between echoes the same -- it will look beautiful no matter what you do.
While echoing, target the 2.0" registration mark or wider. No need to echo to the 1.5" mark, the next motif will fill remaining gaps.
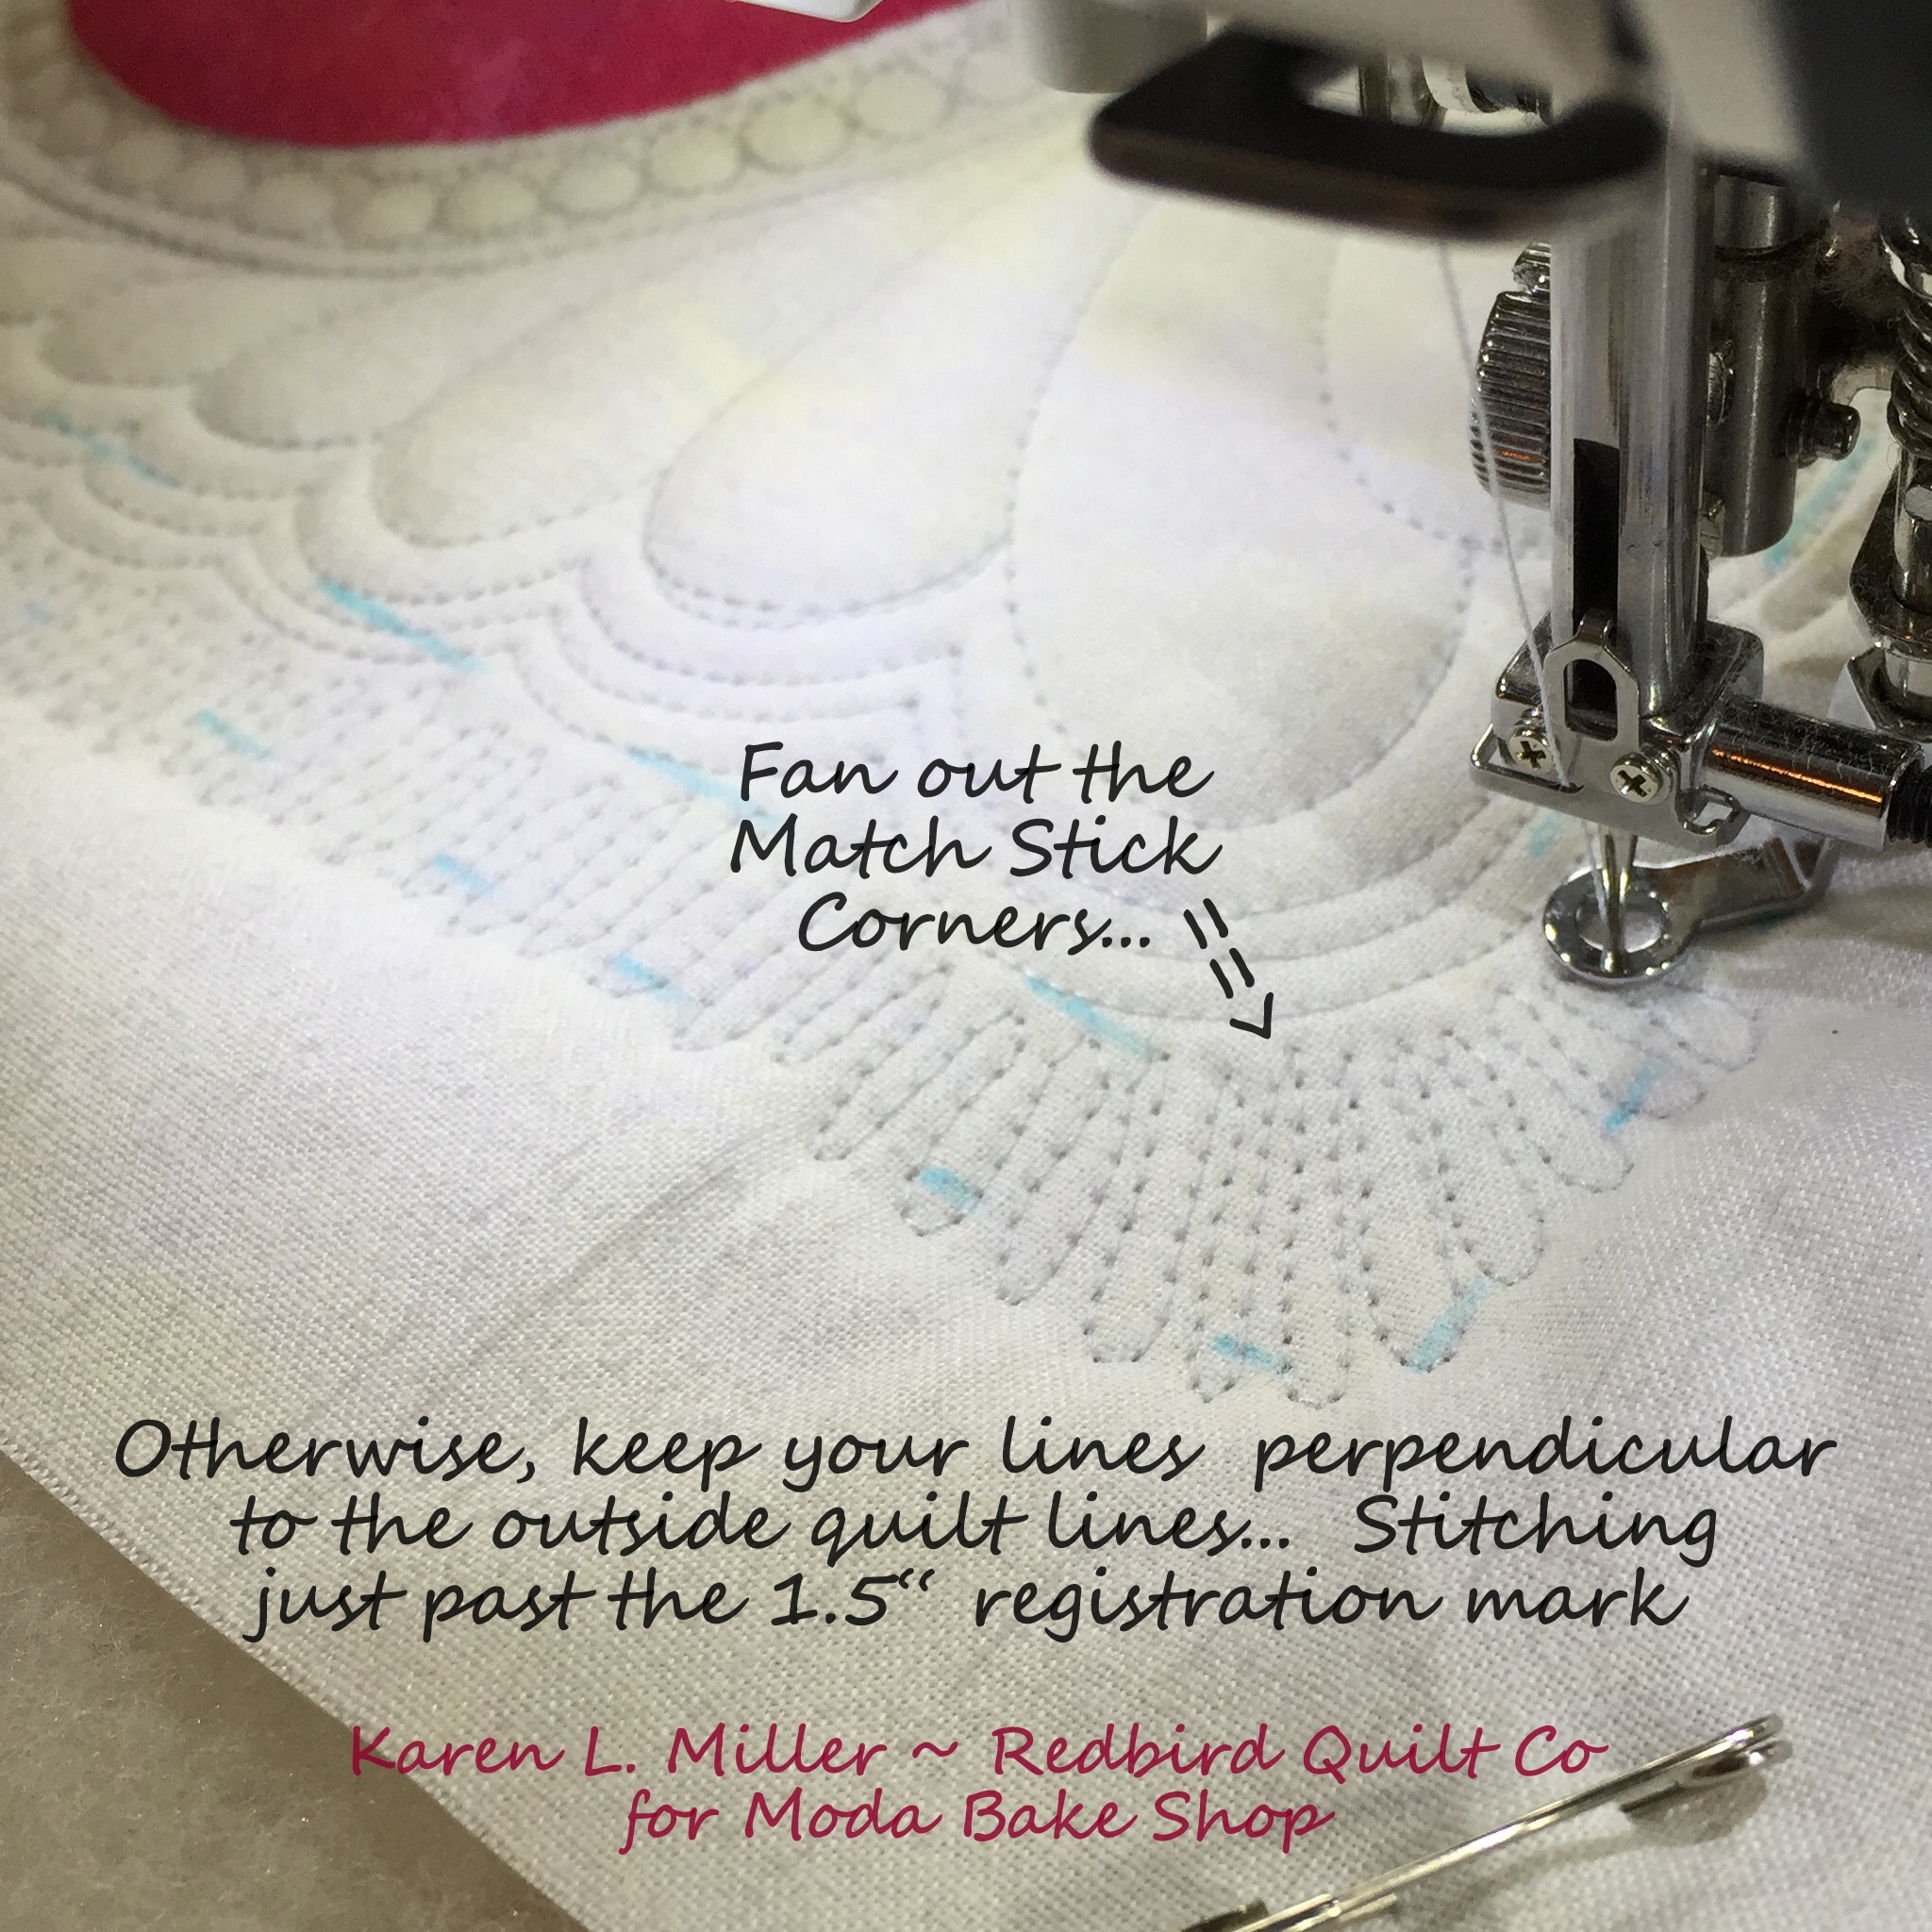
Woot woot! We're almost done. Let's fill the area between the last echo and the 1.5' mark with some matchstick quilting -- free motion style.
Matchstick Quilting:
Generally, match stitch quilting will run perpendicular to the edge of the quilt -- except in the corners where you'll need to fan things out a bit. Don't fuss too much about this quilting as some of it will be trimmed off when we square-up.
Let's not be skimpy on this round of quilting. In our case it's safer to stitch MORE matchstick than less. We'll be trimming excess quilting away, so feel free to stitch well past the 1.5" registration mark if you're comfortable in doing so.

Here's another example of the matchstick quilting taking an odd (fanned out) shape in the corners. Be sure to stitch well past the 1.5" registration mark. (I cut it close!!)
Yay !! All done -- Now Give yourself a pat on the back -- You Did GREAT!
This image reminds us -- if you have your hands on a Clover Eraser Pen give it a whirl for some immediate satisfaction. It amazing how much better the quilt top looks when those blue marks are gone!
Don't have an Eraser Pen ? Dampen the end of a Cotton Swab with water and trace over the blue marks to remove them. A damp cotton swab will also remove pin holes left from basting ;) Give it a try! Dab those holes and watch them disappear.

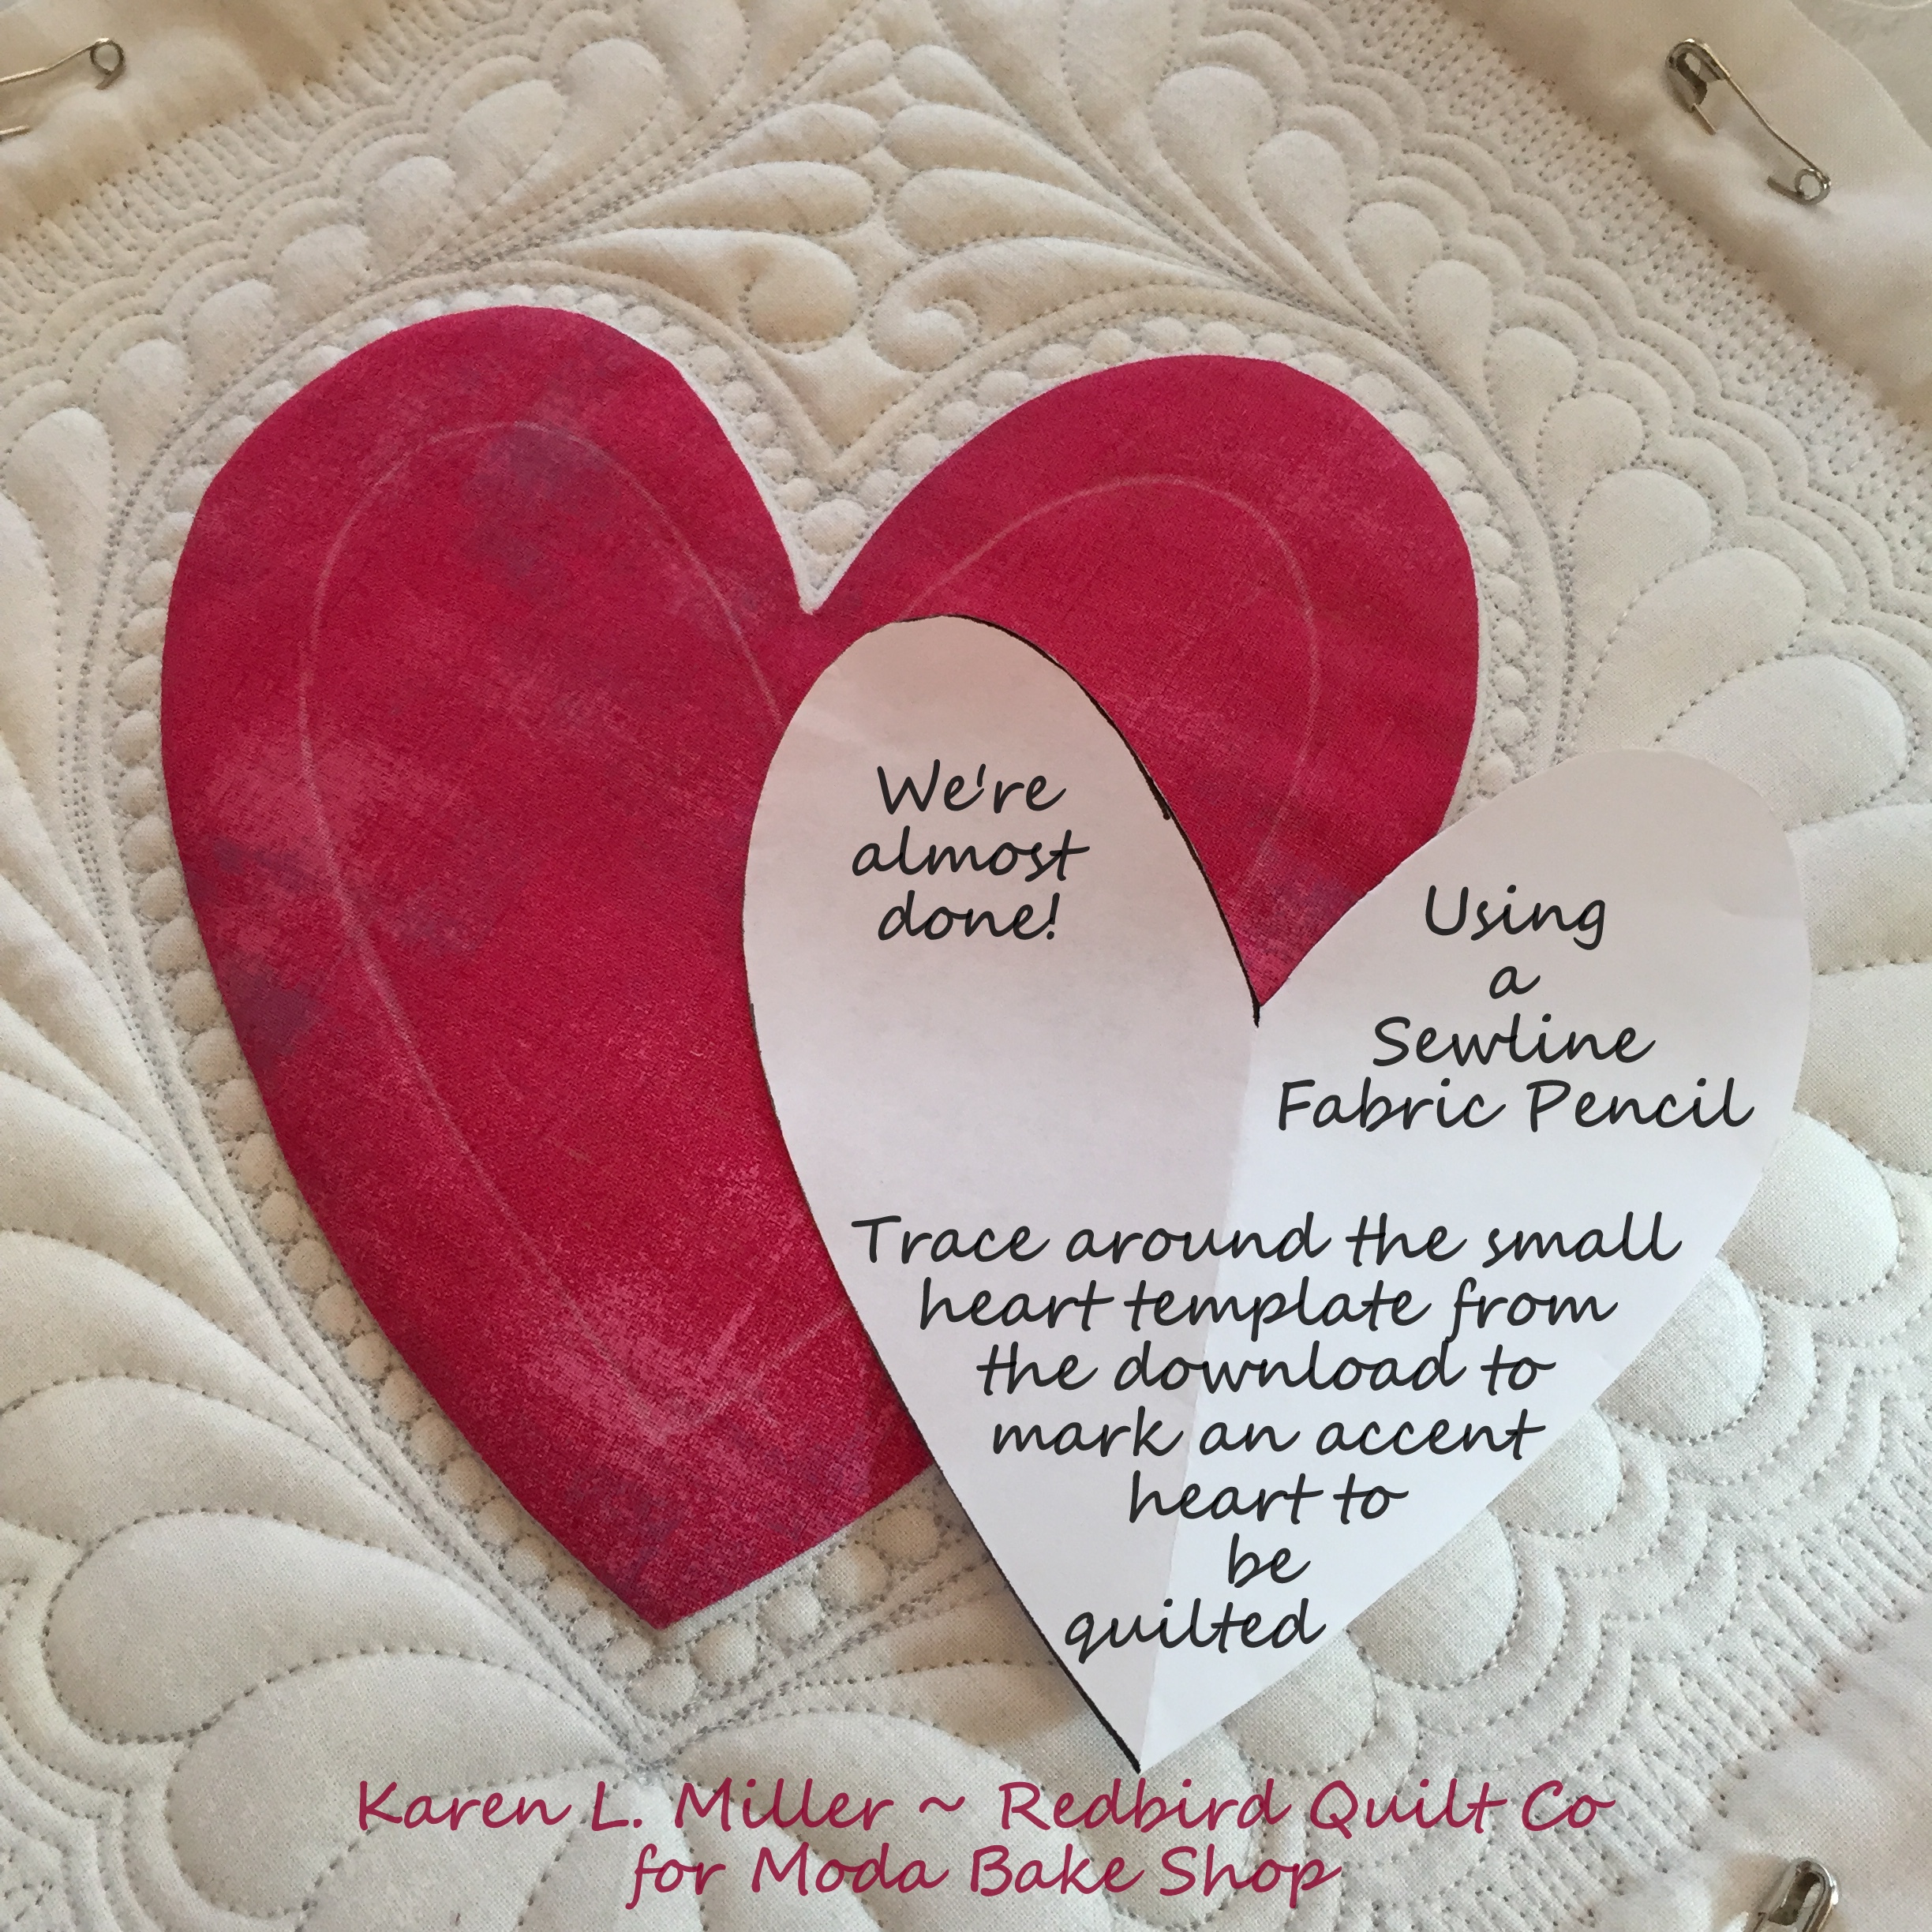
Last steps now.... When I first started this process I'd planned to do some cross-hatch quilting in the heart, but when I finished the background quilting I decided the cross hatch might be a little too formal.
At times I just sit and stare at a top while trying to determine what to quilt. I'm never quite sure where the ideas come from but in this case I wanted something quick, simple, and a little whimsical. Ahhh -- how about another echo? Let's give it a whirl!

Use the smaller heart template from the PDF download, cut on the printed line, center it on the fabric heart and trace around it with the Sewline fabric pencil.
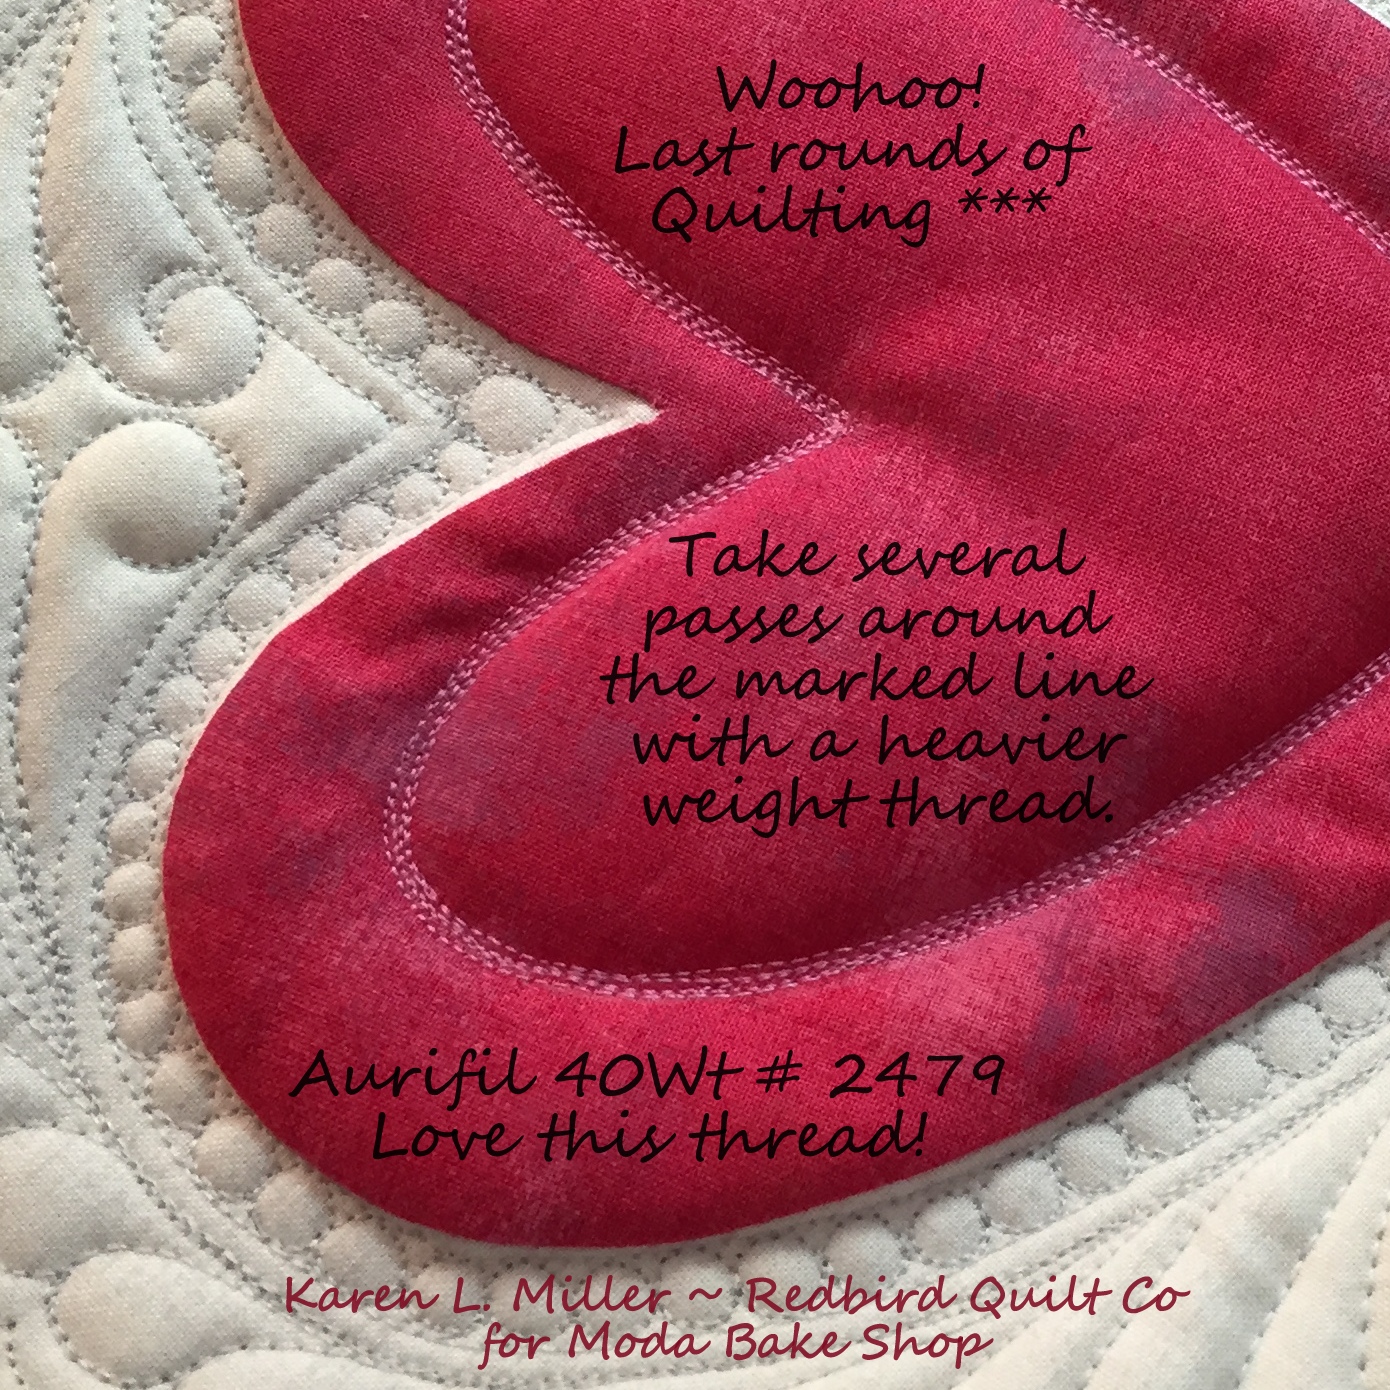
Before you stitch, consider changing thread color. I decided to use Aurifil 40Wt #2479 on the Raspberry Grunge heart.
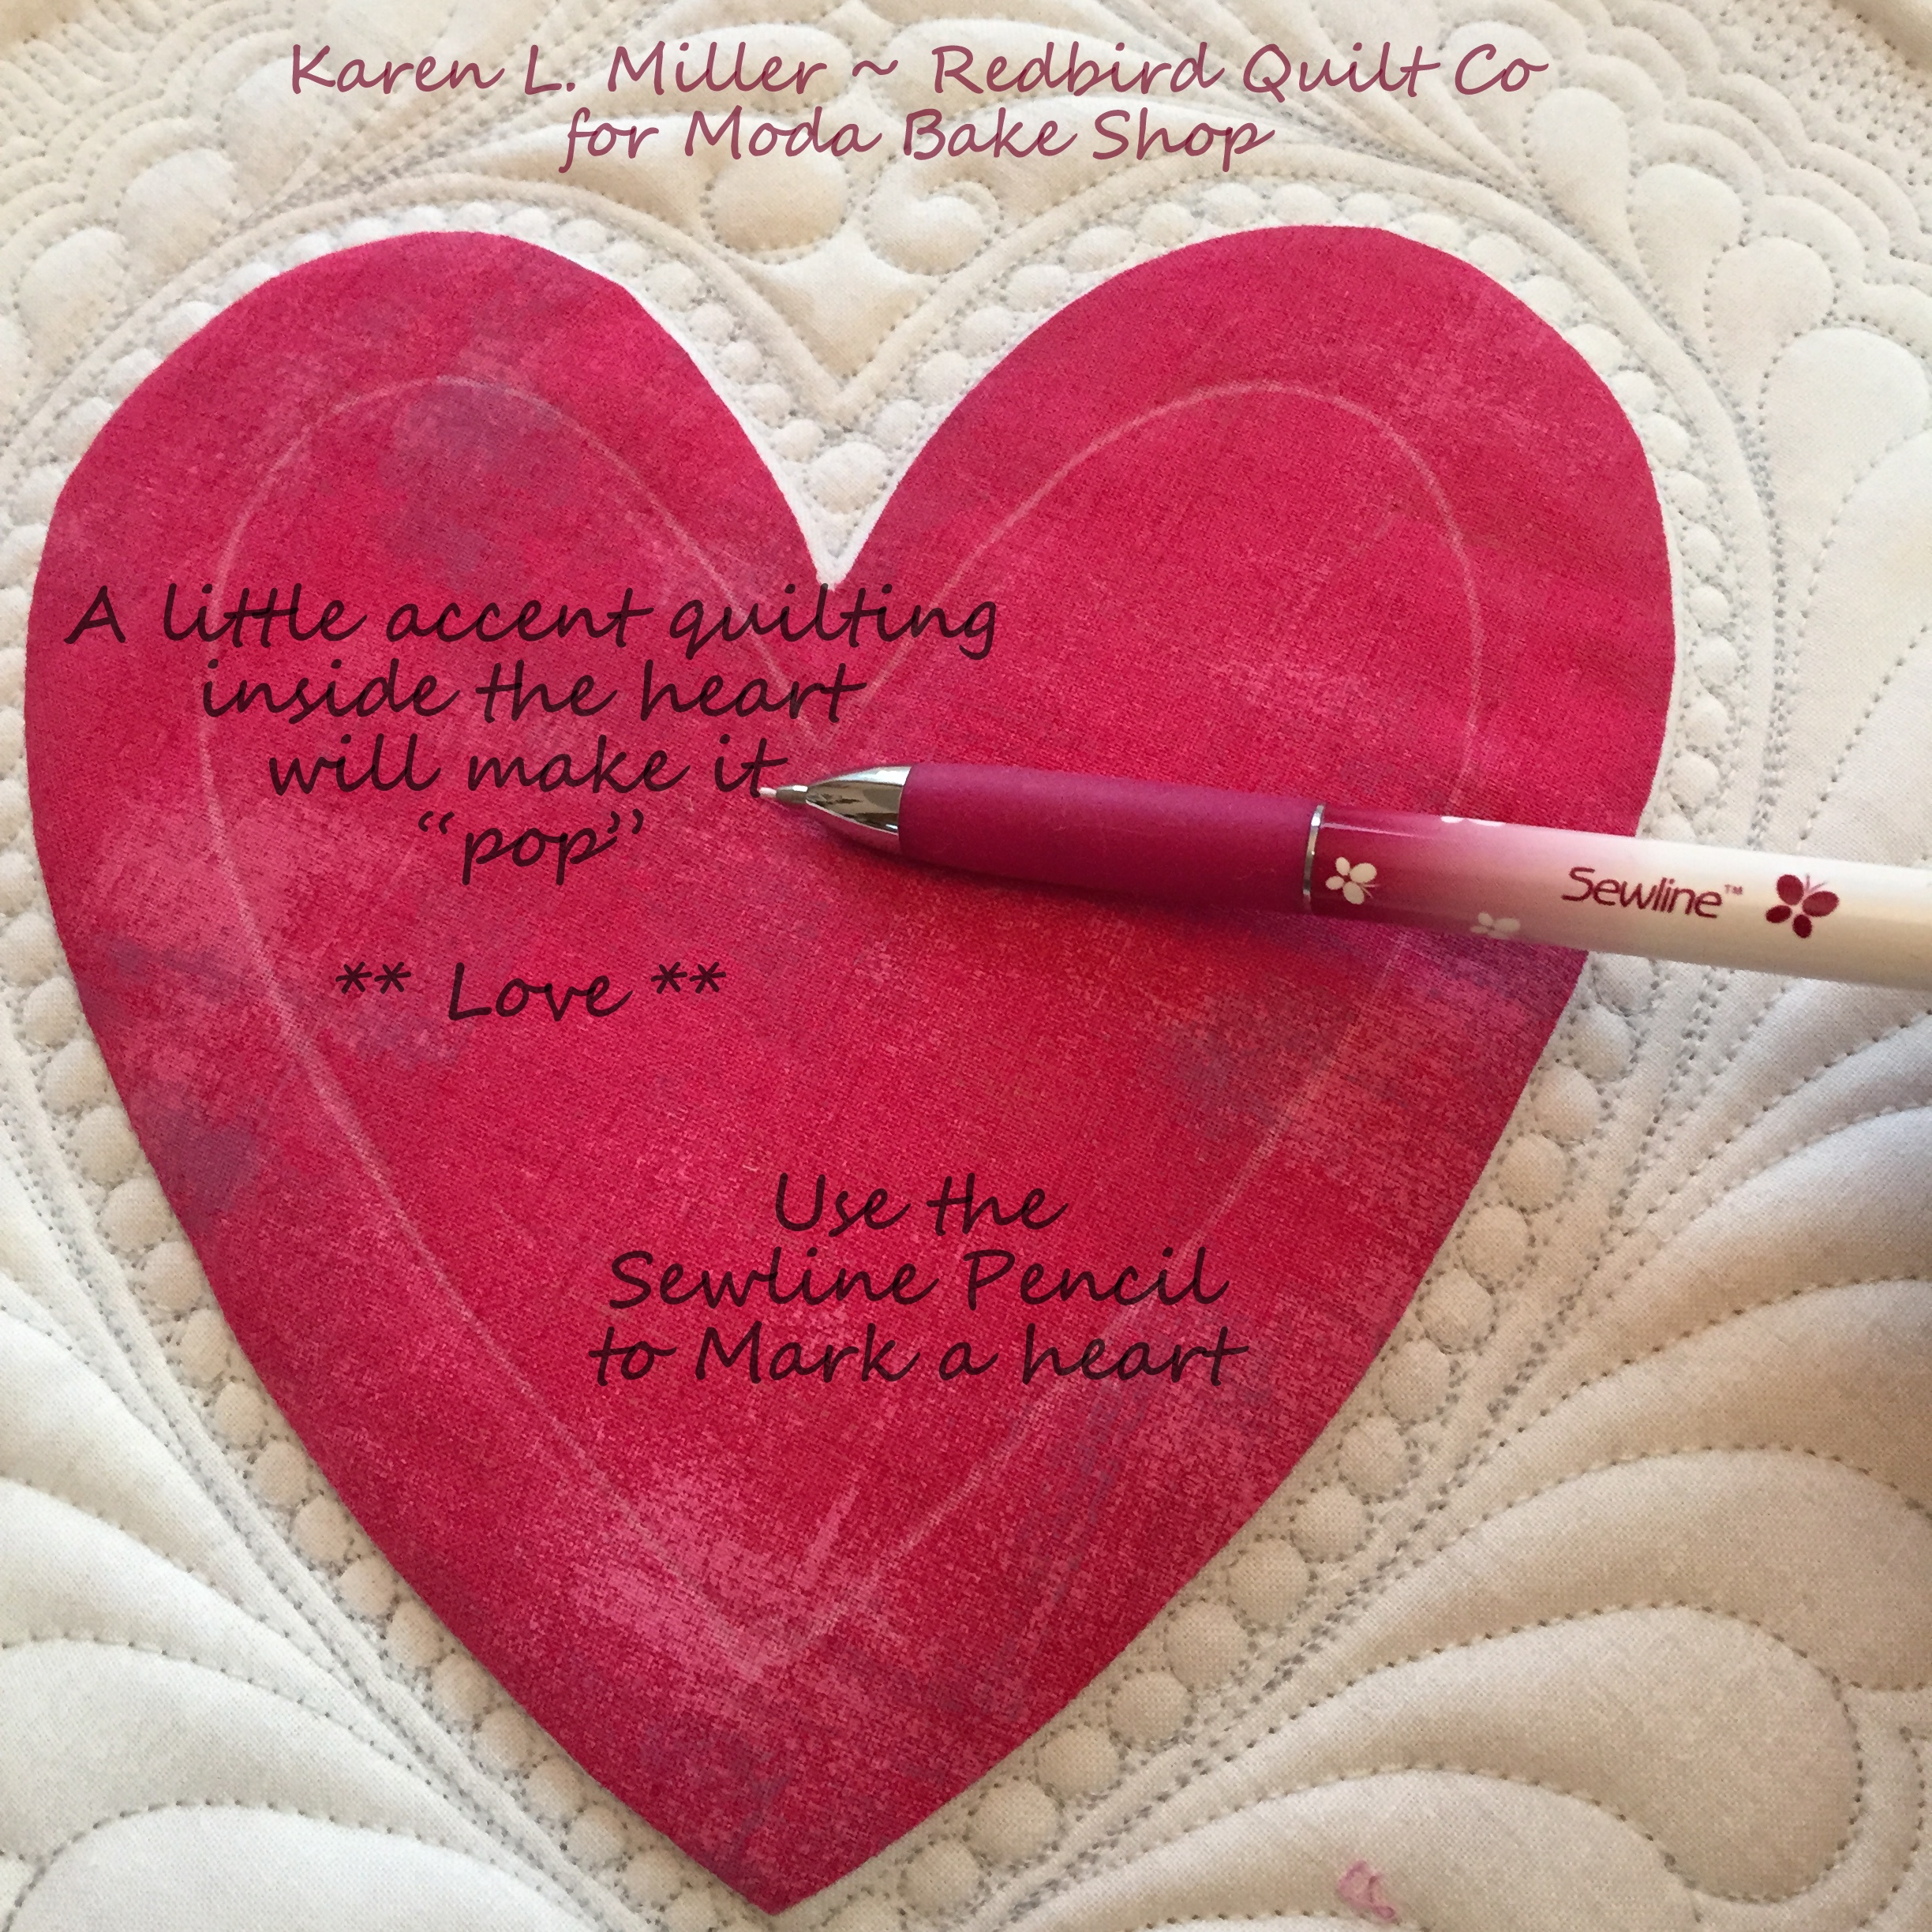
A word of caution: When stitching around the heart keep even pressure on it all the way around to avoid having pull marks or wavy fabric lines between the stitching and the outer edge of the heart. The key is to NOT let the heart get tugged out of shape while quilting.

Oh My Goodness -- I'm loving it! I decided one round of quilting on the heart wasn't enough - so round and round we go about ? 5 times !! Do what looks nice to you.
[wc_fa icon="heart" margin_left="" margin_right=""][/wc_fa] [wc_fa icon="heart" margin_left="" margin_right=""][/wc_fa] [wc_fa icon="heart" margin_left="" margin_right=""][/wc_fa]

I failed to mention that, although I changed the thread colors on top I continued to quilt with Aurifil 50Wt #2615 in the bobbin. 
Square Up & Bind:
My sample squared up at 10.75" all the way around. Just plan to have a little matchstick quilting showing on all 4 sides and square up to a size that works for you.
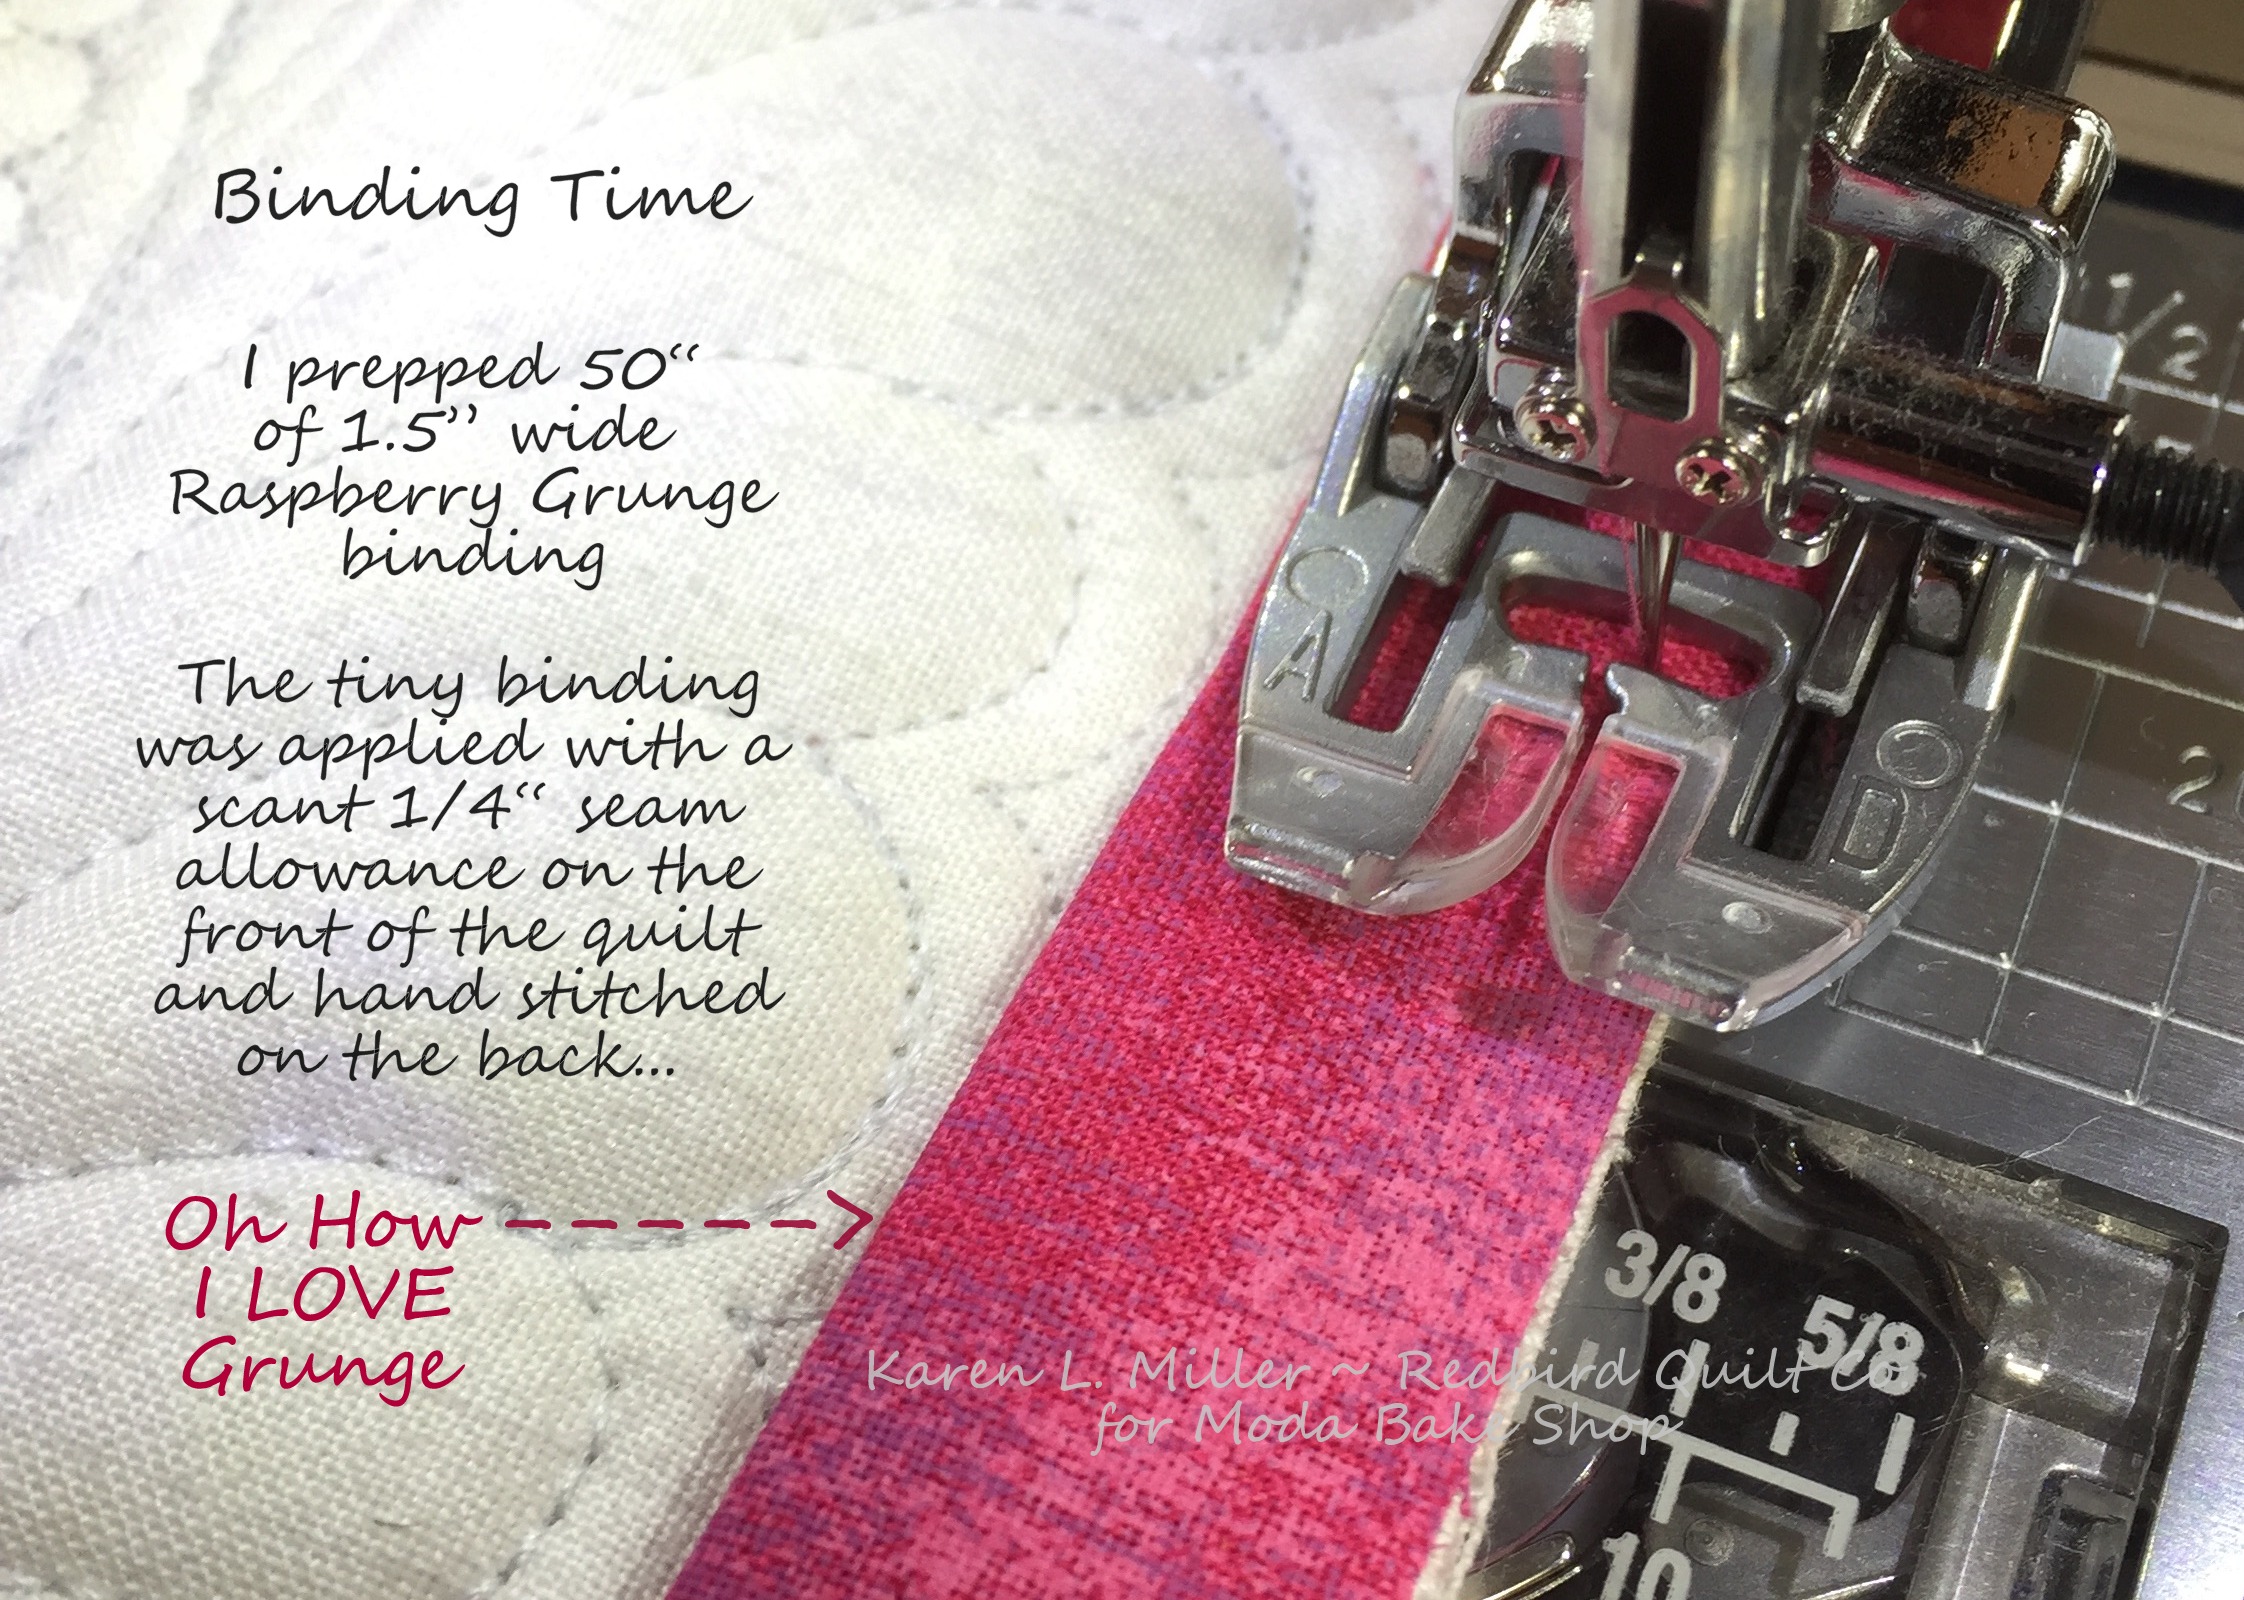
I prepared about 50" of Moda Raspberry Grunge for a Tiny Binding. I cut the binding strips 1.5" wide -- that is tiny!

I folded and pressed the 1.5" binding strips and stitched them to the top of the quilt with a SCANT 1/4" seam. Really tiny. Before you get too far around the top, stop and double check that your binding will wrap around to the back for hand stitching -- Scant is really SCANT in this step. I always stop after the 1st corner, remove my top from the machine, wrap the sewn binding to the backside and ensure the seam is good before I stitch all the way around the quilt.
I mitered the pieced binding and the finish. Gosh I love doing that. It makes for a nice clean finish.
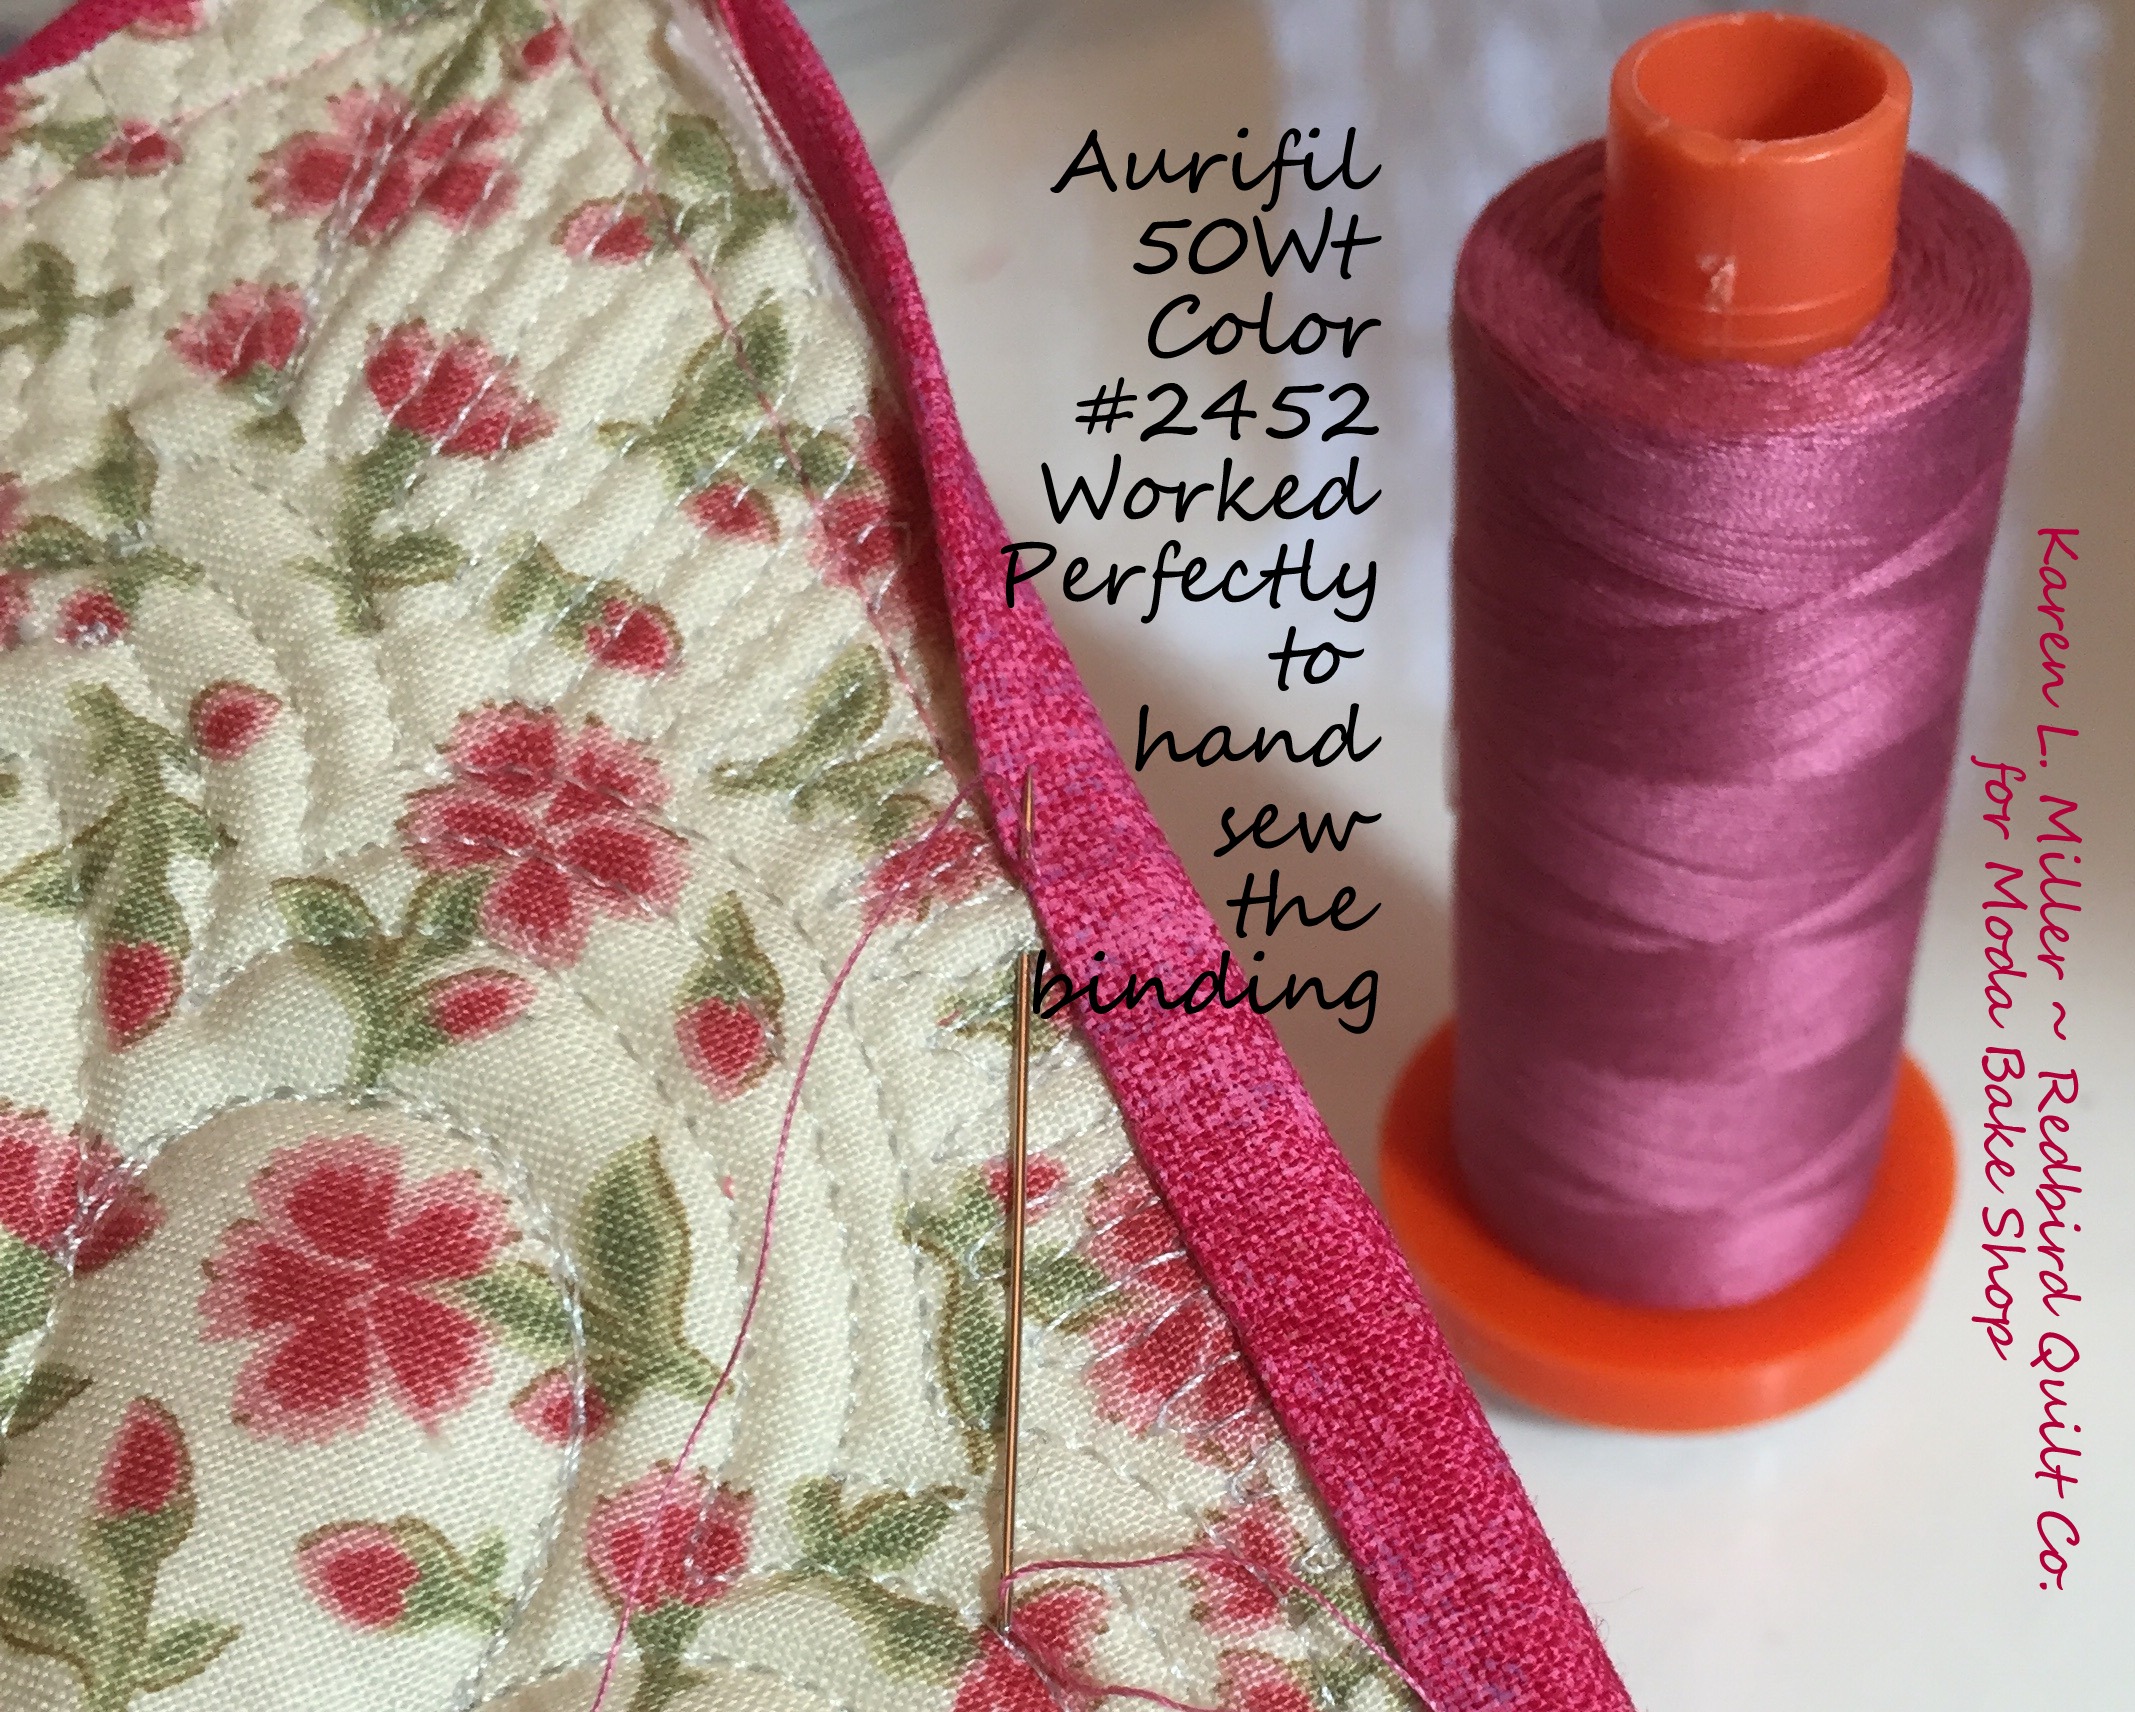
OK then... once that binding is attached to the front, get the hand stitching done on the back. I nearly always use Aurifil 50Wt thread for this hand stitching. It's strong, blends right into the fabric and doesn't twist or knot while I'm hand stitching. I find it very relaxing and rewarding.
I love a clean and crisp binding... Here's the front:

If you prefer to avoid hand stitching consider framing it.... or how about a quick machine zig-zag edge -- you could even use a machine finished binding. My favorite machine binding tutorial is found => here.
It's been a bit dreary around the Finger Lakes this week -- so I brightened up the table top with this display:
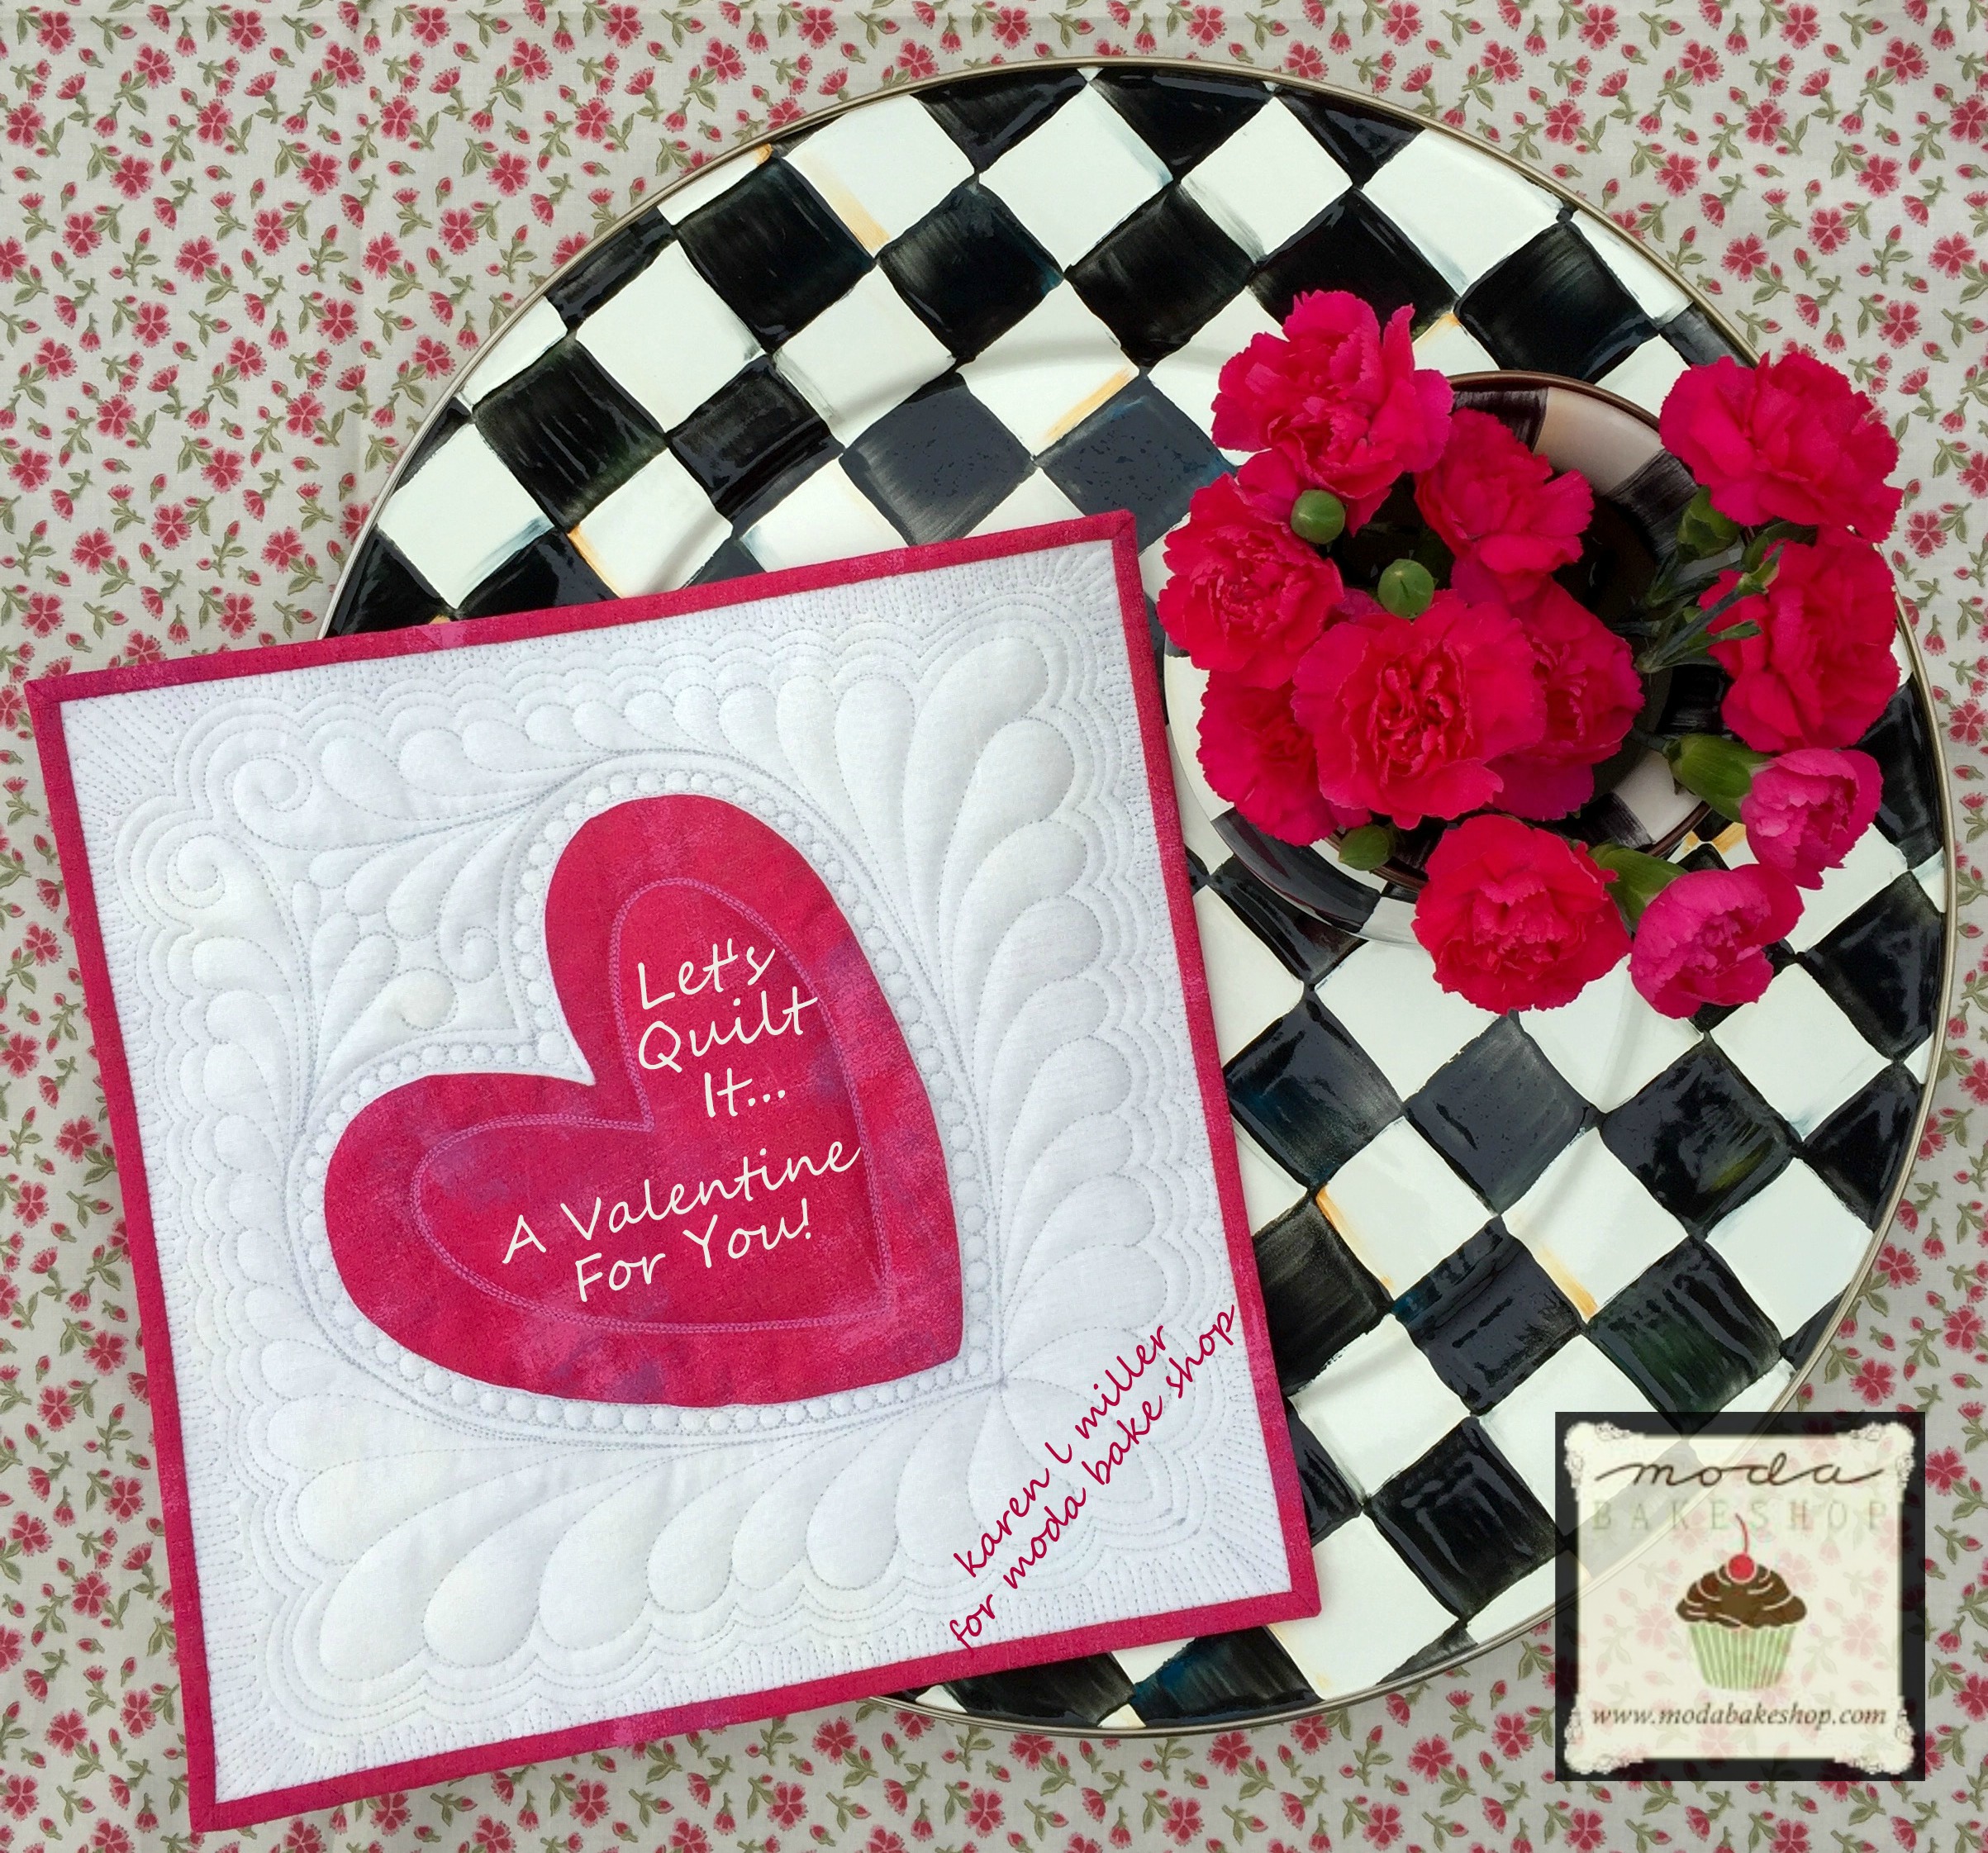
You can't have a Redbird Quilt Co. tutorial without an image at the Lake...

Oh! and 24 hours later we had snow.... This picture was fun!

![]()
One 11" mini quilt... Although, if you wanted to add 3 quadrants to this gem it would make a sweet little table topper....
Was this helpful ?? What shall we stitch for an encore? Leave a comment below and let me know your thoughts.
I would love to see anything you create from this recipe. If you share on social media, be sure to hashtag #redbirdquiltcovalentine and/or #modabakeshopvalentine
Also... Be sure to jump over to this blog post for more pictures, some alternative quilting ideas and... you may find a Giveaway too! I plan to record a video tutorial for our Mini Valentine -- Once recorded I'll put the link in this post. If you're looking for more Free Motion Quilting basics or fun projects, I recommend Pat Sloan's latest book: Teach Me To Machine Quilt. I wrote a review of Pat's book and shared a project I created from it here.
Looking for a Program or Workshop for your Shop, Group, or Guild? I'm booking sessions for 2018+ with a few spots free late in 2017.. You can keep track of my whereabouts on my Redbird Quilt Co. Website or Facebook page. And be sure to follow me on my Blog, Instagram, YouTube and Pinterest for inspiration and tutorials.
Many thanks for your continued support and encouragement. Quilters Rock!!
Karen L. Miller
{Karen's Quilts, Crows and Cardinals Blog}
![]()
Save
Save
Posted in:
Comments