Welcome to Moda Fabrics!
Add a Twist Quilt
Add a Twist Quilt
Published:
May 18 2017 - 23:00
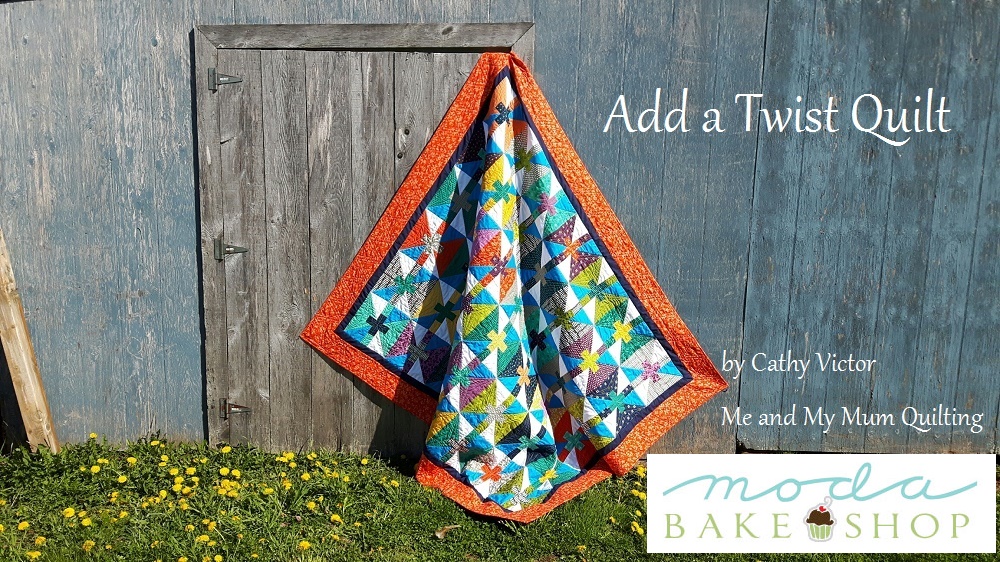

Hi Everyone, Its' Cathy Victor from "Me and My Mum Quilting", I recently took the time to write a tutorial for a quilt I'm making for the PEIMQG and I'd like to share it with you. Some of you may have seen a similar version of this quilt block around, but my method is perfect for anyone who loves pre-cuts.
Just grab 1 Layer cake, 2 (contrasting) charm packs, and if wanted, some yardage for borders. That's all you'll need to create your own "Add a Twist" quilt. This quilt block is very versatile, with a simple twist you can achieve a completely different look.
This quilt/project finishes at 57" x 66" without borders...68" x 77" with borders.
![]()

1 x Layer Cake®, {Basic Mixologie by Studio M)}
1 x Charm Pack Light & 1 x Charm Pack Dark
1/2 yd. of border #1
1 yd. border #2
1/2 yd - 3/4 yd. binding
![]()
Cutting Instructions:
From each of the Layer Cake squares, cut a 5" strip, and a 3" strip which leaves a 2" strip for last.
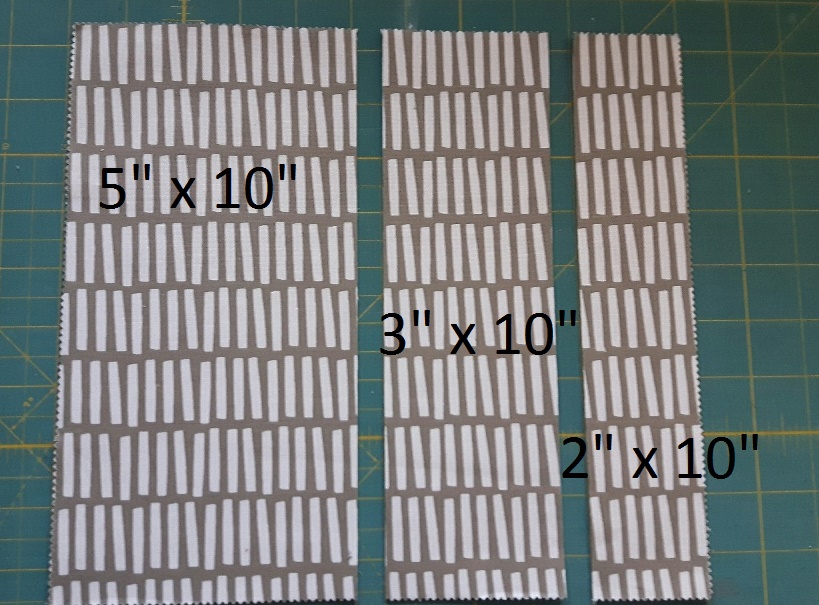
Next subcut these into the following:

2 - 5 x 5
4 - 3 x 2 ( you will have 1 extra)
1 - 2 x 5
2 - 2 x 2
Half Square Triangle Blocks: (HST'S)
Take the 2 matching 5 x 5 squares and pair one with a Light charm square and the other with a Dark charm square.

Draw a diagonal line from corner to corner. Then draw a second line on each side of that line 1/4" away. (The outer lines are your sew lines.)

With right sides together (RST) stitch on the outer lines and cut on the middle line.
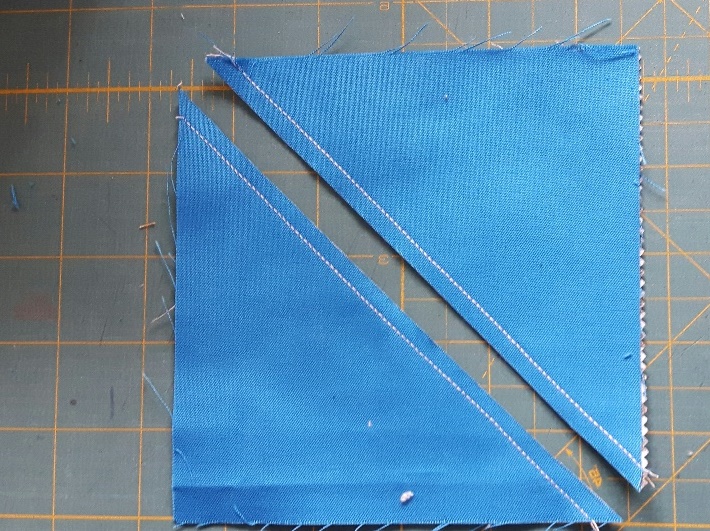
Press the seams as indicated in the photo.

Measure and trim the HST blocks to 4 1/2".
Block Assembly:
You now have all the parts needed to assemble your blocks. I found it easiest to sort my pieces in groups of 2 contrasting Layer cake fabrics. Like the photo below.( Once you understand how the blocks are assembled feel free to sort the entire Layer cake bundle so they all contrast nicely.)
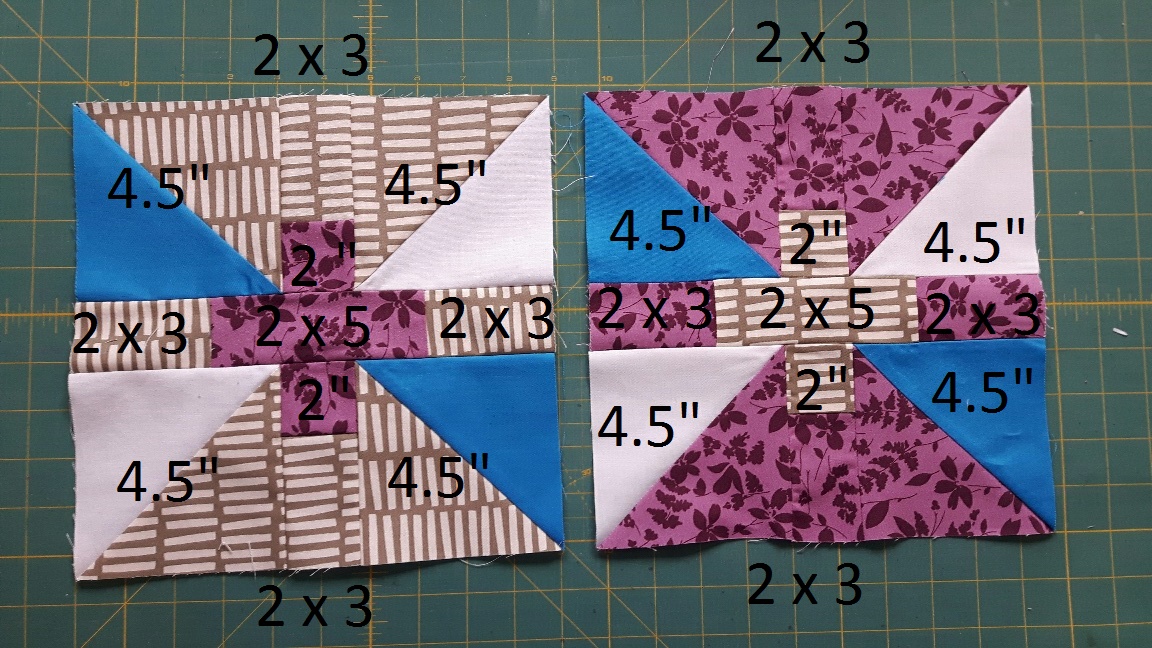
Layout the blocks so that you have the "plus parts" one color and the "frame blocks" the opposite color. The following pieces will be used for the "plus" part of the block ( 2 x 5 & 2 x 2's). The other fabrics ( 4 1/2" HST's, and 2 x 3's) being used for the rest of the block.
Remember to keep your Light and Dark corners consistent for all your blocks ( My blue is in my upper left and lower right corners).
The block should measure 10" at this point, It finishes at 9 1/2" in the quilt. Once you have your blocks laid out how you like go ahead and sew them together.
Proceed with the rest of your Layer Cake pairs until all of you blocks are completed.
(Make sure you check out the additional methods for altering this block at the bottom of the tutorial, for other versions of this quilt.)
The quilt is assembled in a 6 x 7 configuration. Once the blocks are assembled, you can add any borders, if you choose.
The completed quilt without borders measures : (57" x 66".)
Suggested yardage for borders and if your Layer cake doesn't have 42 pcs:
1/2 yd for border#1
1 yd for Border #2
1/2 yd - 3/4 yd of chosen fabric for binding ( I chose my fabric #2)
Sub-cut Fabric #1 into 7 - 2" strips
Sub-cut fabric#2 into 8 - 5" strips.
Cut your binding into 8 strips of desired width . (I use a 2" double fold binding which finishes at 1/4",but most people use 2 1/4" or 2 1/2").
Here's my completed Add a "Blueberry" Twist quilt:

Here's what the quilt looks like if you alternate every other block to face up/down or left/right. I really like the pinwheels that form in between the colored blocks.

and another very different "Add a Twist" quilt. This version uses the same pieces and initial construction but spins the 4 corners so they" frame" the plus .

![]()
This quilt finishes at 68" x 77".
I hope you give the "Add a Twist " quilt a try. It is a fun quilt to make with many possible layouts. To see a couple different versions of this quilt please check out this post on my blog. I'd also love to see any of your "Add a Twist" quilts, so please send me photos of your projects, and if you have any questions please feel free to contact me.
Cathy Victor
{meandmymumquilting.blogspot.ca}
![]()
Posted in:
Comments