Welcome to Moda Fabrics!
Seasoned Pinwheels Quilt
Seasoned Pinwheels Quilt
Published:
Jun 10 2017 - 23:00


Hello everyone! My name is Krystal Jakelwicz and I design monthly quilt patterns on my blog called Lets Quilt Something. (www.letsquiltsomething.blogspot.com) Today is my first ever Moda Bake Shop Recipe and I would like to share with you my Seasoned Pinwheels Quilt Pattern which I hope you all will enjoy! A little known fact about me is I LOVE pinwheels. I love finding new ways to incorporate the pinwheel block within my quilt patterns. Plus I love Jelly Rolls! Seasoned Pinwheels is perfect for just about every print. Today I have selected Cowgirl Country because as a fellow Texan I fell in LOVE. Super cute fabric and I fell in love with the Cowgirl Country text fabric. Also as a added touch I quilted a "Rope" style edge to edge pattern in a wave format since the fabric features a few rope prints within the collection. I hope you enjoyed my Seasoned Pinwheels quilt pattern and tag me on Instagram your progress photos or finished quilts. Or use #letsquiltsomething
This quilt/project finishes at 60" x 72".
![]()

1 Jelly Roll® {Cowgirl Country by Sara Khammash}
2 3/4 yards background fabric {Bella Solids Natural 990012 Moda #1}
4 yards backing fabric {Cowgirl Country Suede Blue Text Fabric 1130313}
1/2 yards binding fabric {Cowgirl Country Denim Blue 1125657}
![]()
- With each 2 ½” Print Strips, you are going to open them at full length. Sub-cut within each strip;
- 3 - 6 ½” x 2 ½” rectangles.
- 3 - 4 ½” x 2 ½” rectangles.
- 3 - 2 ½” x 2 ½” squares.
- With background fabric you are going to start by cutting yardage into 2 ½” strips.
- With background 2 ½” strips you are going to sub-cut;
- 240 - 4 ½” x 2 ½” rectangles. (30 - Strips)
- 120 - 2 ½” x 2 ½” squares. (7 1/2 - Strips)
Piecing A Block: (This quilt pattern was design to keep same prints in one block.)
- With one background 4 ½” x 2 ½” rectangle, place a 2 ½” print square on the right corner. Sew at a diagonal. Trim ¼” away from your sew line and press open. (Shown Below)

2. With your segment made in step one; you are going to add a background 4 ½” x 2 ½” rectangle to the top of the block. Press Open. (Shown Below)

3. Continuing on with your block segment made in step two; you are going to add a print 4 ½” x 2 ½” rectangle to the left side. Press Open. (Shown Below)

4. Lastly with a print 6 ½” x 2 ½” rectangle, place a background 2 ½” square to the left corner. Sew at a Diagonal. Trim ¼” away from your sew line and press open. Add this piece to the top of your step three segment. (Shown Below)
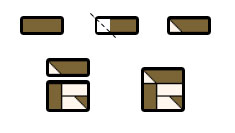
5. Repeat steps 1 - 4 until you have made 120 blocks.
6. Before piecing your quilt top, take 4 different print blocks and rotate 90 degrees to form a larger block. (Shown Below)


Forming your Quilt Top:
- Use a design wall to lay your blocks out accordingly.
- You'll have 6 rows with 5 blocks in each row.
- Sew your blocks together to form rows.
- Lastly sew your rows together to complete quilt top.
- With your binding fabric cut 2 ½" x WOF strips and use your favorite binding technique to bind your quilt.

![]()
This quilt finishes at 60" x 72".

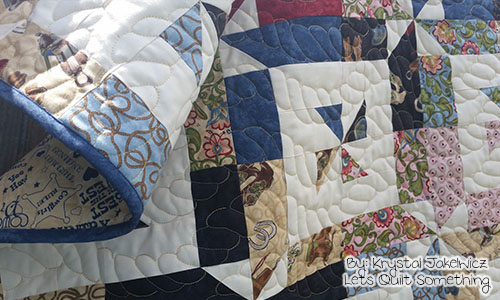

I hope you enjoyed Seasoned Pinwheels quilt pattern! Here are a couple close up photos for you to see the quilting work I did personally. I can't wait to see what fabrics you'll use for Seasoned Pinwheels. Tag me on Instagram your progress photos or finished quilts. Or use #letsquiltsomething Happy Quilting!
Krystal Jakelwicz
{www.letsquiltsomething.com}
{www.letsquiltsomething.blogspot.com}
{www.instagram.com/letsquiltsomething}
{www.facebook.com/letsquiltsomething}
![]()
Posted in:
Comments