Welcome to Moda Fabrics!
Barn Charm Mini Quilts
Barn Charm Mini Quilts
Published:
Mar 2 2018 - 23:00

![]()
I’m excited to be kicking off this month’s mini quilt theme! This set of three mini quilts is inspired by barn quilts. Make one or all of these fun, quick projects using a single charm pack and some yardage. This speedy project is perfect for that one charm pack you love, but can’t figure out what to do with!
I used three classic quilt blocks for these little beauties. These patterns take advantage of the duplicate prints available in most charm packs. You can do the same or use different fabrics for a scrappier look. Most charm packs feature various prints in a single colorway, making for easy combinations.
The mini quilts finish at 14" and 14 1/2".
![]()
One charm pack of Pepper and Flax by Corey Yoder
1/4 yard of each of three coordinating Bella solids—white, gray, and yellow
1/3 yard of three different fabrics for border and binding (fabrics will be mixed and matched among the three quilts)
1 yard of backing fabric (use the same fabric for all three mini quilts)


![]()
A note about border and binding fabric:
I used three different fabrics for the borders and bindings. I mixed and matched these fabrics among the three quilts, so that each quilt had a different border and binding fabric, but each fabric was used once as a border fabric and once as a binding fabric for the three quilts. You can comfortably cut two strips by the width of fabric for the border and two strips by the width of fabric for the binding from each of the three fabrics.
Constructing Half Square Triangles:
These patterns make use of half square triangles (HSTs) several times. To construct a HST, take two squares of equal size. Draw a line diagonally down the back of the lighter square. With right sides together, stitch a scant ¼” away from each side of the line. Cut down the line and press open.
Barn Quilt 1: Duck & Ducklings
Charm Squares Needed:
[2] 5” matching light gray squares
[2] 5” matching dark gray squares
[1] 5” green square
[1] white 5” square
Background Fabric Needed:
[2] 3 1/4” squares
[4] 2 7/8” squares
[4] 2 1/2” squares
Trim the two 5” matching light gray squares to 3 1/4”. Pair with the 3 1/4” squares of background fabric. Make four HSTs. Trim to 2 1/2”.
Cut the 2 7/8” squares of background fabric in half diagonally. Sew each triangle to each side of the HST, forming a large right triangle.

Cut each of the two 5” dark gray matching squares in half diagonally.
Sew to the HST unit, forming a square.
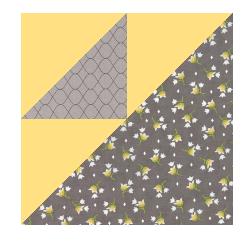
Square up to 4 1/2”.
Cut the green charm square across horizontally and vertically to form four 2 1/2” squares. Sew each to a 2 1/2” background squares.
Sew one square unit between each triangle unit, positioning as shown in the diagram.
Trim the white charm square to 2 1/2”. Sew the other two square units together with the square of white fabric in the center.
Sew block together.
Cut two 2 1/2” by WOF strips from the border fabric. Cut each strip in half. Sew a strip to each side of the quilt block, mitering the corners.
Sandwich quilt top, batting, and backing. Quilt as desired. The mini quilt finishes at 14".
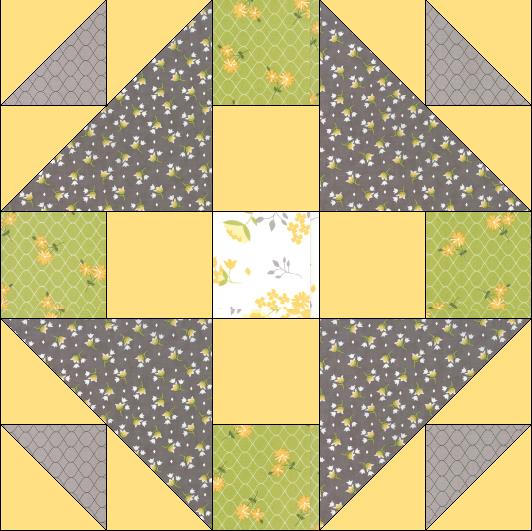
Barn Quilt 2: Clay’s Choice
Charm Squares Needed:
[4] 5” gray squares (four different patterns)
[2] matching 5” green squares
[4] 5” yellow squares (four different patterns)
Background Fabric Needed:
[2] 4” squares
[4] 3” squares
Trim the gray charm squares to 4” then cut in half diagonally.
Trim the green charm squares to 4” then cut in half diagonally.
Cut the 4” background squares in half diagonally.
Pair half of the gray triangles (one of each pattern) with a green triangle—right sides together—and sew together.
Pair the remaining gray triangles with the background triangles and sew together.
Trim HSTs to 3”.
Trim yellow squares to 3”.
Lay the block out as shown in the diagram. Sew together, row by row. Take care to orient the HSTs correctly.

Cut two 2 1/2” by WOF strips from the border fabric. Cut each strip in half. Sew a strip to each side of the quilt block, mitering the corners.
Sandwich quilt top, batting, and backing. Quilt as desired. The mini quilt finishes at 14".
Barn Quilt 3: Barn Star
Charm Squares Needed:
[2] matching yellow 5” squares
[1] dark gray 5” square
[1] white/yellow 5” square
[2] matching white/yellow 5” squares
[1] 5” yellow square
Background Fabric Needed:
[2] 5" squares
Make hourglass units
Take the two matching yellow charm squares, the dark gray charm square, and the white/yellow charm square. Pair a dark gray charm square with a yellow charm square. Pair a white/yellow gray charm square with a yellow charm square.
Draw a line diagonally across the back of the white/yellow squares. With right sides together, stitch 1/4” away from each side of the line. Cut down the line and press open.
Without moving the squares, cut again from the opposite corners. Open the units, pressing towards the yellow. Sew the block so that each hourglass has the two yellow triangles positioned across from each other.
Trim each to 4”, taking care to line the center point up at the 2” mark.
Make HSTs
Pair the 5" squares of background fabric with the matching white/yellow charm squares and construct HSTs. Trim each to 4”.
Center square
Trim yellow charm square to 4”.
Assemble block
Using the diagram as a reference, assemble the quilt block.

Cut two 2 1/2” by WOF strips from the border fabric. Cut each strip in half. Sew a strip to each side of the quilt block, mitering the corners.
Sandwich quilt top, batting and backing. Quilt as desired. The mini quilt finishes at 14 1/2".
![]()
These three mini quilts finish at 14", 14", and 14 1/2".


There are many options for quilting these fun little projects! I quilted each one a little differently. On one I did a cross hatch design, on one stippling, and on one I echoed the shapes with my quilting. Mini quilts are great opportunities to try a new quilting technique or do something a little outside your usual quilting style. Happy sewing!
Christine Weld
The Quarter Inch
{www.thequarterinch.blogspot.com}
![]()
Posted in:
Comments