Welcome to Moda Fabrics!
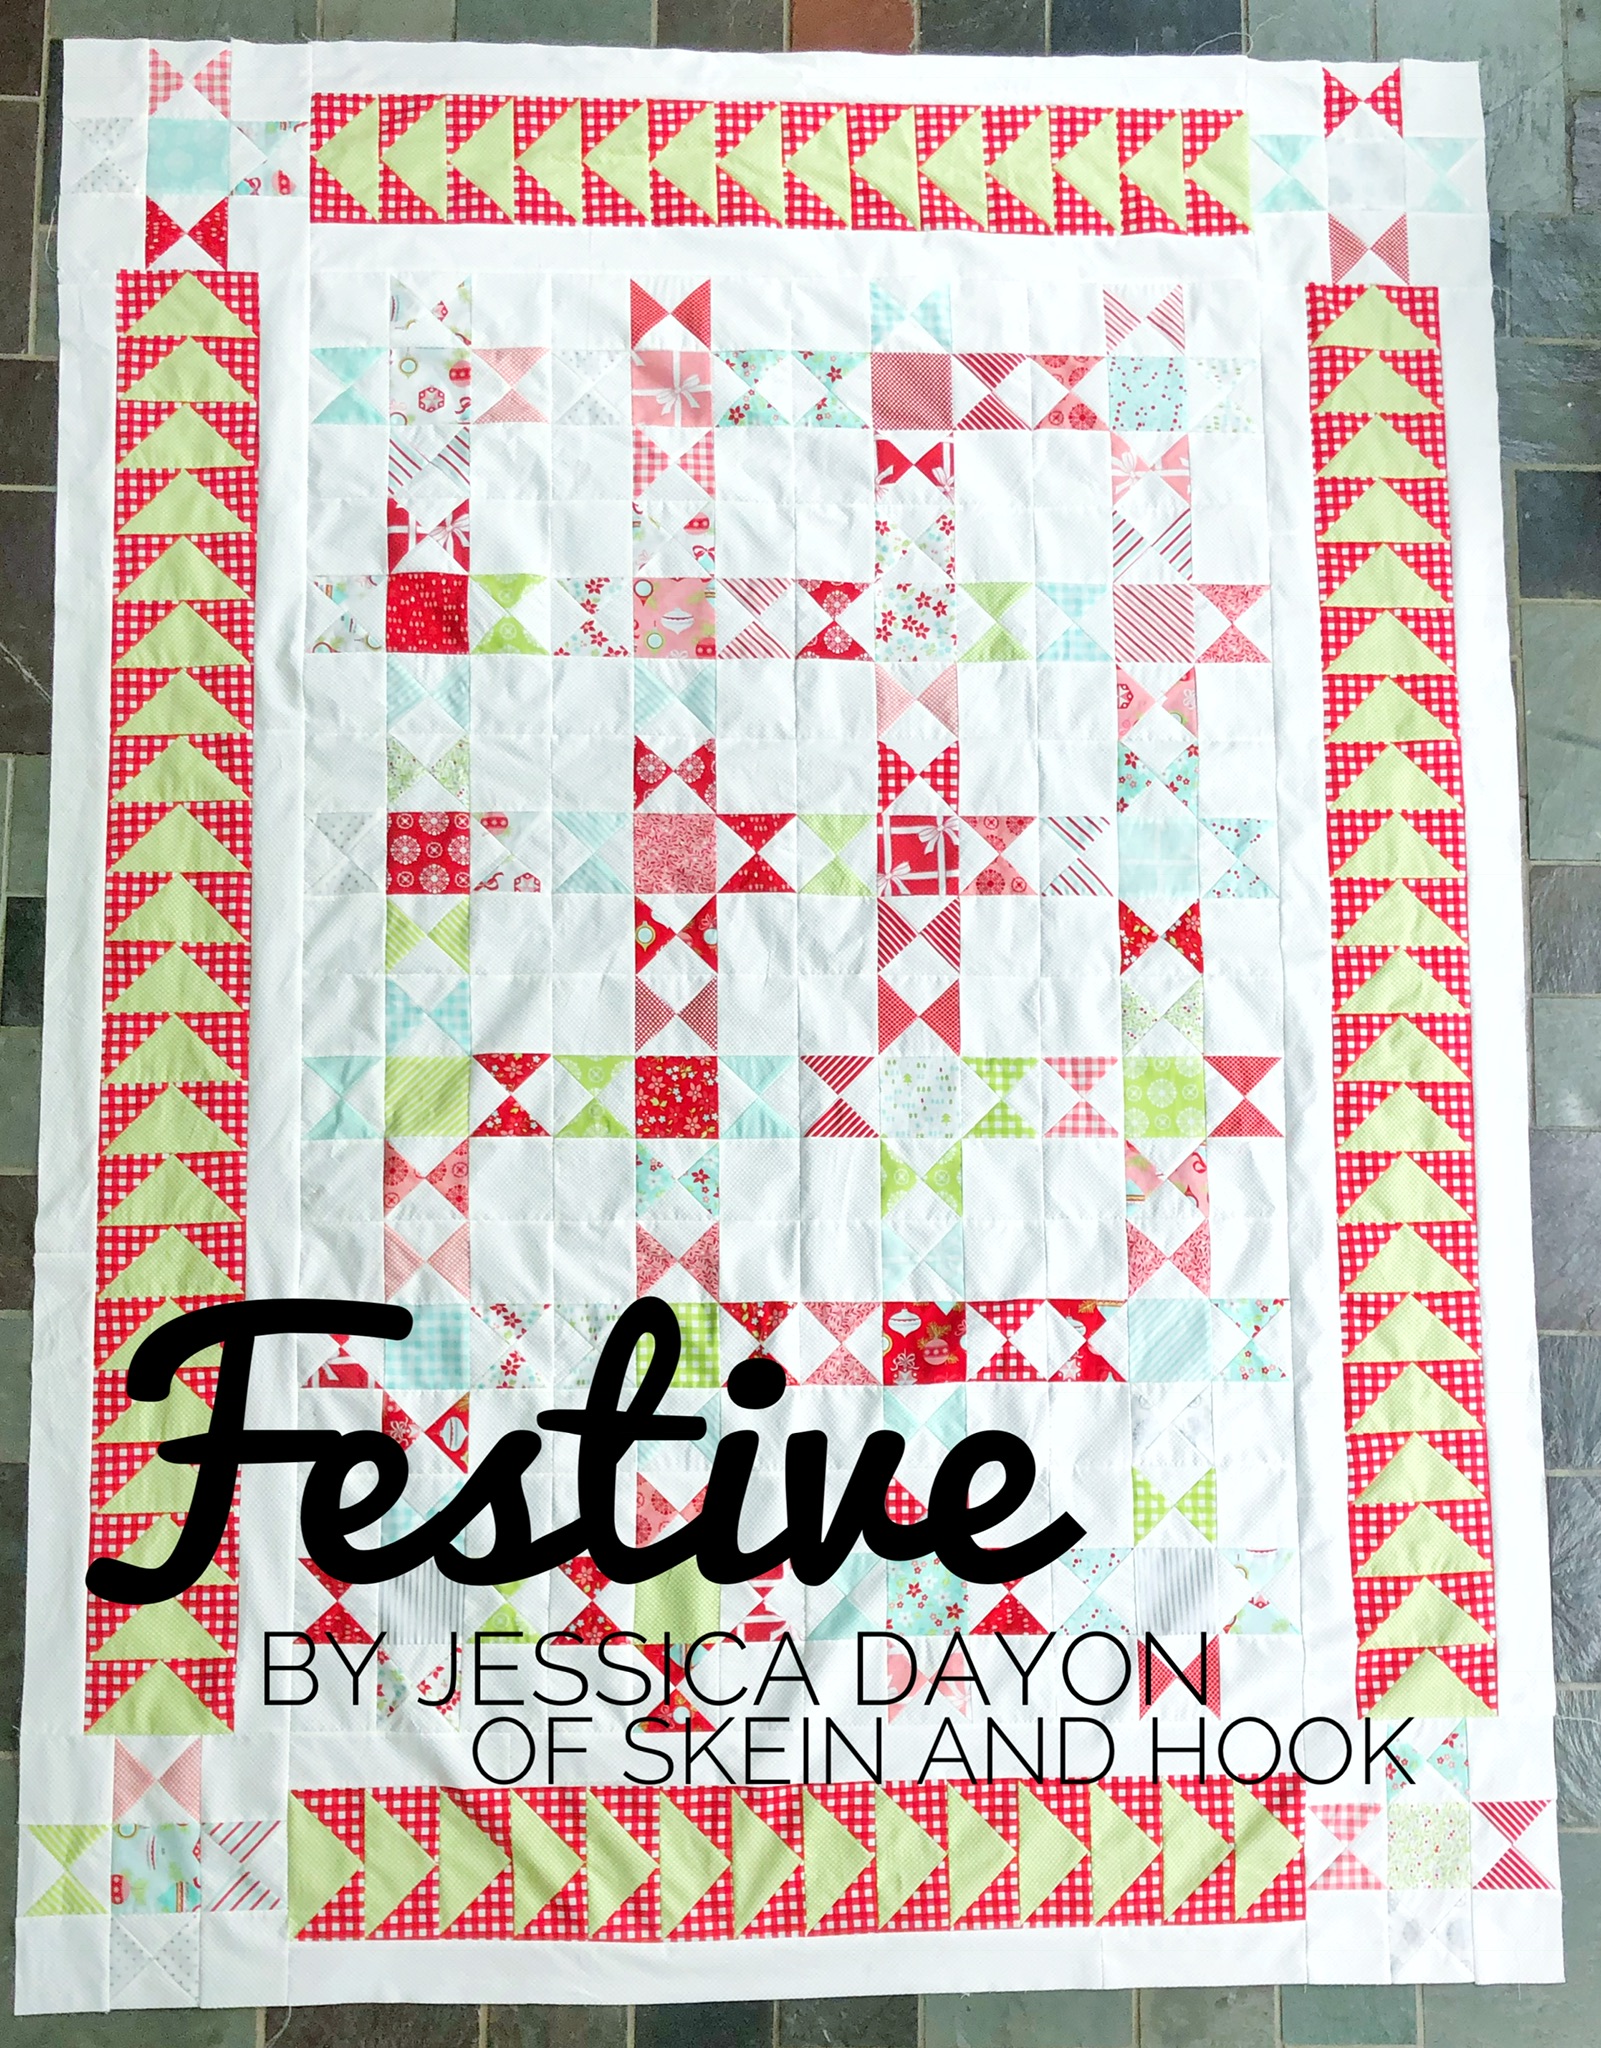
Festive Quilt
Festive Quilt
Published:
May 23 2018 - 23:00
![]()
Hi, Everyone! Jessica Dayon (@jessicadayon), here. I'm so happy to be back in the Bake Shop and sharing my newest pattern with you. This year I'm determined to get started on my holiday quilting really early! Last year I was still finishing quilts a few days before Christmas and I'm trying not to repeat that ;) I have been anxiously awaiting for Vintage Holiday, like so many of you, and I'm so happy it is in shops now! Even though it's only May, let the Christmas sewing begin!
This quilt finishes at 63" x 84".
![]()

3 Charm Packs* Vintage Holiday by Bonnie & Camille {SKU 55160PP}
2 3/4 yards Vintage Holiday Ivory Dot (background fabric) {SKU 55162 18}
1 1/4 yards Vintage Holiday Red gingham fabric {SKU 55164 11}
1 yard Vintage Holiday Green dot fabric {SKU 55162 16}
5 1/4 yards Vintage Holiday Flannel Ornament backing fabric {SKU 55160 18F}
3/4 yards Vintage Holiday Red & Aqua Candy Stripe (binding fabric) {SKU 55168 12}
* You actually need exactly 2 charm packs but I recommend 3 so that you can pull out the white on white because it will completely blend into the background. Also my picture shows a layer cake because that is what I used. I cut it into 4- 5"x5" stacks.
![]()
CUTTING
From the charm packs, pull out 28 squares and trim them to 4" x 4". These will be the centers of the Ohio Stars.
From the Background fabric, cut:
-7- 5" x WOF strips, subcut into 56- 5" squares
-12- 4" x WOF strips, subcut into 112- 4" squares (you'll have 8 leftover)
-5- 2.75" x WOF strips. Cut one strip in half lengthwise, sew one half to another strip to yield a 2.27" x 64". Repeat one more time. (If your borders are measuring short, take a leftover 4" square, trim to 2.75" x 4" and sew onto a border strip to increase the length.)
From the Red gingham fabric, cut:
-5- 7 1/4" x WOF strips, subcut into 18- 7 1/4" squares
From the Green dot fabric, cut:
-8- 3 7/8" x WOF strips, subcut into 72- 3 7/8" squares
BLOCK & BORDER ASSEMBLY
To make the Ohio Star blocks, first we will make the pinwheel blocks. Gather the charm squares and the 5" background squares.

Take one charm square and one 5" background square. On the back of the charm square, draw a line from corner to corner and then another line on each side of that 1/4" away from the center line. Place the charm square on top of the background square, right sides together. Sew on the two outer lines.

Cut down the middle line.
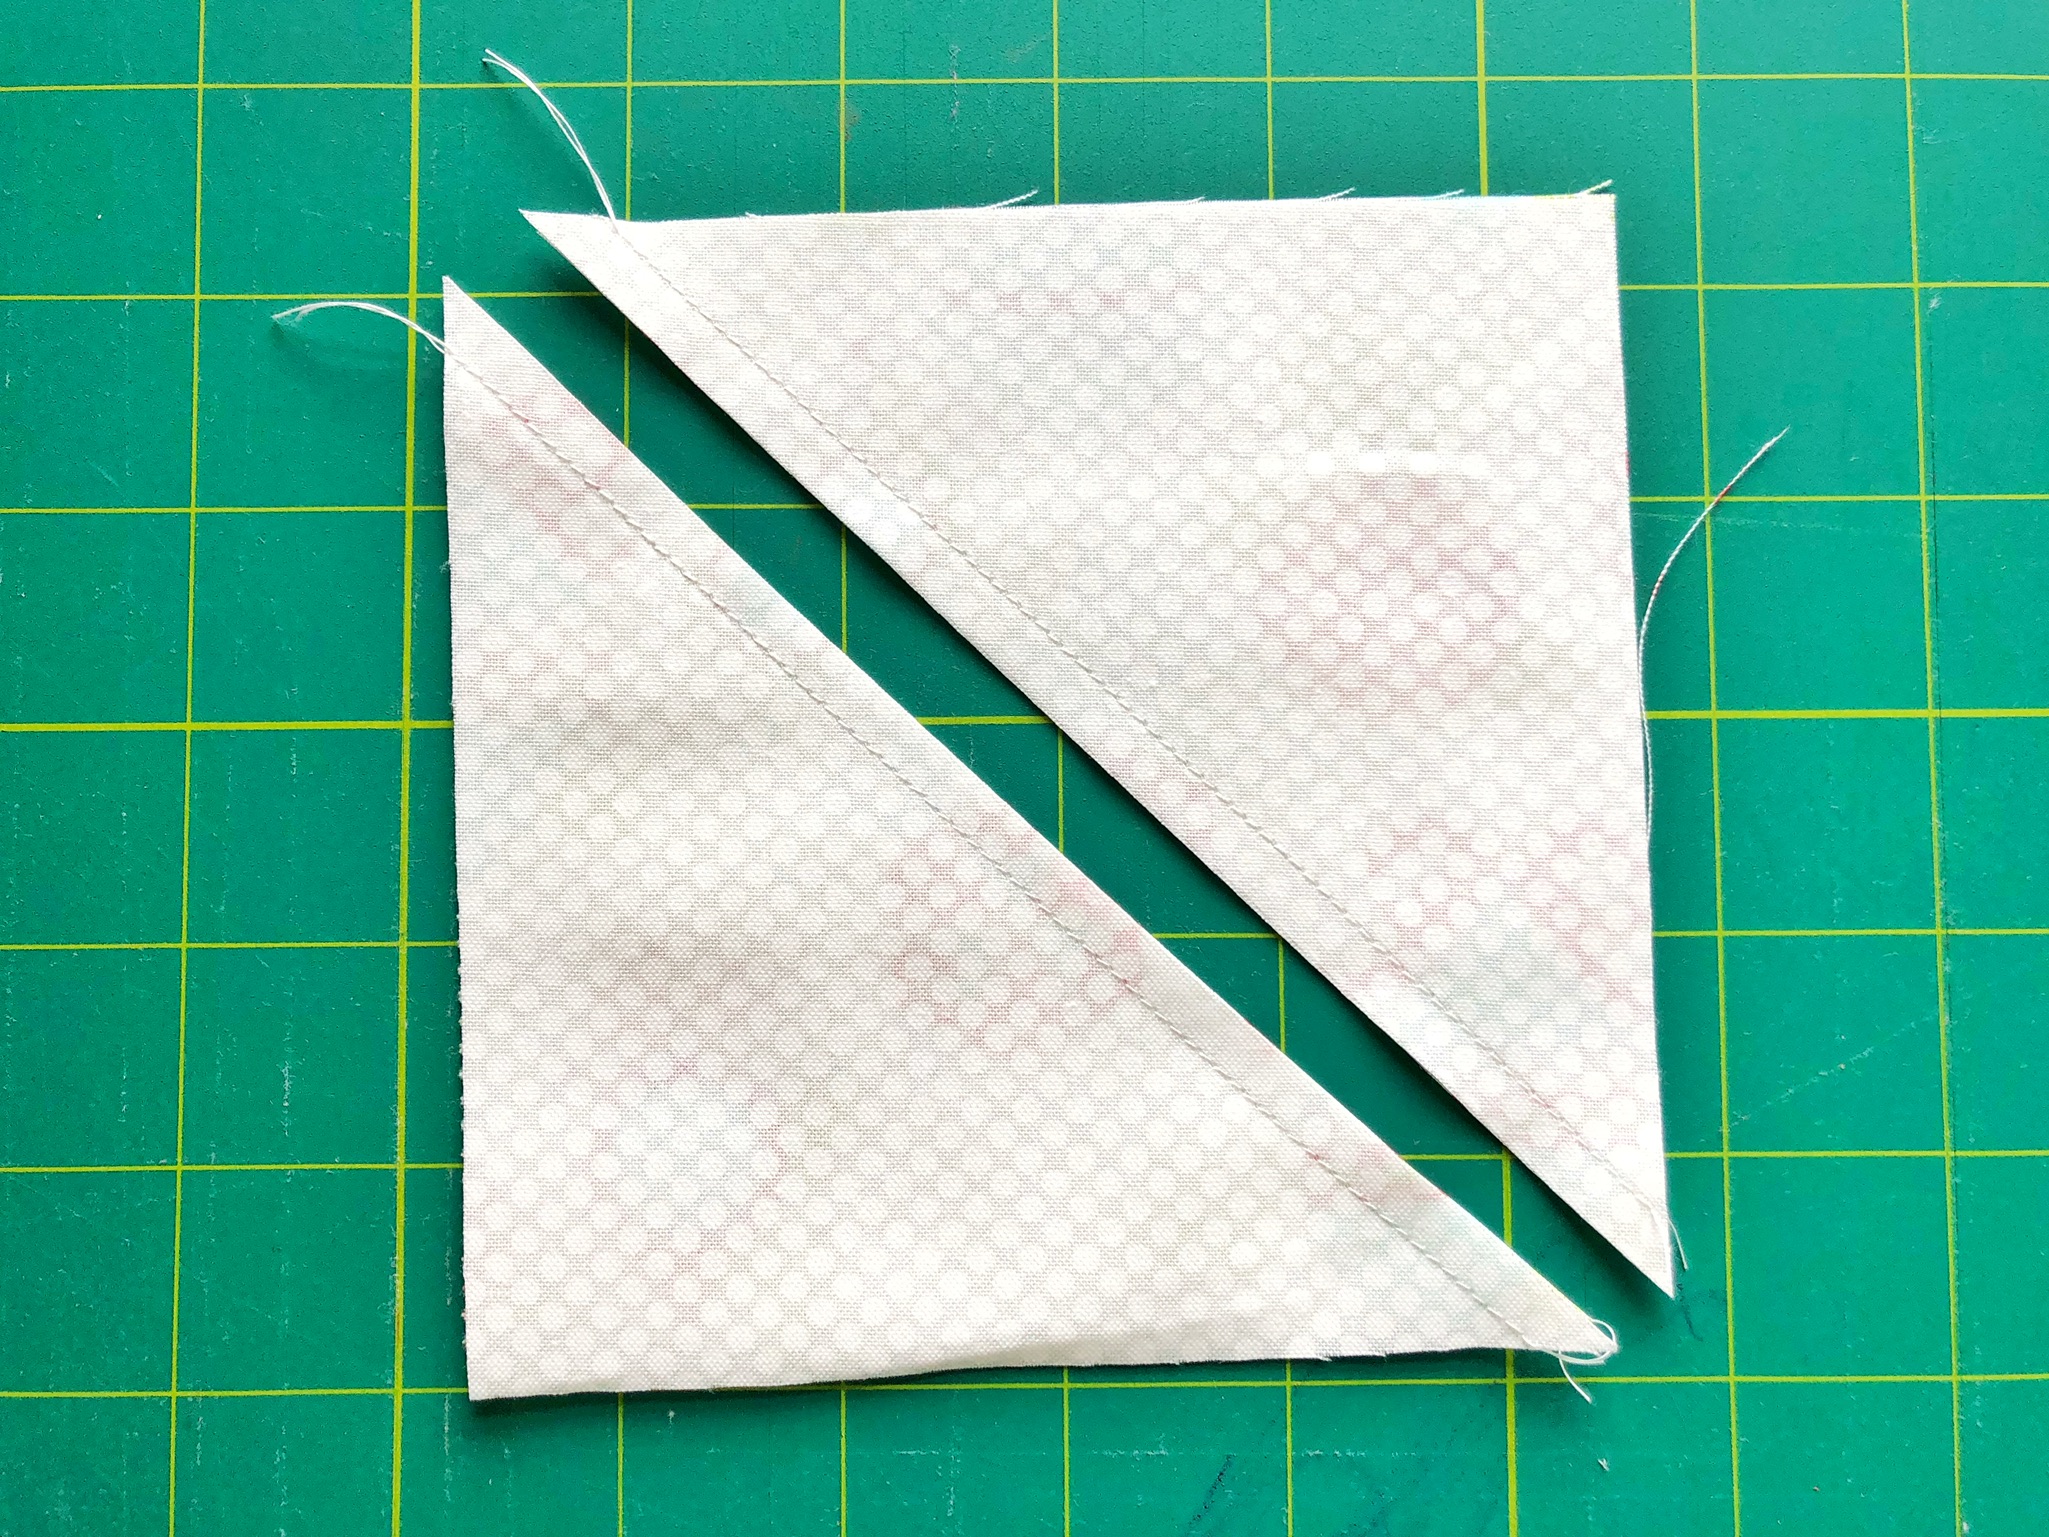
Press each half square triangle with the seam allowance going toward the charm square.

On the back one half square triangle, draw a line from corner to corner and then another line on each side of that 1/4" away from the center line.

Place one half square triangle on top of the other one, with the right sides together so that the backgrounds are matching up with the charm squares. Make sure your seams are matched in the middle.

Sew on the two outer lines.

Cut down the middle line.
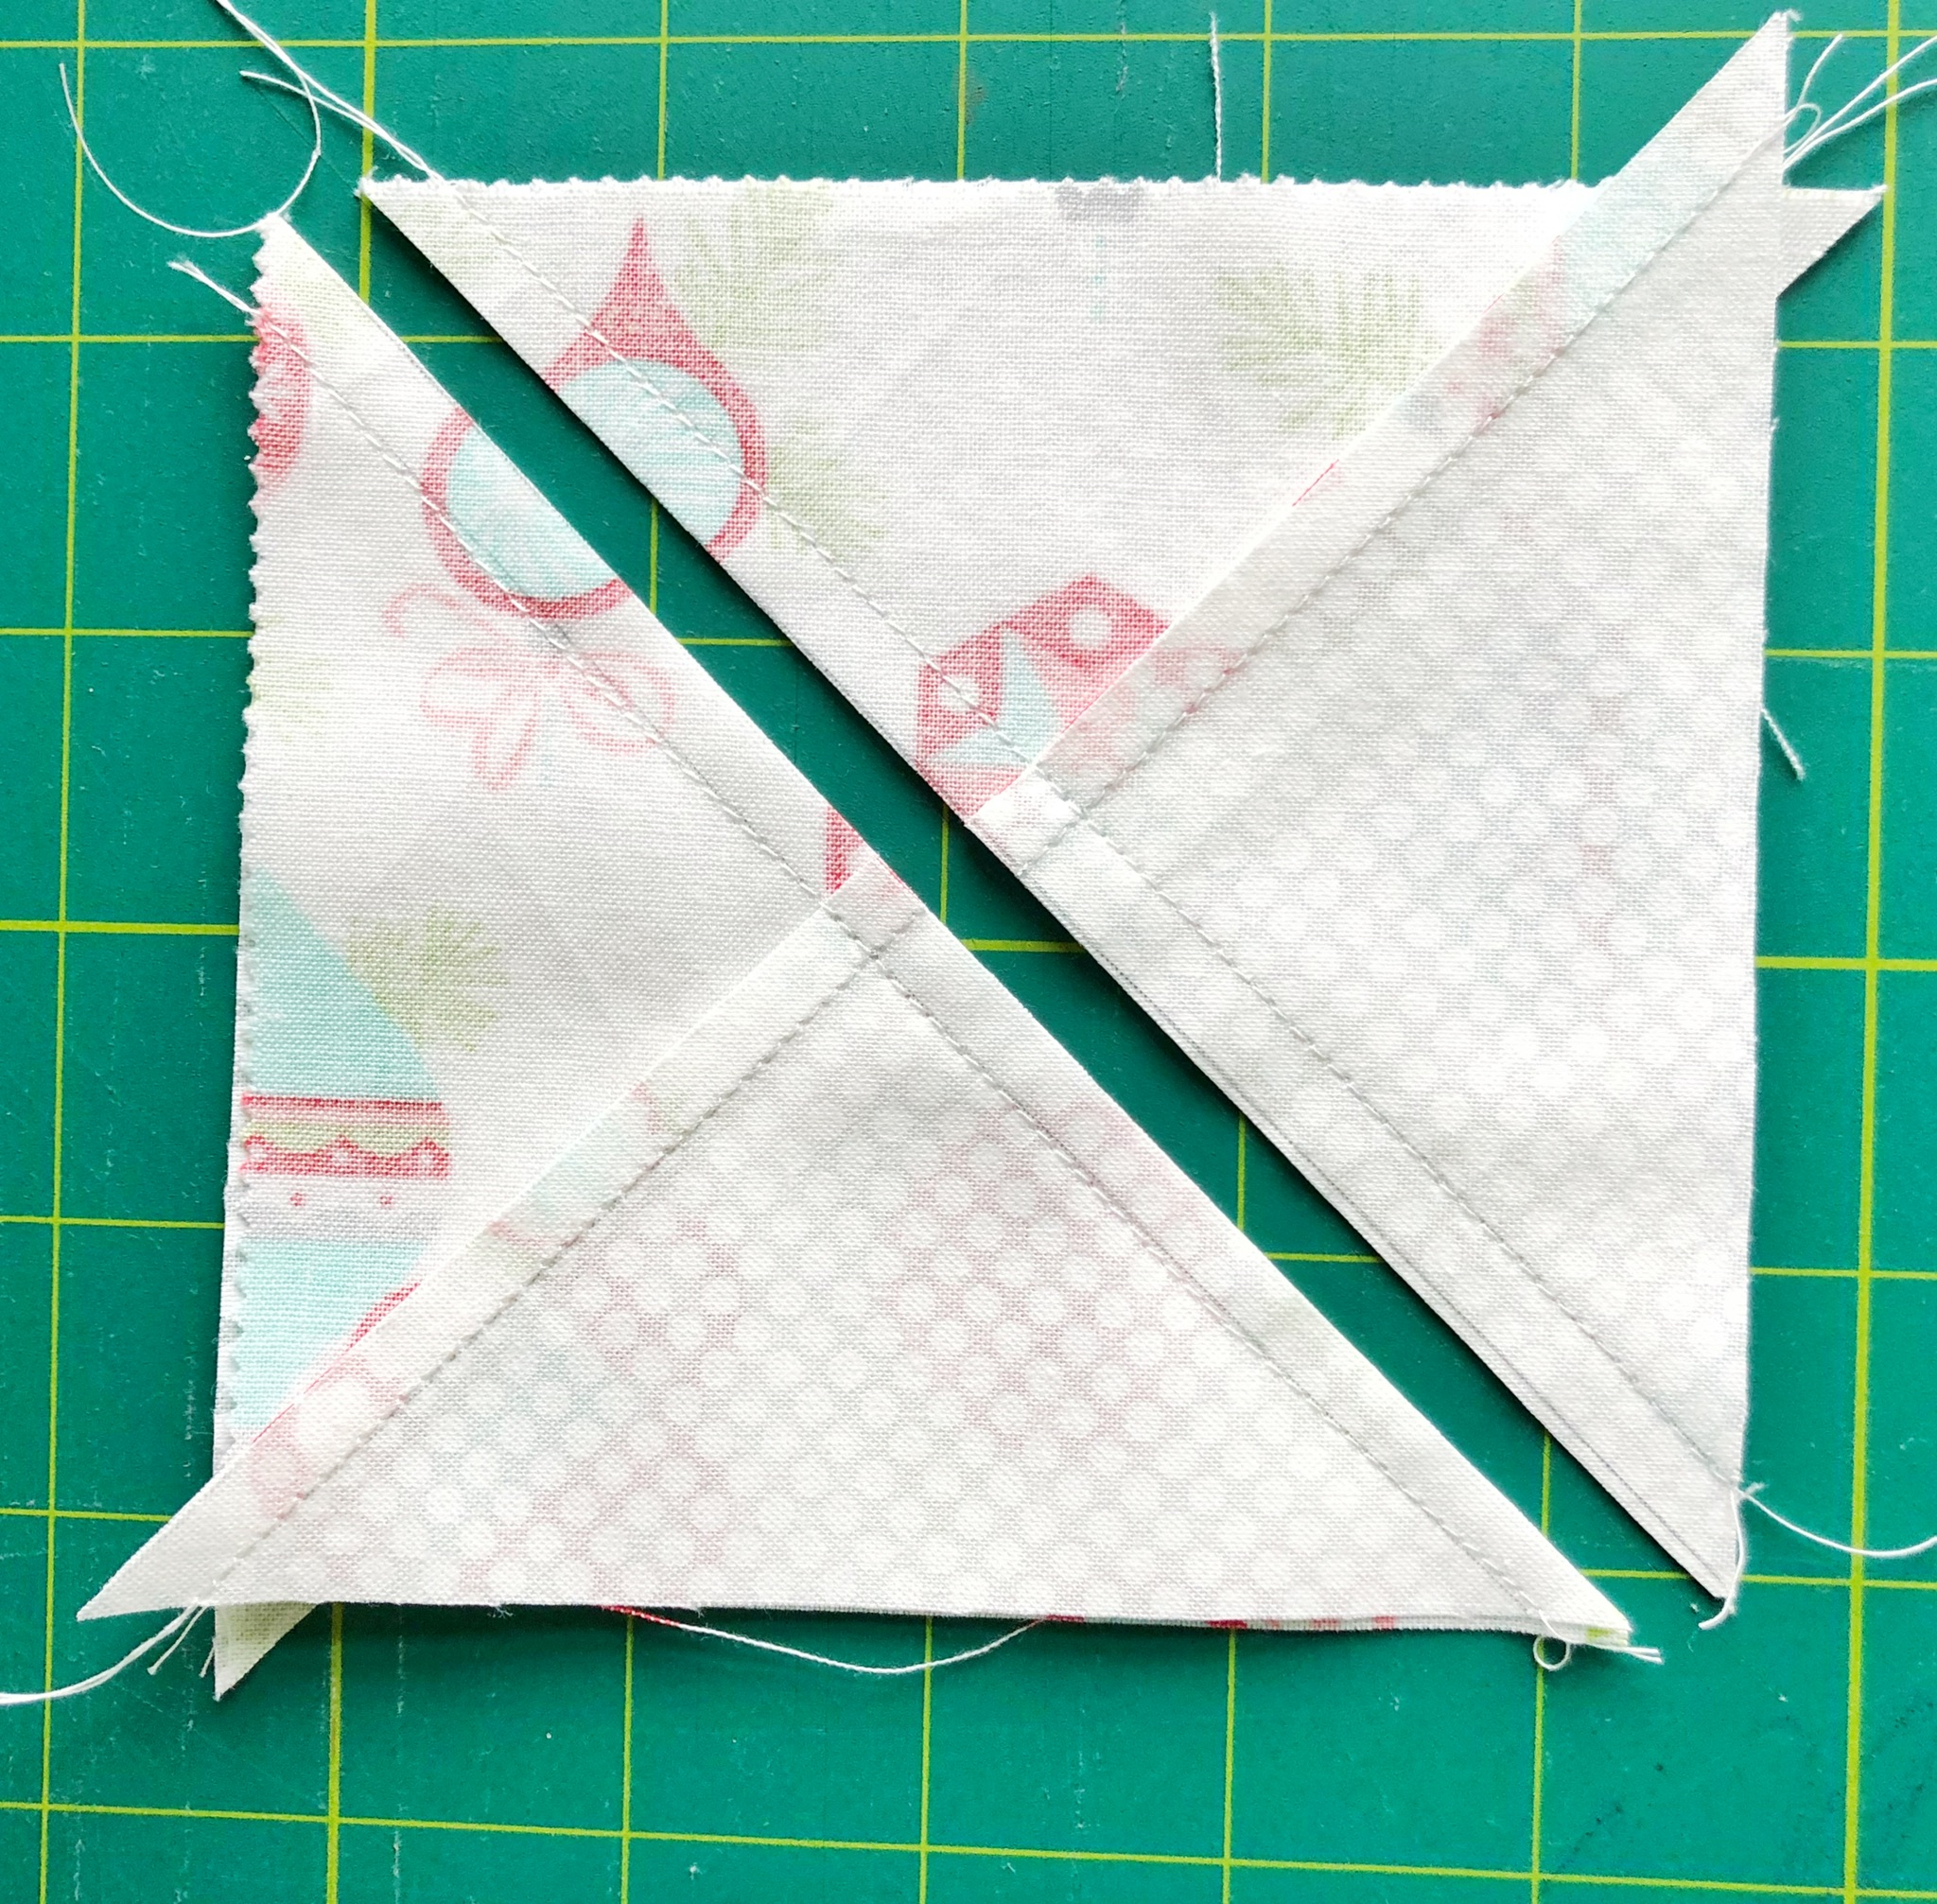
Press. You will now have two pinwheel blocks.

Trim each pinwheel to measure exactly 4" square.
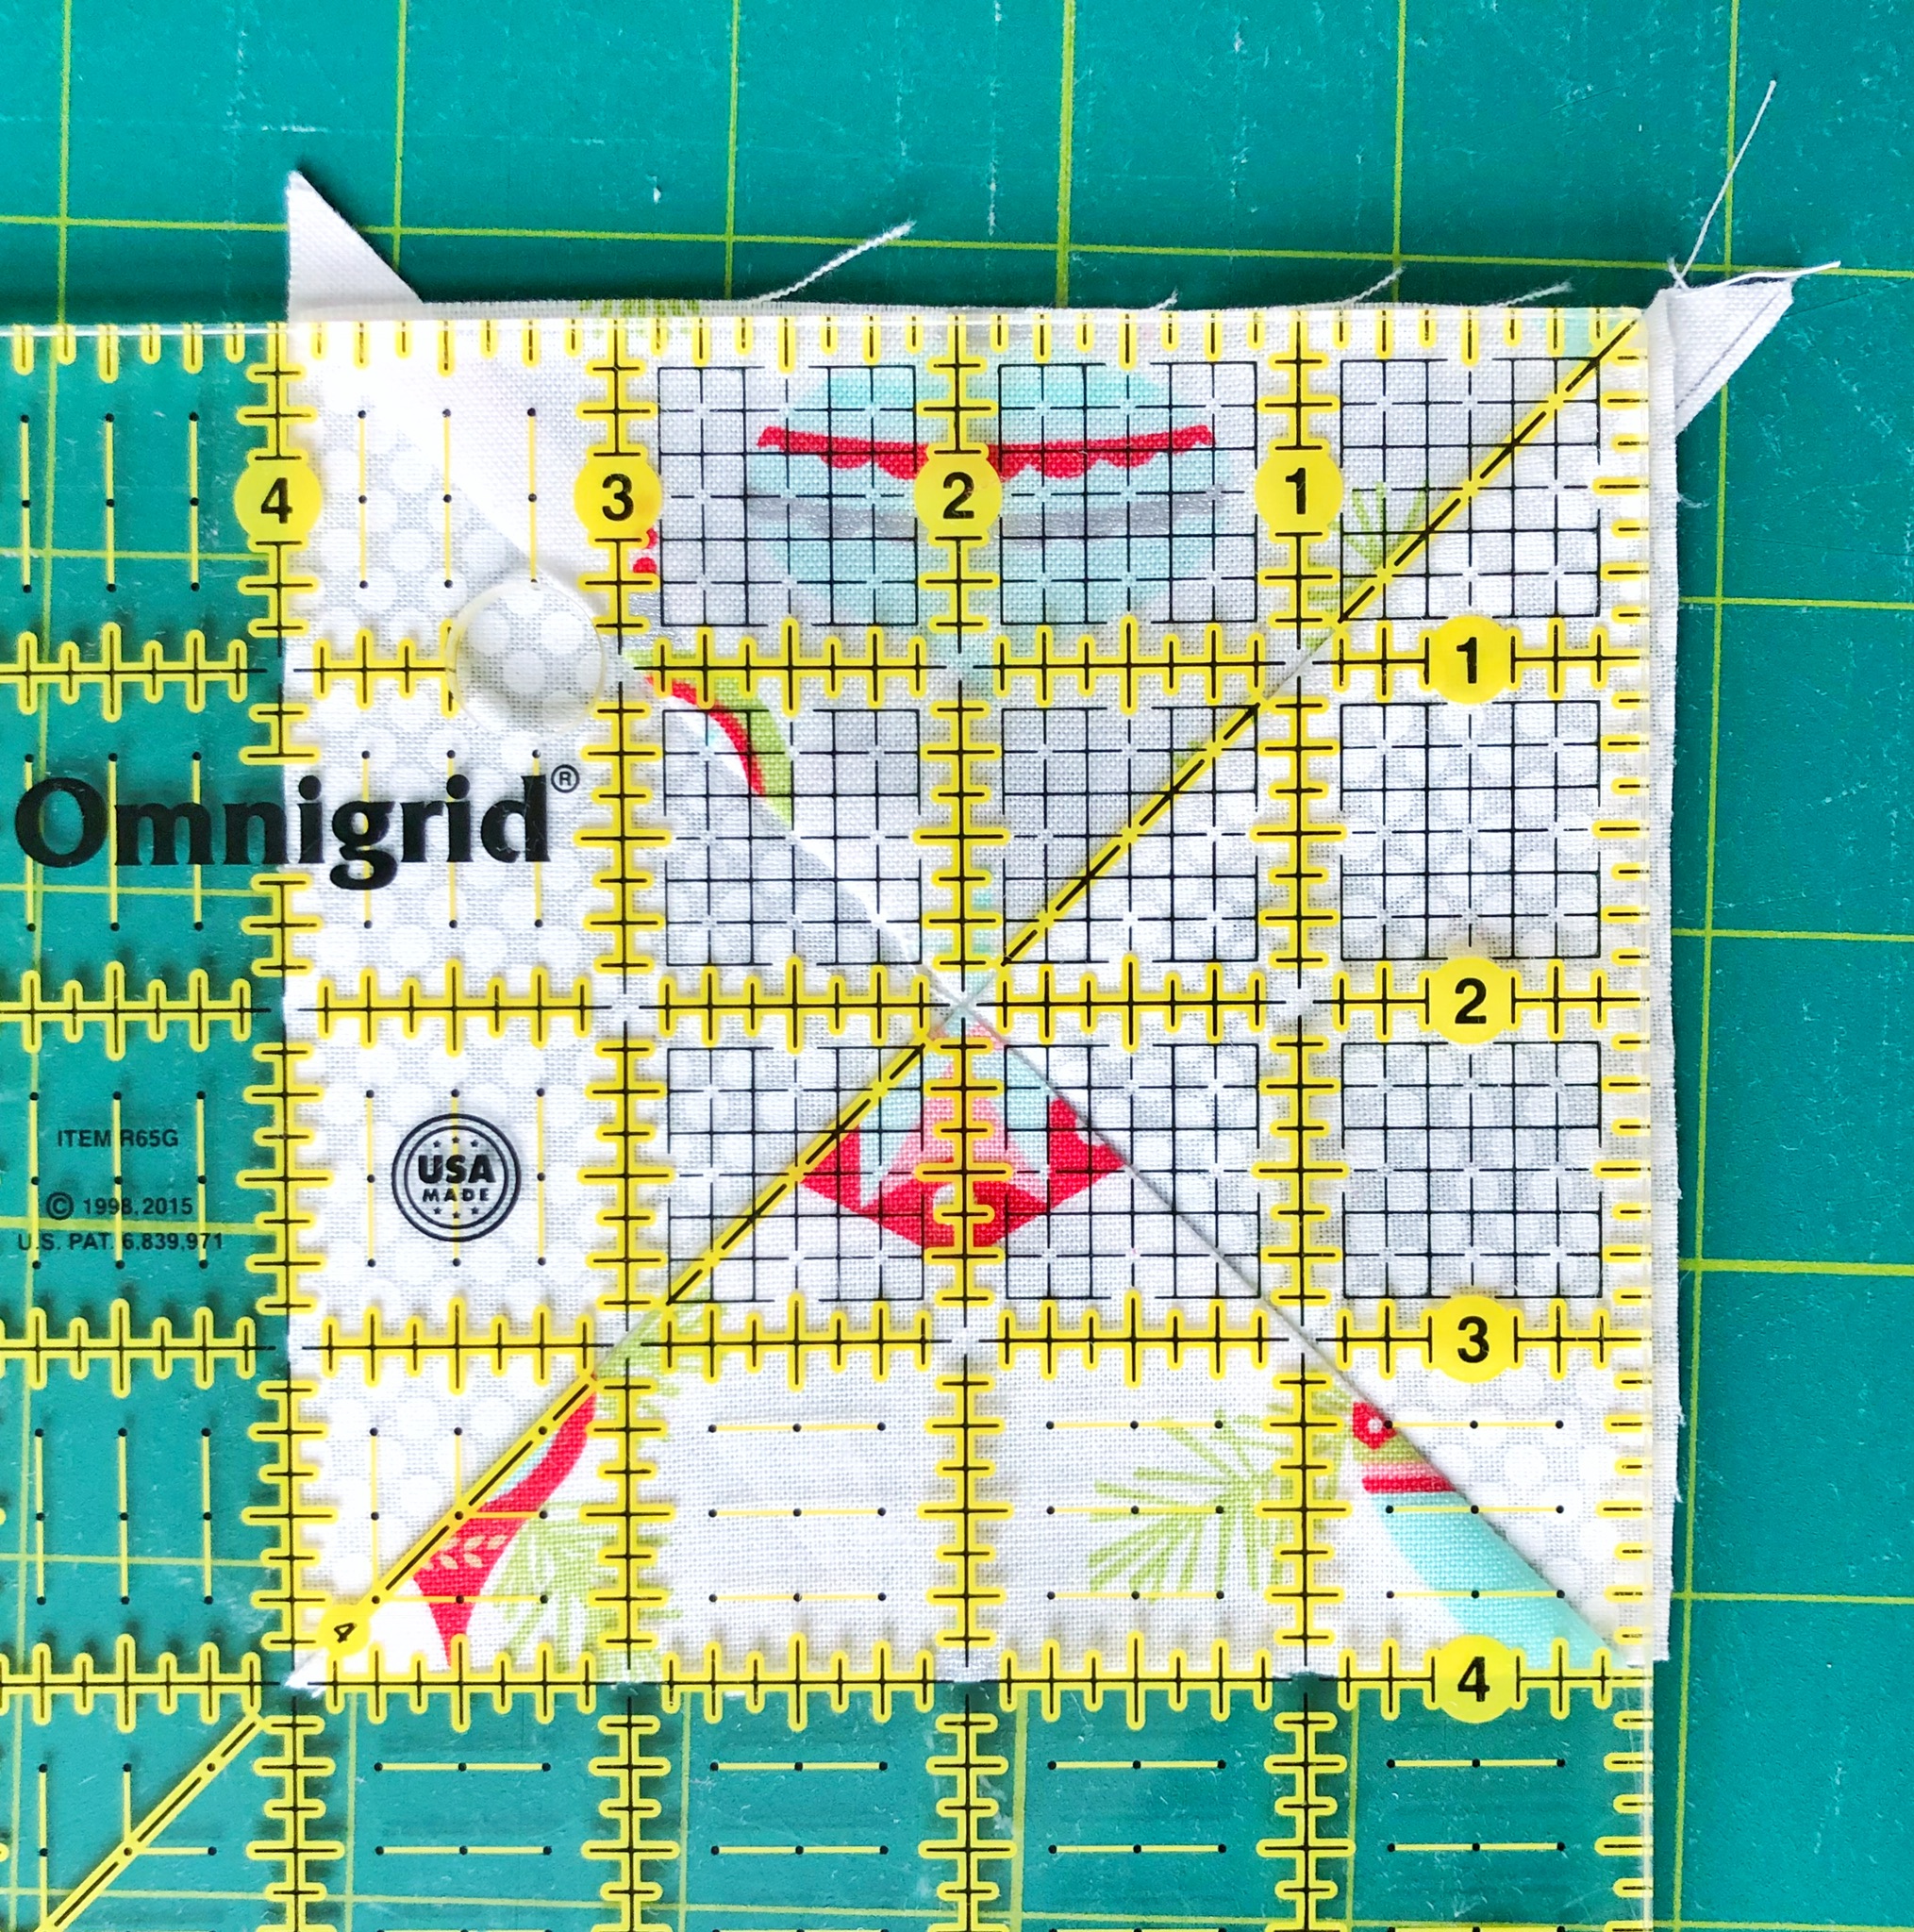
Repeat these steps 55 more times, until you have 112 pinwheels.
Gather the 4" background squares, the charm squares that you cut to 4", and the pinwheels that you just made. The layout is shown below.

Sew the blocks into rows.

Press the seams of each row opposite directions so that you can nest the seams when completing the block. Sew the rows together.

Your block should measure 11" unfinished. You will need 28 Ohio Star blocks total- 4 for the corners (set these aside) and 24 for the center of the quilt.
To make the flying geese for the border, we will use the 4 at a time, no waste method. Gather the red gingham and green dot squares.

To make this, begin by drawing a diagonal line on the back of all of the background squares. Line up two background squares along the diagonal of a larger square RST (the middles will overlap).
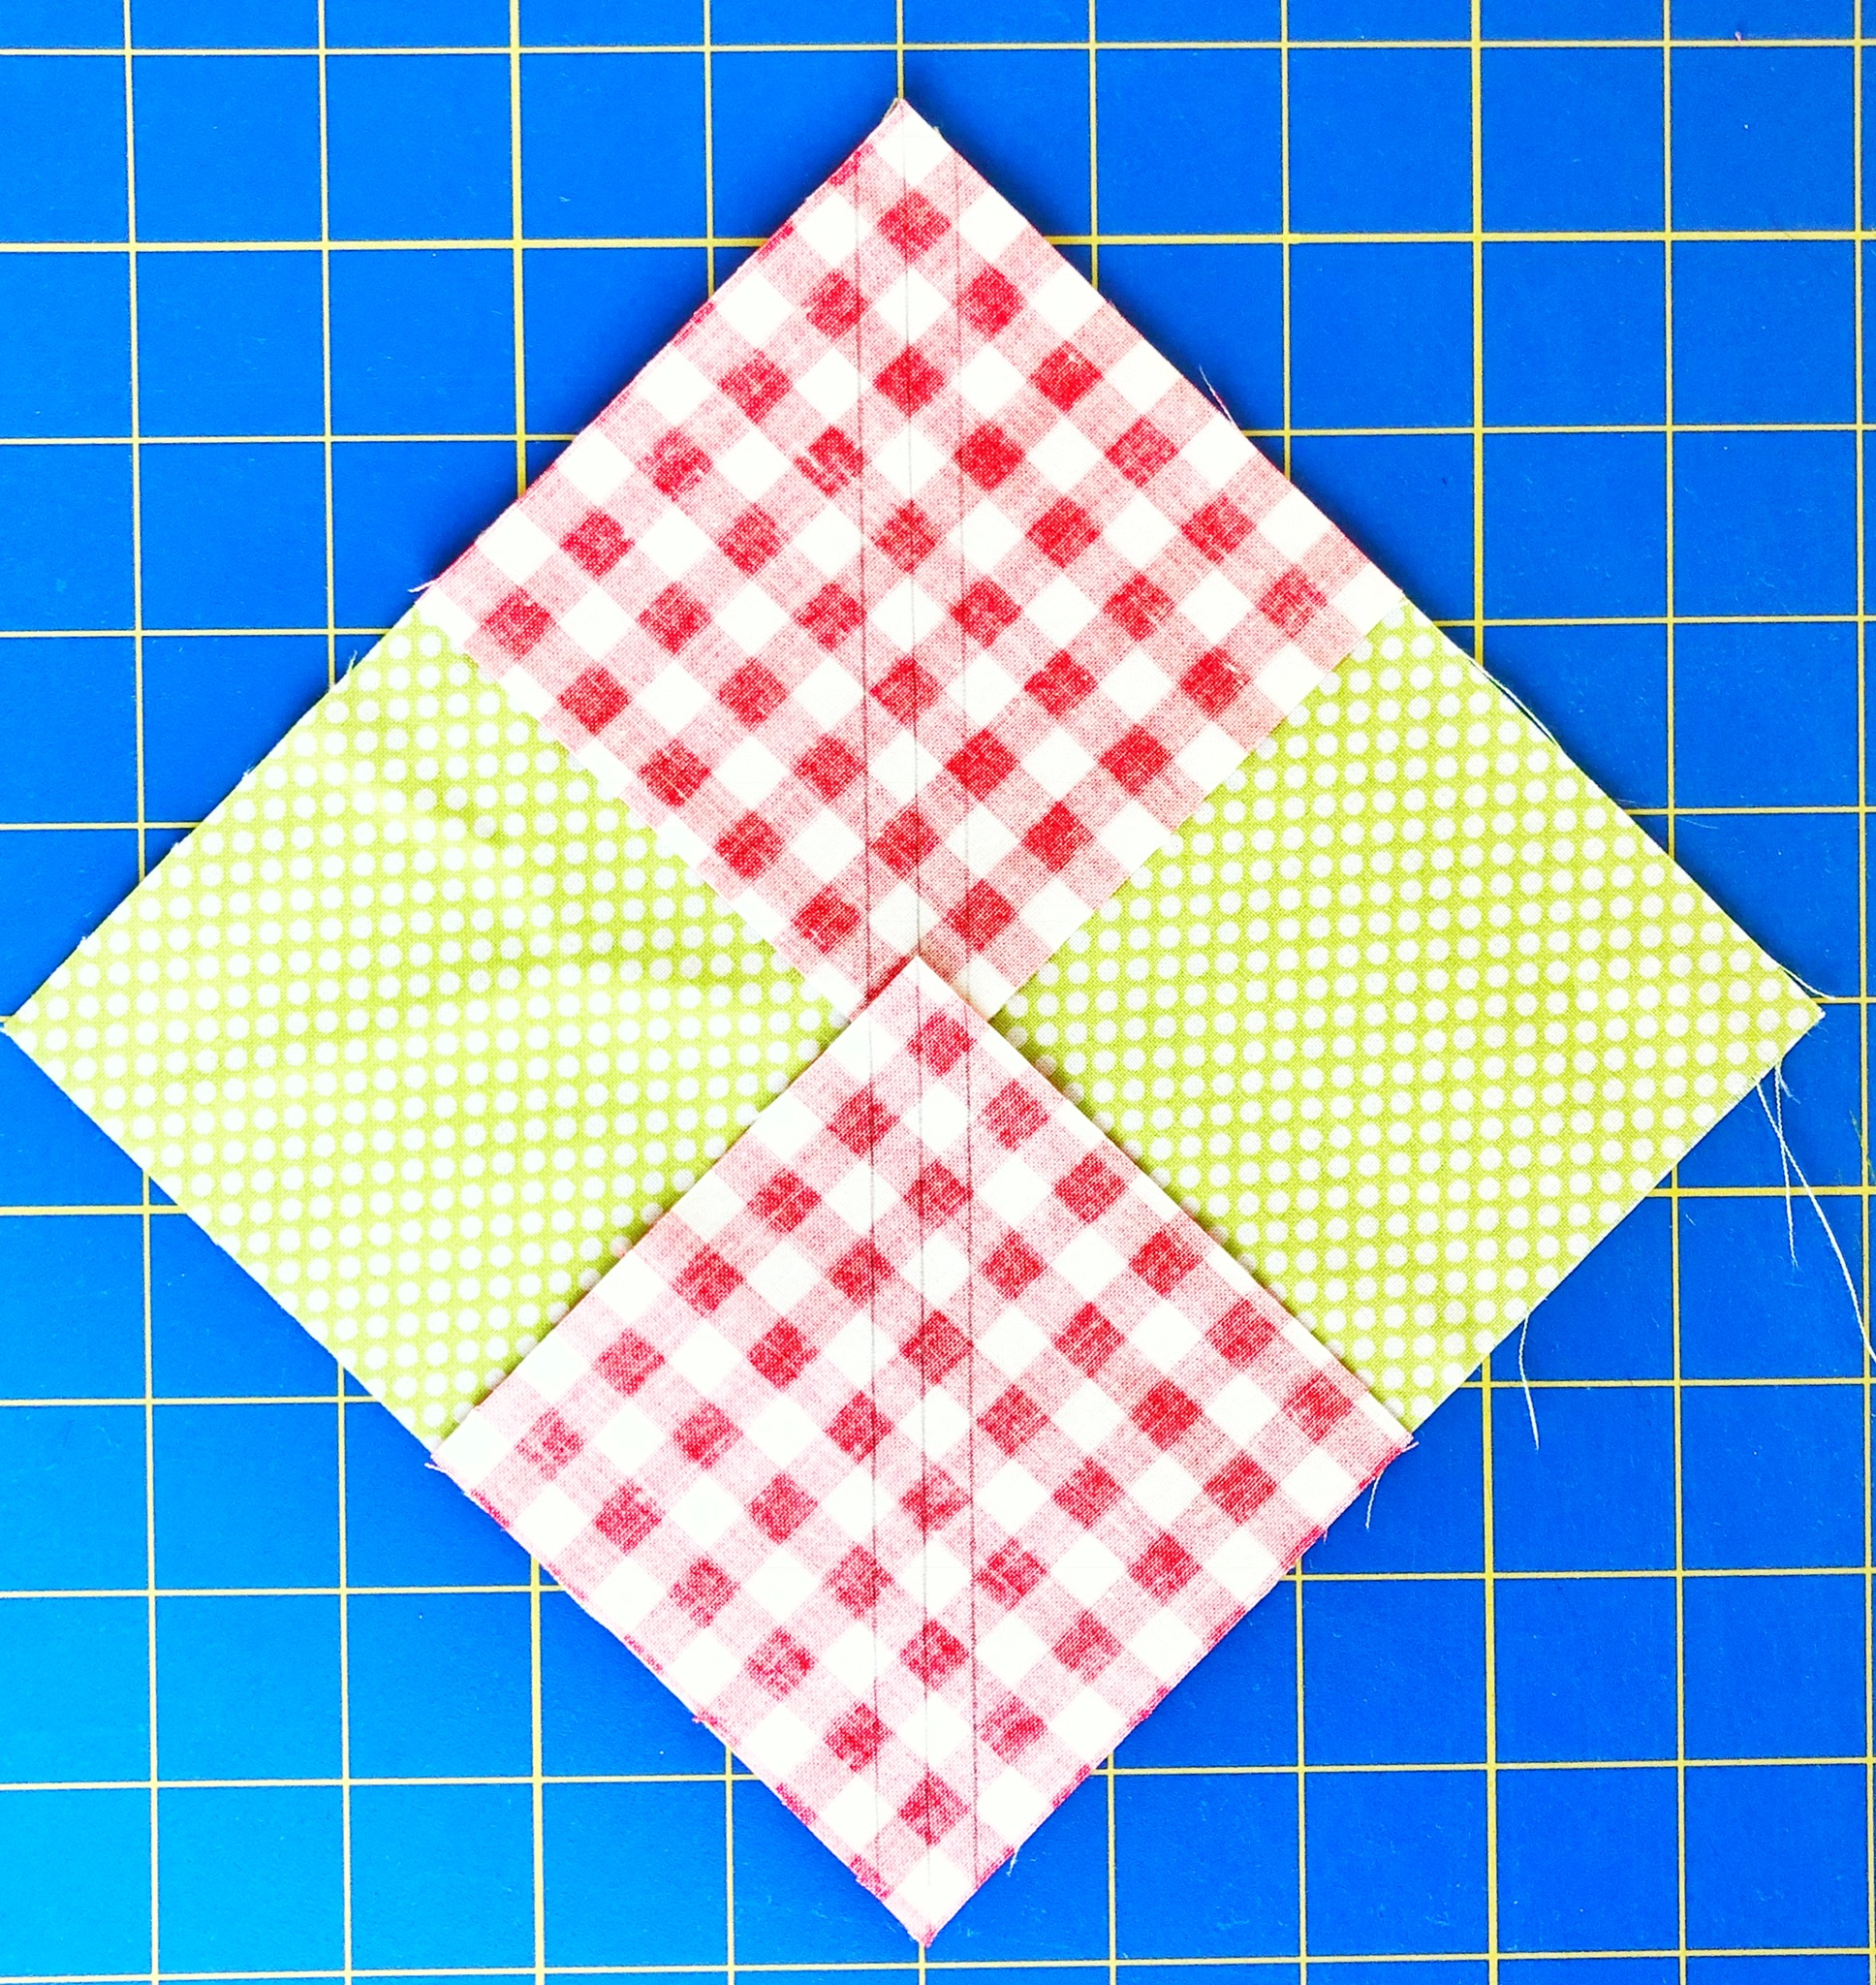
Sew ¼” away from the center line on both sides. Cut on the center line.

Press the units, pressing the seam allowance toward the background fabric. Take care here not to distort the fabric when pressing.

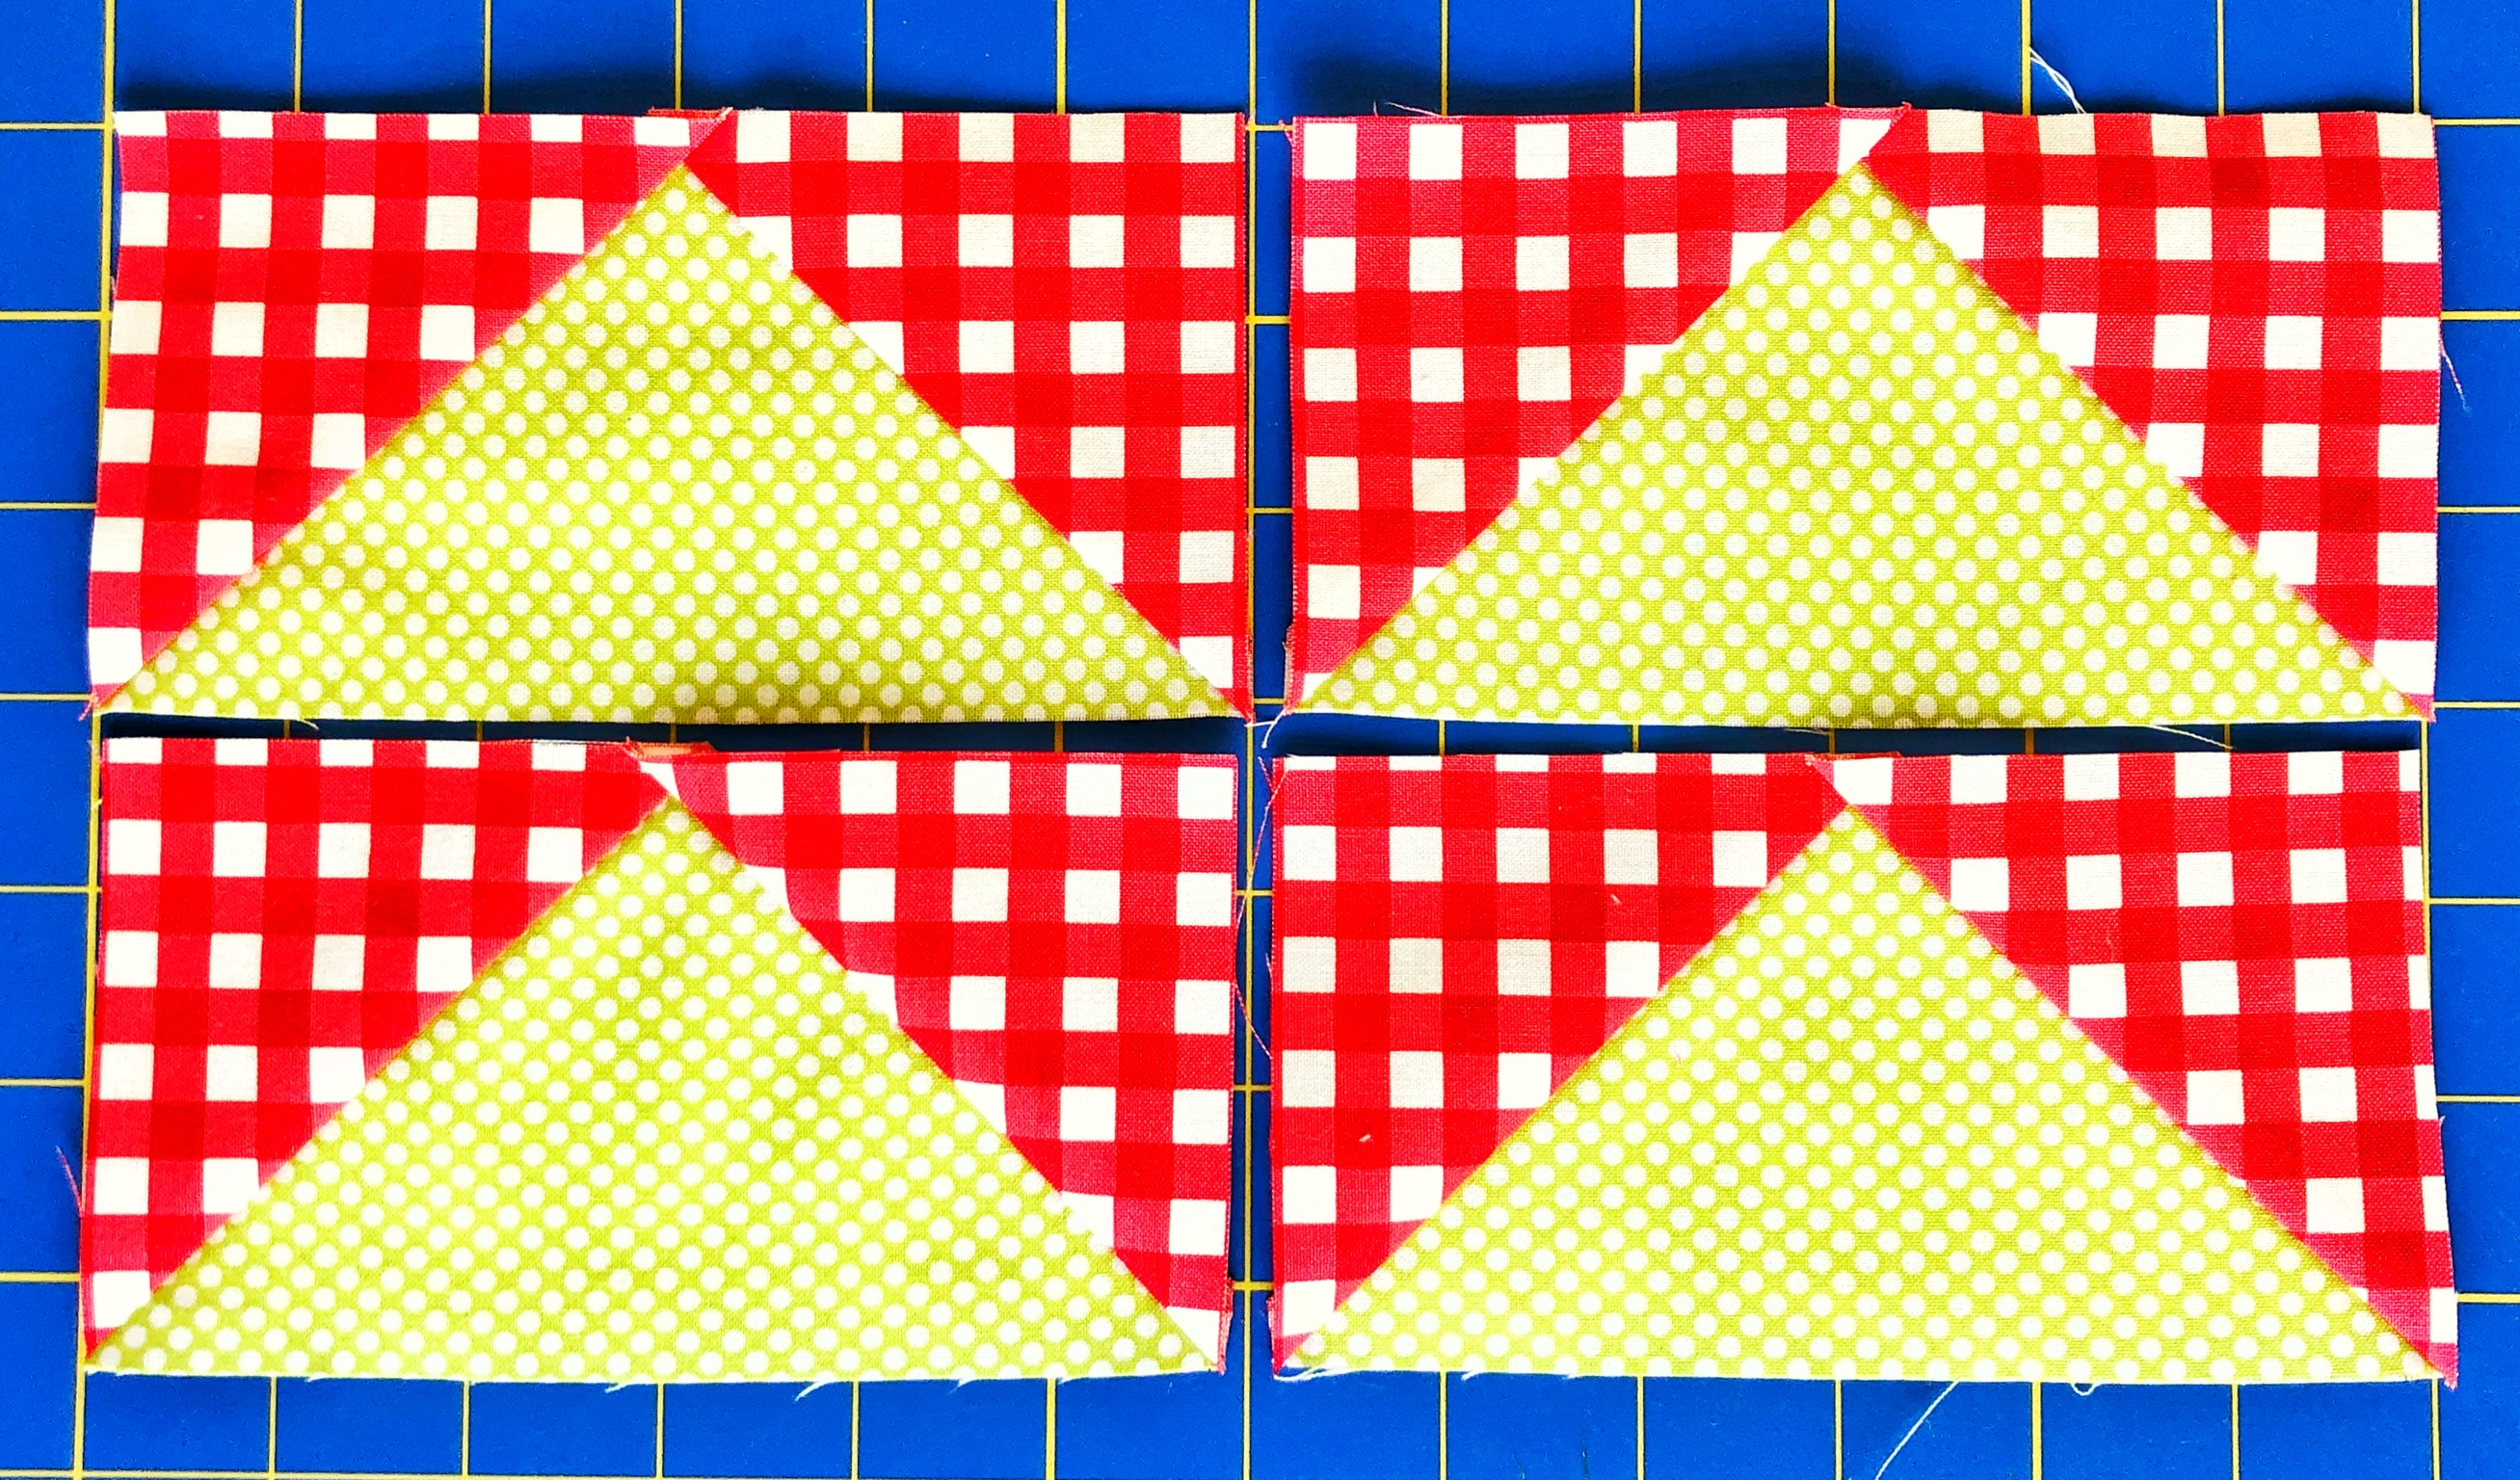
Next, line a background square up with the corner as shown. Sew ¼” away from the center line on both sides.

Cut on the center line.

Press the units, pressing the seam allowance toward the background fabric. Again, take care here not to distort the fabric when pressing. Trim the dog-ears. Each unit should measure 3.5” by 6.5” unfinished.
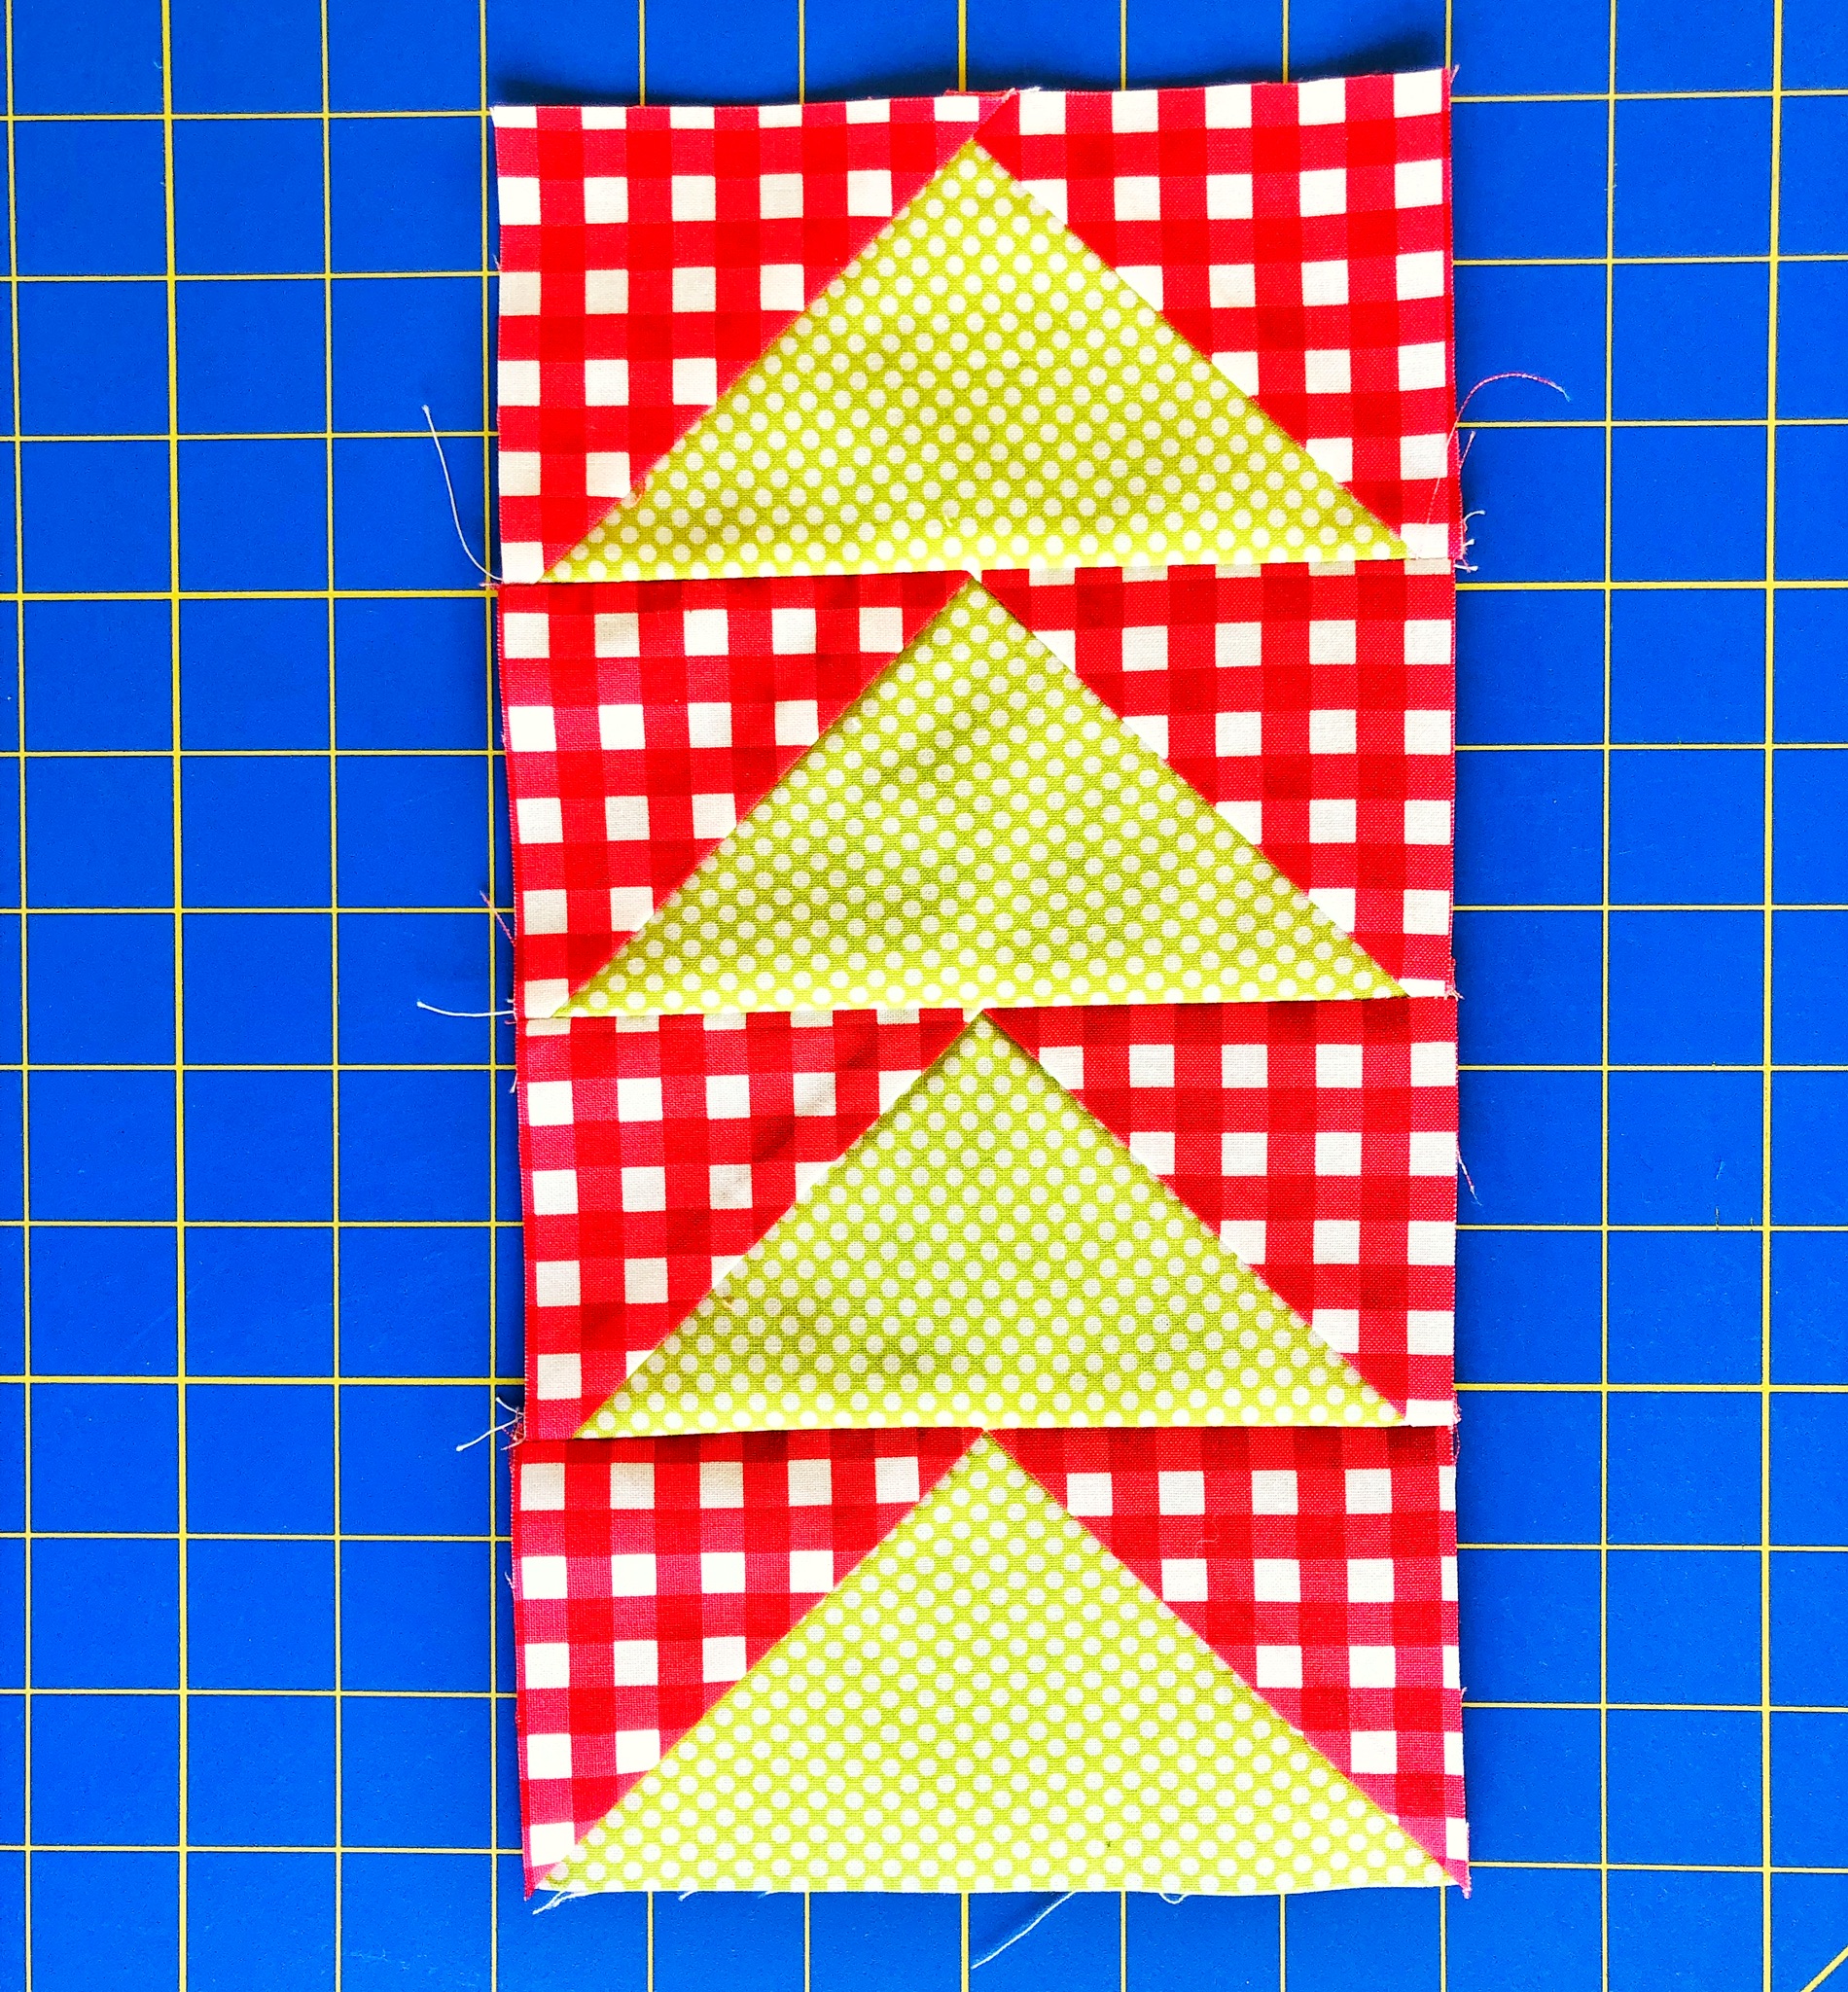
Sew 14 geese together with the points going all in the same direction. Repeat- make one more strip of 14 and two strips of 21.
Gather the 2.75" strips of background fabric and the strips of geese. Sew one background fabric strip onto each side of the geese strips.

QUILT TOP ASSEMBLY
Gather the 24 Ohio Star blocks, sew the blocks together in 6 rows of 4. Sew the rows together.

Sew the border strips that contain 14 geese to the top and bottom of the quilt. Make sure to orient the points in the direction that you'd like them to be. I choose to have the top strip pointing left and the bottom strip pointing right.

Gather the 4 Ohio Star blocks that you set aside. Sew one to each end of the geese strips that contain 21 geese each. Then, sew one of those onto the left side and one onto the right side of the quilt top. Make sure to orient the points in the direction that you'd like them to be. I choose to have the both strips pointing up.

FINISHING THE QUILT
Baste, quilt, and bind the quilt using your preferred methods. I chose one of the Vintage Holiday flannels for my backing. I am so excited about it! It is the first time that I am using a flannel as a backing and I think I'm going to be doing that very often from now on; these Moda flannels are so soft!

![]()
This quilt finishes at 63" x 84".
I hope you enjoyed this tutorial! Come and follow me on Instagram- @jessicadayon- where I'll be showing the finished quilt soon! Also, as I mentioned on Instagram, I want to show you another version of this quilt that's not Christmas-y so you see how versatile this pattern actually is! Here I've used Painted Garden by Crystal Manning for Moda. I've done the outside of the geese in the background fabric. Take a look!

To do something like this, you'll need the recommended 3 charm packs, 4 yards of background fabric, 18- 7 1/4" squares for the geese (you can cut these from a layer cake, from fat quarters, or from yardage, 5 1/4 yards backing, and 3/4 yards binding.
I can't wait to see what you all make with this pattern! Tag me on Instagram- @jessicadayon and use the hashtag #festivequilt so that I can see each of your creations!
Jessica Dayon
{Instagram @jessicadayon}
{blog: Jessica Dayon}
![]()
Comments