Welcome to Moda Fabrics!
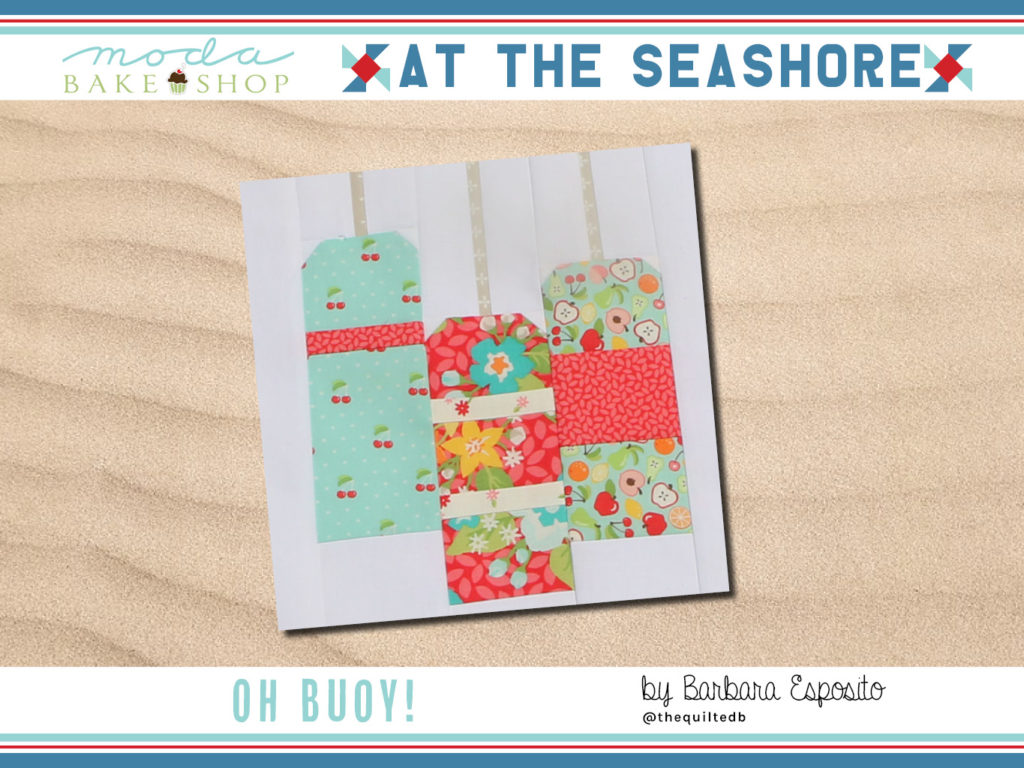
At the Seashore - Oh Buoy!
At the Seashore - Oh Buoy!
Published:
Jul 14 2019 - 23:00
Growing up on Long Island Sound near the Housatonic River in Connecticut often meant summer days at Short Beach. My mother would pile us (generally the four younger of the 6 kids) in to the Ford Falcon station wagon (yes forest green with wood paneling on the sides). We would head down in the morning, lunches packed, towels, sand toys, and blankets in tow.
One sunny beach day, my older brother John (usually the ring leader) thought it would be the funniest thing to bury my mother’s sandals in the sand and see how long it would take her to find them. We marked the spot with seaweed, rocks, and shells so we would remember exactly where they were, and went off to play.
We spent the day playing, swimming, collecting shells, and munching on the packed lunch, and then before we knew it, it was time to go. “Pack everything up!” mom said. “Wait, where are my sandals?” “Hahahaha.” We had a good laugh. “We buried them! Can you find them?”....
This post is part of our summer quilt-along series. Find the rest of the posts by clicking {here}.
Now if you know anything about the beach, you know that there are tides - low tides through high tides – all in the course of a day. You can see where this is going, right? Yeah…sandals buried at low tide, now long gone in the deep water.
My poor mother was not so upset about losing the sandals as she was convinced that she would be pulled over by the police on the 3 mile drive to our home and arrested for driving barefoot. Somehow I think secretly she would have welcomed the reprieve.
Fifty plus years later we all still chuckle over the whole thing, certain we saw Maryann wearing the lost sandals on one of the Gilligan’s Island episodes. Oh Buoy indeed!
![]()
Fabrics:
Orchard by April Rosenthal 24070, 24071, 24073, 24074, 24076, 24077
Bella Solid White 9900 98
All seams are 1/4"{optional}
All fabric were thoroughly spray starched before cutting
![]()
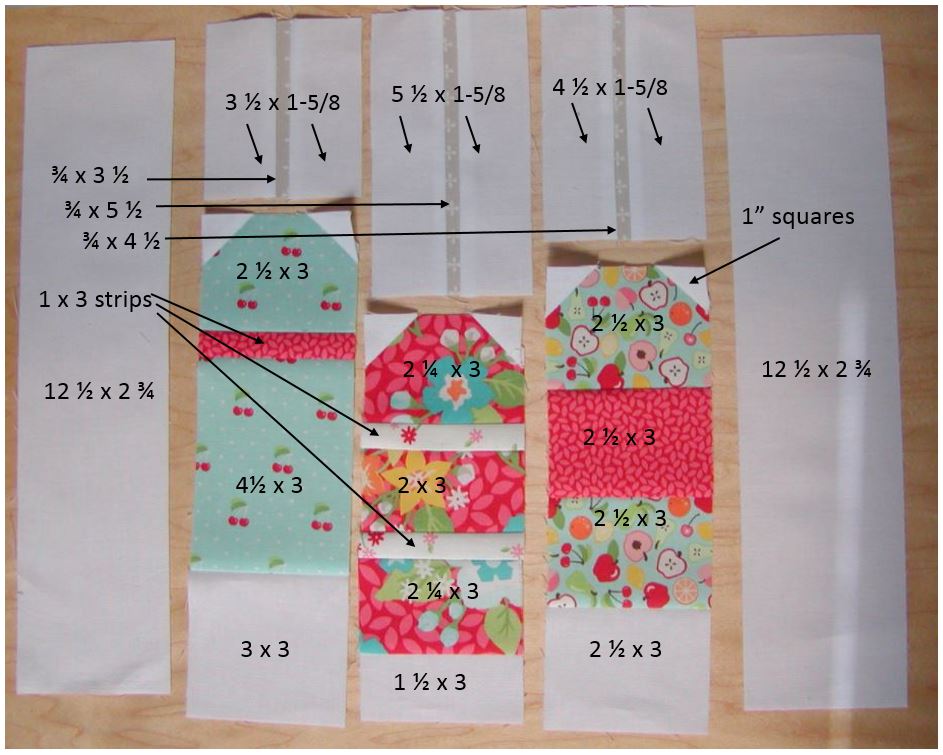
| Background – Bella 98
2 strips 2-3/4” by 12 -1/2” 1 square 3” by 3” 1 strip 2-1/2” by 3” 1 strip 1-1/2” by 3” 6 squares 1” marked on the diagonal 2 strips 3-1/2” by 1-5/8” 2 strips 4-1/2” by 1-5/8” 2 strips 5-1/2” by 1-5/8” |
Rope - 24077
1 piece 3/4” by 3-1/2” 1 piece 3/4” by 4-1/2” 1 piece 3/4” by 5-1/2” |
|
| Buoy One (left)
24074 1 piece 2-1/2” by 3” 24074 1 piece 4-1/2” by 3” 24076 1 piece 1” by 3” |
Buoy Two (center)
24070 2 pieces 2-1/4” by 3” 24070 1 piece 2” by 3” 24073 2 pieces 1” by 3” |
Buoy three (blue)
24071 2 pieces 2-1/2” by 3” 24076 1 piece 2-1/2” by 3” |
Prepare to assemble the buoys by first gathering the corresponding buoy pieces and the white pieces (listed below) for each buoy into piles.
Buoy One (Left) pieces and
White: two 1” squares, two 1-5/8” by 3-1/2” strips, one 3” by 3” square.
Rope: 3/4” by 3-1/2”
Buoy Two (Center) pieces and
White: two 1” squares, two 1-5/8” by 5-1/2” strips, one 1-1/2 by 3” strip
Rope: 3/4” by 5-1/2”
Buoy Three (Right) pieces and
White: two 1” squares, two 1-5/8” by 4-1/2” strips, one 2-1/2” by 3” strip
Rope: 3/4” by 4-1/2”

Sew a 1” square on the diagonal to the top corners of each top buoy piece to “snowball” the corners. Trim the corners and press open.

For each buoy, sew the strips together for the body of the buoy as shown in the piecing diagram.
Assemble the corresponding rope block for each buoy by sewing a white 1-5/8" strip to either side of the "rope" fabric. Then sew this unit to the top of each corresponding buoy, again following the piecing diagram.
Sew completed buoys together.
Finally, add the 2-¾" by 12-½" strips to both sides of the block.
![]()
This block finishes at 12" x 12" (12-½ x 12-½ unfinished).
Hoping you are enjoying your "sew-cation" At The Shore. Somehow sewing with friends makes the making more fun. I can't wait to see your finished quilt!
Barbara Esposito
{instagram: @TheQuiltedB}
![]()
Comments