Welcome to Moda Fabrics!
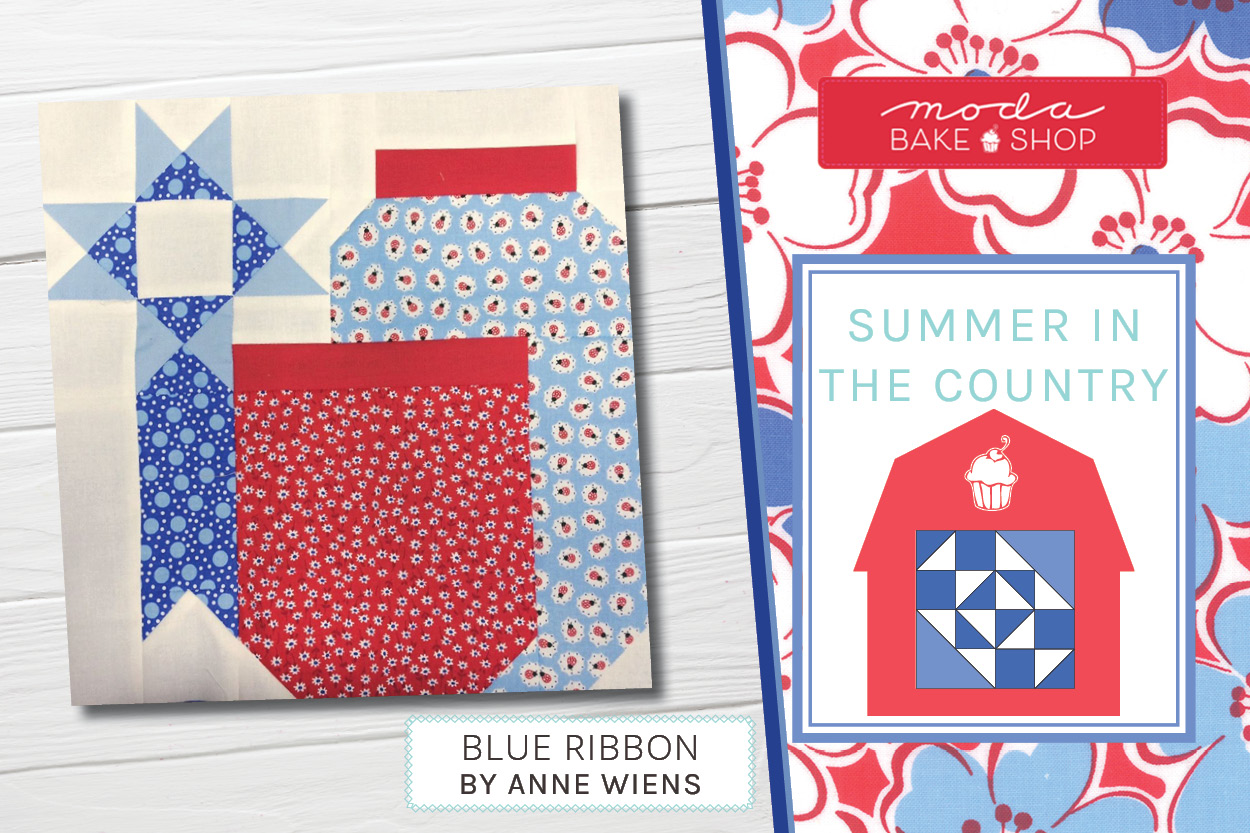
Summer in the Country: Blue Ribbon
Summer in the Country: Blue Ribbon
Inspired by relaxing with friends on a lazy summer afternoon, porch swings, iced tea and laughter, Summer in the Country is here. Using Back Porch by Me & My Sister Designs, this collection is now available at your favorite independent quilt retailer.
This block may be intimidating at first glance, but when we break it down, you see that it’s made in sections. There are a lot of pieces, so cutting must be accurate, and your 1/4” seam must be true. Don’t be discouraged if you occasionally need to re-sew a seam. It happens to all of us.
YIELD
12" finished block
INGREDIENTS
From Fabric A, Cut:
(1) 3¼” square, cut diagonally twice
(5) 2½” squares
(4) 1½” squares
(1) 2½” x 6½” strip
(1) 1½” x 4½” strip
(3) 1½” x 2½” strips
From Fabric B, Cut:
(1) 1½” x 4½” strip
(1) 1½” x 6½” strip
From Fabric C, Cut:
(1) 6½” square
From Fabric D, Cut:
(1) 3½” x 6½” rectangle
(1) 2½” x 7½” rectangle
(1) 1½” square
From Fabric E, Cut:
(2) 3¼” squares, cut diagonally twice
From Fabric F, Cut:
(2) 3¼” squares, cut diagonally twice
(1) 2½” x 4½” rectangle
(2) 1½” squares
INSTRUCTIONS
STEP 1. UPPER LEFT SECTION
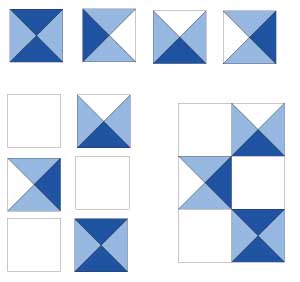
Sew the Dark Blue, Light Blue and White triangles into four Quarter-Square Triangles. One QST will have two dark blue triangles. The other three will have one dark blue and one white triangle. Each QST must measure 2-1/2” x 2-1/2”. You can discard the leftover triangles.
Set one of the white/dark blue QSTs aside. Sew the other three QSTs into a unit with three 2-1/2” white squares. Notice that the QST with the two dark blue triangles is at the bottom right of this unit.
The unit should measure 4-1/2” x 6-1/2”.
STEP 2. LOWER LEFT SECTION
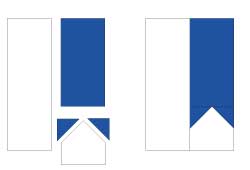
Using the Stitch-n-Flip method and the 1-1/2” dark blue squares, put dark blue corners on one of the 2-1/2” white squares. Sew this unit to the end of the 2-1/2” x 4-1/2” dark blue rectangle.
Sew the “ribbon” strip you just made to the RIGHT side of the 2-1/2” x 6-1/2” white strip.
The unit should measure 4-1/2” x 6-1/2”.
STEP 3. UPPER RIGHT SECTION
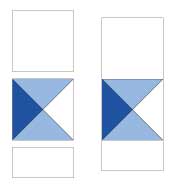
Using the Stitch-n-Flip method and the 1-1/2” dark blue squares, put dark blue corners on one of the 2-1/2” white squares. Sew this unit to the end of the 2-1/2” x 4-1/2” dark blue rectangle.Sew the “ribbon” strip you just made to the RIGHT side of the 2-1/2” x 6-1/2” white strip. The unit should measure 4-1/2” x 6-1/2”.
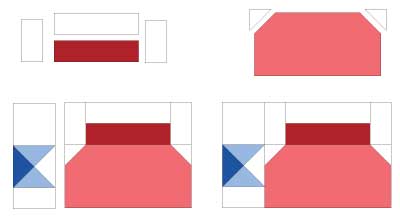
Sew the 1-1/2” x 4-1/2” white and red strips together, then sew a 1-1/2” x 2-1/2” white rectangle to each end of the stripset. Use 1-1/2” white squares to add Stitch-n-Flip triangles to the top corners of the 3-1/2” x 6-1/2” light red rectangle.
Sew the two units together. Now sew the star point unit to the left end of the jar unit. This section should measure 5-1/2” x 8-1/2”.
STEP 4. LOWER RIGHT SECTION
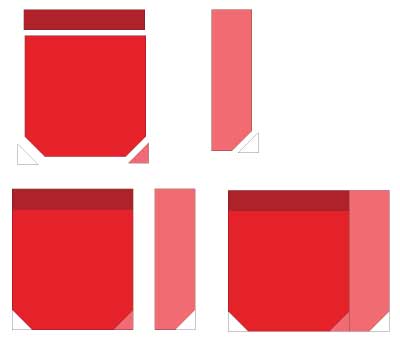
Use a 1-1/2” white square to add a Stitch-n-Flip triangle to the lower left corner of the 6-1/2” red square, and use the 1-1/2” light red square to add a Stitch-n-Flip triangle to the lower right corner of the red square.
Use a 1-1/2” white square to add a Stitch-n-Flip triangle to the lower right corner of the 2-1/2” x 7-1/2 light red strip.
Sew the 1-1/2” x 6-1/2” dark red strip to the top of the 6-1/2” red square, then sew the 1-1/2” light red strip to the right side of the 6-1/2” red square.
This section should measure 7-1/2” x 8-1/2”.
ASSEMBLE THE BLOCK
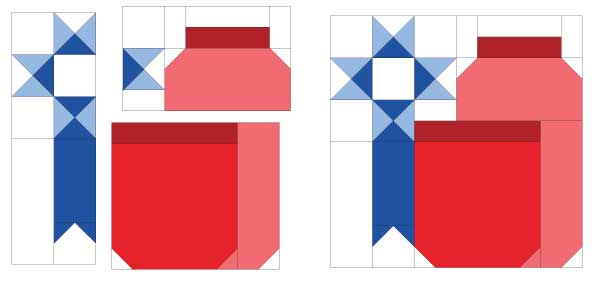
Sew the top left and bottom left sections together. Sew the top right and lower right sections together.
Sew the left and right sections together to complete the block, which should measure 12-1/2” x 12-1/2”
Anne Wiens

Comments