Welcome to Moda Fabrics!
Country Summer 2 Quilt
Country Summer 2 Quilt
Published:
Feb 17 2020 - 19:44
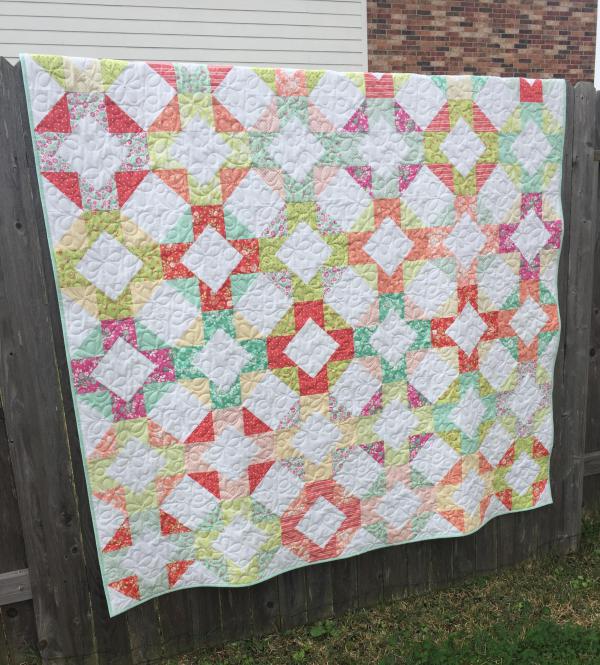
Hello! It’s Amanda of Pieced Just Sew and I am excited to be sharing a new quilt pattern with you today! If you enjoyed making my Country Summer quilt, you will love this quilt! It may not look like it, but this quilt uses the same block! The only difference is that the print and background fabrics have been swapped in the quarter square triangle segments!
![]()
This quilt finishes at 72″ x 72″.
![]()
- 1 fat quarter bundle {Canning Day by Corey Yoder}
- 3 yards background fabric {Bella Solid 9900-98}
- 3/4 yard binding fabric {SKU 29087-17}
- 4-1/2 yards backing fabric {SKU 29080-26}
![]()
Choose 18 fat quarters from your bundle. This pattern looks best if there is contrast between the prints and the background, so I left out the lightest fabrics. I also wanted to keep my quilt bright and cheery, so I also left out the charcoal prints and some of the other darker prints.
Cutting:
From each fat quarter:
- Cut a 5-1/2” strip; subcut the strip into two 5-1/2” squares.
- Cut two 5” strips; subcut each strip into four 5” squares.
Keep the squares cut from one strip separate from the other.
From the background fabric:
- 5 strips, 4-1/2” wide; subcut into 4-1/2” squares (8 per strip) until you have 36 squares.
- 9 strips, 5” wide; subcut into 5” squares (8 per strip) until you have 72 squares.
- 6 strips, 5-1/2” wide; subcut into 5-1/2” squares (6 per strip) until you have 36 squares.
From the binding fabric, cut 8 strips, 2-1/2” wide.
Making the half square triangles:
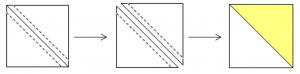
Draw a diagonal line from corner to corner on the 5” background squares. Pair each square with a 5” print square, right sides together. Use only half of the 5” print squares from each fat quarter (4 squares each). Sew 1/4” away from the line on both sides. Cut apart on the center lines and press towards the print fabric to create half square triangles (HST). You will have eight HSTs of each print. Trim each to 4-1/2”.
Making the quarter square triangles:
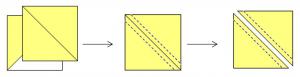
These segments are not traditional quarter square triangles, but they are constructed in a very similar way. First, you are going to make more HSTs. Follow the same steps as above, but use all of the 5-1/2” background and print squares. When finished, you will have four HSTs of each print. You can trim your HSTs down to 5” if you prefer, but it is not necessary. Next, draw a diagonal line on the remaining 5” print squares. Pair each square with a HST that you just created, making sure that the prints match and that the drawn line is perpendicular to the seam line on the bottom piece. If you did not trim your HSTs to 5”, center the smaller background square over the larger HST. If the HSTs are a little bit wonky, make sure that the smaller square does not extend past the edge of the HST. Just like when making HSTs, sew 1/4” away from the line on both sides. Cut apart on the center lines and press towards the print fabric to create quarter square triangles (QST). You will have eight QSTs of each print. Trim each to 4-1/2”. Be careful when trimming to avoid cutting off the points of the print fabric.
Assembling the block:
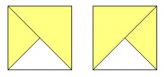
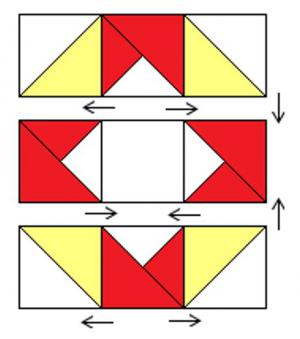
Gather 4 matching HSTs of one print, 4 matching QSTs of a second print and a 4-1/2” background square. Arrange the segments as shown below. Don’t worry about the direction of that last diagonal seam in the QSTs. It does not matter which direction that seam is going in the block, as long as the background quarter of the segment is facing towards the center of the block. Sew the segments in three rows of three, pressing in the direction shown in the diagram. Sew the three rows together, pressing towards the middle row. Repeat to make 36 blocks.
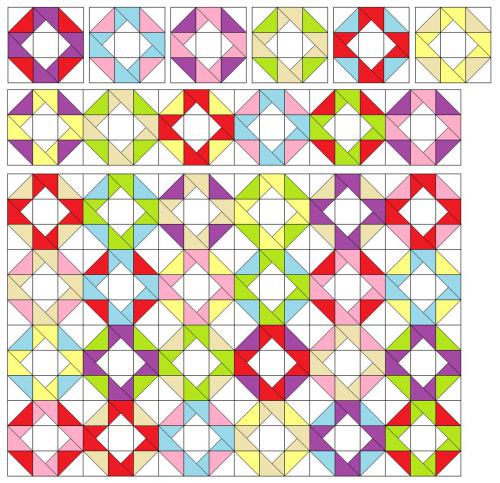
Assembling the quilt top:
Lay out your blocks into six rows of six blocks each. If you rotate every other block a quarter-turn, the seams between the blocks should nest. Once you’ve decided on an arrangement, sew the blocks together into rows. Press the seams in each row in alternating directions so that the seams will nest when the rows are sewn together. When you sew the rows together, the seams can be pressed in either direction. Some of the seams do get bulky, so you may want to press your seams open. Your finished quilt should measure approximately 72” x 72”. I quilted mine with a pantograph called Daisies Galore.
Thank you for joining me today! You can see what else I’m up to on Instagram. If you make this quilt, please share and tag me! I would love to see yours!
Amanda Wilbert
{blog: piecedjustsew.blogspot.com}

Posted in:
Comments